42
•
Revo 3.3
2
2
2
1
1
1
3
3
3
SHOCK TUNING
Shock Pistons
The shock pistons can be replaced
with the available optional pistons
to vary the amount of damping.
Optional pistons with bypass holes
that are larger or smaller (1, 2, or
3) than the factory installed stock
pistons can be used to decrease
or increase damping respectively.
Change the pistons if you only have
one weight of shock oil available
to you. From the factory, Revo is
equipped with #1 pistons in the front
and #2 pistons in the rear.
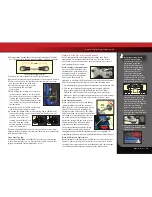
Shock disassembly
The shocks must be removed from
the vehicle and disassembled to
change the pistons. Use the shock
exploded views included with the
model to aid in the assembly process.
1.
Remove the spring and lower
spring retainer from the shock.
2.
Remove the shock cap (A) and
empty the shock body of shock oil.
3.
Remove the lower cap (B) and
the X-ring from the shock body.
4.
Use side cutters to grip the shock
shaft just above the rod end (C). Remove the rod end from the shock
shaft using the suspension multi tool (C).
5.
Remove the shock shaft with piston from the shock body
out through the top of the shock body.
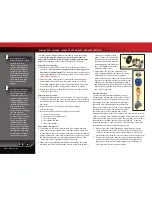
Shock assembly
1.
Replace the stock piston with desired
optional piston. Be careful not to lose the
small washer located below the piston.
2.
Position the new piston onto the shock shaft
above the small washer. Grip the threads
of the shaft with side cutters or needlenose
pliers and tighten the nut with the 4-way
wrench to secure the assembly.
3.
Insert the shock shaft assembly through the shock body until the
piston bottoms out.
4.
Lubricate the shaft and X-ring with silicone oil.
5.
Install the X-ring over the shaft and into the bore of the shock body.
6.
Install the lower cap using the suspension multi tool (B).
7.
Slide the bump stop onto the shaft.
8.
Grip the shaft close to the threads with needle nose pliers or side
cutters and thread the rod end onto the shock shaft until the rod
end bottoms out (C).
9.
Fill the shock with new silicone shock oil up to the top of the
shock body. Slowly move the piston up and down (always keeping
it submerged in oil) to release the air bubbles. Let the shock sit for a
few minutes to allow any remaining air bubbles to surface.
10.
Slowly thread the upper cap with the installed shock bladder onto
the shock body with the suspension multi tool (A). The excess oil will
bleed out of the small hole in the shock cap. Tighten the shock cap
until snug. Use the included steel shock wrench to hold onto shock
body while tightening.
11.
Reinstall the spring and lower retainer.
TRANSMISSION AND DIFFERENTIAL TUNING
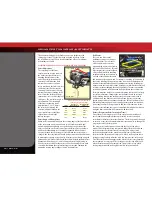
Adjusting the Gear Ratio
The gear ratio on Revo can be adjusted for different conditions that may
require either increased acceleration or increased top speed. Adjusting
the gear ratio is accomplished by changing the clutch bell on the engine
and/or the spur gear (slipper clutch gear) on the transmission. From the
factory, Revo is equipped with a 14-tooth clutch bell and a 38-tooth spur
gear. This combination will provide a good balance of acceleration and
top speed. Optional spur gears and clutch bell gears are listed on your
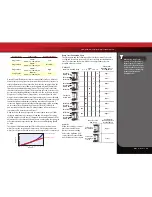
parts list. Refer to the chart on page 5 for possible gearing combinations.
Adjusting the Two-Speed Ratios
Revo is equipped to allow adjustment to the two-speed by installing
optional close and wide-ratio gearsets. This requires transmission
removal and disassembly (see www.Traxxas.com for detailed
instructions). The close ratio gearsets will reduce top speed slightly
but will provide more powerful acceleration by reducing engine rpm
loss when shifting from 1st gear to 2nd gear. The wide ratio gear set is
installed in the Revo 3.3. The additional horsepower and torque output
of the TRX 3.3 engine provides seamless shifting even with the larger
gap between first and second gears.
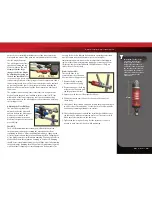
A. Tighten/Loosen Upper Cap
C. Remove/Install Rod End
B. Tighten/Loosen Lower Cap
Multi-tool Shock Functions
Shock Piston Hole Sizes
Piston 1: 1.10 mm
Piston 2: 1.00 mm
Piston 3: 0.95 mm
Never slide the threads on
the shock rod past the X-ring
seal when it is installed and
compressed by the bottom
cap of the shock. Doing so will
damage the seal and cause
shock oil to leak.
Piston Installation/Removal
ADVANCED TUNING ADjUSTMENTS


