background image

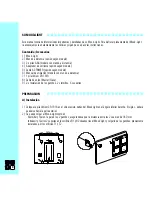
6) Enchufar el adaptador al Mood-Light.
7) Enchufar el cable AC POWER al adaptador y a la corriente.
8) Coloquar las 2 pilas AAA en el mando a distancia.

B) Mood-Light On/Off

Siempre dirigir el mando a distancia hacía el Mood Light MASTER (Maestro)

1) Pulse el botón 

ON

 del mando a distancia para encender su Mood-Light. Nota: tratándose de la primera utilización, el 

Mood-Light se encenderá aleatoriamente.

Puede, ahora, activar y programar el Mood-Light, utilizando las funciones Color, Séquense, Function o Sound como 
indicado a continuación.

2) Pulse el botón 

OFF

 del mando a distancia para apagar su Mood-Light.

3

2

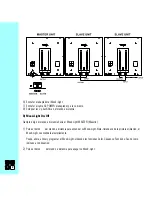
(Fig.4)

Содержание Mood Light Classic

Страница 1: ......

Страница 2: ...0 4 ...

Страница 3: ...ight energy that stimulates the sense of sight mood temporary state of mind mood light The next dimension of light style and self expression The dawning of a new experience 0 5 OPERATION MANUAL WARRANTY ...

Страница 4: ...inbow F2 Fusion F3 Pulse F4 SPEED S1 M1 F1 S2 M2 F2 S3 M3 F3 T M4 F4 OFF ON Mood Light Segment 01 Mood Light Segment 02 Centre Button Mood Light Segment 03 Mood Light Segment 04 Red Light Green Light Blue Light Speed Turn on off the light Mood Buttons Sequence Modes Function Modes ...

Страница 5: ...ing Cable Master Slave 9 2 x Mounting Brackets 2 x Screws 4 x Supporters GETTING STARTED A Installation 1 Install the CR1616 Lithium cell into the battery compartment located on the rear lower right hand corner of the Mood Light The sign on the battery should be facing outwards 2 You can wall mount your Mood Light as per Fig 1 Screw and fix two Mounting Brackets on the wall amke sure that the dime...

Страница 6: ...ed before use 5 Each Mood Light can be used optionally as a Master or a Slave For multiple unit installations you have to select one Master unit with multiple Slave Turn the switch on the rear of the Master unit to the Master position and place the Interconnecting Cable into the OUTPUT position on the reverse of your Mood Light as per Fig 4 Turn the switch on the rear of the Slave unit to the Slav...

Страница 7: ...ter unit in your installation Press the ON button on your remote control to turn on your Mood Light Note The default start up condition of your Mood Light will be ON when power is connected for the first time You can now start and operate all Mood Lights in your installation simultaneously use the Color Mode the Sequence Modes the Function Modes or the Sound Mode as described below Press the OFF b...

Страница 8: ...for which you want to create a color The selected Mood Light unit section will blink once in acknowledgement of the command from your remote Once you have selected to either adjust all four unit sections or just one you can proceed to adjust the color as follows Press RED or to increase or decrease the intensity of the red color Press GREEN or to increase or decrease the intensity of the green col...

Страница 9: ... your remote control to start the Chill Sequence To stop the Chill Sequence and to start another mode press any other button 2 Motion Interchanging waves crashing into psychedelic colors and effects Motion is a light sequence to stimulate your senses Press MOTION S2 on your remote control to start the Motion Sequence To stop the Motion Sequence and to start another mode press any other button 3 Ac...

Страница 10: ...rt another mode press any other button 3 Fusion The Fusion Function is a display of fading and gradually changing colors Press FUSION F3 on your remote control to start the Fusion Function Press SPEED or to increase or decrease the speed of the Fusion Function To stop the Fusion Function and to start another mode press any other button 4 Pulse The Pulse Function is a display of a pulsating light a...

Страница 11: ...at will corrode electronic circuits Do no use or store it in dusty or dirty areas The lighting parts can lose brightness Do not install or store in hot areas High temperatures can shorten the life of electronic items damage batteries and warp or melt certain plastics Do not attempt to open alter or tamper with your Mood Light Non expert handling may damage the unit and may cause injury to the user...

Страница 12: ...any damages due to unauthorized repair unauthorized modifications and alteration of the Mood Light During the limited warranty period Traxon or its authorized distributors will either repair or replace any defective product or parts thereof with new or factory rebuilt replacement items and return the product to the consumer in working condition No charge will be made to the consumer for either par...

Страница 13: ...sumer shall arrange for the product to be delivered to the authorized distributor Expenses related to removing the product from an installation are not covered under this warranty Expenses related to transportation to the distributor are not covered by this warranty 3 The consumer will be billed for any parts or labor charges not covered by this limited warranty 4 The consumer shall be responsible...

Страница 14: ... die den Sehsinn stimuliert mood ein vorübergehender Gemütszustand mood light Die nächste Dimension in Leuchtendesign Lifestyle und persönlichem Ausdruck Die Morgendämmerung einer neuen Erfahrung BEDIENUNGSANLEITUNG UND GARANTIE ...

Страница 15: ...tzkabel optional modellabhängig 6 Bedienungsanleitung 7 1 Lithiumbatterie Typ CR1616 8 Verbindungskabel Master Slave 9 2 x Montagehalterungen 2 x Schrauben 4 x Träger INBETRIEBNAHME A Installation 1 Setzen Sie die Lithiumzelle vom Typ CR1616 in das Batteriefach ein das sich an der hinteren unteren rechten Ecke des Mood Light befindet Das Pluszeichen sollte dabei nach außen zeigen 2 Sie können Ihr ...

Страница 16: ...eninstallationen sollten nur von einem qualifizierten Techniker vorgenommen werden Achtung Für beide Arten der Aufhängung Ihrer Mood Light ist zu beachten daß die Mood Light richtig positioniert und sicher befestigt ist 5 Jedes Mood Light kann optional als Master oder als Slave Modul genutzt werden Bei größeren Installationen müssen Sie sich für ein Master Modul entscheiden und die weiteren Module...

Страница 17: ...lieferten AAA Batterien Microzellen in Ihre Fernbedienung B Ein und Ausschalten des Mood Light Richten Sie Ihre Fernbedienung stets auf das Gerät das Sie zum Hauptgerät bestimmt haben Drücken Sie ON auf Ihrer Fernbedienung um Ihre Mood Light einzuschalten Beachten Sie Bei der ersten Inbetriebnahme Ihres Mood Light ist das Gerät eingeschaltet sobald es an das Stromnetz angeschlossen wurde Nun könne...

Страница 18: ...en Sie eine der Tasten segment 01 segment 02 segment 03 oder segment 04 auf Ihrer Fernbedienung Die gewählte Einheit wird einmal aufblinken als Bestätigung des Fernbedienungsbefehls Wenn Sie entweder alle vier oder eine einzelne Einheitssektion angewählt haben können Sie die Farbe wie folgt regulieren Drücken Sie RED oder um die Intensität der Farbe Rot zu erhöhen oder zu vermindern Drücken Sie GR...

Страница 19: ... Sequenz zu starten Um die Chill Sequenz zu stoppen und einen anderen Modus zu starten drücken Sie eine beliebige Taste 2 Motion Mit wechselnden Wellen die in psychedelische Farben und Effekte hineinplatzen ist Motion eine Lichtsequenz die die Sinne stimuliert Drücken Sie die MOTION Taste S2 auf Ihrer Fernbedienung um die Motion Sequenz zu starten Um die Motion Sequenz zu stoppen und einen anderen...

Страница 20: ...beliebige Taste 3 Fusion Die Fusionsfunktion stellt verblassende und langsam wechselnde Farben dar Drücken Sie die FUSION Taste F3 auf Ihrer Fernbedienung um die Fusionsfunktion zu starten Drücken Sie SPEED oder um die Geschwindigkeit der Fusionsfunktion zu erhöhen oder zu vermindern Um die Fusionsfunktion zu stoppen und einen anderen Modus zu starten drücken Sie eine beliebige Taste 4 Pulse Die P...

Страница 21: ...sion der Schaltkreise führen können Lagern Sie die Anlage nicht an staubigen oder schmutzigen Stellen Dadurch könnten die leuchtenden Teile ihre Leuchtkraft verlieren Die Anlage sollte auch nicht an Orten mit großer Hitze aufgestellt oder gelagert werden Hohe Temperaturen verkürzen die Lebensdauer von Elektronikteilen schädigen Batterien und verformen oder schmelzen bestimmte Kunststoffteile Versu...

Страница 22: ...sten oder Probleme mit der Stromversorgung entstanden sind Traxon haftet nicht für Schäden die durch nichtautorisierte Reparaturen oder Veränderungen des Mood Light verursacht wurden Innerhalb der begrenzten Garantiefrist werden Traxon oder die von ihr autorisierten Händler ein defektes Gerät oder defekte Teile entweder reparieren Die Garantie besteht weiter für das reparierte Gerät während der ve...

Страница 23: ...ritte unternehmen 1 Der Kunde bringt das Gerät zum Zwecke der Reparatur oder des Umtauschs an den Ort des Kaufs zurück 2 Der Kunde sorgt dafür daß das Gerät an den autorisierten Händler geliefert wird Kosten die durch das Entfernen des Geräts aus einer Befestigung oder den Transport zum Händler entstehen werden nicht von der vorliegenden Garantie abgedeckt 3 Dem Kunden werden Ersatzteile und Arbei...

Страница 24: ...2 5 ...

Страница 25: ...2 4 2 6 Subtractive Color Chart Illustration 1 Color Chart Illustration 2 Additive ...

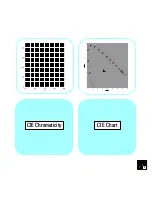
Страница 26: ...2 5 2 7 CIE Chromaticity CIE Chart ...

Страница 27: ...2 8 ...

Страница 28: ...ght una energía estimulante del sentido visual mood un estado de animo mood light Otra dimensión de iluminación estilo y expresión El nacimiento de una nueva experienca 2 9 MANUAL DE UTILIZACIÓN GARANTÍA ...

Страница 29: ...ndo a distancia 7 1 pila lithium CR 1616 8 Cable de unión Master Slave 9 2 x Instalación de los ganchos 2 x tornillos 4 x suportes PREPARACION A Instalación 1 Coloque la pila Lithium CR 1616 en el sitio previsto detrás del Mood Light en el ángulo inferior derecho El siglo deberá quedarse hacía la parte exterior 2 Se puede colgar el Mood Light como en Fig 1 Atornillar y fijar en la pared los 2 ganc...

Страница 30: ...so asegúrense que el Mood Light este muy bien fijado 5 El Mood Light pude utilizarse en opción como Master o Slave maestro o esclavo En el caso de la instalación de varias pantallas deberá de elegir un Maestro para los esclavos Posicionar el interruptor Master en posición Master y enchufar el cable de unión en el enchufe OUTPUT que se encuentra detrás del Mood Light ver Fig 4 Elegir un esclavo pos...

Страница 31: ...cia hacía el Mood Light MASTER Maestro 1 Pulse el botón ON del mando a distancia para encender su Mood Light Nota tratándose de la primera utilización el Mood Light se encenderá aleatoriamente Puede ahora activar y programar el Mood Light utilizando las funciones Color Séquense Function o Sound como indicado a continuación 2 Pulse el botón OFF del mando a distancia para apagar su Mood Light 3 2 Fi...

Страница 32: ...pondiente a la zona segment 1 o segment 2 o segment 3 o segment 4 del mando a distancia La zona elegida se apagará una vez brevemente Una vez elegida la o las zonas se puede realizar el cambio de color Pulse RED o para aumentar o disminuir la intensidad del color ROJO Pulse GREEN o para aumentar o disminuir la intensidad del color VERDE Pulse BLUE o para aumentar o disminuir la intensidad del colo...

Страница 33: ...ando a distancia para activar el modo de la animación Para desactivar el modo Chill y activar otro modo pulse otro botón 2 Motion Una variación de oleadas de colores y efectos psicodélicos El modo Motion es una animación de colores y movimientos que estimula los sentidos Pulse el botón MOTION S2 de su mando a distancia para activar la animación Para desactivar el modo Motion y activar otro modo pu...

Страница 34: ...del modo Rainbow Para desactivar el modo Rainbow y activar otro modo pulse otro botón 3 Fusion Escala progresiva de cambios de colores Pulse el botón FUSION F3 de su mando a distancia para activar la animación Pulse el botón SPEED o para aumentar o disminuir la velocidad del modo Fusion Para desactivar el modo Fusion y activar otro modo pulse otro botón 4 Pulse La función Pulse aparece en la panta...

Страница 35: ...rte electrónica y causar problemas de corrosión Mantener el Mood Light en un lugar limpio El polvo disminuye la luminosidad No almacenar o instalar el Mood Light en un lugar demasiado caliente Las temperaturas muy elevadas pueden disminuir la duración de vida del aparato dañar las pilas y desalterar las partes de plástico No abrir el aparato La intervención de una persona no autorizada puede dañar...

Страница 36: ...fabricante Durante el tiempo de la garantía limitada Traxon o sus distribuidores oficiales harán el cambio o la reparación del aparato o parte defectuosa con piezas de recambio del fabricante Traxon devolverá el aparato al consumidor en buen estado de funcionamiento La mano de obra y piezas de recambio no serán a cargo del consumidor El aparato arreglado será garantizado por el tiempo de la garant...

Страница 37: ... envió hasta el distribuidor autorizado y tener en cuenta que los gastos de desmontaje o de instalación no son cubiertos por la garantía limitada 3 tomar a su cargo todos gastos de mano de obra y otros que los indicados en la garantía limitada 4 tomar nota que la garantía limitada no cubre la instalación del aparato 5 tomar a su cargo los gastos y consecuencia si el aparato no ha llegado al distri...

Страница 38: ...ght une énergie qui stimule le sens visuel mood un état d esprit temporaire mood light Une autre dimension de lumière style et expression La naissance d une nouvelle expérience GUIDE D UTILISATION ET GARANTIE ...

Страница 39: ... Adaptateur de réseau en option suivant model 5 Câble AC POWER en option suivant model 6 Mode d emploi pour model avec commande à distance 7 1 pile lithium CR 1616 8 Cable de raccord Master Slave 9 2 x Placement des crochets 2 x vis 4 x supports PREPARATION A Installation 1 Placer la pile lithium CR 1616 dans le compartiment prévu à cet effet situé dans l angle inférieur droit à l arrière du Mood ...

Страница 40: ... standard pour plafond Le montage au plafond doit être effectué par une personne qualifiée ou un technicien Attention Assurez vous pour chacune des méthodes que votre Mood Light est placé correctement et fixé solidement 5 Le Mood Light peut être utilisé suivant l option en Master ou Slave maître ou esclave Dans le cas d une installation de plusieurs unités Il faut sélectionner un Master pour les e...

Страница 41: ...à distance B Position Mood Light On Off Toujours diriger la commande à distance vers l écran sélectionné comme Maître 1 Appuyez sur la touche ON de votre commande à distance pour allumer votre Mood Light Note Le Mood Light s allume par défaut lors de la première utilisation Vous pouvez maintenant activer et programmer votre Mood Light en utilisant les fonctions Color Sequence Function ou Sound com...

Страница 42: ...egment 1 ou segment 2 ou segment 3 ou segment 4 La zone choisie va clignoter une fois Lorsque vous avez sélectionné une ou plusieurs zones vous pouvez procéder à l ajustement de la couleur Appuyez sur RED ou afin d augmenter ou diminuer l intensité de la couleur ROUGE Appuyez sur GREEN ou afin d augmenter ou diminuer l intensité de la couleur VERTE Appuyez sur BLUE ou afin d augmenter ou diminuer ...

Страница 43: ...puyez sur la touche CHILL S1 de votre commande à distance pour activer cette animation Pour arrêter le mode Chill et activer un autre mode appuyez sur une autre touche 2 Motion Une alternance de vagues qui s écrasent tour à tour aux couleurs et effets psychédéliques Le mode Motion est une animation qui procure une stimulation des sens Appuyez sur la touche MOTION S2 de votre commande à distance po...

Страница 44: ... le mode Rainbow et activer un autre mode appuyez sur une autre touche 3 Fusion Dégradé progressif de changement de couleurs Appuyez sur la touche FUSION F3 de votre commande à distance pour activer le mode Fusion Appuyez sur la touche SPEED ou pour augmenter ou diminuer la vitesse du mode Fusion Pour arrêter le mode Fusion et activer un autre mode appuyez sur une autre touche 4 Pulse Palpitations...

Страница 45: ...iser ou entreposer le Mood Light dans un endroit sale ou poussiéreux qui diminuerait la luminosité de celui ci Ne pas l entreposer ou le placer dans un endroit trop chaud Des températures trop élevées pourraient réduire la durée de vie des composants électroniques endommager les piles et déformer ou faire fondre les éléments en plastique Ne pas ouvrir l appareil L intervention d une personne non q...

Страница 46: ...n effectuée par une personne non autorisée Pendant la période de garantie limité Traxon ou ses distributeurs officiels se chargent de remplacer ou réparer tout l appareil ou partie de l appareil défectueux par de nouvelles pièces ou des pièces de rechanges venant du fabricant Traxon retournera l appareil au consommateur en bon état de fonctionnement La main d œuvre et pièces détachées ne seront pa...

Страница 47: ...oires non fournis par Traxon Pour que l appareil soit pris en garantie le consommateur devra 1 retourner l appareil au lieu d achat 2 prendre à sa charge les frais d envoi vers son distributeur autorisé tenant compte que les frais de démontage de l installation ne sont non plus pas couverts par la garantie limité 3 assumer tous frais de main d œuvres et autres que ceux repris dans la garantie limi...

Страница 48: ...4 9 ...

Страница 49: ......

Отзывы: