background image

MEASUREMENT

16

17

MEASUREMENT


ST

AR

T

ST

OP

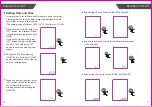
Tie the cuff

2~3cm

1.

4.

Hold your arm with your palm facing up and �e the 

cuff on your upper arm, then posi�on the tube 

off-center toward the inner side of arm in line with 

the li�le finger. Or posi�on the artery mark      over 

the main artery (on the inside of your arm).  Note: 

Locate the main artery by pressing with 2 fingers 

approximately 2 cm above the bend of your elbow 

on the inside of your le� arm. Iden�fy where the 

pulse can be felt the strongest. This is your main 

artery.

The cuff should be snug but not too �ght. You 

should be able to insert one finger between the 

cuff and your arm.

Remove all jewelry, such as watches and bracelets 

from your le� arm.

Note: If your doctor has diagnosed you with poor 

circula�on in your le� arm, use your right arm.
Roll or push up your sleeve to expose the skin. 

Make sure your sleeve is not too �ght.

2.

3.

5.

Sit comfortably with your tested arm res�ng on a flat 

surface. Place your elbow on a table so that the cuff 

is at the same level as your heart. Turn your palm 

upwards. Sit upright in a chair, and take 5-6 deep 

breaths.

Rest for 5 minutes before first measuring.

Wait at least 3 minutes between measurements. 

This allows your blood circula�on to recover.

The pa�ent must relax as much as possible and do not 

move and talk during the measurement procedure.

For a meaningful comparison, try to measure under 

similar condi�ons. For example, take daily 

measurements at approximately the same �me, on 

the same arm, or as directed by a physician.

6.

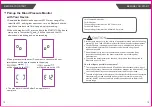
Take the measurement in a silent room.

The cuff should maintain at the same level as the 

right atrium of the heart.

Please sit comfortably. Do not cross your legs and 

keep your feet flat on the ground.

Keep your back against the backrest of the chair.

Helpful �ps for Pa�ents, especially for Pa�ents with 

Hypertension:

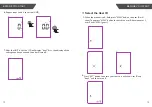
Adjust the zero. 

LCD display

Infla�ng and measuring. 

Display and save the

measurement result. 

Start the Measurement

When the monitor is off, press “START/STOP bu�on, it will finish the 

whole measurement automa�cally, save and transmit the 

measurement data for the desired user. (Take User 1 for example.) 

1. 

Before you start the measurement, Download the MedM Health app 

from APP Store or Google Play, and turn on the Bluetooth. Install the 

APP, and register an account. Then set your personal informa�on 

(Gender, Birthday, Height, Weight, Name and so on).

Содержание TMB-1491-BHJ

Страница 1: ...onitor Please read the user manual carefully and thoroughly so as to ensure the safe usage of this product Keep this manual for further reference in case any issues arise Version 1 0 Guangdong Transte...

Страница 2: ...the Records Delete the Records INFORMATION FOR USER 21 Tips for measurement Maintenance ABOUT BLOOD PRESSURE 23 What are systolic pressure and diastolic pressure What is the standard blood pressure c...

Страница 3: ...such as cardiac pacemakers de brillators Contraindications This product uses the Oscillometric Measuring method to detect blood pressure Before every measurement the unit establishes a zero pressure...

Страница 4: ...f patient blood circulation When measurement please avoid compression or restriction of the connection tubing CAUTION The device cannot be used with HF surgical equipment at the same time The ACCOMPAN...

Страница 5: ...equipment to cool from the maximum storage temperature between uses until it is ready for intended use This equipment needs to be installed and put into service in accordance with the information prov...

Страница 6: ...the measurement 6V 1A Do not use new and used ba eries together Do not use di erent types of ba eries together Do not dispose the ba eries in re Ba eries may explode or leak Remove ba eries if the dev...

Страница 7: ...EM bu on will increase the number by one in a cycling manner When you get the right year press SET bu on to con rm the entry The screen will then show a blinking number represen ng the MONTH It is imp...

Страница 8: ...between user 1 user 2 and USER G guest 1 Press SET bu on to ensure your choice it will show User ID and donE and then turn o 2 7 A er the UNIT is set the LCD will display donE rst then display all th...

Страница 9: ...ment Sensi ve people including pregnant women pre eclamp c and those who implanted medical electronic instruments should avoid using the unit whenever possible Keep the monitor at least 20 cen meters...

Страница 10: ...eep breaths Rest for 5 minutes before rst measuring Wait at least 3 minutes between measurements This allows your blood circula on to recover The pa ent must relax as much as possible and do not move...

Страница 11: ...1 is shown rst Each new measurement is assigned to the rst 1 record All other records are pushed back one digit e g 2 becomes 3 and so on and the last record 60 is dropped from the list 2 Each press M...

Страница 12: ...can delete all results for the selected user by following steps Take User 1 for example If there is no record when you press MEM bu on to check the record the right display will be shown 3 Tips for Me...

Страница 13: ...n indicates that a pulse irregularity consistent with an irregular heart beat was detected during measurement Usually this is NOT a cause for concern However if the symbol appears o en we recommend yo...

Страница 14: ...during use please check the following points PROBLEM SYMPTOM CHECK THIS REMEDY No power Low batteries Error message Display will not light up Ba eries are exhausted Replace with new ba eries Insert th...

Страница 15: ...ery Powered Mode Internally Powered ME Equipment AC Adapter Powered Mode Class II ME Equipment A temperature range of 5 C to 40 C A rela ve humidity range of 15 to 90 non condensing but not requiring...

Страница 16: ...ses Bio compatibility ISO 10993 1 2018 Biological evaluation of medical devices Part 1 Evaluation and testing within a risk management process ISO 10993 5 2009 Biological evaluation of medical devices...

Страница 17: ...anufacturer s declaration electromagnetic emissions RF emissions CISPR 11 RF emissions CISPR 11 Group 1 Class B Class A Comply Compliance Harmonic emissions IEC 61000 3 2 Voltage fluctuations flicker...

Страница 18: ...3 Test specifications for ENCLOSURE PORT IMMUNITY to RF wireless communicati ons equipment Band MHz Modulation W Distance m IMMUNITY TEST LEVEL V m TETRA 400 Pulse modulation b 18 Hz GMRS 460 FRS 460...

Отзывы: