background image

FWD-SVX01D-E4

Choice of fan speed

The FWD unit is delivered from the
factory unwired. Please refer to the
selection chart to select the static
pressure according to the flowrate.
Once the fan rotation speed has been
determined, wire up the fan motor to
the required speed using the supplied
electrical diagrams.

For use of temperature control, refer
to the guide supplied with the
thermostat. 

Initial checks

- Check the electrical connections

and water pipes are fixed securely.

- Rotate the fan blades by hand to

make sure it rotates freely.

- Check that all nuts and bolts are

tightened correctly. 

- Make sure the chilled water piping

and the condensate drainage tube
are properly insulated to avoid
problems with condensation
water flow. 

Maintenance
recommendations (regular
use)

Failure to follow these instructions
may cause damage to the unit. 

The frequency of maintenance will
depend on the conditions of use of
the unit and will be determined by
regular inspections. 

When servicing the units, make sure
also that the air passage through the
coils (both internal and external) is
clean, and free of dirt or debris. 

a) Clean the air filter by beating it and

drawing air through it in the
opposite direction to the passage
of air. 

b) Check the condensate tubes are

not obstructed.

c) Rotate the fan blades and make

sure they are not damaged. Clean
them if necessary and check they
are correctly aligned. 

d) Motor - check the wiring, and make

sure the switches operate correctly.
Replace any damaged
components. 

e) Safety disconnection and electrical

components - check they operate
correctly.

f) Water circuit - check there are no

leaks. 

g) Tighten all the nuts and bolts. 

Operation / Maintenance

16

Содержание FWD 08

Страница 1: ...Ductable water unit FWD 08 12 20 30 45 Installation Operation Maintenance FWD SVX01D E4 ...

Страница 2: ...derate injury It may also be used to alert against unsafe practices or for equipment or property damage only accidents Foreword These installation operation and maintenance instructions are given as a guide to good practice in the installation putting into service operation and periodic maintenance by the user of FWD units They do not contain full service procedures necessary for the continued suc...

Страница 3: ...d and corrected in good time and minimizes the possibility that serious damage will occur Finally regular maintenance ensures the maximum operating life of your equipment We would remind you that failure to respect these installation and maintenance instructions may result in immediate cancellation of the warranty Training The equipment described in this manual is the result of many years of resea...

Страница 4: ...n 5 Introduction 5 Technical data 6 Ceiling installation 7 Installation on the ground 7 Condensate drainage 8 Electrical connections 8 Main power supply 9 Duct connections 10 Diagrams 9 Operation Maintenance 16 Choice of fan speed 16 Initial checks 16 Maintenance recommendations 16 Maintenance 17 Removal of the fan motor 17 Troubleshooting 18 4 FWD SVX01D E4 ...

Страница 5: ... a risk of electrocution Handling the unit Warning Wear protection gloves when handling the unit When removing the unit from its pallet do not handle it by pipes spigots valves drain pan or control panel Take precaution to not damage the unit Description of the unit The FWD unit is a slim discharge cabinet unit for installation in false ceilings lofts and ventilation spaces It is designed for hori...

Страница 6: ... 3 2 5 5 9 3 14 1 16 5 Rated Input Power W 246 516 707 1100 1815 Airflow minimum m3 h 490 980 1400 1800 2700 nominal m3 h 820 1650 2300 3000 4500 maximum m3 h 980 1970 2600 3600 5400 Main coil Water entering leaving connections type ISO R7 rotating female Dia 3 4 3 4 1 1 2 1 1 2 1 1 2 Hot water coil accessory for blower only Heating capacity 4 kW 6 3 12 17 4 22 4 34 5 G2 filter filter box accessor...

Страница 7: ... bends and bending radii that are too small Connection of water inlet and out let lines The coil is connected by means of 3 4 female ISO R7 connectors Warning Limit the tightening torque applied to the connector nuts to prevent deformation of the piping and seals risk of leaks Installation Ceiling installation Preparation of the ceiling and installation of the unit A template for drilling into the...

Страница 8: ...en the terminals securely Figure 4 Connection of the condensate drain Figure 5 Moving the electric cabinet Condensate drainage The unit must be perfectly horizontal in both directions Connect the condensate tray outlet outer diam 20 mm To ensure satisfactory condensate drainage the drainage tube must be sloped 10 There must not be a condensate trap anywhere on the line However a siphon can be prov...

Страница 9: ... damaging the unit The customer s electrical connections must comply with current standards FWD units manufactured byTrane comply with CEI regulations All power supply wiring must be sized and selected in accordance with local code and regulation Fast acting circuit breaker which is sensitive to very low levels of current leakage to ground max 30mA must be installed as a general line protection On...

Страница 10: ...ee selection chart The air intake can be located at the back of the unit or underneath it DIMENSIONS OF DUCT CONNECTIONS INTAKEAND DISCHARGE Sizes 08 12 20 30 45 Length 748 948 1148 1148 1148 Width 198 248 298 598 598 Filtering vital to ensure the unit runs smoothly No filters are supplied with the unit but they can be ordered as accessories Filter box with EU2 filters to fix to the unit s intake ...

Страница 11: ...11 FWD SVX01D E4 ...

Страница 12: ...12 FWD SVX01D E4 ...

Страница 13: ...13 FWD SVX01D E4 ...

Страница 14: ...FWD SVX01D E4 Space requirement plans 14 ...

Страница 15: ...FWD SVX01D E4 15 ...

Страница 16: ...intenance recommendations regular use Failure to follow these instructions may cause damage to the unit The frequency of maintenance will depend on the conditions of use of the unit and will be determined by regular inspections When servicing the units make sure also that the air passage through the coils both internal and external is clean and free of dirt or debris a Clean the air filter by beat...

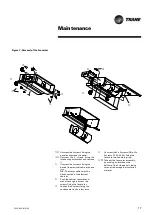
Страница 17: ...he 4 screws fixing the panel and remove the panel Unscrew the 4 screws fixing the intake support bracket and remove it Unscrew the 4 screws fixing the base of the electrical cabinet by one turn N B The motor cables must be disconnected in the electrical cabinet Push the cabinet upwards and move it enough to access the screws fixing the fan motor Loosen the 4 screws fixing the condensate tray by a ...

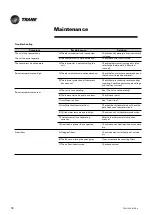
Страница 18: ...control circuit s fuse Check the thermostat is plugged in also refer to the thermostat s instruction manual Check the fan motors are powered up and the fan circuit breakers are reset Check the motor winding resistance after resetting Check the power supply voltage and the input current See The unit is not operating Check the set point See No air flow Checked the chilled water flow Check the gate v...

Страница 19: ...19 FWD SVX01D E4 Notes ...

Страница 20: ...nd the world A business of Ingersoll Rand the leader in creating and sustaining safe comfortable and energy efficient environments Trane offers a broad portfolio of advanced controls and HVAC systems comprehensive building services and parts For more information visit www Trane com Trane has a policy of continuous product and product data improvement and reserves the right to change design and spe...

Отзывы: