


www.TrailFX.com
Page
1
of
4
Rev 031618
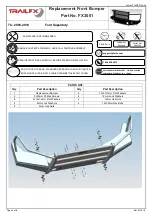
PARTS LIST:
Qty
Part Description
Qty
Part Description
1
Replacement Bumper
8
12×37×3mm Flat Washers
4
5×20mm Phillips Screws
4
12mm Lock Washers
8
5x15x1.2mm Flat Washers
4
12mm Hex Nuts
4
5mm Lock Washers
4
12×50mm Hex Bolts
4
5mm Hex Nuts
Replacement Front Bumper
Part No. FX3001
Fits:
2008-2010
Ford Superduty
ASSISTANCE IS RECOMMENDED.
REMOVE CONTENTS FROM BOX. VERIFY ALL PARTS ARE PRESENT.
READ INSTRUCTIONS CAREFULLY BEFORE STARTING INSTALLATION.
DO NOT OVER
TORQUE
.
STANDARD OPERATING LOAD FOR TIGHTEN
BODY MOUNT NUTS & BOLTS VARIES FROM
45
TO
65
FOOT POUND.
60-180 min
1 866 638 4870
POLISHED STAINLESS STEEL
– LIMITED LIFETIME
POWDER COATED BLACK
– 3 YEARS
Cutting Not
Required
Drilling Not
Required


