ASSEMBLY
Estimated Assembly Time 20~40 minutes
CAUTION!
The drill Press is very heavy and must be lifted with the help
of 2 PEOPLE OR MORE, to safely assemble it.
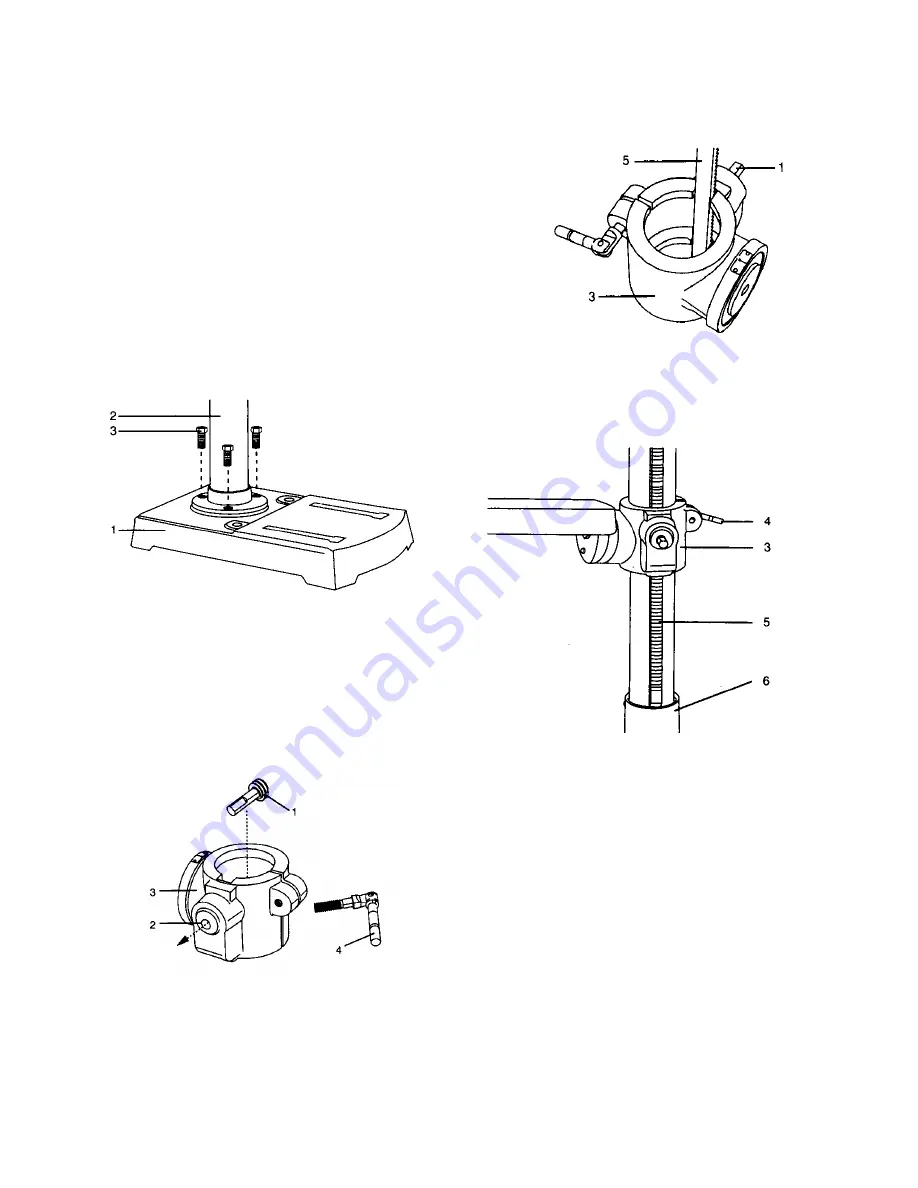
COLUMN SUPPORT TO BASE (FIG. 1)
1. Position the base (1) on the floor.
2. Place the column (2) on the base, aligning the holes in the
column support with the holes in the base.
3. Locate the four long hex bolts (3) from the loose parts bag.
4. Place a bolt in each hole through the column support and
the base. Tighten with an adjustable wrench.
Fig. 1
TABLE TO COLUMN ASSEMBLY (FIG. 2 THROUGH 6)
1. Locate the worm gear (1), table crank and table support lock
handle from the loose parts bag.
2. Insert the worm gear (1) into the table crank handle hole (2)
from inside the table support (3). Make sure the worm gear (1)
meshes with the inside gear.
3. Install the table support lock handle(4) into the hole at the
rear of the table support. Tighten.
NOTE:
Table removed from support in illustration for clarity.
Fig. 2
4. Place the rack (5 – Fig. 3) in position inside the table support
(3), making sure the worm gear (1) on the inside of the table
support is engaged with the teeth of the rack.
Fig. 3
5. Slide the table support assembly with the rack (1,3,5)
toghther onto the column (Fig. 3).
6. Engage the bottom of the rack (5) with the lip of the column
support (6). Tighten the support lock handle (4)
to lock the table support assembly to the column.
Fig. 4
7. Install the collar (7) to the top end of the rack (5) on the
column (Fig. 5).
IMPORTANT:
The bottom of the collar MUST NOT be
pushed all the way down onto the top of the rack. MAKE
SURE the top of the rack is under the bottom of the collar and
that there is enough clearance to allow the rack to freely
rotate around the column. Tighten the set screw (8).
CAUTION:
To avoid column or collar damage, DO NOT
OVERTIGHTEN the set screw.
10
Содержание DP12LW
Страница 7: ...CARTON CONTENTS 7 L M N O ...
Страница 22: ...22 ...


