TP-Link TL-WR850N Скачать руководство пользователя страница 71

67

Chapter 10


Customize Your Network Settings

4. 

When the WPS LED is on, the client device has successfully connected to the router. 

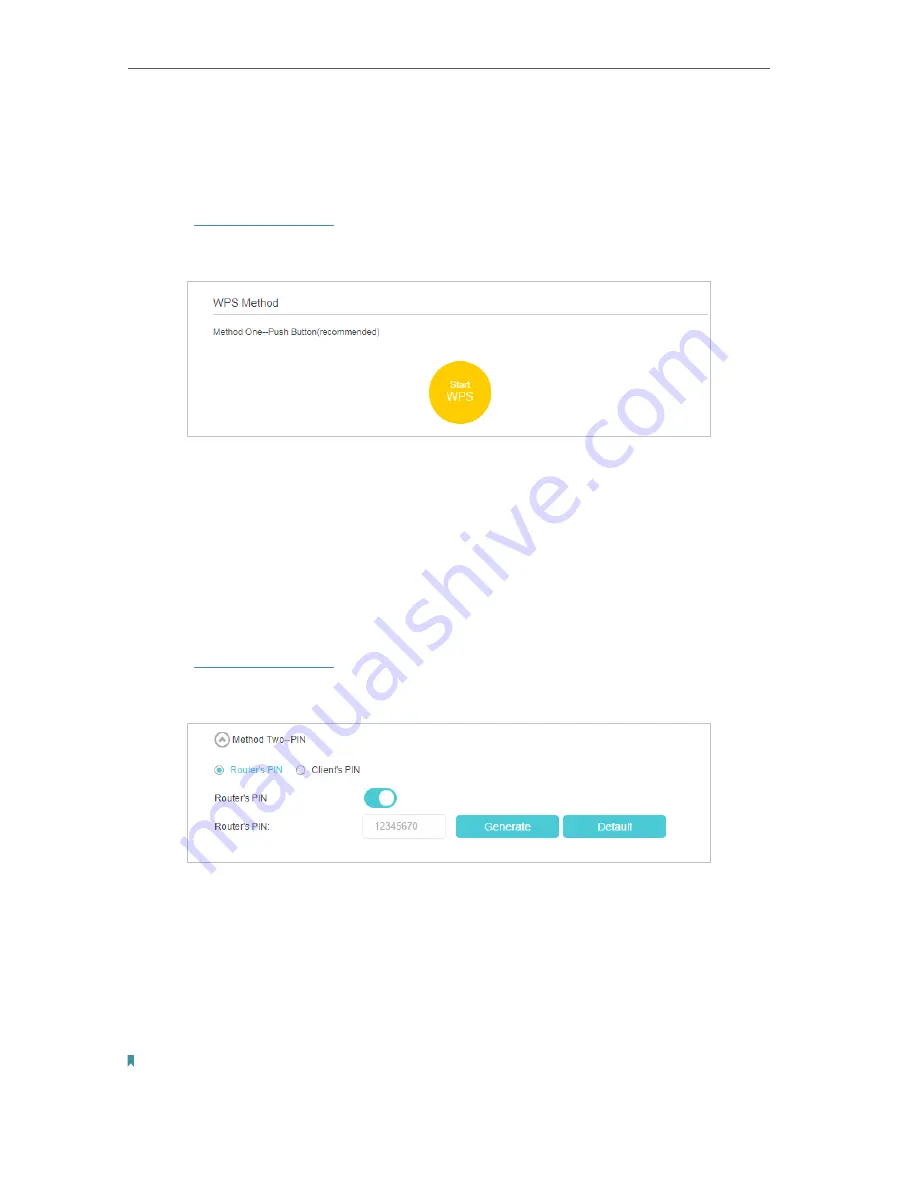
Method 2: Use the WPS button on the web management page

Use this method if your client device has a WPS button.

1. 

Visit 

http://tplinkwifi.net

, and log in with the password you set for the router. 

2. 

Go to


Advanced


Wireless 

>

 WPS

 page.

3. 

Click 

Start WPS 

on the page.

4. 

Press the WPS button of the client device directly. 

5. 

The WPS LED of the router flashes for about 2 minutes during the WPS process. 

6. 

When the WPS LED is on, the client device has successfully connected to the router. 

Method 3: Enter the router’s PIN on your client device

Use this method if your client device asks for the router’s PIN. 

1. 

Visit 

http://tplinkwifi.net

, and log in with the password you set for the router. 

2. 

Go to


Advanced


>


Wireless


WPS

, and click 

Method Two--PIN

.

3. 

Take a note of the current PIN of the router. You can also click the 

Generate

 button 

to get a new PIN.

4. 

Enter the router’s PIN on the client device. (The default PIN is also printed on the 
label of the router.)

5. 

The WPS LED flashes for about 2 minutes during the WPS process. 

6. 

When the WPS LED is on, the client device has successfully connected to the router. 

Note:

1.  The WPS LED on the router will light on for five minutes if the device has been successfully added to the network.

Содержание TL-WR850N

Страница 1: ...1910020832 REV2 0 0 User Guide 300Mbps Wireless N Router TL WR850N...

Страница 2: ...ually Set Up Your Internet Connection 13 4 3 Set Up an IPv6 Internet Connection 15 4 4 More Operation Modes 16 4 4 1 Configure the Router in Access Point Mode 16 4 4 2 Configure the Router in Range Ex...

Страница 3: ...figure the DHCPv6 Server Address Type 53 10 3 Set Up a Dynamic DNS Service Account 54 10 4 Create Interface Groups 55 10 5 Create Static Routes 56 10 6 Set Up the IPv6 Tunnel 59 10 6 1 Use the Public...

Страница 4: ...11 6 3 Remote Management 76 11 6 4 HTTP Referer Head Check 77 11 6 5 ICMP Ping 78 11 7 System Log 78 11 8 CWMP Settings 80 11 9 SNMP Settings 81 11 10 Monitor the Internet Traffic Statistics 82 FAQ 84...

Страница 5: ...o load the corresponding page For example Advanced Wireless Wireless Settings means the Wireless Settings function page is under the Wireless menu that is located in the Advanced tab Note Ignoring thi...

Страница 6: ...Chapter 1 Get to Know Your Router This chapter introduces what the router can do and shows its appearance This chapter contains the following sections Product Overview Appearance...

Страница 7: ...s Wi Fi signal to all your devices while boosting widespread coverage throughout your home and the built in Ethernet ports supply high speed connection to your wired devices Moreover it is simple and...

Страница 8: ...reless function is disabled Ethernet On At least one of router s Ethernet ports is connected Off No Ethernet port is connected Internet On The internet service is available Flashing The router s WAN p...

Страница 9: ...1 2 3 4 For connecting your PCs or other Ethernet network devices to the router WPS RESET Button Press this button to establish a WPS connection If you have a WPS supported device you can press this b...

Страница 10: ...Chapter 2 Connect the Hardware This chapter contains the following sections Position Your Router Connect Your Router...

Страница 11: ...ur Router Follow the steps below to connect your router If your internet connection is through an Ethernet cable from the wall instead of through a DSL Cable Satellite modem connect the Ethernet cable...

Страница 12: ...work Connection TP Link_XXXX Connect automatically Connect Wi Fi Wi Fi TP Link_XXXX CHOOSE A NETWORK Other Settings Smart Device Computer Method 3 Use the WPS button Wireless devices that support WPS...

Страница 13: ...9 Chapter 2 Connect the Hardware 2 Immediately press the WPS RESET button on your router WPS RESET 2 3 WAN 1 4 POWER WLAN On TP Link_5G TP Link Home Office TP Link_123 TP Link_abc MyHome Test Close to...

Страница 14: ...Chapter 3 Log In to Your Router...

Страница 15: ...ch as Microsoft the Internet Explorer Mozilla Firefox or Apple Safari Follow the steps below to log in to your router 1 Set up the TCP IP Protocol in Obtain an IP address automatically mode on your co...

Страница 16: ...s necessary ISP information built in automates many of the steps and verifies that those steps have been successfully completed Furthermore you can also set up an IPv6 connection if your ISP provides...

Страница 17: ...Connection In this part you can check your current internet connection settings You can also modify the settings according to the service information provided by your ISP Follow the steps below to che...

Страница 18: ...PasswordandchooseSecondary Connection provided by your ISP Different parameters are needed according to the Secondary Connection type you have chosen PPPoE users usually have DSL cable modems 4 If you...

Страница 19: ...ng Network Map on the left of the page 2 If you use Dynamic IP and PPPoE and you are provided with any other parameters that are not required on the page please go to Advanced Network Internet to comp...

Страница 20: ...more settings You can check the detailed settings of IPv6 and enter the parameters provided by your ISP 5 Click Save to make the settings effective Now IPv6 service is available for your network 4 4 M...

Страница 21: ...ings Wireless Wireless Settings and set the network name SSID and passwords for the wireless network Now you can connect to the SSID and enjoy your existing network 4 4 2 Configure the Router in Range...

Страница 22: ...etwork name SSID Method 2 Manually configure the network connection To connect to the host network 1 Go to Settings Wireless Connect to Network click Scan to detect all available wireless networks Tip...

Страница 23: ...ion 3 Enter the Password of the host network you selected and click Save to make the settings effective To specify the extended network 1 Go to Settings Wireless Extended Network and configure the bas...

Страница 24: ...disables the wireless security WPA WPA2 Reconmmended Selectthisoptiontoenablethewirelesssecurity This is highly recommended to protect the wireless network from unauthorized access And then you can se...

Страница 25: ...Chapter 5 Parental Controls This function allows you to block inappropriate explicit and malicious websites and control access to specified websites at specified time...

Страница 26: ...6 PM to 22 00 10 PM on the weekdays and not other time 1 Visit http tplinkwifi net and log in with the password you set for the router 2 Go to Basic Parental Controls or Advanced Parental Controls Pa...

Страница 27: ...tion policy Tips With Blacklist selected the controlled devices cannot access any websites containing the specified keywords during the Effective Time period With Whitelist selected the controlled dev...

Страница 28: ...low access only to its related websites If you wish to block all Internet browsing access do not add any keyword to the Whitelist For Blacklist Specify a web address e g wikipedia org a web address ke...

Страница 29: ...Bandwidth Control function to control the bandwidth by configuring rules for limiting various data flows In this way the network bandwidth can be reasonably distributed and utilized It contains the fo...

Страница 30: ...e password you set for the router 2 Go to Advanced Bandwidth Control and enable Bandwidth Control 3 Input the total upload and download speed through the WAN port in the Total Upstream Bandwidth and T...

Страница 31: ...computers in the range will share the given bandwidth Port Range Enter a range of port numbers to be controlled 3 Select the protocol type for this rule 4 Select a priority level for this rule 1 is th...

Страница 32: ...ions You can block or allow specific client devices to access your wireless network using MAC Filtering or using Access Control for wired and wireless networks or you can prevent ARP spoofing and ARP...

Страница 33: ...oS Protection 1 Visit http tplinkwifi net and log in with the password you set for the router 2 Go to Advanced Security Firewall DoS Protection 3 Enable DoS Protection 4 Set the protection level Low M...

Страница 34: ...l be displayed in the Blocked DoS Host List 7 2 Service Filtering With Service Filtering you can prevent certain users from accessing the specified service and even block internet access completely 1...

Страница 35: ...s effective Note If you want to disable an entry click the icon 7 3 Access Control Access Control is used to block or allow specific client devices to access your network via wired or wireless based o...

Страница 36: ...ave 2 Select the device s to be blocked in the Online Devices table or click the Add under the Devices in Blacklist and enter the Device Name and MAC Address manually 3 Click Block above the Online De...

Страница 37: ...Binding IP MAC Binding namely ARP Address Resolution Protocol Binding is used to bind a network device s IP address to its MAC address This will prevent ARP spoofing and other ARP attacks by denying...

Страница 38: ...in the ARP List 2 Click Bind to add to the Binding List To bind the unconnected device 1 Click Add in the Binding List section 2 Enter the MAC address and IP address that you want to bind 3 Select the...

Страница 39: ...to remove the isolation of NAT and allow external internet hosts to initiatively communicate with the devices in the local network thus enabling some special features TP Link router includes four for...

Страница 40: ...Point sessions to be tunneled through an IP network and passed through the router IPSec Pass through If enabled it allows IPSec Internet Protocol Security to be tunneled through an IP network and pas...

Страница 41: ...Port 80 is used in HTTP service port 21 in FTP service port 25 in SMTP service and port 110 in POP3 service Please verify the service port number before configuration Share my personal website I ve b...

Страница 42: ...te that the External Port cannot be overlapped Internet users can enter http WAN IP in this example http 218 18 232 154 to visit your personal website Tips 1 For a WAN IP that is assigned dynamically...

Страница 43: ...e automatically filled in Here we take MSN Gaming Zone as an example 4 Click Save to make the settings effective Tips 1 You can add multiple port triggering rules according to your network needs 2 If...

Страница 44: ...0 2 Visit http tplinkwifi net and log in with the password you set for your router 3 Go to Advanced NAT Forwarding DMZ and select the Enable check box to enable DMZ 4 Enter the IP address 192 168 0 10...

Страница 45: ...install the UPnP components For example when you connect your Xbox to the router which has connected to the internet to play online games UPnP will send request to the router to open the corresponding...

Страница 46: ...stable It is suitable for restricted environment such as campus network and company intranet PPTP VPN is more easily used and its speed is faster it s compatible with most operating systems and also s...

Страница 47: ...Before you enable VPN Server we recommend you configure Dynamic DNS Service recommended or assign a static IP address for router s WAN port and synchronize your System Time with internet 2 The first...

Страница 48: ...y or Apple App Store 2 After the installation copy the file exported from your router to the OpenVPN client utility s config folder for example C Program Files OpenVPN config on Windows The path depen...

Страница 49: ...N server 4 Enter the Username and Password to authenticate clients to the PPTP VPN server 5 Click Save to make the settings effective Step 2 Configure PPTP VPN Connection on Your Remote Device The rem...

Страница 50: ...46 Chapter 9 VPN Server 4 Select Use my Internet connection VPN 5 Enter the internet IP address of the router for example 218 18 1 73 in the Internet address field Click Next...

Страница 51: ...47 Chapter 9 VPN Server 6 Enter the User name and Password you have set for the PPTP VPN server on your router and click Connect 7 The PPTP VPN connection is created and ready to use...

Страница 52: ...48 Chapter 9 VPN Server Tips You can go to Advanced VPN VPN Connections to view the clients that are currently connected to the PPTP VPN servers...

Страница 53: ...e basic configuration of the router using the web management page It contains the following sections Configure LAN Settings Configure IPv6 LAN Settings Set Up a Dynamic DNS Service Account Create Inte...

Страница 54: ...ssword you set for the router 2 Go to Advanced Network LAN Settings page and select IPv4 3 Enter a new IP Address appropriate to your needs 4 Select the Subnet Mask from the drop down list The subnet...

Страница 55: ...by the router After the dynamic IP address expires the user will be automatically assigned a new dynamic IP address 6 Keep the rest settings as the default settings and click Save Note 1 The router ca...

Страница 56: ...add an address reservation entry for your device 4 Enter the MAC Address of the device for which you want to reserve IP address 5 Specify the IP address which will be reserved by the router 6 Selectt...

Страница 57: ...tion about RDNSS and ULA Prefix contact our technical support 2 Keep Site Prefix Type as the default setting Delegated If your ISP has provided a specific IPv6 site prefix select Static and enter the...

Страница 58: ...Account Most ISPs Internet service providers assign a dynamic IP address to the router and you can use this IP address to access your router remotely However the IP address can change any time and you...

Страница 59: ...ce Groups Divide my devices connected to the router into different groups and disallow devices cross group communication For example in my house devices connected to LAN1 and LAN3 are for work while o...

Страница 60: ...information must travel to reach a specific host or network Data from one point to another will always follow the same path regardless of other considerations Normal internet usage does not require th...

Страница 61: ...routers use different LAN IP addresses on the same subnet Disable Router B s DHCP function 2 Visit http tplinkwifi net and log in with the password you set for the Router A 3 Go to Advanced Network St...

Страница 62: ...ination network is a single IP so here we enter 255 255 255 255 Gateway The IP address of the gateway device to which the data packets will be sent This IP address must be on the same subnet with the...

Страница 63: ...f there are any 6to4 servers on your network you can use this mechanism to access IPv6 service If your ISP provides you with an IPv4 only connection but you want to visit IPv6 websites you can try to...

Страница 64: ...p down list 4 According to the parameters provided by your ISP choose Auto or Manual More parameters are needed if you choose Manual 5 Click Save Note If there is no available WAN connection to choose...

Страница 65: ...e check box In this case all the wireless settings will be invalid To change the wireless network name SSID and wireless password 1 Go to Basic Wireless 2 Enter a new SSID 32 characters at most in the...

Страница 66: ...drop down list This field determines which operating frequency will be used It is not necessary to change the wireless channel unless you notice interference problems with another nearby access point...

Страница 67: ...etermine the packet size of data transmission through the router By default the RTS Request to Send Threshold size is 2347 If the packet size is greater than the preset threshold the router sends Requ...

Страница 68: ...proach to set up a security protected Wi Fi connection This function is enabled by default but if you do not need this function clear the WPS Enable check box and then click Save To create guest SSID...

Страница 69: ...ia methods such as network neighbors Samba Ping and FTP select the Allow Guests to Access My Local Network check box 4 Repeat Step 1 to Step 3 to set other two wireless networks if needed and click Sa...

Страница 70: ...ted wireless clients 1 Visit http tplinkwifi net and log in with the password you set for the router 2 Go to Advanced Wireless Statistics page 3 Youcanviewthedetailedinformationofthewirelessclients in...

Страница 71: ...ccessfully connected to the router Method 3 Enter the router s PIN on your client device Use this method if your client device asks for the router s PIN 1 Visit http tplinkwifi net and log in with the...

Страница 72: ...er the client device s PIN on the router 1 Visit http tplinkwifi net and log in with the password you set for the router 2 Go to Advanced Wireless WPS and click Method Two PIN 3 Select Client s PIN 4...

Страница 73: ...rate your router s network This chapter contains the following sections Set System Time Test Internet Connectivity Update the Firmware Back Up and Restore Configuration Settings Reboot the Router Admi...

Страница 74: ...nced System Tools Time Settings page 3 Configure the system time using the following methods Manually Select your time zone enter the date and select the local time Get from PC Click this button if yo...

Страница 75: ...the password you set for your router 2 Go to Advanced System Tools Diagnostics page To test the internet connection of the router Locate the Diagnostic Tools section and click the Start to test the i...

Страница 76: ...uter The latest firmware can also be downloaded from the Support page of our website www tp link com for free Note 1 Make sure that you have a stable connection between the router and your computer It...

Страница 77: ...d System Tools Backup Restore To back up configuration settings Click Backup to save a copy of the current settings to your local computer A conf bin file will be stored to your computer To restore co...

Страница 78: ...o schedule the router to reboot at a specific time 1 Enable Auto Reboot 2 Specify the Time when the router reboots and the Auto Reboot Interval to decide how often it reboots 3 Click Save to make the...

Страница 79: ...tion and locate the Account Management section 3 Enter the old password and a new password twice both case sensitive 4 Click Save to make the settings effective 11 6 2 Local Management You can control...

Страница 80: ...Management By default the remote devices are not allowed to manage the router from the internet You can enable remote management over HTTP and or HTTPS if needed HTTPS is a more secure way to access t...

Страница 81: ...router Tips 1 If you were warned about the certificate when visiting the web management page remotely click Trust or a similar option to continue To avoid this warning you can download and install th...

Страница 82: ...ate the ICMP Ping section 3 Specify the ICMP Ping reply options Remote Select it if you want the computers on a public network to ping the router s WAN IP address Local Enabled by default if enabled t...

Страница 83: ...Save Locally Select this option to cache the system log to the router s local memory select the minimum level of system log to be saved from the drop down list The logs will be shown in the table in...

Страница 84: ...em Tools CWMP Settings page CWMP Enable or disable the CWMP CPE WAN Management Protocol function Inform Enable or disable the function of sending an inform message to the ACS Auto Configuration Server...

Страница 85: ...the settings effective 11 9 SNMP Settings SNMP Simple Network Management Protocol is widely used in network management for network monitoring It allows management applications to retrieve status upda...

Страница 86: ...device This value should include the full name and version identification of the system s hardware type software operating system and networking software System Location Displays the physical location...

Страница 87: ...enable traffic statistics function you can view the total number of packets and bytes received and transmitted by the router within the selected Statistics Interval This function is disabled by defaul...

Страница 88: ...t to create a new login password Note You ll need to reconfigure the router to surf the internet once the router is reset and please mark down your new password for future use Q3 What should I do if I...

Страница 89: ...85 4 Click LAN settings and clear the following three options and click OK 5 Go to Advanced Restore advanced settings click OK to save the settings...

Страница 90: ...er I m using the root router is limited I want to use an extended router to boost the wireless network of the root router Note WDS bridging only requires configuration on the extended router 1 Visit h...

Страница 91: ...ss of the router is altered 3 Select the SSID to be bridged 1 Go to Advanced Wireless Advanced Settings page Locate the WDS section and select the Enable WDS Bridging check box to enable the WDS Bridg...

Страница 92: ...d you should enter the wireless password of the root router 4 Click Save to make the settings effective 4 Disable DHCP 1 Go to Advanced Network LAN Settings page 2 Clear the Enable check box of DHCP a...

Страница 93: ...ed Q5 What should I do if I cannot access the internet even though the configuration is finished 1 Visit http tplinkwifi net and log in with the password you set for the router 2 Go to Advanced Status...

Страница 94: ...r 1 or 2 minutes and check the internet access Reset the router to factory default settings and reconfigure the router Upgrade the firmware of the router Check the TCP IP settings on the particular de...

Страница 95: ...uter The MAC addresses of a computer in wired connection and wireless connection are different Modify the LAN IP address of the router Note Most TP Link routers use 192 168 0 1 192 168 1 1 as their de...

Страница 96: ...pgrade the firmware of the router If you ve tried every method above but still cannot access the internet please contact the technical support Q6 What should I do if I cannot find my wireless network...

Страница 97: ...nfiguration and then select Properties 6 Change Startup type to Automatic click on Start button and make sure the Service status is Started And then click OK If you can find other wireless network exc...

Страница 98: ...ggested to confirm the wireless password of your wireless router Note Wireless Password Network Security Key is case sensitive Windows unable to connect to XXXX Can not join this network Taking longer...

Страница 99: ...roduct names are trademarks or registered trademarks of their respective holders No part of the specifications may be reproduced in any form or by any means or used to make any derivative such as tran...

Страница 100: ...he instructions may cause harmful interference to radio communications However there is no guarantee that interference will not occur in a particular installation If this equipment does cause harmful...

Страница 101: ...e co located or operating in conjunction with any other antenna or transmitter The device is restricted in indoor environment only We TP Link USA Corporation has determined that the equipment shown as...

Страница 102: ...ifferent from that to which the receiver is connected Consult the dealer or an experienced radio TV technician for help This device complies with part 15 of the FCC Rules Operation is subject to the f...

Страница 103: ...e of the general public to electromagnetic fields by way of health protection The device complies with RF specifications when the device used at 20 cm from your body Canadian Compliance Statement This...

Страница 104: ...cm between the radiator your body D claration d exposition aux radiations Cet quipement est conforme aux limites d exposition aux rayonnements IC tablies pour un environnement non contr l Cet quipemen...

Страница 105: ...device where wireless devices are not allowed Adapter shall be installed near the equipment and shall be easily accessible Use only power supplies which are provided by manufacturer and in the origin...

Страница 106: ...ste electrical and electronic equipment WEEE This means that this product must be handled pursuant to European directive 2012 19 EU in order to be recycled or dismantled to minimize its impact on the...

Отзывы: