background image

TL-WA830RE   

300Mbps Wireless N Range Extender User Guide 


18 


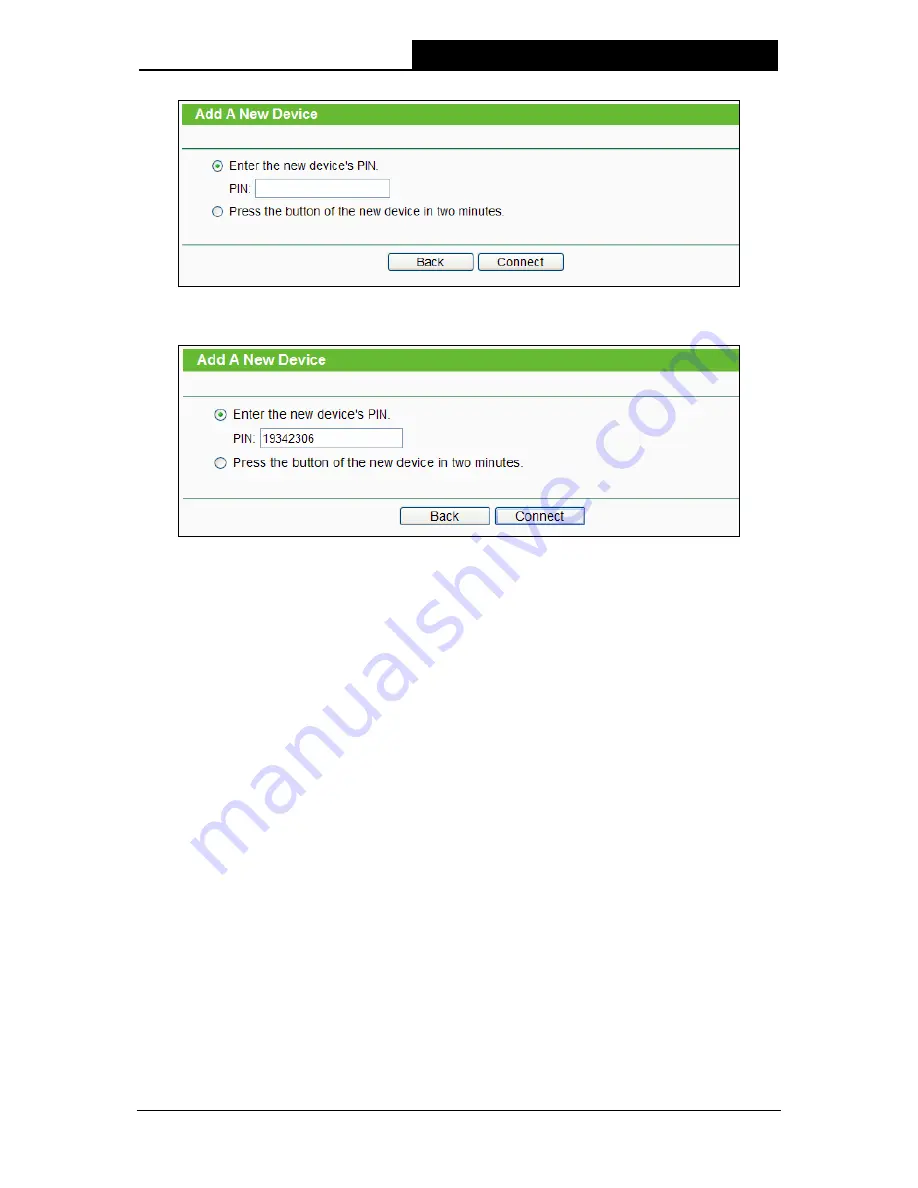
Step 3:  Choose 

Enter the new device's PIN

 and enter the PIN code of the wireless adapter in 

the field behind 

PIN

 in the previous figure. Then click 

Connect


Method Three: Enter the PIN from my Range Extender


Step 1:  Get the Current PIN code of the Range Extender in Figure 4-3 (each Range Extender has 

its unique PIN code. Here takes the PIN code 12345670  of this Range Extender  for 

example). 

Step 2:  For the configuration of the wireless adapter, please choose “

Enter  the  PIN  of  my 

access point or wireless router


in the


configuration utility of the WPS (as shown below), 

and enter the PIN code of the Range Extender into the 

PIN

 field. Then click 

Connect

Содержание TL-WA830RE

Страница 1: ...TL WA830RE 300Mbps Wireless N Range Extender Rev 2 0 0 1910010701 ...

Страница 2: ...s are trademarks or registered trademarks of their respective holders No part of the specifications may be reproduced in any form or by any means or used to make any derivative such as translation transformation or adaptation without permission from TP LINK TECHNOLOGIES CO LTD Copyright 2012 TP LINK TECHNOLOGIES CO LTD All rights reserved http www tp link com ...

Страница 3: ...d radio TV technician for help This device complies with part 15 of the FCC Rules Operation is subject to the following two conditions 1 This device may not cause harmful interference 2 This device must accept any interference received including interference that may cause undesired operation Any changes or modifications not expressly approved by the party responsible for compliance could void the...

Страница 4: ... interference including interference that may cause undesired operation of the device Cet appareil est conforme aux norms CNR exemptes de licence d Industrie Canada Le fonctionnement est soumis aux deux conditions suivantes 1 cet appareil ne doit pas provoquer d interférences et 2 cet appareil doit accepter toute interférence y compris celles susceptibles de provoquer un fonctionnement non souhait...

Страница 5: ...ct when there is no power button the only way to completely shut off power is to disconnect the product or the power adapter from the power source Don t disassemble the product or make repairs yourself You run the risk of electric shock and voiding the limited warranty If you need service please contact us Avoid water and wet locations This product can be used in the following countries AT BG BY C...

Страница 6: ...he product within the scope of Council Directives Directives 1999 5 EC Directives 2004 108 EC Directives 2006 95 EC Directives 1999 519 EC Directives 2011 65 EU The above product is in conformity with the following standards or other normative documents ETSI EN 300 328 V1 7 1 2006 ETSI EN 301 489 1 V1 9 2 2011 ETSI EN 301 489 17 V2 1 1 2009 EN 55022 2010 EN 55024 2010 EN 61000 3 2 2006 A1 2009 A2 ...

Страница 7: ... 4 Configure the Device 12 4 1 Status 12 4 2 Quick Setup 14 4 3 WPS 14 4 4 Network 20 4 5 Wireless 20 4 5 1 Wireless Settings 21 4 5 2 Wireless Security 25 4 5 3 Wireless MAC Filtering 31 4 5 4 Wireless Advanced 33 4 5 5 Wireless Statistics 34 4 5 6 Throughput Monitor 35 4 6 DHCP 36 4 6 1 DHCP Settings 37 4 6 2 DHCP Client List 38 4 6 3 Address Reservation 39 4 7 System Tools 40 4 7 1 SNMP 40 4 7 ...

Страница 8: ...4 7 7 Reboot 46 4 7 8 Password 47 4 7 9 System Log 47 Appendix A Application Example 49 Appendix B Factory Defaults 52 Appendix C Troubleshooting 53 Appendix D Specifications 55 Appendix E Glossary 56 ...

Страница 9: ...r including This User Guide Other helpful information Note Make sure that the package contains the above items If any of the listed items is damaged or missing please contact with your distributor Conventions The AP the Range Extender the Device or TL WA830RE mentioned in this User guide stands for TL WA830RE 300Mbps Wireless N Range Extender without any explanations Parameters provided in the pic...

Страница 10: ...based setup for installation and management Even though you may not be familiar with the Range Extender you can easily configure it with the help of this Guide Before installing the Range Extender please look through this Guide to get the full information of the TL WA830RE 300Mbps Wireless N Range Extender 1 2 Main Features Make use of IEEE 802 11n wireless technology Provides multiple encryption ...

Страница 11: ...r Extender POWER The power port connects to the power adapter provided with the TL WA830RE 300Mbps Wireless N Range Extender ETHERNET One 10 100Mbps RJ45 Ethernet port connects to a network device RANGE EXTENDER If your Wireless Router or AP supports WPS or QSS function you can press the WPS or QSS button and then press the RANGE EXTENDER button to establish a secure connection between the Wireles...

Страница 12: ...tion Place TL WA830RE on a higher position like on a desk 3 No Obstacles and Spacious Clear obstacles in the way between TL WA830RE and Wireless Router It s better to locate it in a spacious place such as near the corridors 4 No Interference Keep TL WA830RE far away from wireless interference which may come from electrical appliances that works in the same frequency band as TL WA830RE such as Blue...

Страница 13: ... 3 Connecting the Device Figure 2 1 Typical connection of TL WA830RE in Range Extender mode To establish a typical connection of the Range Extender please take the following steps 1 Connect the Cable DSL modem to a Wireless Router with an Ethernet cable 2 Place your TL WA830RE next to the Wireless Router and then power on it Connect the TL WA830RE to the Wireless Router wirelessly 3 Connect your W...

Страница 14: ...etwork wirelessly Please refer to Appendix A Application Example 2 Generally the device is horizontally located TL WA830RE also qualifies for wall mount installation Figure 2 2 Wall mount Install The diameter of the screw 3 5mm D 7 8mm and the distance of two screws is 107 5mm The screw that project from the wall need around 4 3mm based and the length of the screw need to be at least 20mm to withs...

Страница 15: ...Apple Safari 1 To access the configuration utility open a web browser and type in the domain name http tplinkextender net in the address field of the browser Figure 3 1 Login to the Range Extender After a moment a login window will appear as shown in Figure 3 8 Enter admin for the User Name and Password both in lower case letters Then click OK or press Enter Figure 3 2 Login Windows Note If the ab...

Страница 16: ... Setup Choose Region and Mode A If choosing Range Extender please take the following steps to finish your quick setup First the device will detect the existing network in Figure 3 5 and then a list of available wireless network will appear Check the box before the SSID of your desired network and then click Next If you could not find your wireless network name SSID in the list you can click Rescan...

Страница 17: ...where you need to enter the Wireless Password of your selected target network Then click Next to proceed Figure 3 7 Quick Setup Wireless Settings Finally double check your wireless setting and network setting if verified click Finish to reboot the Device and have the previous settings take effect if anything wrong click Back to return the previous pages and reconfigure it ...

Страница 18: ...eps to finish your quick setup First there will pop up the Wireless Settings page where you need to set the necessary wireless parameters such as SSID Wireless Security and Wireless Password Then click Next Figure 3 9 Quick Setup Wireless Settings Finally double check your wireless setting and network setting if verified click Finish to reboot the Device and have the previous settings take effect ...

Страница 19: ...1 Figure 3 10 Quick Setup Review Settings Note 1 It s recommended to click the Export Settings button to save these settings as a txt file for your future reference 2 After rebooting it may take about 2 minutes for successful connection please wait patiently ...

Страница 20: ...ny windows Macintosh or UNIX OS with a web browser After a successful login you can configure and manage the device There are seven main menus on the leftmost column of the web based management page Status Quick Setup WPS Network Wireless DHCP and System Tools Submenus will be available after clicking one of the main menus On the right of the web based management page are the detailed explanations...

Страница 21: ...tus for wireless function Operation Mode Indicates the mode which the device is working on Disable means the wireless radio has been turned off You can configure it in the Wireless Wireless Settings page Local Wireless Network Name SSID The Device s wireless network name also called SSID which your PC or other device can be connected to Channel The current wireless channel in use Mode The current ...

Страница 22: ...reless device to an existing network quickly by WPS function The WPS function can be configured on the page shown as Figure 4 3 only when you have the device working in Access Point mode Note The WPS unction is only available when the Operation Mode is set to Access Point in other words if you select Range Extender as the Operation Mode in Figure 3 4 the WPS function is not available In that case ...

Страница 23: ...this device receives multiple failed attempts to authenticate an external Registrar this function will be disabled automatically Add device You can add a new device to the existing network manually by clicking this button To add a new device If the wireless adapter supports WPS you can establish a wireless connection between wireless adapter and device using either PBC Push Button Configuration me...

Страница 24: ...d click Connect Step 3 For the configuration of the wireless adapter please choose Push the button on my access point or wireless router in the configuration utility of the WPS as shown below and click Connect Figure 4 5 The WPS Configuration Screen of Wireless Adapter Step 4 Wait until the next screen appears Click OK to complete the WPS configuration ...

Страница 25: ... PIN of this device into my access point or wireless adapter in the configuration utility of the WPS as shown below and click Connect The WPS Configuration Screen of wireless adapter Note In this example the default PIN code of this adapter is 19342306 as the above figure shows Step 2 Configure the Router Keep the default WPS Status as Enabled and click the Add device button in Figure 4 3 then the...

Страница 26: ...ange Extender Step 1 Get the Current PIN code of the Range Extender in Figure 4 3 each Range Extender has its unique PIN code Here takes the PIN code 12345670 of this Range Extender for example Step 2 For the configuration of the wireless adapter please choose Enter the PIN of my access point or wireless router in the configuration utility of the WPS as shown below and enter the PIN code of the Ra...

Страница 27: ...s Figure 4 3 You will see the following screen when the new device has successfully connected to the network Figure 4 8 Note 1 The WPS LED on the Range Extender will light green for five minutes if the device has been successfully added to the network 2 The WPS function cannot be configured if the Wireless function of the Range Extender is disabled Please make sure the Wireless function is enabled...

Страница 28: ...etting is 192 168 0 254 Subnet Mask An address code that determines the size of the network Normally use 255 255 255 0 as the subnet mask Gateway The gateway should be in the same subnet as your IP address Note 1 If you are not familiar with the setting items in this page it s strongly recommended to keep the provided default values otherwise may result in lower wireless network performance or eve...

Страница 29: ... function The detailed explanations for each submenu are provided below Figure 4 10 Wireless menu 4 5 1 Wireless Settings Selecting Wireless Wireless Settings will enable you to configure the basic settings for your wireless network on the screen below Figure 4 12 This page allows you to configure the wireless mode for your device Several operation modes are supported here including Access Point R...

Страница 30: ...tations can connect to the device 11n only Only 802 11n wireless stations can connect to the device 11bg mixed Both 802 11b and 802 11g wireless stations can connect to the device 11bgn mixed All 802 11b 802 11g and 802 11n wireless stations can connect to the device Channel Width Determines the channel width to be used It is unnecessary to change the default value unless required Max Wireless Rat...

Страница 31: ...is going to connect to as a client You can also use the search function to select the BSSID to join Region Select your region from the drop down list This field specifies the region where the wireless function of this device can be used It may be illegal to use the wireless function of this device in a region while you chose a different region in the drop down list If your country or region is not...

Страница 32: ...ice 3 Range Extender mode 1 In this mode the Range Extender with WDS disabled will relay data to an associated root AP AP function is enabled meanwhile The wireless repeater relays signal between its stations and the root AP for greater wireless range Please input the MAC address of root AP in the field MAC Address of Root AP Figure 4 13 Wireless Settings in Range Extender mode 1 Operation Mode Th...

Страница 33: ... can connect in the same transmission mode eg 802 11b you can choose Only mode eg 11b only If you have some devices that use a different transmission mode choose the appropriate Mixed mode Channel Width The bandwidth of the wireless channel Max Wireless Rate You can limit the maximum wireless rate of the device through this field Enable Wireless Radio Select or deselect this check box to allow or ...

Страница 34: ...able security WPA WPA2 Personal Select WPA based on pre shared key Version You can select one of following versions 1 Automatic Select WPA PSK or WPA2 PSK automatically based on the wireless station s capability and request 2 WPA PSK Pre shared key of WPA 3 WPA2 PSK Pre shared key of WPA2 Encryption When you select WPA PSK or WPA2 PSK for Authentication Type you can select either Automatic TKIP or...

Страница 35: ...rmat You can select ASCII or Hexadecimal format ASCII format stands for any combination of keyboard characters in the specified length Hexadecimal format stands for any combination of hexadecimal digits 0 9 a f A F in the specified length WEP Key Select which of the four keys will be used and enter the matching WEP key information for your network in the selected key radio button These values must...

Страница 36: ...nal Select WPA based on pre shared key Version You can select one of following versions 1 Automatic Select WPA PSK or WPA2 PSK automatically based on the wireless station s capability and request 2 WPA PSK Pre shared key of WPA 3 WPA2 PSK Pre shared key of WPA2 Encryption When you select WPA PSK or WPA2 PSK for Authentication Type you can select either Automatic TKIP or AES as Encryption Wireless ...

Страница 37: ... in the selected key radio button These values must be identical on all wireless stations in your network Key Type You can select the WEP key length 64 bit or 128 bit or 152 bit for encryption Disabled means this WEP key entry is invalid 1 For 64 bit encryption You can enter 10 hexadecimal digits any combination of 0 9 a f A F zero key is not permitted or 5 ASCII characters 2 For 128 bit encryptio...

Страница 38: ...nal Select WPA based on pre shared key Version You can select one of following versions 1 Automatic Select WPA PSK or WPA2 PSK automatically based on the wireless station s capability and request 2 WPA PSK Pre shared key of WPA 3 WPA2 PSK Pre shared key of WPA2 Encryption When you select WPA PSK or WPA2 PSK for Authentication Type you can select either Automatic TKIP or AES as Encryption Wireless ...

Страница 39: ...s this WEP key entry is invalid 1 For 64 bit encryption You can enter 10 hexadecimal digits any combination of 0 9 a f A F zero key is not permitted or 5 ASCII characters 2 For 128 bit encryption You can enter 26 hexadecimal digits any combination of 0 9 a f A F zero key is not permitted or 13 ASCII characters 3 For 152 bit encryption You can enter 32 hexadecimal digits any combination of 0 9 a f ...

Страница 40: ...uctions First you must decide whether the unspecified wireless stations can access the device or not If you desire that the unspecified wireless stations can access the device please select the radio button Allow the stations not specified by any enabled entries in the list to access otherwise select the radio button Deny the stations not specified by any enabled entries in the list to access To a...

Страница 41: ...d entries in the list to access for Filtering Rules 3 Delete all or disable all entries if there are any entries already 4 Click the Add New button and enter the MAC address 00 0A EB 00 07 BE in the MAC Address field enter Wireless Station A in the Description field and select Enabled in the Status pull down list Click the Save button The filtering rules that configured should be similar to the fo...

Страница 42: ...alue is the maximum size determining whether packets will be fragmented Setting the Fragmentation Threshold too low may result in poor network performance since excessive packets 2346 is the default setting and is recommended DTIM Interval Determines the interval of the Delivery Traffic Indication Message DTIM You can specify the value between 1 255 Beacon Intervals The default value is 1 which in...

Страница 43: ...ckets received by the station Sent Packets packets sent by the station You cannot change any of the values on this page To update this page and to show the current connected wireless stations click the Refresh button If the numbers of connected wireless stations go beyond one page click the Next button to go to the next page and click the Previous button to return the previous page Note This page ...

Страница 44: ...or Dynamic Host Configuration Protocol The DHCP Server will automatically assign dynamic IP addresses to the computers on the network This protocol simplifies network management and allows new wireless devices to receive IP addresses automatically without the need to manually assign new IP addresses There are three submenus under the DHCP menu shown as Figure 4 22 DHCP Settings DHCP Client List an...

Страница 45: ...nnot be configured if you have chosen Smart IP DHCP in Network LAN in which situation the device will help you configure the DHCP automatically as you need The DHCP Settings page will appear as Figure 4 23 Figure 4 23 DHCP Settings Disabled Figure 4 24 DHCP Settings Enabled DHCP Server Selecting the radio button before Disable Enable will disable enable the DHCP server on your Range Extender The d...

Страница 46: ...the IP address of another DNS server if your ISP provides two DNS servers The factory default setting is 0 0 0 0 Click Save to save the changes Note To use the DHCP server function of the device you should configure all computers in the LAN as Obtain an IP Address automatically mode This function will not take effect until the device reboots 4 6 2 DHCP Client List Selecting DHCP DHCP Client List w...

Страница 47: ...dify To modify or delete an existing entry To Reserve IP Addresses you can follow these steps 1 Enter the MAC Address The format for the MAC Address is XX XX XX XX XX XX and the IP address in dotted decimal notation of the computer you wish to add 2 Click the Save button To modify a Reserved IP Address you can follow these steps 1 Select the reserved address entry as you desired modify it If you w...

Страница 48: ...agement page Besides you can find out what happened to the system in System Log There are nine submenus under the System Tools menu shown as Figure 4 27 SNMP Diagnostic Ping Watch Dog Firmware Upgrade Factory Defaults Backup Restore Reboot Password and System Log Clicking any of them will enable you to configure the corresponding function The detailed explanations for each submenu are provided bel...

Страница 49: ... would be forgotten the next time the agent was restarted Get Community Enter the community name that allows Read Only access to the Device s SNMP information The community name can be considered a group password The default setting is public Get Source Get source defines the IP address or subnet for management systems that can read information from this get community device Set Community Enter th...

Страница 50: ...me System DNS queries Traceroute This diagnostic tool determines the path taken to a given host by sending Internet Control Message Protocol ICMP Echo Request messages with varying Time to Live TTL values to the destination Each gateway along the path is required to decrement the TTL in an IP packet by at least 1 before forwarding it Effectively the TTL is a maximum link counter When the TTL on a ...

Страница 51: ...target destination The default is 20 Click the Start button to start the diagnostic procedure The Diagnostic Results page displays the result of diagnosis If the result is similar to the following screen the connectivity of the Internet is fine Figure 4 30 Diagnostic Results Note 1 Only one user can use this tool at one time 2 Options Number of Pings Ping Size and Ping Timeout are only available f...

Страница 52: ...ce can drop continuously If this value is overrun the device will restart automatically Be sure to click the Save button to make your settings in operation 4 7 4 Firmware Upgrade Selecting System Tools Firmware Upgrade allows you to upgrade the latest version of firmware for the device on the screen shown in Figure 4 32 Figure 4 32 Firmware Upgrade New firmware versions are posted at http www tp l...

Страница 53: ...File blank 3 Click Upgrade Note Do not turn off the device or press the Reset button while the firmware is being upgraded The device will reboot after the Upgrading has been finished 4 7 5 Factory Defaults Selecting System Tools Factory Default allows you to restore the factory default settings for the device on the screen shown in Figure 4 33 Figure 4 33 Restore Factory Defaults Click Restore to ...

Страница 54: ...The restoring process lasts for 20 seconds and this device will restart automatically then Keep the power of this device on during the process in case of any damage 4 7 7 Reboot Selecting System Tools Reboot allows you to reboot the device on the screen shown in Figure 4 35 Figure 4 35 Reboot the device Click the Reboot button to reboot the device Some settings of the device will take effect only ...

Страница 55: ...er name and password of the device All users who try to access the device s web based management page or Quick Setup will be prompted for the device s user name and password Note The new user name and password must not exceed 14 characters in length and must not include any spaces Enter the new Password twice to confirm it Click Save when finished Click Clear All to clear all 4 7 9 System Log Sele...

Страница 56: ...logs of this type will be shown Log Level By selecting the log level only logs of this level will be shown Click the Refresh button to show the latest log list Click the Save Log button to save all the logs in a txt file Click the Clear Log button to delete all the logs from the system permanently not just from the page Click the Next button to go to the next page or click the Previous button retu...

Страница 57: ...nd note down the SSID of the Range Extender You are suggested to name a unique and easy to remember SSID and set the wireless security for your wireless network Please refer to 4 5 1 Wireless Settings and 4 5 2 Wireless Security 4 Remove the Ethernet cable between TL WA830RE and your PC 5 Connect your TL WA830RE to the front end Router or Switch with an Ethernet cable Step 2 Configure your TL WA83...

Страница 58: ...y Network Connections and select Properties 2 On the My Network Connections window right click Wireless Network Connection and select Enable to activate the wireless network function 3 Right click the wireless connection icon at the right bottom of the desktop and then select View Available Wireless Networks 4 Highlight the SSID of the Range Extender here takes TP LINK for example and click Connec...

Страница 59: ...TL WA830RE 300Mbps Wireless N Range Extender User Guide 51 5 Then the following page will display which indicates your successful connection to the wired network via wireless means ...

Страница 60: ...ord admin IP Address 192 168 0 254 Subnet Mask 255 255 255 0 Domain http tplinkextender net Wireless SSID TP LINK_Extender_XXXXXX Wireless Security Disabled Wireless MAC Address Filtering Disabled Note The default SSID is TP LINK_Extender_XXXXXX XXXXXX indicates the last unique six characters of each device s MAC address This value is case sensitive ...

Страница 61: ...cess the web based configuration page 1 Check to verify all the connections either wireless or wired ones are proper If yes please proceed to the next step otherwise check the connections again 2 Try to obtain an IP address and gateway if succeed open your web browser enter the default domain http tplinkextender net in the address field and get logged in If you are unable to log in please RESET th...

Страница 62: ...evices are set to work in half duplex instead of full duplex mode In other words the Range Extender has to process one way communication between your root Wireless Router or AP and the terminal clients so the transmission time will be double increased while the speed will be half decreased TP LINK recommends that you connect to the Range Extender when your home network connection is poor or when y...

Страница 63: ...tic 11g 54 48 36 24 18 12 9 6M Automatic 11b 11 5 5 2 1M Automatic Frequency Expansion DSSS Direct Sequence Spread Spectrum Modulation DBPSK DQPSK CCK OFDM 16 QAM 64 QAM Security WEP WPA WPA2 Enterprise WPA WPA2 Personal Sensitivity PER 270M 68dBm 10 PER 108M 68dBm 10 PER 54M 68dBm 10 PER 11M 85dBm 8 PER 6M 88dBm 10 PER 1M 90dBm 8 PER Antenna Gain 2 5dBi Physical and Environment Working Temperatur...

Страница 64: ...idge to each other DNS Domain Name System An Internet Service that translates the names of websites into IP addresses Domain Name A descriptive name for an address or group of addresses on the Internet DoS Denial of Service A hacker attack designed to prevent your computer or network from operating or communicating DSL Digital Subscriber Line A technology that allows data to be sent or received ov...

Страница 65: ...eling with WEP with the benefit of easier administration and use This is similar to 802 1x support and requires a RADIUS server in order to implement The Wi Fi Alliance will call this WPA Enterprise One variation of WPA is called WPA Pre Shared Key or WPA Personal for short this provides an authentication alternative to an expensive RADIUS server WPA Personal is a simplified but still powerful for...

Отзывы: