TP-Link RE350K Скачать руководство пользователя страница 18


Manage  the  Range  Extender


18


a)


Extended 2.4GHz 

and

 Extended 5GHz:

 The extended network is 

enabled by default. Deselect 

Enable

 if you do not want to use the 

extender’s 2.4GHz or 5GHz band. 

b)


Extended 2.4GHz SSID 

and

 Extended 5GHz SSID:

 You can either 

enter a new name or click 

  to use the same SSID of 

the main (host) network. 

c)


Hide SSID broadcast:

 Select this checkbox to hide the extender’s 

SSID from the Wi-Fi network list. 

4)


Click 

  to save the extended network settings. 


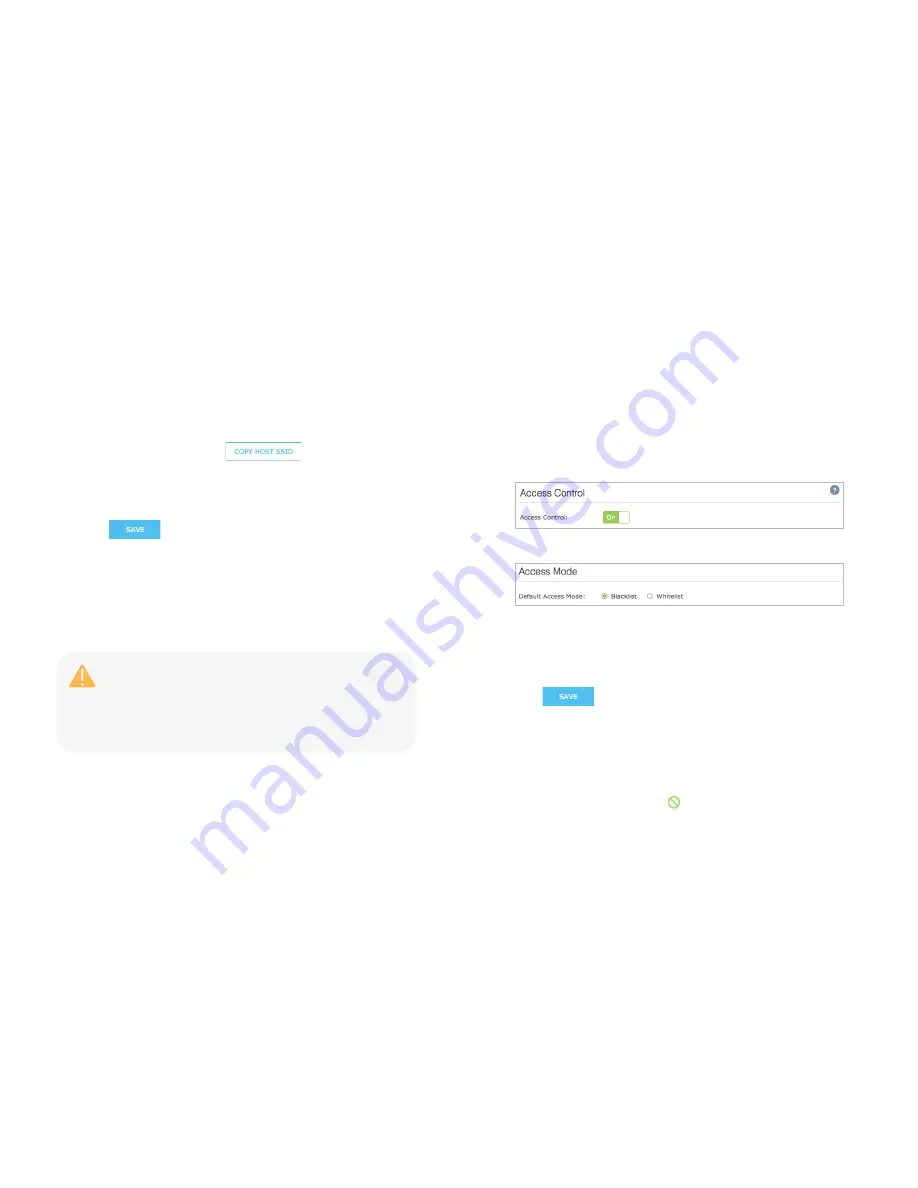
Wi-Fi Access Control 

By default, any wireless devices can connect to the extended network through 
the SSID. To increase network security, you can restrict access to the Wi-Fi 
network of your extender using the Access Control function.   


To restrict access: 

1)


Launch a web browser and type: 

http://tplinkrepeater.net

 in the URL 

field, then log in using the admin credentials. 

2)


Go to 

Settings > Wireless > Access Control

3)


Toggle 

On

 to enable the Access Control function. 


4)


Under 

Access Mode

, select 

Blacklist

 or 

Whitelist


Blacklist: 

The devices in this list 

are


not 

allowed to connect to the 

extended network.


Whitelist: 

Only the devices in this list 

are

 allowed to connect to the 

extended network.


5)


Click 


To add one or more wireless devices (clients) to the Blacklist: 

1)


In the 

Online Devices

 list, displaying all wireless device(s) that are 

currently connected to the extended network. 


To block a device, click the 

  (Block) icon on the row of the device. 

It is strongly recommended that you use a computer with a 
wired connection to configure and enable the Access Control 
function. 

If you use a wireless device to manage the Access Control, 
make sure that you add the device to the Whitelist first. 

Содержание RE350K

Страница 1: ...19100112 RE 1910011514 REV 1 0 0 Easy Wi Fi Extension Flexible Placement AC 1200 Wi Fi Range Extender RE350K...

Страница 2: ...es are trademarks or registered trademarks of their respective holders No part of the specifications may be reproduced in any form or by any means or used to make any derivative such as translation tr...

Страница 3: ...Computer 10 Manage the Range Extender 14 Manage via Web Interface 14 Changing admin account 14 Dashboard 15 Extending another Wi Fi network 16 Extended Network Settings 17 Wi Fi Access Control 18 Chan...

Страница 4: ...s such as HD 4K video streaming and online gaming The Range Extender provides two easy to use setup options to extend your existing Wi Fi network Option One Setup Using the Mobile App Option Two Setup...

Страница 5: ...Appearance Buttons u LED Press this button to turn the status LEDs on or off u Power I O Switch Slide the Power switch to turn the extender on or off u App Config Press this button for 2 seconds unti...

Страница 6: ...reen The extender is initializing or updating firmware Green The extender is ready for use Off The extender is powered off 2 4GHz Blinking Green App Config is initiated Green The extender is connected...

Страница 7: ...ypical ranges vary based on the types of materials and background RF Radio Frequency noise in your home or office In order to optimize the performance of the AC1200 Wi Fi Range Extender please read th...

Страница 8: ...sipation u Turn off and unplug the extender during a lightning storm to avoid electronic shock or fire u Operating temperature of the extender should be 0 C 40 C 32 F 104 F u Operating humidity of the...

Страница 9: ...ur Wi Fi network 4 Connect to Extended Network Unless you customized the extended network names during the configuration the extender adds _EXT to the end of the main network s SSIDs and uses the same...

Страница 10: ...en 2 Connect via Wireless Disconnect the Ethernet wired connection from your computer if any Click the Wi Fi icon on the taskbar and connect to the extender s network e g TP LINK_2G_EXT or TP LINK_5G_...

Страница 11: ...our router s 2 4GHz network and enter your Wi Fi password then click If this is your first time logging into the extender s web based interface you are prompted to create a new username and password P...

Страница 12: ...tings and click The extender applies the settings and automatically reboots Once the connection is established the 2 4GHz and 5GHz LEDs on the extender should turn on and stay solid If your network na...

Страница 13: ...oser to the router Unless you customized the extended network names during the configuration step 4d the extender adds _EXT to the end of the main network s SSIDs and uses the same Wi Fi password For...

Страница 14: ...re that you connect your computer or mobile device to the extended network before any configuration Changing admin account The default admin account credentials to log into the extender s web interfac...

Страница 15: ...time you log in The dashboard displays the current status of your extended networks To view the additional information about the main host network or see who s currently connected to your extended ne...

Страница 16: ...Icon Indication A secure Wi Fi connection A non secure Wi Fi connection No Wi Fi connection Extending another Wi Fi network If you want to change the extender s connection to another Wi Fi network you...

Страница 17: ...can change or hide the network name SSID of the extended network However you cannot change the extender s Wi Fi security You must use the same Wi Fi password of the main host network to connect to th...

Страница 18: ...Launch a web browser and type http tplinkrepeater net in the URL field then log in using the admin credentials 2 Go to Settings Wireless Access Control 3 Toggle On to enable the Access Control functio...

Страница 19: ...st To manually add a device to the Blacklist or Whitelist 1 Under the Devices in Blacklist or Devices in Whitelist click 2 Enter the Device Name 3 Enter the device s MAC Address in hexadecimal format...

Страница 20: ...atic IP address to the extender To change the extender s IP address 1 Launch a web browser and type http tplinkrepeater net in the URL field then log in using the admin credentials 2 Go to Settings Ne...

Страница 21: ...the following options Auto This option is selected by default to automatically allocate IP addresses to devices On If you want the extender to allocate IP addresses from a IP address pool select this...

Страница 22: ...The time duration that the IP address is leased to the DHCP client Other Functions Wireless Adapter The Range Extender can also be used as a wireless adapter to connect any Ethernet only device such a...

Страница 23: ...aunch a web browser and type http tplinkrepeater net in the URL field then log in using the admin credentials 2 Go to Settings System Tools LED Control 3 Select Night Mode to enable the LED Control fe...

Страница 24: ...e from the TP LINK Support website to your computer To upgrade the extender s firmware 1 Launch a web browser and type http tplinkrepeater net in the URL field then log in using the admin credentials...

Страница 25: ...tended network 2 Launch a web browser and type http tplinkrepeater net in the URL field then log in using the admin credentials 3 Go to Settings System Tools Backup Restore 4 Under Backup click to sav...

Страница 26: ...set button on the extender for 2 seconds To factory reset via the web based interface 1 Launch a web browser and type http tplinkrepeater net in the URL field then log in using the admin credentials 2...

Страница 27: ...ser and type http tplinkrepeater net in the URL field then log in using the admin credentials 2 Go to Settings System Tools System Log 3 Under Log Filter select the type of logs and or the log level y...

Страница 28: ...n simply reboot the extender There are two ways to reboot the extender Toggle the Power Switch to Off Wait for 10 seconds then switch it back on Log into the extender s web based interface and click R...

Страница 29: ...Settings The following are the factory default settings of the Range Extender Admin Account Username admin Password admin Wireless Info Default SSIDs 2 4GHz TP LINK_2G_EXT 5GHz TP LINK_5G_EXT Security...

Страница 30: ...Follow Kasa s instructions to reinitiate the App Config process or use Option 2 to set up the extender using a computer Q4 What should I do if I cannot access the extender s web based interface Make...

Страница 31: ...as Wi Fi which provides speeds up to 11 Mbps using direct sequence spread spectrum DSSS technology and operating in the unlicensed radio spectrum at 2 4GHz and WEP encryption for security 802 11g The...

Страница 32: ...the Wi Fi Alliance and the brand name for products using the IEEE 802 11 family of standards WLAN Wireless Local Area Network A group of computers and associated devices communicate with each other wi...

Страница 33: ...quipment and receiver Connect the equipment into an outlet on a circuit different from that to which the receiver is connected Consult the dealer or an experienced radio TV technician for help This de...

Страница 34: ...Part 15E Section 15 407 of the FCC Rules CE Mark Warning This is a class B product In a domestic environment this product may cause radio interference in which case the user may be required to take ad...

Страница 35: ...her than FHSS wideband modulation 2 1 Maximum mean e i r p density is 2 mW MHz Maximum 100 mW e i r p 2 2 Maximum mean e i r p density is 20 mW MHz Maximum 100 mW e i r p It is permitted to use SRD fo...

Страница 36: ...s appropriate and The high power radars are allocated as primary users i e priority users of the bands 5250 5350 MHz and 5650 5850 MHz and that these radars could cause interference and or damage to L...

Страница 37: ...alled and operated with minimum distance 20cm between the radiator your body D claration d exposition aux radiations Cet quipement est conforme aux limites d exposition aux rayonnements IC tablies pou...

Страница 38: ...duct has power button the power button is one of the way to shut off the product when there is no power button the only way to completely shut off power is to disconnect the product or the power adapt...

Страница 39: ...sk of electric shock and voiding the limited warranty If you need service please contact us Avoid water and wet locations This product can be used in the following countries AT BG BY CA CZ DE DK EE ES...

Страница 40: ...C Directives 2004 108 EC Directives 2006 95 EC Directives 1999 519 EC Directives 2011 65 EU The above product is in conformity with the following standards or other normative documents EN 300 328 V1 8...

Страница 41: ...arking this declaration Yang Hongliang Product Manager of International Business Date of issue 2015 11 10 TP LINK TECHNOLOGIES CO LTD Building 24 floors 1 3 4 5 and 28 floors 1 4 Central Science and T...

Отзывы: