background image

Archer C20i

AC750 Wireless Dual Band Router


- 34 - 

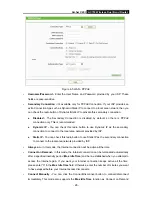
2)  If the new LAN IP Address you set is not in the same subnet, the IP Address pool of the DHCP 

server will change accordingly at the same time

while the Virtual Server and DMZ Host will 

not take effect until they are re-configured. 

4.4.3 

MAC Clone 

Choose menu “

Network 

 MAC Clone

”, you can configure the MAC address of the WAN on 

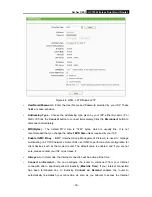
the screen below, Figure 4-11: 


Figure 4-11 MAC Clone 

Some ISPs require that you register the MAC Address of your adapter. Changes are rarely 

needed here. 

¾


WAN MAC Address -

 This field displays the current MAC address of the Internet port. If 

your ISP requires you to register the MAC address, please enter the correct MAC address 

into this field in 

XX:XX:XX:XX:XX:XX

 format (X is any hexadecimal digit).   

¾


Your PC's MAC Address -

 This field displays the MAC address of the PC that is managing 

the router. If the MAC address is required, you can click the 

Clone MAC Address

 button 

and this MAC address will fill in the 

WAN MAC Address

 field. 

Click 

Restore Factory MAC

 to restore the MAC address of Internet port to the factory default 

value. Click the 

Save

 button to save your settings. 

)


Note:


Only the PC on your LAN can use the 

MAC Address Clone

 function. 

4.5  Dual Band Selection 

Choose menu “

Dual Band Selection

”, and you can choose the working frequency for your router. 

It is recommended that your computers and devices running video and voice applications use the 
5GHz band, while your guest access and computers that are only browsing the web use the 
2.4GHz band. 

Содержание Archer C20i

Страница 1: ...Archer C20i AC750 Wireless Dual Band Router REV1 0 0 1910011018...

Страница 2: ...are trademarks or registered trademarks of their respective holders No part of the specifications may be reproduced in any form or by any means or used to make any derivative such as translation tran...

Страница 3: ...radio TV technician for help This device complies with part 15 of the FCC Rules Operation is subject to the following two conditions 1 This device may not cause harmful interference 2 This device mus...

Страница 4: ...and has been ongoing in recent years to allow current relaxed regulation Full implementation planned 2012 Italy None If used outside of own premises general authorization is required Luxembourg None G...

Страница 5: ...ouhait de l appareil Industry Canada Statement Complies with the Canadian ICES 003 Class B specifications Cet appareil num rique de la classe B est conforme la norme NMB 003 du Canada This device comp...

Страница 6: ...nnect the product or the power adapter from the power source z Don t disassemble the product or make repairs yourself You run the risk of electric shock and voiding the limited warranty If you need se...

Страница 7: ...ectives 2011 65 EU The above product is in conformity with the following standards or other normative documents EN 300 328 V1 7 1 2006 EN 301 489 1 V1 9 2 2011 EN301 489 17 V2 2 1 2012 EN 55022 2010 E...

Страница 8: ...2 3 Connecting the Router 7 Chapter 3 Quick Installation Guide 9 3 1 TCP IP Configuration 9 3 2 Quick Installation Guide 11 Chapter 4 Configuring the router 21 4 1 Login 21 4 2 Status 21 4 3 Quick Set...

Страница 9: ...oragre 66 4 10 2 User Accounts 66 4 10 3 Storage Sharing 68 4 10 4 FTP Server 69 4 10 5 Media Server 71 4 10 6 Print Server 73 4 11 NAT 73 4 12 Forwarding 74 4 12 1 Virtual Servers 74 4 12 2 Port Trig...

Страница 10: ...DDNS 103 4 20 IPv6 104 4 20 1 IPv6 Status 105 4 20 2 IPv6 WAN 106 4 20 3 IPv6 LAN 110 4 21 System Tools 111 4 21 1 Time Settings 111 4 21 2 Diagnostic 113 4 21 3 Firmware Upgrade 114 4 21 4 Factory De...

Страница 11: ...Band Router DC Power Adapter for Archer C20i AC750 Wireless Dual Band Router Quick Installation Guide Resource CD for Archer C20i AC750 Wireless Dual Band Router including This Guide Other Helpful Inf...

Страница 12: ...at speed much faster than 802 11n It is also compatible with all IEEE 802 11n IEEE 802 11a IEEE 802 11b and IEEE 802 11g products Multiple Security Protections With multiple protection measures includ...

Страница 13: ...cess for users supporting Dynamic IP Static IP PPPoE PPTP L2TP BigPond Internet access Supports simultaneous 2 4GHz and 5GHz connections for 750Mbps of total available bandwidth Supports Virtual Serve...

Страница 14: ...eless function is enabled The router is working on 2 4GHz or 5GHz or both radio bands Off No device is connected to the Ethernet ports Ethernet On At least one device has connected to the Ethernet por...

Страница 15: ...d then turn off 2 The router is set to work concurrently in 2 4GHz and 5GHz by default If you desire to choose the working frequency please go to 4 5 Dual Band Selection 1 4 2 The Rear Panel Figure 1...

Страница 16: ...o quickly establish a connection between the router and client devices and automatically configure wireless security for your wireless network Pressing this button for more than 5 seconds enables the...

Страница 17: ...e 0 40 32 104 Operating Humidity 10 90 RH Non condensing 2 3 Connecting the Router Before installing the router make sure your PC is connected to the Internet through the broadband service successfull...

Страница 18: ...our computer is NOT connected to any other wireless network Figure 2 1 Hardware Installation Figure 2 2 USB Installation Note If you want to use the router to share files or printer plug the USB stora...

Страница 19: ...nd then you can configure the IP address for your PC by the following method Set up the TCP IP Protocol in Obtain an IP address automatically mode on your PC If you need instructions as to how to do t...

Страница 20: ...hould be lit 2 Is the TCP IP configuration for your PC correct Note If the router s IP address is 192 168 0 1 your PC s IP address must be within the range of 192 168 0 2 192 168 0 254 3 Is the defaul...

Страница 21: ...ddress http tplinklogin net in the address field Figure 3 3 Log in the router After a moment a login window will appear similar to Figure 3 4 Enter admin for the User Name and Password both in lower c...

Страница 22: ...lect the very type and click Next to go on configuring 4 If you select Auto Detect the router will automatically detect the connection type your ISP provides Make sure the cable is securely plugged in...

Страница 23: ...s This is the WAN IP address as seen by external users on the Internet including your ISP Your ISP will provide you with the IP address you need to enter here Enter the IP address into the field Subne...

Страница 24: ...ake sure that the password is correct 4 If your connection type is L2TP Russia L2TP select L2TP Russia L2TP in Figure 3 6 and the next screen will appear as shown in Figure 3 10 Configure the followin...

Страница 25: ...in Figure 3 11 Configure the following parameters and then click Next to continue Figure 3 11 Quick Setup PPTP Russia PPTP Username Password Enter the Username and Password provided by your ISP These...

Страница 26: ...for example Click Next to continue Figure 3 12 Quick Setup Dual Band Selection 2 4GHz You can use the 2 4GHz band to connect to many classic wireless devices like gaming consoles laptops DVRs ect 5GH...

Страница 27: ...function of the router in a region other than one of those specified in this field If your country or region is not listed please contact your local government agency for assistance Note Limited by lo...

Страница 28: ...just the channel width for your clients automatically Channel This field determines which operating frequency will be used It is not necessary to change the wireless channel unless you notice interfer...

Страница 29: ...the wireless stations will be able to connect the router without encryption The above settings are only for basic wireless parameters For advanced settings please check More Advanced Wireless Settings...

Страница 30: ...Archer C20i AC750 Wireless Dual Band Router 20 Figure 3 15 Quick Setup Comfirm 9 Click the Finish button to complete the Quick Setup Figure 3 16 Quick Setup Finish...

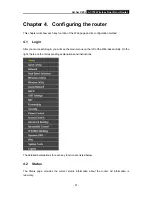
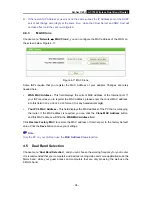
Страница 31: ...method 4 1 Login After your successful login you will see the main menus on the left of the Web based utility On the right there are the corresponding explanations and instructions The detailed explan...

Страница 32: ...Archer C20i AC750 Wireless Dual Band Router 22 Figure 4 1 Status 4 3 Quick Setup Please refer to 3 2 Quick Installation Guide...

Страница 33: ...k any of them and you will be able to configure the corresponding function 4 4 1 WAN Choose menu Network WAN you can configure the IP parameters of the WAN on the screen below 1 If your ISP provides t...

Страница 34: ...evices such as the modem router The default value is enabled and if you are not sure please contact your ISP or just leave it Get IP with Unicast A few ISPs DHCP servers do not support the broadcast a...

Страница 35: ...Transmission Unit value for most Ethernet networks is 1500 Bytes It is not recommended that you change the default MTU size unless required by your ISP Enable Fullcone NAT It is a type of NAT if not...

Страница 36: ...nnect to the local area network provided by ISP z Static IP You can check this radio button to use Static IP as the secondary connection to connect to the local area network provided by ISP Always on...

Страница 37: ...st cases leaving these fields blank will work MTU Bytes The default MTU size is 1480 bytes which is usually fine It is not recommended that you change the default MTU Size unless required by your ISP...

Страница 38: ...n please select BigPond Cable And you should enter the following parameters Figure 4 7 Figure 4 7 WAN BigPond Cable Username Password Enter the User Name and Password provided by your ISP These fields...

Страница 39: ...u want to have elapsed before your Internet access disconnects Connect Manually You can click the Connect Disconnect button to connect disconnect immediately This mode also supports the Max Idle Time...

Страница 40: ...your ISP Enable IGMP Proxy IGMP Internet Group Management Protocol is used to manage multicasting on TCP IP networks Some ISPs use IGMP to perform remote configuration for client devices such as the...

Страница 41: ...to re establish your connection automatically as soon as you attempt to access the Internet again To use this option check the radio button If you want your Internet connection to remain active at al...

Страница 42: ...on after a specified period of inactivity Max Idle Time If your Internet connection has been terminated due to inactivity Connect on Demand enables the router to automatically re establish your connec...

Страница 43: ...IP Connections which use dynamic IP address assignment z Static IP Connections which use static IP address assignment The router cannot detect PPTP L2TP Big Pond connections with your ISP If your ISP...

Страница 44: ...please enter the correct MAC address into this field in XX XX XX XX XX XX format X is any hexadecimal digit Your PC s MAC Address This field displays the MAC address of the PC that is managing the rou...

Страница 45: ...e sensitive music video streaming or gaming Using this band can avoid interference with 2 4GHz networks or noisy devices like cordless phones and microwave ovens 4 6 Wireless 2 4GHz Figure 4 13 Wirele...

Страница 46: ...drop down list This field specifies the region where the wireless function of the router can be used It may be illegal to use the wireless function of the router in a region other than one of those s...

Страница 47: ...g field will turn grey and the value will become 20M which is unable to be changed Enable SSID Broadcast When wireless clients survey the local area for wireless networks to associate with they will d...

Страница 48: ...the screen as shown in Figure 4 16 This section will guide you to add a new wireless device to an existing network quickly by WPS Wi Fi Protected Setup function Figure 4 16 WPS WPS Enable or disable...

Страница 49: ...e router as shown in Figure 4 17 You can also keep the default WPS status as Enabled and click the Add device button in Figure 4 16 Then choose Press the WPS button of the new device within the next t...

Страница 50: ...s for the router s PIN number Step 1 On the client device enter the PIN number listed on the router s Wi Fi Protected Setup screen shown in Figure 4 16 Step 2 The Wi Fi Protected Setup LED flashes for...

Страница 51: ...tication type based on pre shared passphrase The router is configured by this security type by default Authentication Type you can choose the version of the WPA PSK security on the drop down list The...

Страница 52: ...to disable the update WPA WPA2 Enterprise It s based on Radius Server Version you can choose the version of the WPA security on the drop down list The default setting is Automatic which can select WP...

Страница 53: ...mal digits 0 9 a f A F in the specified length ASCII format stands for any combination of keyboard characters in the specified length WEP Key Select which of the four keys will be used and enter the m...

Страница 54: ...s Disabled MAC Address The wireless station s MAC address that you want to filter Status The status of this entry either Enabled or Disabled Host The host network for the filtering rules Description A...

Страница 55: ...es disabled Click the Delete Selected button to delete selected l entries For example If you desire that the wireless station A with MAC address 00 0A EB B0 00 0B and the wireless station B with MAC a...

Страница 56: ...he packets sent by the router to synchronize a wireless network Beacon Interval value determines the time interval of the beacons The default value is 100 RTS Threshold Here you can specify the RTS Re...

Страница 57: ...olation This function can isolate wireless stations on your network from each other Wireless devices will be able to communicate with the router but not with each other To use this function check this...

Страница 58: ...s 4 7 Wireless 5GHz Figure 4 28 Wireless menu There are six submenus under the Wireless menu shown in Figure 4 13 Basic Settings WPS Wireless Security Wireless MAC Filtering Wireless Advanced and Wire...

Страница 59: ...d by local law regulations version for North America does not have region selection option Mode Select the desired mode z 11an mixed Select if you are using both 802 11a and 802 11n wireless clients I...

Страница 60: ...runs in the current channel Key type This option should be chosen according to the AP s security configuration It is recommended that the security type is the same as your AP s security type WEP Index...

Страница 61: ...ts Wi Fi Protected Setup WPS you can establish a wireless connection between wireless adapter and router using either Push Button Configuration PBC method or PIN method Note To build a successful conn...

Страница 62: ...tes during the Wi Fi Protected Setup process Step 4 When the WPS LED is on the client device has successfully connected to the router II Enter the client device s PIN on the router Use this method if...

Страница 63: ...n Figure 4 31 Step 2 The Wi Fi Protected Setup LED flashes for two minutes during the Wi Fi Protected Setup process Step 3 When the WPS LED is on the client device has successfully connected to the ro...

Страница 64: ...n type based on pre shared passphrase The router is configured by this security type by default Authentication Type you can choose the version of the WPA PSK security on the drop down list The default...

Страница 65: ...sable the update WPA WPA2 Enterprise It s based on Radius Server Authentication Type you can choose the version of the WPA security on the drop down list The default setting is Automatic which can sel...

Страница 66: ...cimal digits 0 9 a f A F in the specified length ASCII format stands for any combination of keyboard characters in the specified length WEP Key Select which of the four keys will be used and enter the...

Страница 67: ...led MAC Address The wireless station s MAC address that you want to filter Status The status of this entry either Enabled or Disabled Host The host network for the filtring rules Description A simple...

Страница 68: ...the Delete Selected button to delete the selected entries Click the Back button to return to the previous page For example If you desire that the wireless station A with MAC address 00 0A EB B0 00 0B...

Страница 69: ...r Beacon Interval here The beacons are the packets sent by the router to synchronize a wireless network Beacon Interval value determines the time interval of the beacons The default value is 100 RTS T...

Страница 70: ...y by reducing the guard interval time Enabled AP Isolation This function can isolate wireless stations on your network from each other Wireless devices will be able to communicate with the router but...

Страница 71: ...button to go to the next page and click the Previous button to return the previous page Note This page will be refreshed automatically every 5 seconds 4 8 Guest Network Choose Guest Network and you ca...

Страница 72: ...r The maximum of guests at the same time Security You can configure the security of Guest Network here Access Time During this time the wireless stations could accessing the AP Note The range of bandw...

Страница 73: ...connection to the router with their current dynamic IP Address Enter the amount of time in minutes and the user will be leased this dynamic IP Address After the time is up the user will be automatical...

Страница 74: ...eased After the dynamic IP address has expired a new dynamic IP address will be automatically assigned to the user You cannot change any of the values on this page To update this page and to show the...

Страница 75: ...2 Enter the MAC address in XX XX XX XX XX XX format and IP address in dotted decimal notation of the computer for which you want to reserve an IP address 3 Click the Save button Figure 4 48 Add or Mod...

Страница 76: ...SB Mass Storagre The USB Mass Storage page provides the basic information about the USB mass storage device Click the Refresh button to update this page Figure 4 50 User Account Management 4 10 2 User...

Страница 77: ...ssword in the Confirm Password field 5 Click Set to make your settings take effect New Username Type the user name that you want to give access to the USB drive The user name must be composed of alpha...

Страница 78: ...USB disk drive attached to the router and view volume and share such properties as share name directory user access and status on this page as shown below Figure 4 52 Storage Sharing Server Status In...

Страница 79: ...ou want to share a new folder when the number has reached 10 you can delete an existing share folder and then add a new one 2 If you want to change the FTP settings you need to restart FTP Server to m...

Страница 80: ...flash drive into this router 2 Click the Enable Disable radio box to enable disable Internet access to FTP from Internet port 3 Specify a port for the FTP server to use The default port number is 21 4...

Страница 81: ...1 The max share folders number is 10 If you want to share a new folder when the number has reached 10 you can delete an existing share folder and then add a new one 2 If you want to change the FTP se...

Страница 82: ...by click Delete To set up your media server please follow the instructions below 1 Plug an external USB hard disk drive or USB flash drive into this router and then click the Enable button to start t...

Страница 83: ...e print server on this page as shown below Figure 4 58 Print Server Setting There are two states of the print server they are as follows Online Indicates the print service has been turned on and no us...

Страница 84: ...d then you can view and add virtual servers on this page shown in Figure 4 61 Virtual servers can be used for setting up public services on your LAN A virtual server is defined as a service port and a...

Страница 85: ...pop up Figure 4 62 2 Select the service you want to use from the Common Service Port list If the Common Service Port menu does not list the service that you want to use enter the number of the service...

Страница 86: ...applications that cannot work with a pure NAT router Figure 4 63 Port Triggering Trigger Port The port for outgoing traffic An outgoing connection using this port will trigger this rule Trigger Protoc...

Страница 87: ...either TCP or UDP or All 5 Select Enabled in Status field 6 Click the Save button to save the new rule Figure 4 64 Add or Modify a Triggering Entry To modify or delete an existing entry 1 Find the de...

Страница 88: ...as Internet gaming or videoconferencing The router forwards packets of all services to the DMZ host Any PC whose port is being forwarded must have its DHCP client function disabled and should have a n...

Страница 89: ...t z External Port The port which the router opened for the application z Protocol The type of protocol which is opened z Internal Port The port which the router opened for local host z IP Address The...

Страница 90: ...enable or disable the router s firewall z SPI Firewall SPI Stateful Packet Inspection also known as dynamic packet filtering helps to prevent cyber attacks by tracking more state per session It valida...

Страница 91: ...ilters to be plugged into the gateway to support address and port translation for certain application layer control data protocols such as FTP TFTP H323 etc z FTP ALG To allow FTP clients and servers...

Страница 92: ...tween 5 3600 When the current ICMP FLOOD Packets number is beyond the set value the router will startup the blocking function immediately Enable UDP FLOOD Filtering Enable or Disable the UDP FLOOD Fil...

Страница 93: ...he Router s Web Based Utility is checked If you want to allow PCs with specific MAC Addresses to access the Setup page of the router s Web Based Utility locally from inside the network check the radio...

Страница 94: ...ddress is set to the default value of 0 0 0 0 To enable this function change 0 0 0 0 to a valid IP address If set to 255 255 255 255 then all the hosts can access the router from internet Note 1 To ac...

Страница 95: ...2 Parent Control Settings Parent Control Check Enable if you want this function to take effect otherwise check Disable MAC Address of Parental PC In this field enter the MAC address of the controlling...

Страница 96: ...the Add button 4 Set the time period allowed for the PC controlled to access the Internet For detailed information please go to Access Control Schedule 5 Click the Save button Click the Delete Selecte...

Страница 97: ...Archer C20i AC750 Wireless Dual Band Router 87 Figure 4 73 Parent Control Settings 4 15 Access Control Figure 4 74 Access Control...

Страница 98: ...so the Default Filter Policy can take effect Description Here displays the name of the rule and this name is unique LAN Host Here displays the host selected in the corresponding rule Target Here disp...

Страница 99: ...lect a schedule from the Protocol drop down list 9 Click the Save button Figure 4 76 Add Internet Access Control Entry For example If you desire to allow the host with MAC address 00 11 22 33 44 AA to...

Страница 100: ...s 1 In Rule Name field create a name for the rule Note that this name should be unique for example Rule_1 2 In Host field select Host_1 3 In Target field select Target_1 4 In Schedule field select Sch...

Страница 101: ...2 If you select MAC Address the screen shown is Figure 4 79 z In Description field create a unique description for the host e g Host_1 z In MAC Address field enter the MAC address 3 Click the Save bu...

Страница 102: ...r the Access Control Rule Figure 4 80 Target Settings Description Here displays the description about the target and this description is unique Details The target can be IP address port or domain name...

Страница 103: ...Figure 4 83 Figure 4 83 Add or Modify an Access Target Entry I In Description field create a unique description for the target e g Target_1 II In Add URL Address field enter the domain name either th...

Страница 104: ...le list in the next screen as shown in Figure 4 84 The Schedule list is necessary for the Access Control Rule Figure 4 84 Schedule Settings Description Here displays the description of the schedule an...

Страница 105: ...d first follow the settings below 1 Click Add New button shown in Figure 4 84 to enter the Advanced Schedule Settings page 2 In Description field create a unique description for the schedule e g Sched...

Страница 106: ...reach a specific host or network Figure 4 87 Static Route To add static route entries 1 Click Add New shown in Figure 4 87 you will see the following screen Figure 4 88 Add or Modify a Static Route En...

Страница 107: ...in Figure 4 89 System routing table views all of the valid route entries in use The Destination IP address Subnet Mask Gateway and Interface will be displayed for each entry Figure 4 89 System Routing...

Страница 108: ...ct Egress Bandwidth The upload speed through the Internet port Ingress Bandwidth The download speed through the Internet port Click Save to make the settings take effect Description This is the inform...

Страница 109: ...nding Figure 4 92 the IP MAC Binding menu There are two submenus under the IP MAC Binding menu shown in Figure 4 92 Binding Settings and ARP List Click any of them and you will be able to scan or conf...

Страница 110: ...94 Figure 4 94 IP MAC Binding Setting Add Modify To add IP MAC Binding entries follow the steps below 1 Click the Add New button as shown in Figure 4 93 2 Enter the MAC Address and IP Address 3 Select...

Страница 111: ...ll prompt as well Likewise Load All only loads the items without interference to the IP MAC Binding list 4 19 Dynamic DNS Choose menu Dynamic DNS and you can configure the Dynamic DNS function The rou...

Страница 112: ...ble DDNS 5 Click the Login button to login to the DDNS service Connection Status The status of the DDNS service connection is displayed here Click Logout to log out the DDNS service Note If you want t...

Страница 113: ...DNS 5 Click the Login button to login the DDNS service Connection Status The status of the DDNS service connection is displayed here Click Logout to log out of the DDNS service Note If you want to log...

Страница 114: ...he status of the DDNS service connection is displayed here Click Logout to logout of the DDNS service Note If you want to login again with another account after a successful login please click the Log...

Страница 115: ...The status of IPv6 connection IPv6 Address The WAN IPv6 address IPv6 Default Gateway The router s default gateway Primary IPv6 DNS The primary IPv6 DNS address Secondary IPv6 DNS The secondary IPv6 DN...

Страница 116: ...ic IPv6 Connections which use dynamic IPv6 address assignment Static IPv6 Connections which use static IPv6 address assignment PPPoEv6 Connections which use PPPoEV6 that requires a user name and passw...

Страница 117: ...fy the MTU But this is rarely required and should not be done unless you are sure it is necessary for your ISP connection If your ISP gives you one or two DNS IPv6 addresses select Set IPv6 DNS Server...

Страница 118: ...the DNS IPv6 address provided by your ISP Secondary IPv6 DNS Server Enter another DNS IPv6 address provided by your ISP MTU Bytes The normal MTU Maximum Transmission Unit value for most Ethernet netw...

Страница 119: ...DHCPv6 Dynamic Host Configuration Protocol for IPv6 Server MTU Bytes The normal MTU Maximum Transmission Unit value for most Ethernet networks is 1500 Bytes For some ISPs you may need to modify the M...

Страница 120: ...connection is IPv6 WAN Connection Display the available wan connection Click the Save button to save your settings 4 20 3 IPv6 LAN Figure 4 106 IPv6 LAN Address Auto Configuration Type Choose the IPv...

Страница 121: ...oot Password System Log and Statistics Click any of them and you will be able to configure the corresponding functions The detailed explanations for each submenu are provided below 4 21 1 Time Setting...

Страница 122: ...the third field and the time in the last field End The time to end the Daylight Saving Select the month in the first field the week in the second field the day in the third field and the time in the l...

Страница 123: ...is configured accordingly 4 The Daylight Saving will take effect one minute after the configurations are completed 4 21 2 Diagnostic Choose menu System Tools Diagnostic and then you can transact Ping...

Страница 124: ...tes to be sent The default is 64 Ping Timeout Time to wait for a response in milliseconds The default is 800 Traceroute Max TTL Set the maximum number of hops max TTL to be reached in the path to sear...

Страница 125: ...for free There is no need to upgrade the firmware unless the new firmware has a new feature you want to use However when experiencing problems caused by the router rather than the configuration you c...

Страница 126: ...kup Restore and then you can save the current configuration of the router as a backup file and restore the configuration via a backup file as shown in Figure 4 114 Figure 4 114 Backup Restore Configur...

Страница 127: ...rebooting which include Change the LAN IP Address system will reboot automatically Upgrade the firmware of the router system will reboot automatically Restore the router s settings to factory defaults...

Страница 128: ...g Type By selecting the log type only logs of this type will be shown Log Level By selecting the log level only logs of this level will be shown Refresh Refresh the page to show the latest log list Cl...

Страница 129: ...DoS protection in Security settings will be disabled Statistics Interval 5 60 The default value is 10 Select a value between 5 and 60 seconds in the drop down list The Packets Statistic interval indic...

Страница 130: ...ICMP packets transmitted to WAN per second at the specified Packets Statistics interval It is shown like current transmitting rate Max transmitting rate UDP Tx The number of UDP packets transmitted to...

Страница 131: ...Archer C20i AC750 Wireless Dual Band Router 121 4 22 Logout Choose Logout and you will be back to the login screen as shown in Figure 4 118 Figure 4 118 Logout...

Страница 132: ...n the User Name field and password in the Password field type password in the Confirm Password field again finish by clicking Connect Figure A 1 PPPoE Connection Type 4 If your ADSL lease is in pay ac...

Страница 133: ...our PC s MAC address will fill in the WAN MAC Address field Or else type the MAC Address into the WAN MAC Address field The format for the MAC Address is XX XX XX XX XX XX Then click the Save button I...

Страница 134: ...enu on the left of your browser and click DMZ submenu On the DMZ page click Enable radio button and type your IP address into the DMZ Host IP Address field using 192 168 0 169 as an example remember t...

Страница 135: ...2 To change the WEB management port number Log in to the router click the Security menu on the left of your browser and click Remote Management submenu On the Remote Management page type a port number...

Страница 136: ...on the Add or Modify a Virtual Server page enter 80 into the blank next to the Service Port and your IP address next to the IP Address assuming 192 168 0 188 for an example remember to Enable and Save...

Страница 137: ...s manual if needed 1 Install TCP IP component 1 On the Windows taskbar click the Start button point to Settings and then click Control Panel 2 Click the Network and Internet Connections icon and then...

Страница 138: ...uter 128 5 The following TCP IP Properties window will display and the IP Address tab is open on this window by default 6 Select Obtain an IP address automatically and Obtain DNS server automatically...

Страница 139: ...P maximum 100m LEDs Power Wireless Ethernet Internet USB USB WPS Safety Emissions FCC CE Wireless Frequency Band 2 4GHz 5GHz Radio Data Rate 11b 1 2 5 5 11Mbps 11a g 6 9 12 18 24 36 48 54 Mbps 11n up...

Страница 140: ...spectrum DSSS technology and operating in the unlicensed radio spectrum at 2 4GHz and WEP encryption for security 802 11b networks are also referred to as Wi Fi networks 802 11g specification for wir...

Страница 141: ...in a network to communicate with each other all devices must be configured with the same SSID This is typically the configuration parameter for a wireless PC card It corresponds to the ESSID in the wi...

Отзывы: