


19
Chapter 4
Set Up Internet Connection
2. Go to
Advanced
>
IPv6
.
3. Enable IPv6 and select the internet connection type provided by your ISP.
Tips:
If you do not know what your internet connection type is, contact your ISP or judge according to the already known
information provided by your ISP.
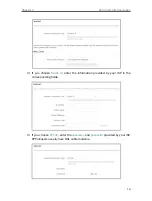
4. Fill in information as required by different connection types.
1 )
Static IP:
Fill in blanks and click
Save
.
2 )
Dynamic IP(SLAAC/DHCPv6):
Click
Advanced
to input further information if
your ISP requires. Click
Save
and then click
Renew
.
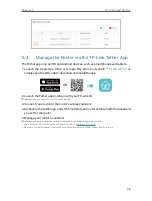
3 )
PPPoE:
By default, the router uses the IPv4 account to connect to the IPv6
server. Click
Advanced
to input further information if your ISP requires. Click
Save
and then click
Connect
.
Содержание Archer AX53
Страница 1: ...2021 TP Link 1910013106 REV1 0 0 User Guide AX3000 Gigabit Wi Fi 6 Router Archer AX53...
Страница 15: ...Chapter 3 Log In to Your Router...
Страница 56: ...52 Chapter 10 Network Security...
Страница 71: ...67 Chapter 12 VPN Server...
Страница 97: ...93 Chapter 14 Manage the Router...