TP-Link Archer AX53 Скачать руководство пользователя страница 21

17

Chapter 4


Set Up Internet Connection
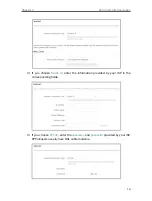
4 )  If you choose 

L2TP

, enter the 

username

 and 

password

 and choose the 

Secondary Connection

 provided by your ISP. Different parameters are needed 

according to the Secondary Connection you have chosen. 


5 )  If you choose 

PPTP

, enter the 

username

 and 

password

, and choose the 

Secondary Connection

 provided by your ISP. Different parameters are needed 

according to the Secondary Connection you have chosen.


5. Click 

Save

.

Tips: 

•  If you use 

Dynamic IP

 and 

PPPoE

 and you are provided with any other parameters that are not required on the page, 

please go to 

Advanced

 > 

Network

 >

 Internet 

to complete the configuration.

•  If you still cannot access the internet, refer to the 

FAQ

 section for further instructions.

Содержание Archer AX53

Страница 1: ...2021 TP Link 1910013106 REV1 0 0 User Guide AX3000 Gigabit Wi Fi 6 Router Archer AX53...

Страница 2: ...t Connection 15 4 4 Set Up the Router as an Access Point 18 4 5 Set Up an IPv6 Internet Connection 18 Chapter 5 TP Link Cloud Service 22 5 1 Register a TP Link ID 23 5 2 Change Your TP Link ID Informa...

Страница 3: ...47 10 2 Access Control 47 10 3 IP MAC Binding 49 10 4 ALG 51 Chapter 11 NAT Forwarding 53 11 1 Share Local Resources on the Internet by Port Forwarding 54 11 2 Open Ports Dynamically by Port Triggerin...

Страница 4: ...14 2 Backup and Restore Configuration Settings 79 14 3 Change the Login Password 80 14 4 Password Recovery 81 14 5 Local Management 82 14 6 Remote Management 83 14 7 System Log 85 14 8 Test the Netwo...

Страница 5: ...to be emphasized and texts on the web page are in teal including the menus items buttons etc The menu structures to show the path to load the corresponding page For example Advanced Wireless WDS means...

Страница 6: ...omplexity and network overhead and 3 client limitations including rated performance location connection quality and client condition Use of Wi Fi 6 802 11ax and features including OFDMA MU MIMO 1024 Q...

Страница 7: ...Chapter 1 Get to Know About Your Router This chapter introduces what the router can do and shows its appearance It chapter contains the following sections Product Overview Appearance...

Страница 8: ...oreover it is simple and convenient to set up and use the TP Link router due to its intuitive web interface and the powerful Tether app 1 2 Appearance 1 2 1 Top Panel The router s LEDs view from left...

Страница 9: ...Internet port is connected but the internet service is not available Off The router s Internet port is unplugged Ethernet On At least one powered on device is connected to the router s Ethernet port...

Страница 10: ...econds to turn on or off the wireless function of your router Reset Button Press and hold the button until the Power LED blinks to reset the router to its factory default settings WAN Port For connect...

Страница 11: ...Chapter 2 Connect the Hardware This chapter contains the following sections Position Your Router Connect Your Router...

Страница 12: ...al surface such as on a shelf or desktop The device also can be mounted on the wall as shown in the following figure 16 42 8 1 211 1 2 3 NOTE 4 67mm D 9 85mm d 4 0mm H 3mm 4 6mm N 20 M Note The diamet...

Страница 13: ...connection is correct by checking the following LEDs Power On Internet On 2 4 GHz On 5 GHz On 5 Connect your computer to the router Method 1 Wired Turn off the Wi Fi on your computer and connect the d...

Страница 14: ...your router through this method Note WPS is not supported by iOS devices The WPS function cannot be configured if the wireless function of the router is disabled Also the WPS function will be disable...

Страница 15: ...Chapter 3 Log In to Your Router...

Страница 16: ...s Microsoft Internet Explorer Mozilla Firefox or Apple Safari Follow the steps below to log in to your router 1 Set up the TCP IP Protocol in Obtain an IP address automatically mode on your computer 2...

Страница 17: ...on built in automates many of the steps and verifies that those steps have been successfully completed Furthermore you can also set up an IPv6 connection if your ISP provides IPv6 service It contains...

Страница 18: ...mplete service from TP Link remote management TP Link DDNS and more log in with your TP Link ID or click Sign Up Now to get one Then follow the instructions to bind the cloud router to your TP Link ID...

Страница 19: ...ent internet connection settings You can also modify the settings according to the service information provided by your ISP Follow the steps below to check or modify your internet connection settings...

Страница 20: ...t Connection 2 If you choose Static IP enter the information provided by your ISP in the corresponding fields 3 If you choose PPPoE enter the username and password provided by your ISP PPPoE users usu...

Страница 21: ...r the username and password and choose the Secondary Connection provided by your ISP Different parameters are needed according to the Secondary Connection you have chosen 5 Click Save Tips If you use...

Страница 22: ...able 4 Log in again to the web management page http tplinkwifi net and go to Advanced Quick Setup 5 Configure your wireless settings and click Next 6 Confirm the information and click Save Now you can...

Страница 23: ...known information provided by your ISP 4 Fill in information as required by different connection types 1 Static IP Fill in blanks and click Save 2 Dynamic IP SLAAC DHCPv6 Click Advanced to input furt...

Страница 24: ...er the username and password for the IPv6 connection 4 6to4 Tunnel An IPv4 internet connection type is a prerequisite for this connection type Manually Set Up Your Internet Connection Click Advanced t...

Страница 25: ...ndows users are recommended to choose from the first two types Fill in Address Prefix provided by your ISP and click Save 6 Click Status to check whether you have successfully set up an IPv6 connectio...

Страница 26: ...ll notify you when an important firmware upgrade is available Surely you can also manage multiple TP Link Cloud devices with a single TP Link ID This chapter introduces how to register a new TP Link I...

Страница 27: ...ink ID refer to Manage the User TP Link IDs Once you have registered a TP Link ID on the web management page you can only register another TP Link ID via the Tether APP Please refer to Manage the Rout...

Страница 28: ...ssword 2 Enter the current password then a new password twice And click Save 5 3 Manage the User TP Link IDs The TP Link ID used to log in to the router for the first time will be automatically bound...

Страница 29: ...TP Link ID and focus on the Bound Accounts section 3 Click enter another TP Link ID as needed and click Save Note If you need another TP Link ID please register a new one via the Tether app Refer to M...

Страница 30: ...d log in with your TP Link ID Note If you don t have a TP Link ID create one first 3 Connect your device to the router s wireless network 4 GobacktotheTetherapp selectthemodelofyourrouterandloginwitht...

Страница 31: ...ings This chapter guides you on how to configure the wireless settings It contains the following sections Specify Wireless Settings Schedule Your Wireless Function Use WPS for Wireless Connection Adva...

Страница 32: ...s speed and efficiency Noted that only when your clients also support OFDMA can you fully enjoy the benefits It is disabled by default 1 Go to Advanced Wireless Wireless Settings 2 Enable OFDMA To ena...

Страница 33: ...the network in Password The value is case sensitive Note If you change the wireless settings with a wireless device you will be disconnected when the settings are effective Please write down the new...

Страница 34: ...ntly enhancing the network efficiency 1 Go to Advanced Wireless Wireless Settings 2 Make sure Smart Connect is disabled and enable MU MIMO for the 5 GHz band Note MU MIMO works only on the 5 GHz band...

Страница 35: ...Setup WPS provides an easier approach to set up a security protected Wi Fi connection 1 Visit http tplinkwifi net and log in with your TP Link ID or the password you set for the router 2 Make sure th...

Страница 36: ...or directly press the router s WPS button Within two minutes enable WPS on your personal device Success will appear on the screen and the WPS LED of the router should change from flashing to solid on...

Страница 37: ...s to determine the duration between beacon packets that are broadcasted by the router to synchronize the wireless network The default value is 100 milliseconds RTS Threshold Enter a value between 1 an...

Страница 38: ...your main network When you have guests in your house apartment or workplace you can create a guest network for them In addition you can customize guest network options to ensure network security and...

Страница 39: ...e SSID Don t select Hide SSID unless you want your guests to manually input the SSID for guest network access 3 Select the Security type and customize your own password If No security is selected no p...

Страница 40: ...guests to see each other Tick this checkbox if you want to allow the wireless clients on your guest network to communicate with each other via methods such as network neighbors and Ping Allow guests t...

Страница 41: ...res built in TP Link HomeShield Whether protecting your sensitive data or limiting the access of kids and guests TP Link HomeShield provides you the tools you need to fully manage your network It cont...

Страница 42: ...DDoS attacks To use this feature download Tether to enjoy the HomeShield service 1 Scan the QR code or get the Tether app from the Apple App Store or Google Play OR 2 Launch the Tether app and log in...

Страница 43: ...ID If you don t have an account create one first 3 Log in to your router and tap the HomeShield tab to use this feature 8 3 Network Analysis Optimization TP Link HomeShield provides many tools for you...

Страница 44: ...40 Chapter 8 HomeShield 2 Launch the Tether app and log in with your TP Link ID If you don t have an account create one first 3 Log in to your router and tap the HomeShield tab to use this feature...

Страница 45: ...Chapter 9 OneMesh with Seamless Roaming This chapter introduces the TP Link OneMeshTM feature It contains the following sections Set Up a OneMesh Network Manage Devices in the OneMesh Network...

Страница 46: ...same wireless settings including network name password access control settings and more Seamless Roaming Devices automatically switch between your router and extenders as you move through your home f...

Страница 47: ...page Note To check full list of TP Link OneMesh devices visit https www tp link com onemesh compatibility 4 If you have set up the extender to join the OneMesh network it will be listed on the router...

Страница 48: ...in the network 1 Visit http tplinkwifi net and log in with your TP Link ID or the password you set for the router 2 Go to Network Map 3 Click to view all mesh devices and click to view all connected c...

Страница 49: ...amless Roaming 4 Manage the OneMesh device as needed You can Change device information Click Manage Device to redirect to the web management page of this device Click Leave OneMesh to delete this devi...

Страница 50: ...ect your home network from cyber attacks block or allow specific client devices to access your network using Access Control or you can prevent ARP spoofing and ARP attacks using IP MAC Binding It cont...

Страница 51: ...ttings 10 2 Access Control Access Control is used to block or allow specific client devices to access your network via wired or wireless based on a list of blocked devices Blacklist or a list of allow...

Страница 52: ...means the selected devices have been successfully added to the blacklist To allow specific device s 1 Select Whitelist and click SAVE 2 Your own device is in the whitelist by default and cannot be del...

Страница 53: ...will appear on the screen which means the device has been successfully added to the whitelist Done Now you can block or allow specific client devices to access your network via wired or wireless usin...

Страница 54: ...password you set for the router 2 Go to Advanced Security IP MAC Binding 3 Enable IP MAC Binding 4 Bind your device s according to your need To bind the connected device s 1 Click in the Binding List...

Страница 55: ...ged into the gateway to support address and port translation for certain application layer control data protocols such as FTP TFTP H323 etc It is recommended to keep the default settings You may need...

Страница 56: ...52 Chapter 10 Network Security...

Страница 57: ...warding feature the router can penetrate the isolation of NAT and allows devices on the internet to initiatively communicate with devices on the local network thus realizing some special functions The...

Страница 58: ...d in HTTP service port 21 in FTP service port 25 in SMTP service and port 110 in POP3 service Please verify the service port number before the configuration I want to SharemypersonalwebsiteI vebuiltin...

Страница 59: ...mmended to keep the default settings of Internal Port and Protocol if you are not clear about which port and protocol to use If the service you want to use is not in the common services list you can e...

Страница 60: ...e triggering port all the external ports will be opened for subsequent connections The router can record the IP address of the host When the data from the internet return to the external ports the rou...

Страница 61: ...he internet which can realize the unlimited bidirectional communication between internal hosts and external hosts The DMZ host becomes a virtual server with all ports opened When you are not clear abo...

Страница 62: ...devices to automatically find the front end NAT device and send request to it to open the corresponding ports With UPnP enabled the applications or host devices on the local network and the internet c...

Страница 63: ...erefore you can play Xbox online games without a hitch INTERNET If necessary you can follow the steps to change the status of UPnP 1 Visit http tplinkwifi net and log in with your TP Link ID or the pa...

Страница 64: ...more stable It is suitable for restricted environment such as campus network and company intranet PPTP VPN is more easily used and its speed is faster it s compatible with most operating systems and...

Страница 65: ...n with your TP Link ID or the password you set for the router 2 Go to Advanced VPN Server OpenVPN and tick the Enable box of OpenVPN Note Before you enable VPN Server we recommend you configure Dynami...

Страница 66: ...ility Note You need to install the OpenVPN client utility on each device that you plan to apply the VPN function to access your router Mobile devices should download a third party app from Google Play...

Страница 67: ...vices by the PPTP VPN server 4 Set the PPTP connection permission according to your needs Select Allow Samba Network Place access to allow your VPN device to access your local Samba server Select Allo...

Страница 68: ...the Windows built in PPTP software or a third party PPTP software to connect to PPTP Server Here we use the Windows built in PPTP software as an example 1 Go to Start Control Panel Network and Intern...

Страница 69: ...65 Chapter 12 VPN Server 4 Select Use my Internet connection VPN 5 Enter the internet IP address of the router for example 218 18 1 73 in the Internet address field Click Next...

Страница 70: ...66 Chapter 12 VPN Server 6 Enter the User name and Password you have set for the PPTP VPN server on your router and click Connect 7 The PPTP VPN connection is created and ready to use...

Страница 71: ...67 Chapter 12 VPN Server...

Страница 72: ...s chapter guides you on how to configure advanced network features It contains the following sections Change the LAN Settings Configure to Support IPTV Service Specify DHCP Server Settings Set Up a Dy...

Страница 73: ...e to your needs And leave the Subnet Mask as the default settings 4 Click SAVE Note If you have set the Port Forwarding DMZ or DHCP address reservation and the new LAN IP address is not in the same su...

Страница 74: ...your ISP is not listed and no other parameters are required Select Custom if your ISP is not listed but provides necessary parameters 3 After you have selected a mode the necessary parameters includi...

Страница 75: ...es for specified client devices 1 Visit http tplinkwifi net and log in with your TP Link ID or the password you set for the router 2 Go to Advanced Network DHCP Server To specify the IP address that t...

Страница 76: ...ends to access your router and local servers FTP HTTP etc using a domain name without checking and remembering the IP address Note DDNS does not work if the ISP assigns a private WAN IP address such a...

Страница 77: ...u want to use a new DDNS account please click Logout first and then log in with a new account 13 5 Create Static Routes Static routing is a form of routing that is configured manually by a network adm...

Страница 78: ...is established To surf the internet and visit my company s network at the same time I need to configure the static routing Company s server PC Router B Router A Switch LAN 192 168 0 1 192 168 0 100 LA...

Страница 79: ...255 255 255 255 Default Gateway The IP address of the gateway device to which the data packets will be sent This IP address must be on the same subnet with the router s IP which sends out data In the...

Страница 80: ...r router It contains the following sections Upgrade the Firmware Backup and Restore Configuration Settings Change the Login Password Password Recovery Local Management Remote Management System Log Tes...

Страница 81: ...Update 1 Visit http tplinkwifi net and log in with your TP Link ID or the password you set for the router 2 Enable Auto Update 3 Specify the Update Time and save the settings The router will update fi...

Страница 82: ...eb browser is opened Click UPGRADE and log in to the web management page with the username and password you set for the router You will see the Firmware Upgrade page 14 1 3 Local Upgrade 1 Download th...

Страница 83: ...outer to the default factory settings 1 Visit http tplinkwifi net and log in with your TP Link ID or the password you set for the router 2 Go to Advanced System Tools Backup Restore To backup configur...

Страница 84: ...reset the router We strongly recommend you backup the current configuration settings before resetting the router 14 3 Change the Login Password The account management feature allows you to change your...

Страница 85: ...3 Tick the Enable box of Password Recovery 4 Specify a mailbox From for sending the recovery letter and enter its SMTP Server address Specify a mailbox To for receiving the recovery letter If the mai...

Страница 86: ...the router 2 Go to Advanced System Administration and complete the settings In Local Management section as needed Access the router via HTTPS and HTTP Tick the Enable box of Local Management via HTTP...

Страница 87: ...this entry 5 Click SAVE 14 6 Remote Management This feature allows you to control remote devices authority to manage the router 1 Visit http tplinkwifi net and log in with your TP Link ID or the passw...

Страница 88: ...for Remote Managers 4 Click SAVE Devices on the internet can log in to http Router s WAN IP address port number such as http 113 116 60 229 1024 to manage the router Tips You can find the WAN IP addr...

Страница 89: ...gging in to http Router s WAN IP port number such as http 113 116 60 229 1024 Tips The router s WAN IP is usually a dynamic IP Please refer to Set Up a Dynamic DNS Service Account if you want to log i...

Страница 90: ...at a fixed time every day however it s too troublesome to log in to the web management page every time I want to go checking It would be great if the system logs could be sent to my mailbox at 8 a m...

Страница 91: ...ss Tips SMTP server is available for users in most webmail systems For example the SMTP server address of Hotmail is smtp mail outlook com 6 Email To Enter the recipient s email address which can be t...

Страница 92: ...is used to display the route path your router has passed to reach the tested host and measure transit delays of packets across an Internet Protocol network 2 Enter the IP Address or Domain Name of the...

Страница 93: ...ike Parental Controls You can choose the way to obtain the system time as needed System language is the language displayed when you log into the router You can change the system language as needed 1 V...

Страница 94: ...rver 6 Click SAVE To get time from your computer 1 In the Set Time field select Get from Managing Device 2 The time of your computer will then be displayed and click SAVE To manually set the date and...

Страница 95: ...time zone 4 Click SAVE To Set System Language Select the language from the dropdown list then click Save 14 10 Set the Router to Reboot Regularly The Scheduled Reboot feature cleans the cache to enha...

Страница 96: ...er indicates its activities and status You can enable the Night Mode feature to specify a time period during which the LED is off 1 Visit http tplinkwifi net and log in with your TP Link ID or the pas...

Страница 97: ...93 Chapter 14 Manage the Router...

Страница 98: ...http tplinkwifi net to create a new login password Note Please refer to Password Recovery to learn how to configure Password Recovery You ll need to reconfigure the router to surf the internet once t...

Страница 99: ...95 4 Click LAN settings and deselect the following three options and click OK 5 Go to Advanced Restore advanced settings click OK to save the settings...

Страница 100: ...even though the configuration is finished 1 Visit http tplinkwifi net and log in with your TP Link ID or the password you set for the router 2 Go to Advanced Network Status to check internet status If...

Страница 101: ...d check the internet access Reset the router to factory default settings and reconfigure the router Upgrade the firmware of the router Check the TCP IP settings on the particular device if all other d...

Страница 102: ...MAC address to the router The MAC addresses of a computer in wired connection and wireless connection are different Modify the LAN IP address of the router Note Most TP Link routers use 192 168 0 1 19...

Страница 103: ...3 Go to Advanced Network Internet 4 Select your Internet Connection Type and fill in other parameters 5 Click Save 6 Restart the modem and the router again Please upgrade the firmware of the router I...

Страница 104: ...n the Services list on the right side 5 Right click Wireless Zero Configuration and then select Properties 6 Change Startup type to Automatic click on Start button and make sure the Service status is...

Страница 105: ...r wireless router Note Wireless Password Network Security Key is case sensitive Windows unable to connect to XXXX Can not join this network Taking longer than usual to connect to this network Check th...

Страница 106: ...guarantee that interference will not occur in a particular installation If this equipment does cause harmful interference to radio or television reception which can be determined by turning the equipm...

Страница 107: ...e is no unauthorized change is made in the equipment and the equipment is properly maintained and operated FCC compliance information statement Product Name I T E Power Supply Model Number T120150 2B1...

Страница 108: ...uthority to operate the equipment We TP Link USA Corporation has determined that the equipment shown as above has been shown to comply with the applicable technical standards FCC part 15 There is no u...

Страница 109: ...he device complies with RF specifications when the device used at 20 cm from your body National Restrictions Attention This device may only be used indoors in all EU member states EFTA countries and N...

Страница 110: ...tif fonctionnant dans la bande 5150 5250 MHz est r serv uniquement pour une utilisation l int rieur afin de r duire les risques de brouillagepr judiciableauxsyst mesdesatellitesmobilesutilisantlesm me...

Страница 111: ...Fi 6 Router Equipment name Archer AX53 Type designation Type nit Restricted substances and its chemical symbols Lead Pb Mercury Hg Cadmium Cd Hexavalent chromium Cr 6 Polybrominated biphenyls PBB Pol...

Страница 112: ...Do not use damaged charger or USB cable to charge the device Do not use any other chargers than those recommended Do not use the device where wireless devices are not allowed Adapter shall be installe...

Страница 113: ...orting symbol for Waste electrical and electronic equipment WEEE This means that this product must be handled pursuant to European directive 2012 19 EU in order to be recycled or dismantled to minimiz...

Отзывы: