background image

58

Chapter 13


Customize Your Network Settings

2 )  Click 

Save

.

3 )  After configuring IGMP proxy, IPTV can work behind your router now. You can 

connect your set-top box to any of the router’s Ethernet port.

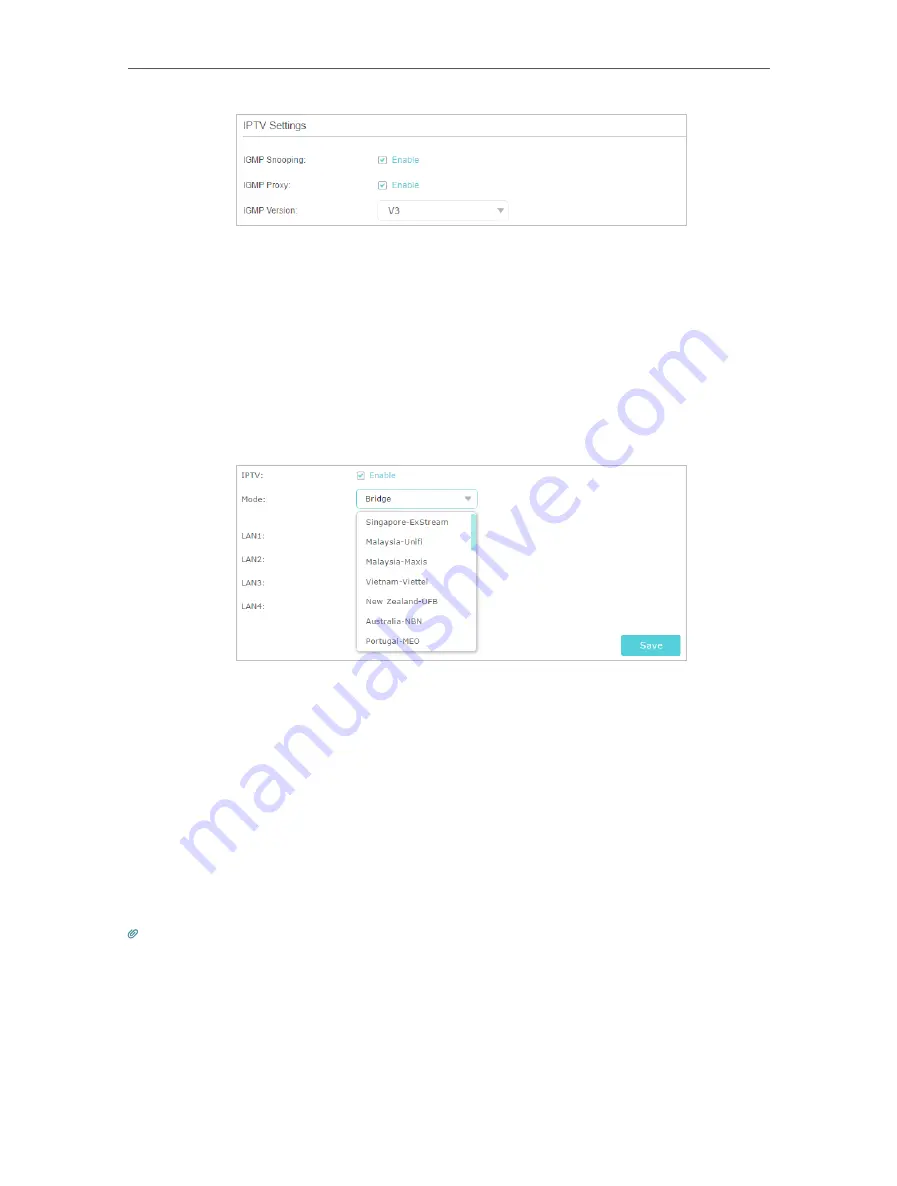
If IGMP is not the technology your ISP applies to provide IPTV service:

1 )  Enable IPTV.
2 )  Select the appropriate 

Mode

 according to your ISP.

•  Select 

Bridge

 if your ISP is not listed and no other parameters are required.

•  Select 

Custom

 if your ISP is not listed but provides necessary parameters.

3 )  After you have selected a mode, the necessary parameters, including the LAN port 

for IPTV connection, are predetermined. If not, select the LAN type to determine 
which port is used to support IPTV service.

4 )  Click 

Save

.

5 )  Connect the set-top box to the corresponding LAN port which is predetermined or 

you have specified in Step 3.

Done!

Your IPTV setup is done now! You may need to configure your set-top box before 
enjoying your TV.

Tips:

 Qos and IPTV cannot be enabled at the same time.

13. 3.  Specify DHCP Server Settings

By default, the DHCP (Dynamic Host Configuration Protocol) Server is enabled and 
the router acts as a DHCP server; it dynamically assigns TCP/IP parameters to client 

Содержание AC2600 MU-MIMO

Страница 1: ...REV1 0 0 1910012362 User Guide AC2600 MU MIMO Wi Fi Router Archer A10...

Страница 2: ...d 14 4 2 Manually Set up Your Internet Connection 14 4 3 Set Up an IPv6 Internet Connection 17 Chapter 5 Set Up the Router as an Access Point 21 Chapter 6 TP Link Cloud Service 24 6 1 Register a TP Li...

Страница 3: ...Your Home Network 50 12 2 Use PPTP VPN to Access Your Home Network 51 Chapter 13 Customize Your Network Settings 56 13 1 Change the LAN Settings 57 13 2 Configure to Support IPTV Service 57 13 3 Speci...

Страница 4: ...Set the Router to Reboot Regularly 77 14 6 Change the Administrator Account 77 14 7 Local Management 78 14 8 Remote Management 78 14 9 System Log 79 14 10 Monitor the Internet Traffic Statistics 81 1...

Страница 5: ...menu that is located in the Advanced tab Note Ignoring this type of note might result in a malfunction or damage to the device Tips Indicates important information that helps you make better use of yo...

Страница 6: ...Chapter 1 Get to Know About Your Router This chapter introduces what the router can do and shows its appearance It contains the following sections Product Overview Panel Layout...

Страница 7: ...devices while boosting widespread coverage throughout your home and the built in Ethernet ports supply high speed connection to your wired devices Moreover it is simple and convenient to set up and u...

Страница 8: ...The 5GHz wireless band is disabled Internet Blue On Internet service is available Orange On The router s Internet port is connected but the internet service is not available Off The router s Internet...

Страница 9: ...Item Description Wi Fi On Off Button Press and hold the WiFi button for about 2 seconds to turn on or off the wireless function of your router Reset Button Press and hold this button for more than 5...

Страница 10: ...a power socket via the provided power adapter Power On Off Button Press this button to power on or off the router Internet Port For connecting to a DSL Cable modem or an Ethernet jack LAN Ports 1 2 3...

Страница 11: ...Chapter 2 Connect the Hardware This chapter contains the following sections Position Your Router Connect Your Router...

Страница 12: ...rom devices with strong electromagnetic reference such as Bluetooth devices cordless phones and microwaves 2 2 Connect Your Router Follow the steps below to connect your router If your internet connec...

Страница 13: ...s both the LEDs shoud turn solid on 7 Connect your computer to the router Method 1 Wired Turn off the Wi Fi on your computer and connect the devices as shown below Ethernet cable Method 2 Wirelessly 1...

Страница 14: ...t be configured if the wireless function of the router is disabled Also the WPS function will be disabled if your wireless encryption is WEP Please make sure the wireless function is enabled and is co...

Страница 15: ...Chapter 3 Log In to Your Router...

Страница 16: ...to log in to your router 1 Set up the TCP IP Protocol in Obtain an IP address automatically mode on your computer 2 Visit http tplinkwifi net and create a login password for secure management purpose...

Страница 17: ...izard It has necessary ISP information built in automates many of the steps and verifies that those steps have been successfully completed Furthermore you can also set up an IPv6 connection if your IS...

Страница 18: ...d the cloud router to your TP Link ID Note To learn more about the TP Link Cloud service please refer to the TP Link Cloud Service section If you do not want to register a TP Link ID now you may click...

Страница 19: ...Follow the instructions on the page to continue the configuration Parameters on the figures are just used for demonstration 1 If you choose Dynamic IP you need to select whether to clone the MAC addre...

Страница 20: ...ection provided by your ISP Different parameters are needed according to the Secondary Connection you have chosen 5 If you choose PPTP enter the username and password and choose the Secondary Connecti...

Страница 21: ...cannot access the internet refer to the FAQ section for further instructions 4 3 Set Up an IPv6 Internet Connection Your ISP provides information about one of the following IPv6 internet connection ty...

Страница 22: ...r ISP requires Click Save 3 PPPoE Select this type if your ISP uses PPPoEv6 and provides you with a username and password By default the router uses the IPv4 account to connect to the IPv6 server Clic...

Страница 23: ...to4 deployment for assigning address Click Save 5 Pass Through Bridge Select this type if your ISP uses Pass Through Bridge network deployment No configuration is required for this type of connection...

Страница 24: ...et Connection 6 Click Status to check whether you have successfully set up an IPv6 connection The following figure is an example of a successful PPPoE configuration Tips Visit the FAQ section if there...

Страница 25: ...apter 5 Set Up the Router as an Access Point In the Access Point mode your router connects to a wired or wireless router via an Ethernet cable and extends the wireless coverage of your existing networ...

Страница 26: ...et for the router 2 Go to Advanced Operation Mode select Access Point and click Save The router will reboot and switch to Access Point mode 3 After rebooting connect the router to your existing wired...

Страница 27: ...et Up the Router as an Access Point Tips Functions such as Parental Controls Qos and NAT Forwarding are not supported in the Access Point mode Functions such as Guest Network is the same as those in t...

Страница 28: ...Link Cloud will notify you when an important firmware upgrade is avaliable Surely you can also manage multiple TP Link Cloud devices with a single TP Link ID This chapter introduces how to register a...

Страница 29: ...s Once the router is bound to your TP Link ID you need to log in to the router with the TP Link ID You can register another TP Link ID via the Tether APP Please refer to Manage the Router via TP Link...

Страница 30: ...TP Link ID used to log in to the router for the first time will be automatically bound as the Admin account An admin account can add or remove other TP Link IDs to or from the same router as Users All...

Страница 31: ...eeded and click Save Note If you need another TP Link ID please refer to Manage the Router via TP Link Tether App to install the app and register a new one 4 The new TP Link ID will be displayed in th...

Страница 32: ...s 1 Open the Apple App Store or Google Play and search the key word TP Link Tether or simply scan the QR code to download and install the app OR 2 Connect your device to the router s wireless network...

Страница 33: ...your main network When you have guests in your house apartment or workplace you can create a guest network for them In addition you can customize guest network options to ensure network security and...

Страница 34: ...lly input the SSID for guest network access 3 Set Security to WPA WPA2 Personal keep the default Version and Encryption values and customize your own password 4 Click Save Now your guests can access y...

Страница 35: ...ng Allow guests to access my local network Check this box if you want to allow the wireless clients on your guest network to communicate with the devices connected to your router s LAN ports or main n...

Страница 36: ...his function allows you to block inappropriate explicit and malicious websites and control access to specified websites at specified time It contains the following sections Setting Up Access Restricti...

Страница 37: ...to 7 AM on weekdays How can I do that 1 Visit http tplinkwifi net and log in with your TP Link ID or the password you set for the router 2 Go to Basic Parental Controls or Advanced Parental Controls...

Страница 38: ...2 Click Next 6 Set time restrictions on internet access 1 Enable Time Limits on Monday to Friday and Saturday Sunday then set the allowed online time to 2 hours each day 2 Enable Bed Time and use the...

Страница 39: ...trols 3 Find the correct profile and click in the Insights column Note If you have not set up a profile for your child yet you should do that first by clicking then follow the steps to create a profil...

Страница 40: ...Chapter 9 QoS This chapter introduces how to create a QoS Quality of Service rule to specify prioritization of traffic and minimize the impact caused when the connection is under heavy load...

Страница 41: ...n I do that 1 Enable QoS and set bandwidth allocation 1 Visit http tplinkwifi net and log in with your TP Link ID or the password you set for the router 2 Go to Advanced QoS Global Settings 3 Select E...

Страница 42: ...n protect your home network against DoS Denial of Service attacks from flooding your network with server requests using DoS Protection block or allow specific client devices to access your network usi...

Страница 43: ...or the router 2 Go to Advanced Security Settings 3 Enable DoS Protection 4 Set the level Off Low Middle or High of protection for ICMP FLOOD Attack Filtering UDP FlOOD Attack Filtering and TCP SYN FLO...

Страница 44: ...t to Block or allow specific client devices to access my network via wired or wireless How can I do that 1 Visit http tplinkwifi net and log in with your TP Link ID or the password you set for the rou...

Страница 45: ...k OK Done Now you can block or allow specific client devices to access your network via wired or wireless using the Blacklist or Whitelist 10 3 IP MAC Binding IP MAC Binding namely ARP Address Resolut...

Страница 46: ...our device s according to your need To bind the connected device s Click to add the corresponding device to the Binding List To bind the unconnected device 1 Click Add in the Binding List section 2 En...

Страница 47: ...warding feature the router can penetrate the isolation of NAT and allows devices on the internet to initiatively communicate with devices on the local network thus realizing some special functions The...

Страница 48: ...verify the service port number before the configuration I want to SharemypersonalwebsiteI vebuiltinlocalnetworkwithmyfriendsthroughtheinternet Forexample thepersonalwebsitehasbeenbuiltonmyhomePC 192 1...

Страница 49: ...anuse http domain name to visit the website If you have changed the default External Port you should use http WAN IP External Port or http domain name External Port to visit the website 11 2 Open Port...

Страница 50: ...e enter the parameters manually You should verify the external ports the application uses first and enter them into External Port field according to the format the page displays 11 3 Make Applications...

Страница 51: ...to Advanced NAT Forwarding DMZ and select Enable DMZ 4 Enter the IP address 192 168 0 100 in the DMZ Host IP Address filed 5 Click Save Done The configuration is completed You ve set your PC to a DMZ...

Страница 52: ...to the router which has connected to the internet to play online games UPnP will send request to the router to open the corresponding ports allowing the following data penetrating the NAT to transmit...

Страница 53: ...more stable It is suitable for restricted environment such as campus network and company intranet PPTP VPN is more easily used and its speed is faster it s compatible with most operating systems and...

Страница 54: ...ID or the password you set for the router 2 Go to Advanced VPN Server OpenVPN and select Enable VPN Server Note Before you enable VPN Server we recommend you configure Dynamic DNS Service recommended...

Страница 55: ...e OpenVPN client utility on each device that you plan to apply the VPN funxtion to access your router Mobile devices should download a third party app from Google Play or Apple App Store 2 After the i...

Страница 56: ...s by the PPTP VPN server 4 Enter the Username and Password to authenticate clients to the PPTP VPN server 5 Click Save Step 2 Configure PPTP VPN Connection on Your Remote Device The remote device can...

Страница 57: ...53 Chapter 12 VPN Server 4 Select Use my Internet connection VPN 5 Enter the internet IP address of the router for example 218 18 1 73 in the Internet address field Click Next...

Страница 58: ...54 Chapter 12 VPN Server 6 Enter the User name and Password you have set for the PPTP VPN server on your router and click Connect 7 The PPTP VPN connection is created and ready to use...

Страница 59: ...55 Chapter 12 VPN Server...

Страница 60: ...eatures It contains the following sections Change the LAN Settings Configure to Support IPTV Service Specify DHCP Server Settings Set Up a Dynamic DNS Service Account Create Static Routes Specify Wire...

Страница 61: ...leave the Subnet Mask as the default settings 4 Click Save Note If you have set the Virtual Server DMZ or DHCP address reservation and the new LAN IP address is not in the same subnet with the old one...

Страница 62: ...ters 3 After you have selected a mode the necessary parameters including the LAN port for IPTV connection are predetermined If not select the LAN type to determine which port is used to support IPTV s...

Страница 63: ...the password you set for the router 2 Go to Advanced Network DHCP Server To specify the IP address that the router assigns 1 Enable DHCP Server 2 Enter the starting and ending IP addresses in the IP A...

Страница 64: ...the DDNS Dynamic Domain Name Server feature on the router to allow you and your friends to access your router and local servers FTP HTTP etc using a domain name without checking and remembering the I...

Страница 65: ...you have to log in with a TP Link ID If you have not logged in with one click Log in 4 Click Register in the Domain Name List if you have chosen TP Link and enter the Domain Name as needed If you have...

Страница 66: ...ackets to the specific destination I want to Visit multiple networks and servers at the same time For example in a small office my PC can surf the internet through Router A but I also want to visit my...

Страница 67: ...0 30 1 Subnet Mask Determines the destination network with the destination IP address If the destination is a single IP address enter 255 255 255 255 otherwise enter the subnet mask of the correspondi...

Страница 68: ...o to Advanced Wireless Wireless Settings 2 The wireless radio is enabled by default If you want to disable the wireless function of the router just uncheck the box for Enable Wireless Radio In this ca...

Страница 69: ...GHz or 5GHz 3 Select an option from the Security drop down list We recommend you don t change the default settings unless necessary If you select other options configure the related parameters accordi...

Страница 70: ...can use WPS Wi Fi Protected Setup feature to add a new wireless device to your existing network quickly 13 7 1 Method 1 Use the WPS Button Use this method if your client device has a WPS button 1 Pres...

Страница 71: ...MAC addresses I want to Deny or allow specific wireless client devices to access my network by their MAC addresses For example you want the wireless client A with the MAC address 00 0A EB B0 00 0B and...

Страница 72: ...listed as the picture shows below Done Now only client A and client B can access your network 13 9 Schedule Your Wireless Function This feature allows you to turn off the wireless netowrks at a speci...

Страница 73: ...k Save Note The Effective Time Schedule is based on the time of the Router Make sure that the time of the router is correct before applying this function For details refer to Set Up System Time The wi...

Страница 74: ...contains the following sections Set Up System Time Test the Network Connectivity Upgrade the Firmware Backup and Restore Configuration Settings Set the Router to Reboot Regularly Change the Administr...

Страница 75: ...2 Select your local Time Zone from the drop down list 3 Optional Enter the IP address of the NTP Server I or NTP Server II and the router will get the time from the NTP Server automatically In additi...

Страница 76: ...ther network devices 1 Visit http tplinkwifi net and log in with your TP Link ID or the password you set for the router 2 Go to Advanced System Tools Diagnostics 3 Enter the information with the help...

Страница 77: ...iding better network experience for users We will inform you throught the web management page if there s any update firmware available for your router Also the latest firmware will be released at the...

Страница 78: ...a web browser is opened Click Upgrade now and log into the web management page with the username and password you set for the router You will see the Firmware Upgrade page 14 3 2 Local Upgrade 1 Downl...

Страница 79: ...Browse and select the downloaded firmware file 5 Click Upgrade and wait for a few minutes until the router completes the upgrading and restarts 14 4 Backup and Restore Configuration Settings The conf...

Страница 80: ...r the Factory Default Restore session 2 Wait a few minutes for the resetting and rebooting Note During the resetting process do not turn off the router After reset you can still use the current login...

Страница 81: ...tart To reboot regularly 1 Select Timeout to reboot the router when time is out or select Schedule to set when and how often the router reboots regularly 2 Click Save 14 6 Change the Administrator Acc...

Страница 82: ...mplete the settings In Local Management section as needed 3 Enable Local Management via HTTPS as needed 4 Keep the Port as the default setting Enter a valid local IP address or MAC address of the devi...

Страница 83: ...ss the router remotely select Only the Following IP MAC Address and enter a valid local IP address or MAC address of the device If you want all devices to be allowed to access the router remotely sele...

Страница 84: ...ecific logs 2 Select the log Level and you will see the logs with the specific or higher levels 3 Click Refresh to refresh the log list To save the system logs You can choose to save the system logs t...

Страница 85: ...nformation of the remote server If the remote server has a log viewer client or a sniffer tool implemented you can view and analyze the system log remotely in real time 14 10 Monitor the Internet Traf...

Страница 86: ...less networks It s recommended to keep the default settings if you are not sure of the proper ones in the case Click on the management interface to know more about items 1 Visit http tplinkwifi net an...

Страница 87: ...Wireless Distribution System Bridging feature allows you to bridge a router with an access point to extend the wireless network coverage The access point should also support WDS Bridging feature 1 Vi...

Страница 88: ...r the router 2 Go to Advanced System Tools System Parameters Focus on LED section 3 Tick the Night Mode checkbox 4 Specify a time period in the LED Off Time as needed and the LEDs will be off during t...

Страница 89: ...85 Chapter 14 Manage the Router...

Страница 90: ...tp tplinkwifi net to create a new login password Note You ll need to reconfigure the router to surf the internet once the router is reset and please mark down your new password for future use Q3 What...

Страница 91: ...87 4 Click LAN settings and deselect the following three options and click OK 5 Go to Advanced Restore advanced settings click OK to save the settings...

Страница 92: ...router is limited I want to use an extended router to boost the wireless network of the root router Note WDS bridging only requires configuration on the extended router WDS bridging function can be e...

Страница 93: ...WDS Bridging feature 2 Click Survey to scan all available networks and select the network you want to bridge The SSID network name and MAC Address will be automatically populated You can also manually...

Страница 94: ...r 2 Go to Advanced Status to check internet status As the follow picture shows if IP Address is a valid one please try the methods below and try again Your computer might not recognize any DNS server...

Страница 95: ...heck the TCP IP settings on the particular device if all other devices can get internet from the router As the picture below shows if the IP Address is 0 0 0 0 please try the methods below and try aga...

Страница 96: ...existing ADSL modem router If so the router is not able to communicate with your modem and you can t access the internet To resolve this problem we need to change the LAN IP address of the router to...

Страница 97: ...rnet please contact the technical support Q6 What should I do if I cannot find my wireless network or I cannot connect the wireless network If you fail to find any wireless network please follow the s...

Страница 98: ...uration in the Services list on the right side 5 Right click Wireless Zero Configuration and then select Properties 6 Change Startup type to Automatic click on Start button and make sure the Service s...

Страница 99: ...Key 3 If it continues to show note of Network Security Key Mismatch it is suggested to confirm the wireless password of your wireless router Note Wireless Password Network Security Key is case sensiti...

Страница 100: ...roduct names are trademarks or registered trademarks of their respective holders No part of the specifications may be reproduced in any form or by any means or used to make any derivative such as tran...

Страница 101: ...e instructions may cause harmful interference to radio communications However there is no guarantee that interference will not occur in a particular installation If this equipment does cause harmful i...

Страница 102: ...t be co located or operating in conjunction with any other antenna or transmitter The device is restricted in indoor environment only We TP Link USA Corporation has determined that the equipment shown...

Страница 103: ...ifferent from that to which the receiver is connected Consult the dealer or an experienced radio TV technician for help This device complies with part 15 of the FCC Rules Operation is subject to the f...

Страница 104: ...nditions 1 This device may not cause interference and 2 This device must accept any interference including interference that may cause undesired operation of the device Le pr sent appareil est conform...

Страница 105: ...sign s utilisateurs principaux c d qu ils ont la priorit pour les bandes 5745 5850 MHz et que ces radars pourraient causer du brouillage et ou des dommages aux dispositifs LAN EL Radiation Exposure St...

Страница 106: ...the device Do not use any other chargers than those recommended Do not use the device where wireless devices are not allowed Adapter shall be installed near the equipment and shall be easily accessibl...

Страница 107: ...equipment WEEE This means that this product must be handled pursuant to European directive 2012 19 EU in order to be recycled or dismantled to minimize its impact on the environment User has the choic...

Отзывы: