TOYOTA
4-RUNNER
2006 -
TOWING HITCH
Procedure
Page 4 of 7 pages
Issue: C 07/06/05
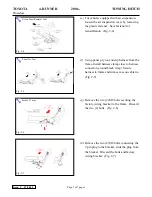
3. Attach Hitch Center to Vehicle.
(a) Install closeout panel and (2) spacer plates to
center attachment bracket by hand starting
(2) M12-1.25x45 black bolts through
closeout panel and spacer plates into forward
most set of holes. (Fig. 3-1)
(b) Slide hitch onto pre-installed bolts using
open ended slots to support the hitch.
(Fig. 3-1)
(c) Hand start two (2) M12-1.25x45 black bolts
to rear most position to secure the hitch and
spacer plates using a socket extension and a
17mm socket. Bolts can be fed through
chain holes. Do not tighten. (Fig. 3-1)
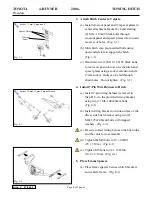
4. Install 7-Pin Wire Harness to Hitch.
(a) Install 7-pin wiring harness (removed in
Step B. 8.) to the provided wiring bracket
using two (2) M6-1.00x20mm bolts.
(Fig. 4-1)
(b) Install wiring bracket to inside surface of the
driver side hitch bracket using two (2)
M8x1.25x20 black bolts with trapped
washers. (Fig. 4-1)
(c) Be sure to feed wiring between the hitch tube
and the vehicle cross member.
(d) Tighten the M8 bolts to 19 ± 4 lbf•ft
(25 ± 5 N•m). (Fig. 4-1)
(e) Tighten M6 bolts to 94 ± 19 lbf•in
(10.4 ± 2 N•m). (Fig. 4-1)
5. Place Frame Spacers.
(a) Place frame spacers between hitch brackets
and vehicle frame. (Fig. E-1)
Fig. 3-1
Socket, 17 mm, Extension 6”
Closeout
Panel
Spacer Plates
Fig. 4-1
Socket, 10 mm, 12mm; Torque Wrench
Fig. 3-1


