background image

Z10079

Length

Length

Brush Holder Side

Field Frame Side

ST0019

P00303

Ohmmeter

No Continuity

--

STARTING 

STARTER

ST--7

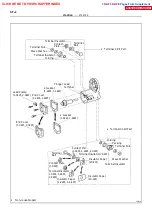
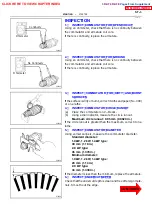
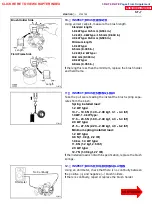
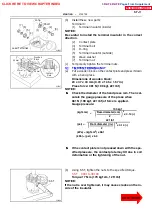
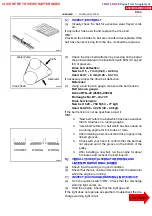
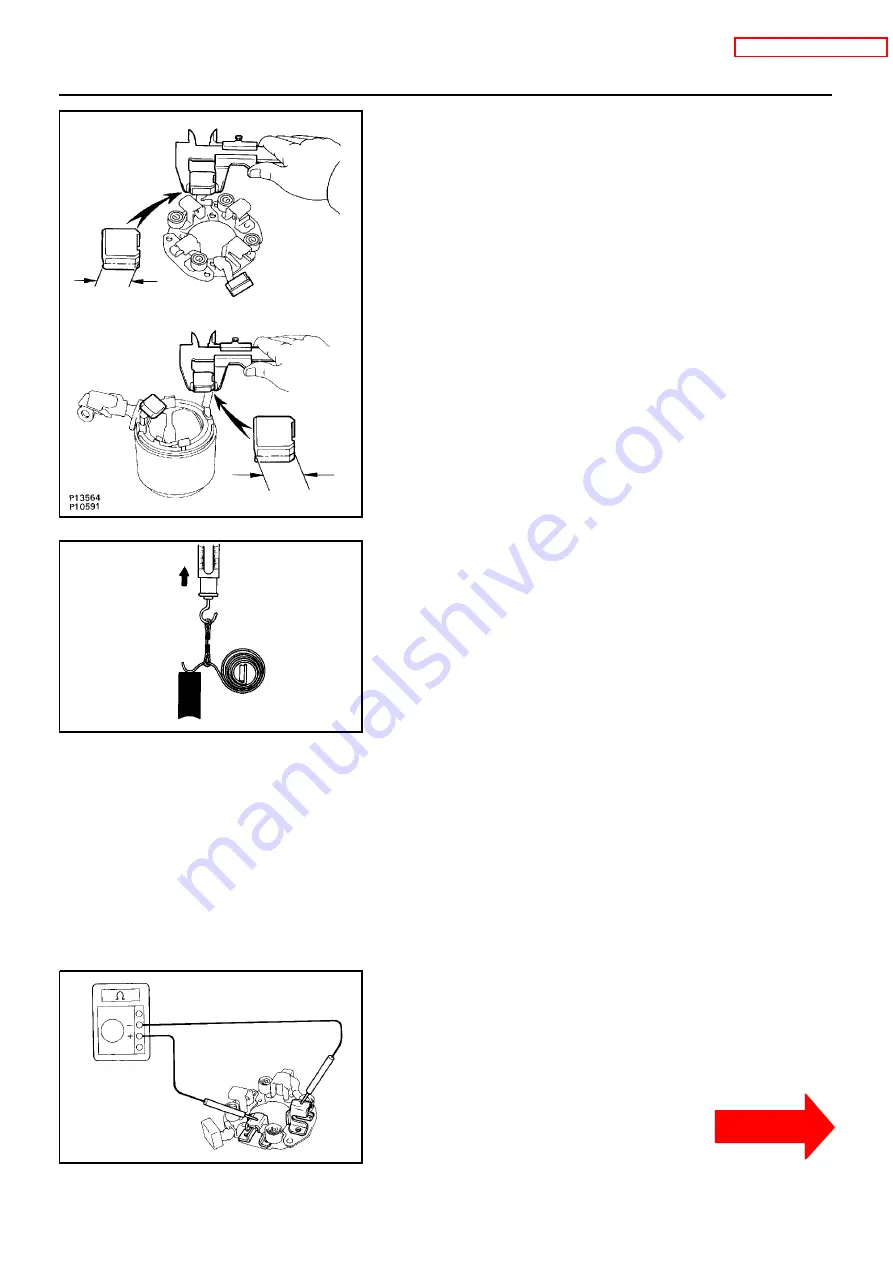
10. INSPECT BRUS H L E NG T H

Using vernier calipers, measure the brush length.

Standard length:
1.0 kW type: 13.5 mm (0.531 in.)
1.2 kW, 1.4 kW type: 15.5 mm (0.610 in.)
2.0 kW type: 15.0 mm (0.596 in.)
Minimum length:
1.0 kW type:
8.5 mm (0.335 in.)
1.2 kW, 1.4 kW type:
10.0 mm (0.394 in.)
2.0 kW type:
9.0 mm (0.355 in.)

If the length is less than the minimum, replace the brush holder
and field frame.

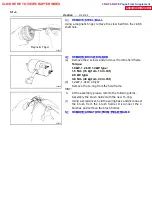
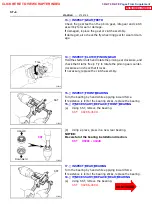
11 . INSPECT BRUS H S P RI NG L O AD

Take the pull scale reading the instant the brush spring sepa-
rates from the brush.

Spring installed load:
1.2 kW type:
13.7 -- 19.6 N (1.40 -- 2.00 kgf, 3.1 -- 4.4 lbf)
1.0kW, 1.4 kW type:
17.6 -- 23.5 N (1.80 -- 2.40 kgf, 4.0 -- 5.3 lbf)
2.0 kW type:
21.5 -- 27.5 N (2.20 -- 2.80 kgf, 4.9 -- 6.2 lbf)
Minimum spring installed load:
1.2 kW type:
9.8 N (1.0 kgf, 2.2 lbf)
1.0k w, 1.4 kW type:
11.8 N (1.2 kgf, 2.6 lbf)
2.0 kW type:
12.7 N (1.30 kgf, 2.7 lbf)

If the installed load is not within specification, replace the brush
springs.

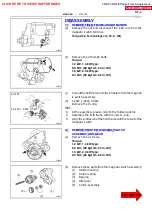
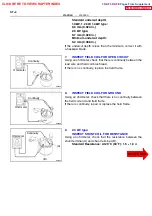
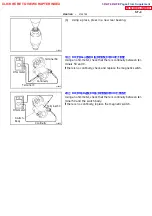
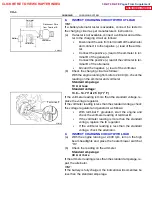
12. INSPECT BRUS H HO L DE R I NS ULAT I O N

Using an ohmmeter, check that there is no continuity between
the positive (+) and negative (--) brush holders.
If there is continuity, repair or replace the brush holder.

CLICK HERE TO VIEW CHAPTER INDEX

Pages From Supplement

TO MODEL INDEX

CONTINUED

3RZ-F,3RZ-FE
Содержание 1RZ

Страница 1: ...t may cause severe injury to you or other people around and also cause damage to your customer s vehicle In order to prevent dangerous operation and damages to your customer s vehicle be sure to follow the instruction shown below S Must read this manual thoroughly It is especially important to have good understanding all the contents written in the PRECAUTION of IN section S The service method wri...

Страница 2: ...E MECHANICAL EMISSION CONTROL ELECTRONIC FUEL INJECTION COOLING LUBRICATION IGNITION STARTING CHARGING ALPHABETICAL INDEX BACK TO MAIN FOREWORD Engine Index SUPPLEMENT ENGINE 3RZ F 3RZ FE Pages From Supplement TO MODEL INDEX MAIN INDEX HILUX August 1997 3RZ F 3RZ FE ...

Страница 3: ...L INFORMATION IN 4 FOR ALL OF VEHICLES IN 7 PRECAUTION IN 7 HOW TO TROUBLESHOOT ECU CONTROLLED SYSTEMS IN 8 GENERAL INFORMATION IN 8 HOW TO PROCEED WITH TROUBLESHOOTING IN 9 HOW TO USE THE DIAGNOSTIC CHART AND INSPECTION PROCEDURE IN 21 TERMS IN 26 ABBREVIATIONS USED IN THIS MANUAL IN 26 BACK TO MAIN INDEX Pages From Supplement TO MODEL INDEX 3RZ F 3RZ FE ...

Страница 4: ...ained in that section Read these precautions before starting any repair task 3 TROUBLESHOOTING TROUBLESHOOTING tables are included for each system to help you diagnose the problem and find the cause The fundamentals of how to proceed with troubleshooting are described on page IN 8 Be sure to read this before performing troubleshooting 4 PREPARATION Preparation lists the SST Special Service Tools r...

Страница 5: ...t provides detailed informa tion Important specifications and warnings always stand out in bold type 6 REFERENCES References have been kept to a minimum However when they are required you are given the page to refer to 7 SPECIFICATIONS Specifications are presented in bold type throughout the text where needed You never have to leave the procedure to look up your specifications They are also found ...

Страница 6: ...N IDENTIFICATION INFORMATION IN 3 IDENTIFICATION INFORMATION ENGINE SERIAL NUMBER The engine serial number is stamped on the engine block as shown CLICK HERE TO VIEW CHAPTER INDEX Pages From Supplement TO MODEL INDEX 3RZ F 3RZ FE ...

Страница 7: ...t loose and tighten the nut after installation Do not use a hammer to tap the cable ends onto the terminals 6 Be sure the cover for the positive terminal is properly in place d Check hose and wiring connectors to make sure that they are secure and correct e Non reusable parts 1 Always replace cotter pins gaskets O rings and oil seals etc with new ones 2 Non reusable parts are indicated in the comp...

Страница 8: ... SSM can be found in the preparation part at the front of each section in this manual j When replacing fuses be sure the new fuse has the cor rect amperage rating DO NOT exceed the rating or use one with a lower rating k Care must be taken when jacking up and supporting the vehicle Be sure to lift and support the vehicle at the prop er locations 1 If the vehicle is to be jacked up only at the fron...

Страница 9: ...ch to remove or install temperature switches or temperature sensors 7 When checking continuity at the wire connector in sert the tester probe carefully to prevent terminals from bending 8 When using a vacuum gauge never force the hose onto a connector that is too large Use a step down adapter instead Once the hose has been stretched it may leak m Tag hoses before disconnecting them 1 When disconne...

Страница 10: ...tion systems such as two way radios and cellular telephones observe the following precautions 1 Install the antenna as far as possible away from the ECU and sensors of the vehicle s electronic system 2 Install the antenna feeder at least 20 cm 7 87 in away from the ECU and sensors of the ve hicle s electronics systems For details about ECU and sensors locations refer to the section on the applicab...

Страница 11: ...leshooting of these systems is not complex If you have adequate understanding of the system and a basic knowledge of electricity accurate diagnosis and necessary repair can be performed to locate and fix the problem This manual is designed through emphasis of the above standpoint to help service technicians perform accurate and effective troubleshooting and is compiled for the following major ECU ...

Страница 12: ...D DIAGNOSTIC TROUBLE CODE CHECK IN 11 12 3 SYMPTOM SIMULATION IN 13 14 4 1RZ E DIAGNOSTIC TROUBLE CODE CHART IN 15 5 2RZ FE 3RZ FE DIAGNOSTIC TROUBLE CODE CHART IN 16 6 PROBLEM SYMPTOMS TABLE IN 17 7 1RZ FE CIRCUIT INSPECTION IN 18 8 2RZ FE 3RZ FE CIRCUIT INSPECTION IN 19 20 CLICK HERE TO VIEW CHAPTER INDEX TO MODEL INDEX Pages From Supplement 3RZ F 3RZ FE ...

Страница 13: ...nostic trouble code chart or the matrix chart of problem symptoms 4 5 6 Check and repair the affected system or part in accordance with the instructions in Step 6 7 After completing repairs confirm that the problem has been eliminated If the problem is not reproduced perform the confirmation test under the same conditions and in the same environment as when it occurred for the first time 8 INTRODU...

Страница 14: ...uring A C operation Shifting from N to D Other Datas Problem Constant Sometimes times per day month Inspector s Name CUSTOMER PROBLEM ANALYSIS CHECK IN 10 INTRODUCTION HOW TO TROUBLESHOOT ECU CONTROLLED SYSTEMS 1 CUSTOMER PROBLEM ANALYSIS In troubleshooting the problem symptoms must be confirmed accurately and all preconceptions must be cleared away in order to give an accurate judgment To ascerta...

Страница 15: ...y the technician during troubleshooting Another function is the Input Signal Check which checks if the signals from various switches are sent to the ECU correctly By using these check functions the problem areas can be narrowed down quickly and troubleshooting can be performed effectively Diagnostic functions are incorporated in the following systems in the HILUX System Diagnostic Trouble Code Che...

Страница 16: ... displayed in the initial diagnostic trouble code check it indicates that the trouble may have occurred in a wire harness or connector in that circuit in the past Therefore check the wire harness and con nectors See page IN 21 IN 12 INTRODUCTION HOW TO TROUBLESHOOT ECU CONTROLLED SYSTEMS Taking into account the above points a flow chart showing how to proceed with troubleshooting using the diagnos...

Страница 17: ...in the repair operation and make a wrong guess somewhere which will only lead to a standstill For example for a problem which only occurs when the en gine is cold or for a problem which occurs due to vibration caused by the road during driving etc the prob lem can never be determined so long as the symptoms are confirmed with the engine hot condition or the vehicle at a standstill Since vibration ...

Страница 18: ...e malfunction seems to occur on a rainy day or in a high humidity condition Heat the component that is the likely cause of the malfunction with a hair dryer or similar object Check to see if the malfunction occurs Sprinkle water onto the vehicle and check to see if the malfunc tion occurs Turn on all electrical loads including the heater blower head lights rear window defogger etc and check to see...

Страница 19: ... type of instrument or other factors If a malfunction code is displayed during the DTC check in check mode check the circuit for that code listed in the table below For details of each code turn to the page referred to under the See page for the respective DTC No in the DTC chart D Open or short in NE circuit D IIA D Engine ECU D Open or short in water temp sensor circuit D Water temp sensor D Eng...

Страница 20: ...If a malfunction code is displayed during the DTC check in check mode check the circuit for that code listed in the table below For details of each code turn to the page referred to under the See page for the respective DTC No in the DTC chart D Open or short in intake air temp sensor circuit D Intake air temp sensor D Engine ECU D Open or short in throttle position sensor circuit D Throttle posit...

Страница 21: ...power sourcecircuit 2 Fuel pump control circuit 3 Engine ECU 1 Starter signal circuit 2 Fuel pump control circuit 1 Fuel pump control circuit ST 12 13 DI 124 DI 127 IN 30 PROBLEM SYMPTOMS TABLE 1 Compression 2 Fuel pump control circuit 1 A C signal circuit 2 Fuel pump control circuit 1 A C signal circuit Compressor circuit 2 Engine ECU power source circuit 1 Starter signal circuit 2 Fuel pump cont...

Страница 22: ...n is poor A rich mix ture is these fore necessary in order to achieve good startability While the engine is being cranked the battery positive voltage is applied to terminal STA of the ECU DTC No Detection Item Trouble Area 43 No starter signal to ECU D Open or short in signal circuit D engine ECU D Diagnostic Trouble Code No and Detection Item D Circuit Description The major role and operation et...

Страница 23: ...tric element which generates a voltage when it becomes deformed which occurs when the cylinder block vibrates due to knocking DTC No Detection Item Trouble Area P0325 52 No knock sensor 1 signal to engine ECU with engine speed between 1 700 rpm and 5 200 rpm D Open or short in knock sensor circuit D Knock sensor Looseness D Engine ECU D Diagnostic Trouble Code No and Detection Item D Circuit Descr...

Страница 24: ...rness Ignition Switch LOCK OFF Ignition Switch START LOCK Ignition Switch ON Ignition Switch ACC START ON ACC D Inspection Procedure Use the inspection procedure to determine if the circuit is normal or abnormal and if it is abnormal use it to determine whether the problem is located in the sensors actuators wire harness or ECU D Indicates the place to check the voltage or resistance D Indicates t...

Страница 25: ...ver these instructions appear OPEN CIRCUIT This could be due to a disconnected wire harness faulty con tact in the connector a connector terminal pulled out etc HINT S It is rarely the case that a wire is broken in the middle of it Most cases occur at the connector In particular care fully check the connectors of sensors and actuators S Faulty contact could be due to rusting of the connector termi...

Страница 26: ...both ends b Measure the resistance between the applicable terminals of the connectors and body ground Be sure to carry out this check on the connectors on both ends Resistance 1 MΩ or higher HINT Measure the resistance while lightly shaking the wire harness vertically and horizontally 4 VISUAL CHECK AND CONTACT PRESSURE CHECK a Disconnect the connectors at both ends b Check for rust or foreign mat...

Страница 27: ...uity 1 Disconnect connectors A and C and measure the resistance between them In the case of Fig 2 Between terminal 1 of connector A and terminal 1 of connector C No continuity open Between terminal 2 of connector A and terminal 2 of connector C Continuity Therefore it is found out that there is an open circuit between terminal 1 of connector A and terminal 1 of connector C 2 Disconnect connector B...

Страница 28: ...n Terminal 1 of connector B and Body Ground 0V Between Terminal 1 of connector C and Body Ground Then it is found out that there is an open circuit in the wire har ness between terminal 1 of B and terminal 1 of C 7 CHECK SHORT CIRCUIT If the wire harness is ground shorted as in Fig 5 locate the sec tion by conducting a continuity check with ground Check the continuity with ground 1 Disconnect conn...

Страница 29: ... short therefore it is found out that there is a short circuit between terminal 1 of connector B2 and terminal 1 of connector C 8 CHECK AND REPLACE ECU First check the ECU ground circuit If it is faulty repair it If it is normal the ECU could be faulty so replace the ECU with a known good one and check if the symptoms appear 1 Measure the resistance between the ECU ground terminal and the body gro...

Страница 30: ...med In Place Gasket FL Fusible Link M T Manual Transmission IG Ignition IIA Integrated Ignition Assembly ISC Idle Speed Control J B Junction Block O S Oversize PCV Positive Crankcase Ventilation SSM Special Service Materials SST Special Service Tools SW Switch TDC Top Dead Center TWC Three Way Catalyst VSV Vacuum Switching valve w With w o Without 2WD Two Wheel Drive Vehicles 4 x 2 4WD Four Wheel ...

Страница 31: ...NE MECHANICAL PP 1 EMISSION CONTROL PP 8 ELECTRONIC FUEL INJECTION PP 10 COOLING PP 13 LUBRICATION PP 15 IGNITION PP 20 STARTING PP 22 CHARGING PP 25 BACK TO MAIN INDEX Pages From Supplement TO MODEL INDEX 3RZ F 3RZ FE ...

Страница 32: ...pressor 09207 76010 Rocker Arm Bushing 09213 54015 Crankshaft Pulley Holding Tool 09223 15030 Oil Seal Bearing Replacer Crankshaft rear oil seal 09223 50010 Crankshaft Front oil Seal Replacer 09236 00101 Water Pump Overhaul Tool Set 09236 15010 Bearing Stay Valve stem oil seal 09243 00020 Idle Adjusting Screw Wrench 09248 55040 Valve Clearance Adjust Tool Set CLICK HERE TO VIEW CHAPTER INDEX Pages...

Страница 33: ... 1 Replacer Handle Valve guide busing 09608 30012 Front Hub Drive Pinion Bearing Tool Set 09951 07100 Handle 100 Crankshaft rear oil seal 09636 20010 Upper Ball Joint Dust Cover Replacer Crankshaft timing gear 09816 30010 Oil Pressure Switch Socket Knock sensor 09843 18020 Diagnosis Check Wire 09950 40010 Puller B Set 09951 04010 Hanger 150 CLICK HERE TO VIEW CHAPTER INDEX Pages From Supplement CO...

Страница 34: ... 09950 50010 Puller C Set 09951 05010 Hanger 150 09952 05010 Slide Arm 09953 05010 Center Bolt 100 09954 05020 Claw No 2 09960 10010 Variable Pin Wrench Set 09962 01000 Variable Pin Wrench Arm Assy 09963 00500 Pin 5 09963 01000 Pin 10 CLICK HERE TO VIEW CHAPTER INDEX Pages From Supplement CONTINUED TO MODEL INDEX 3RZ F 3RZ FE ...

Страница 35: ...PP 4 PREPARATION ENGINE MECHANICAL 09950 70010 Handle Set 09951 07150 Handle 150 CLICK HERE TO VIEW CHAPTER INDEX Pages From Supplement CONTINUED TO MODEL INDEX 3RZ F 3RZ FE ...

Страница 36: ...5 RECOMMENDED TOOLS 09082 00040 TOYOTA Electrical Tester 09200 00010 Engine Adjust Kit 09258 00030 Hose Plug Set Plug for the vacuum hose fuel hose etc CLICK HERE TO VIEW CHAPTER INDEX Pages From Supplement CONTINUED TO MODEL INDEX 3RZ F 3RZ FE ...

Страница 37: ...ster Heater Magnetic finger Micrometer OBD II scan tool Engine speed Piston ring compressor Piston ring expander Plastigage Precision straight edge Soft brush Spring tester Valve spring Steel square Valve spring Thermometer Torque wrench V block Valve seat cutter Vernier calipers Tachometer CLICK HERE TO VIEW CHAPTER INDEX Pages From Supplement CONTINUED TO MODEL INDEX 3RZ F 3RZ FE ...

Страница 38: ...cylinder head and timing chain cover Semi circular plug Oil pan Rear oil seal retaine 08833 00070 Adhesive 1324 THREE BOND 1324 or equivalent Spark plug tube Drive plate bolt 08833 00080 Adhesive 1344 THREE BOND 1344 LOCTITE 242 or equivalent Oil pressure switch CLICK HERE TO VIEW CHAPTER INDEX Pages From Supplement TO MODEL INDEX 3RZ F 3RZ FE ...

Страница 39: ...PP0L6 01 PP 8 PREPARATION EMISSION CONTROL EMISSION CONTROL RECOMMENDED TOOLS 09082 00040 TOYOTA Electrical Tester CLICK HERE TO VIEW CHAPTER INDEX Pages From Supplement TO MODEL INDEX 3RZ F 3RZ FE ...

Страница 40: ...PP0L7 01 PREPARATION EMISSION CONTROL PP 9 EQUIPMENT OBD II scan tool Engine speed Torque wrench Vacuum gauge CLICK HERE TO VIEW CHAPTER INDEX Pages From Supplement TO MODEL INDEX 3RZ F 3RZ FE ...

Страница 41: ...ng Tool Set 09268 41091 NO 7 Union 90405 09015 No 1 Union 09268 45012 EFI Fuel Pressure Gauge 09631 22020 Power Steering Hose Nut 14 x 17 mm Wrench Set Fuel line flare nut 09816 30010 Oil Pressure Switch Socket Knock sensor 09842 30070 Wiring F EFI Inspection 09843 18020 Diagnosis Check Wire CLICK HERE TO VIEW CHAPTER INDEX Pages From Supplement TO MODEL INDEX 3RZ F 3RZ FE ...

Страница 42: ...ECTION PP 11 RECOMMENDED TOOLS 09082 00040 TOYOTA Electrical Tester 09200 00010 Engine Adjust Kit 09258 00030 Hose Plug Set Plug for vacuum hose fuel hose etc CLICK HERE TO VIEW CHAPTER INDEX Pages From Supplement TO MODEL INDEX 3RZ F 3RZ FE ...

Страница 43: ... EQUIPMENT Carburetor cleaner Throttle body Graduated cylinder Injector Heater Ohmmeter Soft brush Throttle body Sound scope Injector Thermometer Tachometer Torque wrench CLICK HERE TO VIEW CHAPTER INDEX Pages From Supplement TO MODEL INDEX 3RZ F 3RZ FE ...

Страница 44: ...B 01 PREPARATION COOLING PP 13 COOLING EQUIPMENT Heater Thermostat Radiator cap tester Thermometer Thermostat Torque wrench CLICK HERE TO VIEW CHAPTER INDEX Pages From Supplement TO MODEL INDEX 3RZ F 3RZ FE ...

Страница 45: ...ters 8 2 US qts 6 9 lmp qts 7 8 liters 8 2 US qts 6 9 lmp qts 7 3 liters 7 7 US qts 6 4 lmp qts 7 4 liters 7 8 US qts 6 5 lmp qts 6 9 liters 7 3 US qts 6 1 lmp qts 7 7 liters 8 1 US qts 6 8 lmp qts 7 2 liters 7 6 US qts 6 3 lmp qts 7 7 liters 8 1 US qts 6 8 lmp qts Ethylene glycol base CLICK HERE TO VIEW CHAPTER INDEX Pages From Supplement TO MODEL INDEX 3RZ F 3RZ FE ...

Страница 46: ...5 LUBRICATION SST Special Service Tools 09223 50010 Crankshaft Front oil Seal Replacer 09228 07501 Oil Filter Wrench 09816 30010 Oil Pressure Switch Socket CLICK HERE TO VIEW CHAPTER INDEX Pages From Supplement TO MODEL INDEX 3RZ F 3RZ FE ...

Страница 47: ...PP0LE 01 PP 16 PREPARATION LUBRICATION RECOMMENDED TOOLS 09200 00010 Engine Adjust Kit CLICK HERE TO VIEW CHAPTER INDEX Pages From Supplement TO MODEL INDEX 3RZ F 3RZ FE ...

Страница 48: ...PP0LF 01 PREPARATION LUBRICATION PP 17 EQUIPMENT Oil pressure gauge Precision straight edge Oil pump Torque wrench CLICK HERE TO VIEW CHAPTER INDEX Pages From Supplement TO MODEL INDEX 3RZ F 3RZ FE ...

Страница 49: ...e 5 1 liters 5 4 US qts 4 5 lmp qts 4 7 liters 5 0 US qts 4 1 lmp qts 4 0 liters 4 2 US qts 3 5 lmp qts 6 3 liters 6 7 US qts 5 5 lmp qts 6 0 liters 6 3 US qts 5 3 lmp qts 5 3 liters 5 6 US qts 4 7 lmp qts API grade SH Energy Conserving II or SJ Ener gy Conserving or ILSAC multigrade engine oil Recommended viscosity is as shown in the il lustration CLICK HERE TO VIEW CHAPTER INDEX Pages From Suppl...

Страница 50: ...N LUBRICATION PP 19 SSM Service Special Materials 08833 00080 Adhesive 1344 THREE BOND 1344 LOCTITE 242 or equivalent Oil pressure switch CLICK HERE TO VIEW CHAPTER INDEX Pages From Supplement TO MODEL INDEX 3RZ F 3RZ FE ...

Страница 51: ... 01 PP 20 PREPARATION IGNITION IGNITION RECOMMENDED TOOLS 09082 00040 TOYOTA Electrical Tester 09200 00010 Engine Adjust Kit CLICK HERE TO VIEW CHAPTER INDEX Pages From Supplement TO MODEL INDEX 3RZ F 3RZ FE ...

Страница 52: ...PP0LJ 01 PREPARATION IGNITION PP 21 EQUIPMENT Spark plug cleaner Torque wrench Ohmmeter CLICK HERE TO VIEW CHAPTER INDEX Pages From Supplement TO MODEL INDEX 3RZ F 3RZ FE ...

Страница 53: ...9286 46011 Injection Pump Spline Shaft Puller Armature bearing 09810 38140 Starter Magnet Switch Nut Wrench 14 Terminal nut 09820 00030 Alternator Rear Bearing Replacer Armature rear bearing CLICK HERE TO VIEW CHAPTER INDEX Pages From Supplement TO MODEL INDEX 3RZ F 3RZ FE ...

Страница 54: ...PP0LL 01 PREPARATION STARTING PP 23 RECOMMENDED TOOLS 09082 00040 TOYOTA Electrical Tester CLICK HERE TO VIEW CHAPTER INDEX Pages From Supplement TO MODEL INDEX 3RZ F 3RZ FE ...

Страница 55: ...mmutator Magnetic finger Steel ball Pull scale Brush spring Sandpaper Commutator Torque wrench V block Commutator Vernier calipers Commutator Brush Press Magnetic switch terminal kit CLICK HERE TO VIEW CHAPTER INDEX Pages From Supplement TO MODEL INDEX 3RZ F 3RZ FE ...

Страница 56: ...ne Shaft Puller Rectifier end frame 09820 00021 Alternator Rear Bearing Puller 09820 00030 Alternator Rear Bearing Replacer Rotor rear bearing 09820 63010 Alternator Pulley Set Nut Wrench Set 09950 60010 Replacer Set Rotor front bearing 09951 00260 Replacer 26 09951 00500 Replacer 50 09952 06010 Adapter CLICK HERE TO VIEW CHAPTER INDEX Pages From Supplement TO MODEL INDEX 3RZ F 3RZ FE ...

Страница 57: ...PP0LO 01 PP 26 PREPARATION CHARGING RECOMMENDED TOOLS 09082 00040 TOYOTA Electrical Tester CLICK HERE TO VIEW CHAPTER INDEX Pages From Supplement TO MODEL INDEX 3RZ F 3RZ FE ...

Страница 58: ... CHARGING PP 27 EQUIPMENT Ammeter A Battery specific gravity gauge Belt tension gauge Torque wrench Vernier calipers Rotor Slip ring Brush CLICK HERE TO VIEW CHAPTER INDEX Pages From Supplement TO MODEL INDEX 3RZ F 3RZ FE ...

Страница 59: ...BOLT SS 1 ENGINE MECHANICAL SS 3 EMISSION CONTROL SS 14 ELECTRONIC FUEL INJECTION SS 15 COOLING SS 18 LUBRICATION SS 20 IGNITION SS 22 STARTING SS 24 CHARGING SS 26 BACK TO MAIN INDEX Pages From Supplement TO MODEL INDEX 3RZ F 3RZ FE ...

Страница 60: ...2 Protruding lines 2 Protruding lines 3 Protruding lines 4 Protruding lines Hexagon flange bolt w washer hexagon bolt Hexagon flange bolt w washer hexagon bolt Hexagon flange bolt w washer hexagon bolt Stud bolt Welded bolt 4 Protruding lines 5 Protruding lines 6 Protruding lines No mark Grooved 9T 10T 11T 4T 6T 4T SERVICE SPECIFICATIONS STANDARD BOLT SS 1 STANDARD BOLT HOW TO DETERMINE BOLT STREN...

Страница 61: ... head bolt Hexagon flange bolt N m kgf cm ft lbf N m kgf cm ft lbf in lbf in lbf in lbf in lbf in lbf in lbf SS 2 SERVICE SPECIFICATIONS STANDARD BOLT SPECIFIED TORQUE FOR STANDARD BOLTS CLICK HERE TO VIEW CHAPTER INDEX Pages From Supplement TO MODEL INDEX 3RZ F 3RZ FE ...

Страница 62: ...ntacting angle Exhaust Contacting width Cylinder head bolt thread outside diameter STD Minimum 0 15 mm 0 0059 in 0 20 mm 0 0079 in 30 45 60 45 1 0 1 4 mm 0 039 0 055 in 10 760 10 970 mm 0 4236 0 4319 in 10 40 mm 0 4094 in Cylinder head 2RZ FE 3RZ F 3RZ FE Warpage Cylinder block side Maximum Manifold side Maximum Valve seat Refacing angle Intake Exhaust Contacting angle Contacting width Cylinder he...

Страница 63: ... 0026 in 0 08 mm 0 0031 in 0 10 mm 0 0039 in 1 0 mm 0 039 in 0 5 mm 0 020 in Valve 3RZ F 3RZ FE Valve overall length 3RZ F STD Intake Exhaust 3RZ FE STD Intake Exhaust 3RZ F Minimum Intake Exhaust 3RZ FE Minimum Intake Exhaust Valve face angle Stem diameter Intake Exhaust Stem oil clearance STD Intake Exhaust Maximum Intake Exhaust Margin thickness 3RZ F STD Intake Exhaust Minimum Intake Exhaust 3...

Страница 64: ...0 0021 in 0 10 mm 0 0039 in Valve lifter 2RZ FE 3RZ F 3RZ FE Lifter diameter Lifter bore diameter Oil clearance STD Maximum 30 969 30 976 mm 1 1578 1 2195 in 31 000 31 016 mm 1 2205 1 2211 in 0 024 0 050 mm 0 0009 0 0020 in 0 07 mm 0 0028 in Manifold 1RZ 1RZ E Warpage Maximum Intake Exhaust 0 20 0 0079 in 0 70 0 00276 in Manifold 2RZ FE 3RZ F 3RZ FE Warpage Maximum Intake Exhaust 0 20 mm 0 0078 in...

Страница 65: ... in 94 990 95 003 mm 3 7400 3 7403 in 95 06 mm 3 7425 in 10 76 10 97 mm 0 4236 0 4319 in 10 40 mm 0 4094 in 64 004 64 010 mm 2 5198 2 5201 in 64 011 64 016 mm 2 5201 2 5203 in 64 017 64 022 mm 2 5203 2 5205 in 64 000 64 024 mm 2 5197 2 5206 in Piston and piston ring 1RZ 1RZ E Piston diameter STD O S 0 50 Piston oil clearance STD Maximum Piston ring groove clearance No 1 No 2 Piston ring end gap ST...

Страница 66: ...1 491 mm 0 0586 0 0587 in 0 030 0 055 mm 0 0012 0 0022 in 0 031 0 071 mm 0 0012 0 0028 in 0 08 mm 0 0031 in 0 05 mm 0 0020 in 0 15 mm 0 0059 in 24 008 24 017 mm 0 9452 0 9455 in 24 000 24 009 mm 0 9449 0 9452 in 0 005 0 011 mm 0 0002 0 0004 in 0 05 mm 0 0020 in 7 800 7 900 mm 0 3071 0 3110 in 7 50 mm 0 2953 in Connecting rod 2RZ FE Thrust clearance STD Maximum Connecting rod bearing center wall th...

Страница 67: ... 0 9449 0 9452 in 0 005 0 011 mm 0 0002 0 0004 in 0 015mm 0 0006 in 7 80 7 90 mm 0 3071 0 3110 in 7 60 mm 0 2992 in Crankshaft 1RZ 1RZ E Thrust clearance STD Maximum Thrust washer thickness Main journal oil clearance STD No 3 Others U S 0 25 No 3 Others Maximum Main journal diameter STD No 3 Others U S 0 25 No 3 Others Main bearing center wall thickness STD Mark 1 Reference Mark 2 Mark 3 Crank pin...

Страница 68: ... No 3 Others Maximum Journal diameter STD No 3 Others U S 0 25 No 3 Others Main bearing center wall thickness STD Mark 1 Mark 2 Mark 3 U S 0 25 Crank pin diameter STD U S 0 25 Circle runout Maximum Main journal taper and out of round Maximum Crank pin taper and out of round Maximum 0 020 0 0220 mm 0 0008 0 0087 in 0 30 mm 0 0118 in 2 440 2 490 mm 0 0961 0 0980 in 0 030 0 055 mm 0 0012 0 0022 in 0 ...

Страница 69: ...r 35 mm 1 38 in length bolt 12 mm head for except 35 mm 1 38 in length bolt 14 mm head 18 20 39 185 200 440 13 15 29 Water bypass pipe x Thermostat guide plate 19 5 200 14 Alternator drive belt adjusting bar x Cylinder block 63 7 650 47 Crankshaft pulley x Crankshaft 259 2 650 191 Fluid coupling x Water pump 20 5 210 15 Alternator drive belt adjusting bar x Alternator 19 195 14 Alternator x Altern...

Страница 70: ... 29 300 22 Timing chain tensioner slipper x Cylinder block 27 270 20 Timing chain case x Cylinder block 14 mm head bolt 12 mm head bolt A and nut Bolt B 64 20 44 650 200 440 47 14 32 Timing chain case mounting bolt 18 185 13 Water bypass pipe mounting nut 20 200 14 Crankshaft pulley x crankshaft 260 2 650 192 Oil strainer x Cylinder block 18 185 13 Oil pan x Cylinder block 13 130 9 Alternator brac...

Страница 71: ...mber 3RZ FE x Intake manifold 21 210 15 Fuel inlet pipe x Delivery pipe 3RZ FE 29 300 22 Intake chamber stay x Air intake chamber 3RZ FE 20 200 15 Intake manifold stay x LH engine mounting bracket 3RZ FE 20 200 15 Intake manifold stay x Intake manifold LH mounting bracket 20 200 15 Intake air connector x Cylinder head 18 185 13 Balance shaft drive gear x Balance shaft 3RZ FE 25 250 18 No 2 chain t...

Страница 72: ...250 18 Oil filter bracket union x Cylinder block 25 250 18 Oil filter bracket x Cylinder block 28 290 21 Water bypass pipe x Cylinder block 20 200 14 Knock sensor 3RZ FE x Cylinder block 37 380 27 Fuel filter 3RZ FE x Cylinder block 20 200 14 Rear end plate x Cylinder block 18 185 13 Rear end plate x Water bypass pipe 20 200 14 Flywheel x Crankshaft 1 st 2 nd 26 5 Turn 90 270 Turn 90 19 Turn 90 Dr...

Страница 73: ...ft lbf EGR pipe x Intake chamber assembly 2RZ FE 19 195 14 EGR pipe x Cylinder head 2RZ FE 20 200 15 EGR valve x Intake chamber assembly 2RZ FE 19 195 14 Converter x Front pipe 2RZ FE 48 490 35 Front pipe x Oxygen sensor 2RZ FE 20 200 14 CLICK HERE TO VIEW CHAPTER INDEX Pages From Supplement TO MODEL INDEX 3RZ F 3RZ FE ...

Страница 74: ...0 in VTA E2 0 57 mm 0 0022 in IDL E2 0 74 mm 0 029 in IDL E2 Throttle valve fully open VTA E2 VC E2 0 2 5 7 kΩ 2 3 kΩ or less Infinity 2 0 10 2 kΩ 2 5 5 9 kΩ Throttle position sensor 2RZ FE 3RZ FE Clearance between stop screw and lever 0 mm 0 in VTA E2 Throttle valve fully open VTA E2 VC E2 0 2 5 7 kΩ 2 0 10 2 kΩ 2 5 5 9 kΩ Throttle body 1RZ E Throttle body fully closed angle Dashpot setting speed...

Страница 75: ... kΩ 0 9 1 3 kΩ 0 4 0 7 kΩ 0 2 0 4 kΩ Oxygen sensor 2RZ FE Heater resistance 20 C 68 F 11 7 14 3 Ω Variable resistor Voltage VCC E2 Resistance 4 5 5 5 V 4 6 kΩ Fuel cut RPM 1RZ E Fuel return rpm 1 200 rpm Fuel cut RPM 2RZ FE Fuel return rpm 1 400 rpm Fuel cut RPM 3RZ FE Fuel return rpm M T A T 1 200 rpm 1 500 rpm CLICK HERE TO VIEW CHAPTER INDEX Pages From Supplement TO MODEL INDEX 3RZ F 3RZ FE ...

Страница 76: ...bly x Fuel tank 4 0 35 40 in lbf Fuel pressure regulator x Delivery pipe 1RZ E 2RZ FE 3RZ FE 8 8 8 0 90 80 78 in lbf 69 in lbf Delivery pipe x Cylinder head 29 300 22 Pulsation damper x Delivery pipe 21 210 15 Water temperature sensor x Cylinder head 20 200 14 Knock sensor x Cylinder block 44 450 33 CLICK HERE TO VIEW CHAPTER INDEX Pages From Supplement TO MODEL INDEX 3RZ F 3RZ FE ...

Страница 77: ...erature Valve lift at 95 C 203 F 80 84 C 176 183 F 8 mm 0 31 in or more Radiator cap Relief valve opening pressure STD 93 123 kPa 0 95 1 25 kgf cm2 13 1 18 2 psi Radiator Lock plate hight 7 4 7 8 mm 0 2959 0 3119 in CLICK HERE TO VIEW CHAPTER INDEX Pages From Supplement TO MODEL INDEX 3RZ F 3RZ FE ...

Страница 78: ... COOLING SS 19 TORQUE SPECIFICATION Part tightened N m kgf cm ft lbf Cylinder block x Drain plug 24 5 250 18 Water pump pulley x Water pump 21 210 16 CLICK HERE TO VIEW CHAPTER INDEX Pages From Supplement TO MODEL INDEX 3RZ F 3RZ FE ...

Страница 79: ...si or more 245 490 kPa 2 5 5 0 kgf cm2 36 71 psi Oil Pump Body clearance STD Maximum Tip clearance STD Maximum Side clearance STD Maximum 0 100 0 175 mm 0 014 0 0069 in 0 30 mm 0 0118 in 0 110 0 240 mm 0 0043 0 0094 in 0 25 mm 0 0098 in 0 030 0 090 mm 0 0012 0 0035 in 0 15 mm 0 0059 in CLICK HERE TO VIEW CHAPTER INDEX Pages From Supplement TO MODEL INDEX 3RZ F 3RZ FE ...

Страница 80: ... SERVICE SPECIFICATIONS LUBRICATION SS 21 TORQUE SPECIFICATION Part tightened N m kgf cm ft lbf Oil pan x Drain plug 37 375 27 CLICK HERE TO VIEW CHAPTER INDEX Pages From Supplement TO MODEL INDEX 3RZ F 3RZ FE ...

Страница 81: ...ld at hot Secondary coil resistance at cold at hot Distributor Air gap Pickup coil NE NE at cold at hot 1 12 1 68 Ω 1 42 1 98 Ω 9 6 14 4 kΩ 12 2 17 0 kΩ 0 2 0 4 mm 0 008 0 016 in 370 550 Ω 475 650 Ω Ignition coil 3RZ F Primary coil resistance at cold at hot Secondary coil resistance at cold at hot 0 36 0 55 Ω 0 45 0 65 Ω 9 0 15 4 kΩ 11 4 18 1 kΩ Distributor 3RZ F Air gap Signal generator pickup co...

Страница 82: ... plug x Cylinder head 20 200 14 Ignition coil x Cylinder head 2RZ FE 3RZ FE 10 100 7 Camshaft position sensor x Cylinder head 2RZ FE 3RZ FE 5 4 55 48 in lbf Crankshaft position sensor x Oil pump 2RZ FE 3RZ FE 8 5 85 74 in lbf CLICK HERE TO VIEW CHAPTER INDEX Pages From Supplement TO MODEL INDEX 3RZ F 3RZ FE ...

Страница 83: ... 3 1 4 4 lbf 17 6 23 5 N 1 8 2 4 kgf 4 0 5 3 lbf 9 8 N 1 0 kgf 2 2 lbf 11 8 N 1 2 kgf 2 6 lbf 30 mm 1 18 in 29 mm 1 14 in 0 6 mm 0 024 in 0 2 mm 0 08 in 0 05 mm 0 0020 in 0 9 mm 0 035 in Starter 2 0 kW type Rated voltage and output power No load characteristics Current rpm Brush length STD Minimum Spring installed load STD Minimum Commutator Diameter STD Minimum Undercut depth STD Minimum Circle r...

Страница 84: ...assembly 1 2 kW 1 4 kW 1 0 kW 2 0 kW 5 9 9 3 60 93 52 in lbf 82 in lbf End cover x Brush holder 1 0 kW 1 2 kW 1 4 kW 2 0 kW 1 5 3 8 15 39 13 in lbf 34 in lbf Lead wire x Terminal C 5 9 60 52 in lbf Terminal nut x Terminal 30 of starter Terminal C of starter 17 170 12 Magnetic switch end cover x Magnetic switch 1 2 kW 1 4 kW type 1 0 kW 2 0 kW type 2 5 3 6 26 37 23 in lbf 32 in lbf CLICK HERE TO VI...

Страница 85: ... 77 kgf 295 392 N 30 40 kgf Alternator Rated output Rotor coil resistance 45 A 55 A 70 A Slip ring diameter STD Minimum Bush exposed length STD Minimum 12 V 45 A 55 A 70 A 2 7 3 1 Ω 2 7 3 1 Ω 2 1 2 5 Ω 14 2 14 4 mm 0 559 0 567 in 12 8 mm 0 504 in 10 5 mm 0 413 in 1 5 mm 0 059 in IC regulator Regulating voltage at 25 C 77 F 13 8 14 7 V CLICK HERE TO VIEW CHAPTER INDEX Pages From Supplement TO MODEL...

Страница 86: ...frame 2 5 27 23 in lbf Drive end frame x Rectifier end frame 4 5 46 40 in lbf Rectifier end frame x Rectifier holder Screw Bolt 2 0 3 9 20 40 17 4 in lbf 35 in lbf Rectifier end frame x End cover 4 5 46 40 in lbf Terminal insulator x Rectifier holder 4 1 42 36 in lbf CLICK HERE TO VIEW CHAPTER INDEX Pages From Supplement TO MODEL INDEX 3RZ F 3RZ FE ...

Страница 87: ...OF ECU DI 17 PROBLEM SYMPTOMS TABLE DI 18 CIRCUIT INSPECTION DI 20 ENGINE 2RZ FE 3RZ FE DI 72 HOW TO PROCEED WITH TROUBLESHOOTING DI 72 CUSTOMER PROBLEM ANALYSIS CHECK DI 74 PRE CHECK DI 75 DIAGNOSTIC TROUBLE CODE CHART DI 87 PARTS LOCATION DI 89 TERMINALS OF ECU DI 90 PROBLEM SYMPTOMS TABLE DI 92 CIRCUIT INSPECTION DI 94 BACK TO MAIN INDEX Pages From Supplement TO MODEL INDEX 3RZ F 3RZ FE ...

Страница 88: ...ntermittent Problems P DI 9 Identification of Problem Confirmation Test End 1 2 3 4 5 6 7 10 8 9 11 12 13 14 Normal Malfunction code Check and Clear Diagnostic Trouble Code Pre check P DI 3 Setting the Test Mode Diagnosis P DI 2 Problem Symptom Confirmation Symptom Simulation P IN 21 Malfunction does not occur Step 2 3 6 11 14 Diagnostic steps permitting the use of the hand held tester or break ou...

Страница 89: ...ccurred Problem Frequency Condition When Problem Occurs Weather Engine Operation Engine Temp Place Outdoor Temperature Constant Sometimes times per day month Once only Other Fine Cloudy Rainy Snowy Various Other Hot Warm Cool Cold approx F C Highway Suburbs Inner City Uphill Downhill Rough road Other Cold Warming up After Warming up Any temp Other Starting Just after starting min Idling Racing Dri...

Страница 90: ...n in DI 15 are monitored If a malfunction is de tected in any one of the systems indicated by code Nos 13 22 24 31 and 41 the ECU lights the check engine warning light to warn the technician that malfunction has been detected In this case TE2 and E1 terminals on the check connector should be connected as shown later See page DI 5 In the test mode even if the malfunction is corrected the malfunctio...

Страница 91: ...t does not light up proceed to troubleshooting of the combination meter 2 When the engine is started the check engine warn ing light should go off If the light remains on the diagnosis system has de tected a malfunction or abnormality in the system b Diagnostic Trouble Code Check 1 Turn ignition switch ON 2 Using SST connect terminals between TE1 and E1 of check connector SST 09843 18020 3 Read th...

Страница 92: ... If the event of 2 or more malfunction codes indication will begin from the smallest numbered code and continue in order to the largest 3 DIAGNOSIS INSPECTION Test Mode HINT Compared to the normal mode the test mode has an increased sensing ability to detect malfunctions The same diagnostic items which are detected in the normal mode can also be detected in the test mode a Diagnostic Trouble Code ...

Страница 93: ...ck disconnect the SST from terminals TE1 TE2 and E1 and turn off the display HINT S The test mode will not start if terminals TE2 and E1 are connected after the ignition switch turned ON S When vehicle speed is 5 km h 3 mph or below diagnos tic trouble code 42 Vehicle speed signal is output but this is not abnormal b Diagnostic Trouble Code Check Using Hand Held Tester 1 Hook up the hand held test...

Страница 94: ... not been repaired throughly d ECU Data Monitor Using Hand Held Tester 1 Hook up the hand held tester to the check connec tor 2 Monitor the ECU data by following the prompts on the tester screen HINT S Hand held tester has a Snapshot function which re cords the monitored data S Please refer to the hand held tester operator s manual for further details e ECU Terminal Values Measurement Using Break ...

Страница 95: ...d at 80 C 176 F Returned to normal condition 24 Intake air temperature is fixed at 20 C 68 F Returned to normal condition 31 S Ignition timing fixed at 5 BTDC S Manifold absolute pressure is fixed at 46 7 kPa 350 mmHg 13 8 in Hg Returned to normal condition 41 Throttle position is fixed at 0 The following must each be repeated at least 2 times consecutively S 0 1 V VTA and 0 95 V CLICK HERE TO VIE...

Страница 96: ...Trouble Codes See step 3 2 Set Test Mode S With the ignition switch OFF using SST con nect the terminals TE2 and E1 of the check connector SST 09843 18020 S Start the engine and check to see if the check engine warning light to goes off 3 Perform a Simulation Test Using the symptom simulation See page IN 9 apply vibration to and pull lightly on the wire harness connector or terminals in the circui...

Страница 97: ...ine check shown in the following flow chart the location causing the problem can be found quickly and efficiently Therefore use of this check is essential in engine trouble shooting 1 Is battery positive voltage 11 V or more when engine is stopped NO Charge or replace battery YES 2 Does engine crank NO Proceed to problem symptoms table on page DI 18 YES 3 Does engine start NO Go to step 7 YES CLIC...

Страница 98: ...p engine to normal operating temperature c Switch off all accessories d Switch off air conditioning e Connect tachometer test probe to terminal IG of check connector and set the tachometer to the 4 cylinder range CHECK Check idle speed OK Idle speed 700 800 rpm CAUTION S S S S Never allow tachometer testprobe totouch groundas itcould resultin damage to igniter and or ignition coil S S S S As some ...

Страница 99: ... timing 5 BTDC at idle NG Proceed to page EM 14 andcontinue totrouble shoot OK Proceed to problem symptoms table on page DI 18 7 Check fuel pressure PREPARATION a Be sure that there is enough fuel in the tank b Turn ignition switch ON c Using SST connect terminals FP and B of check con nector SST 09843 18020 CHECK Check the fuel pressure by pinching the fuel return hose HINT At this time you will ...

Страница 100: ...s while the engine is being cranked NOTICE To prevent excessive fuel being injected from the injectors during this check don t crank the engine for more than 1 2 seconds at a time NG Proceed to See Pub RM467E and continue to troubleshoot OK Proceed to problem symptoms table on page DI 18 CLICK HERE TO VIEW CHAPTER INDEX Pages From Supplement TO MODEL INDEX CONTINUED 3RZ F 3RZ FE ...

Страница 101: ... operating temp 1 Increase engine load Approx 160 350 Gradually increases COOLANT TEMP Engine at normal operating temp 75 95 C 185 203 F 2 THROTTLE Closed throttle position Wide open throttle From closed throttle position to wide open throttle Below 5 Above 70 Gradually increases VEHICLE SPD During driving Comparison with speedometer No large differences TARGET A F L Engine idling at normal operat...

Страница 102: ...sensor circuit S Vacuum sensor S Engine ECU ON ON f 41 DI 37 Throttle Position Sensor Circuit S Open or short in throttle position sensor circuit S Throttle position sensor S Engine ECU OFF ON f 42 DI 40 Vehicle Speed Sensor Signal Circuit S Open or short in vehicle speed sensor circuit S Vehicle speed sensor S Combination meter S Engine ECU ON OFF f 43 DI 42 Starter Signal Circuit S Open or short...

Страница 103: ...Switch Combination Meter Speed Meter Engine ECU Vacuum Sensor EFI Relay Marking EFI Starter Relay Marking STARTER Water Temp Sensor Check Connector IIA Injector DI 16 DIAGNOSTICS ENGINE 1RZ E PARTS LOCATION CLICK HERE TO VIEW CHAPTER INDEX Pages From Supplement TO MODEL INDEX 3RZ F 3RZ FE ...

Страница 104: ... 11 E1 E4 24 P B BR Cranking 6 0 or more IG switch ON 9 14 10 E4 12 E01 E4 13 R L BR Idling Pulse generation See page DI 57 IG switch ON 9 14 20 E4 25 E02 E4 26 L BR Idling Pulse generation See page DI 57 IGT E4 6 E1 E4 24 B L BR Idling Pulse generation See page DI 24 IGF E4 7 E1 E4 24 B Y BR IG switch ON Disconnect IIA connector 4 5 5 5 IGF E4 7 E1 E4 24 B Y BR Idling Pulse generation See page DI...

Страница 105: ...on 7 Injector circuit DI 42 DI 60 DI 57 Cold engine Difficult to start 1 Starter signal circuit 3 Fuel system circuit 4 Injector circuit 5 IIA 6 Spark plug DI 42 DI 60 DI 57 Hot engine Difficult to start 1 Starter signal circuit 3 Fuel system circuit 4 Injector circuit 5 IIA 6 Spark plug DI 42 DI 60 DI 57 High engine idle speed Poor idling 1 Engine ECU power source circuit 2 Back up power source c...

Страница 106: ...cuit DI 57 Surging Poor driveability 1 Fuel system circuit 2 Variable resistor circuit 3 Spark plug 4 Injector circuit DI 60 DI 67 DI 57 Soon after starting Engine stall 1 Fuel system circuit 2 Vacuum sensor circuit DI 60 DI 35 After accelerator pedal depressed Engine stall 1 Vacuum sensor circuit DI 35 After accelerator pedal released Engine stall 1 Injector circuit 3 Engine ECU DI 57 DI 49 Durin...

Страница 107: ...I 35 CIRCUIT DESCRIPTION DI 35 WIRING DIAGRAM DI 35 INSPECTION PROCEDURE DI 36 DTC 41 THROTTLE POSITION SENSOR CIRCUIT DI 37 CIRCUIT DESCRIPTION DI 37 WIRING DIAGRAM DI 37 INSPECTION PROCEDURE DI 38 39 DTC 42 VEHICLE SPEED SENSOR SIGNAL CIRCUIT DI 40 CIRCUIT DESCRIPTION DI 40 WIRING DIAGRAM DI 40 INSPECTION PROCEDURE DI 41 DTC 43 STARTER SIGNAL CIRCUIT DI 42 CIRCUIT DESCRIPTION DI 42 WIRING DIAGRA...

Страница 108: ...ECTION PROCEDURE DI 58 59 FUEL SYSTEM CIRCUIT DI 60 CIRCUIT DESCRIPTION DI 60 WIRING DIAGRAM DI 61 INSPECTION PROCEDURE DI 62 63 TE1 TE2 TERMINAL CIRCUIT DI 64 CIRCUIT DESCRIPTION DI 64 WIRING DIAGRAM DI 64 INSPECTION PROCEDURE DI 65 66 VARIABLE RESISTOR CIRCUIT DI 67 CIRCUIT DESCRIPTION DI 67 WIRING DIAGRAM DI 67 INSPECTION PROCEDURE DI 68 71 CLICK HERE TO VIEW CHAPTER INDEX PAGE 2 OF 2 TO MODEL ...

Страница 109: ...circumference The NE signal sensor generates 4 signals for every engine revolution The ECU detects the engine speed by the NE signals DTC No Detection Item Trouble Area 12 No NE signal to ECU during cranking S Open or short in NE circuit S IIA S Open or short in STA circuit S Engine ECU Reference INSPECTION USING OSILLOSCOPE During cranking or idling check between terminals NE and NE of engine ECU...

Страница 110: ... low OK Resistance NE Pickup Coil Cold 370 550 Ω NE Pickup Coil NE NE Hot 475 650 Ω Cold is from 10 C 14 F to 50 C 122 F and Hot is from 50 C 122 F to 100 C 212 F NG Replace distributor housing OK 2 Check for open and short in harness and connector between engine ECU and distributor See page IN 21 NG Repair or replace harness or connector OK CLICK HERE TO VIEW CHAPTER INDEX Pages From Supplement C...

Страница 111: ... cap rotor and dust cover CHECK Using a feeler gauge measure the air gap between the signal rotor and pickup coil projection OK Air gap 0 2 0 4 mm 0 008 0 016 in NG Replace distributor housing OK Check and replace engine ECU CLICK HERE TO VIEW CHAPTER INDEX Pages From Supplement TO MODEL INDEX 3RZ F 3RZ FE ...

Страница 112: ... that it has returned to normal Note that although this problem may not necessarily appear at the time of inspection it cannot be ignored because this diagnostic trouble code is output indicating that there is or was a malfunction in the NE signal circuit this malfunction is usually a loose connector The distributor connector and the NE terminal of the ECU connector must therefore be checked for t...

Страница 113: ...w to the ignition coil based on the engine speed and ignition timing one revolution ago that is the time the Tr2 turns ON When it reaches the ignition timing the ECU turns Tr1 OFF and outputs the IGT signal 0 This turns Tr2 OFF interrupting the primary current flow and generating a high voltage in the secondary coil which causes the spark plug to spark Also by the counter electromotive force gener...

Страница 114: ...nnector OK 3 Disconnect IIA connector and check voltage between terminal IGF of engine ECU connector and body ground PREPARATION a Disconnect IIA connector b Remove the glove compartment See page FI 61 c Turn ignition switch ON CHECK Measure voltage between terminal IGF of ECU connector and body ground OK Voltage 4 5 5 5 V OK Replace igniter NG Check and replace engine ECU See page IN 21 CLICK HER...

Страница 115: ...T of engine ECU connector and body ground PREPARATION Remove the glove compatment See page FI 61 CHECK Measure voltage between terminal IGT of ECU connector and body ground when engine is cranked OK Voltage More than 0 1 V and less than 4 5 V Reference INSPECTION USING OSCILLOSCOPE During idling check waveform between terminals IGT and E1 of ECU HINT The correct waveform are as shown NG Check and ...

Страница 116: ... engine is cranked OK Voltage More than 0 1 V and less than 4 5 V NG Check and replace engine ECU See page IN 21 OK 7 Check voltage of IIA power source PREPARATION Disconnect IIA connector CHECK Measure voltage between terminal 1 of IIA connector and body ground when ignition switch is turned to ON and START position OK Voltage 9 14 V NG Check for open and short in harness and con nector between i...

Страница 117: ...DI 28 DIAGNOSTICS ENGINE 1RZ E 8 Check ignition coil See Pub No RM467E NG Replace ignition coil OK Replace igniter CLICK HERE TO VIEW CHAPTER INDEX Pages From Supplement TO MODEL INDEX 3RZ F 3RZ FE ...

Страница 118: ...ge in the ECU is applied to the water temperature sensor from the terminal THW via a re sistor R That is the resistor R and the water temperature sen sor are connected in series When the resistance value of the water temperature sensor changes in accordance with changes in the coolant temperature the potential at the termi nal THW also changes Based on this signal the ECU in creases the fuel injec...

Страница 119: ...FI 61 b Turn ignition switch ON CHECK Measure voltage between terminals THW and E2 of engine ECU connector OK Engine Coolant Temp Voltage 20 C 68 F Engine is cool 0 5 3 4 V 80 C 176 F Engine is hot 0 2 1 0 V OK Check for intermittent problems See page DI 9 NG 2 Check water temp sensor PREPARATION Disconnect the water temp sensor connector CHECK Measure resistance between terminals OK Resistance is...

Страница 120: ...n and short in harness and connector between engine ECU and water temp sensor See page IN 21 NG Repair or replace harness or connector OK Check and replace engine ECU CLICK HERE TO VIEW CHAPTER INDEX Pages From Supplement TO MODEL INDEX 3RZ F 3RZ FE ...

Страница 121: ...CU is the same as in the water temp sensor shown on page DI 29 If the engine ECU detects the diagnostic trouble code 24 it operates the fail safe function in which the intake air temperature is assumed to be 20 C 68 F DTC No Detection Item Trouble Area 24 Open or short in intake air temp sensor circuit for 0 5 sec or more S Open or short in intake air temp sensor circuit S Intake air temp sensor S...

Страница 122: ...Turn ignition switch ON CHECK Measure voltage between terminals THA and E2 of engine ECU connector OK Engine Coolant Temp Voltage 20 C 68 F Engine is cool 0 5 3 4 V 80 C 176 F Engine is hot 0 2 1 0 V OK Check for intermittent problems See page DI 9 NG 2 C h eck intake air temp sensor PREPARATION Disconnect the intake air temp sensor connector CHECK Measure resistance between terminals OK Resistanc...

Страница 123: ...nd short in harness and connector between engine ECU and intake air temp sensor See page IN 21 NG Repair or replace harness or connector OK Check and replace engine ECU CLICK HERE TO VIEW CHAPTER INDEX Pages From Supplement TO MODEL INDEX 3RZ F 3RZ FE ...

Страница 124: ... absolute pressure inside the intake manifold the pressure in proportion to the preset abso lute vacuum 0 it is not influenced by fluctuations in the atmo spheric pressure due to high altitude and other factors this per mits it to control the air fuel ratio at the proper level under all conditions DTC No Detection Item Trouble Area 31 Open or short in vacuum sensor circuit for 0 5 sec or more S Op...

Страница 125: ...ECU OK 2 Check voltage between terminals PIM and E2 of engine ECU connector PREPARATION a Remove the glove compartment See page FI 61 b Turn ignition switch ON CHECK Measure voltage between terminals PIM and E2 of engine ECU OK Voltage 3 3 3 9 V OK When diagnostic trouble code 31 is displayed check and replace engine ECU NG 3 Check for open and short in harness and connector between engine ECU and...

Страница 126: ...mately 3 2 4 9 V when the throttle valve is fully opened The ECU judges the vehicle driving conditions from these signals input from the terminals VTA and uses them as one of the conditions for deciding the air fuel ratio correc tion power increase correction and fuel cut control etc DTC No Detection Item Trouble Area 41 Open or short in throttle position sensor circuit for 0 5 sec or more S Open ...

Страница 127: ...RATION a Remove the glove compartment See page FI 61 b Turn ignition switch ON c Apply vacuum to the throttle opener CHECK Measure voltage between terminals VTA and E2 of engine ECU connector when the throttle valve is opened gradually from the closed condition OK Throttle Valve Voltage Fully closed 0 3 1 0 V Fully open 2 7 5 2 V HINT The voltage should increase steadily in proportion to the throt...

Страница 128: ...valve Resistance 1 4 2 5 5 9 kΩ 1 3 Fully closed 0 2 5 7 kΩ 1 3 Fully open 2 0 10 2 kΩ HINT Resistance between terminals 1 and 3 should increrace gradu ally in accordance with the throttle valve opening angle NG Replace throttle position sensor OK 3 Check for open and short in harness and connector between engine ECU and throttle position sensor See page IN 21 NG Repair or replace harness or conne...

Страница 129: ...4 times for every revolution of the speedometer It is then transmitted to the ECU The ECU determines the vehicle speed based on the frequency of these pulse signals DTC No Diagnostic Trouble Code Detecting Condition Trouble Area 42 All conditions below are detected continuously for 8 sec or more a Vehicle speed signal 0 km h 0 mph b Engine speed 2 500 4 500 rpm c Water temp 80 C 176 F or more d Lo...

Страница 130: ...ng OK 2 Check voltage between terminal SPD of engine ECU connector and body ground PREPARATION a Remove the glove compartment See page FI 61 b Shift the shift lever to N position c Jack up one of the rear wheels d Turn ignition switch ON CHECK Measure voltage between terminal SPD of engine ECU con nector and body ground when the wheel is turned slowly OK Voltage is generated intermittently NG Chec...

Страница 131: ... fuel vaporization is poor A rich mixture is therefore necessary in order to achieve good startability While the engine is being cranked the battery positive volt age is applied to terminal STA of the ECU The starter signal is mainly used to increase the fuel injection volume for the starting injection control and after start injection control DTC No Detection Item Trouble Area 43 No starter signa...

Страница 132: ...witch ON Don t start the engine d Using SST connect terminals TE1 and E1 of check con nector SST 09843 18020 CHECK Check if code 43 is output by the check engine warming light OK Code 43 is output CHECK Start the engine Check if the code 43 disappear OK Code 43 is not output OK Proceed to next circuit inspection shown on problem symptom table See page DI 18 NG 2 Check for open in harness and conne...

Страница 133: ...eed of the engine if necessary Throttle Position Sensor IDL Signal The IDL contacts are mounted in the throttle position sensor and detects the idle condition DTC No Detection Item Trouble Area 51 1 3 sec or more after engine starts idle switch OFF IDL1 3 A C switch ON S Throttle position sensor IDL circuit S Accelerator pedal and cable S A C switch circuit S Engine ECU HINT In this circuit diagno...

Страница 134: ... is output by the check engine warning light OK Condition Code Throttle Position Accelerator pedal released Normal 1 Throttle Position Sensor IDL Accelerator pedal depressed 51 1 A C S it h A C A C SW ON 51 A C Switch A C A C SW OFF Normal 1 Before the STA signal is input ST is not ON diagnostic trouble code 43 is also output HINT Diagnostic trouble code 42 output with vehicle speed 3 mph 5 km h o...

Страница 135: ...nsor See page FI 31 OK Check and repair harness or connector be tween engine control module and throttle position sensor 3 Disconnect A C amplifier connector check voltage between terminal ACT of A C amplifier connector and body ground PREPARATION a Remove glove compartment See page FI 61 b Disconnect A C amplifier connector c Turn ignition switch ON CHECK Measure voltage between terminal ACT of A...

Страница 136: ...pen and short in harness and connector between engine ECU and A C amplifier See page IN 21 NG Repair or replace harness or connector OK Check and replace engine ECU CLICK HERE TO VIEW CHAPTER INDEX Pages From Supplement TO MODEL INDEX 3RZ F 3RZ FE ...

Страница 137: ...symptoms table on page DI 18 1 Check the starter signal PREPARATION Remove the glove compartment See page FI 61 CHECK Measure voltage between terminal STA of engine ECUconnec tor and body ground during cranking OK Voltage 6 0 V or more OK Proceed to next circuit inspection shown on problem symptoms table See page DI 18 NG 2 Check for open in harness and connector between engine ECU and starter rel...

Страница 138: ...B R Engine Room J B Drive Side J B Engine Room J B J1 22 DIAGNOSTICS ENGINE 1RZ E DI 49 ECU Power Source Circuit CIRCUIT DESCRIPTION When the ignition switch is turned ON battery positive voltage is applied to the coil closing the contacts of the EFI main relay and supplying power to the terminal B of the ECU WIRING DIAGRAM DI1HY 01 CLICK HERE TO VIEW CHAPTER INDEX Pages From Supplement TO MODEL I...

Страница 139: ...ECK Measure voltage between terminals B and E1 of engine ECU connector OK Voltage 9 14 V OK Proceed to next circuit inspection shown on problem symptoms table See page DI 18 NG 2 Check for open in harness and connector between terminal E1 of engine ECU and body ground See page IN 21 NG Repair or replace harness or connector OK CLICK HERE TO VIEW CHAPTER INDEX Pages From Supplement TO MODEL INDEX C...

Страница 140: ...3 and 5 Open Terminals 1 and 2 Continuity CHECK a Apply battery positive voltage between terminals 1 and 2 b Check continuity between terminals 3 and 5 OK Terminals 3 and 5 Continuity NG Replace EFI main relay OK 4 Check IGN fuse PREPARATION Remove IGN fuse from drive side J B CHECK Check continuity of IGN fuse OK Continuity NG Check for short in all the harness and compo nents connected to IGN fu...

Страница 141: ...nals shown below OK Switch Position Terminal No to continuity Lock ACC 2 3 ON 2 3 4 6 7 START 1 2 4 6 7 8 NG Replace ignition switch OK 6 Check for open in harness and connector between IG switch and EFI main relay EFI main relay and body ground See page IN 21 NG Repair or replace harness or connector OK CLICK HERE TO VIEW CHAPTER INDEX Pages From Supplement TO MODEL INDEX CONTINUED 3RZ F 3RZ FE ...

Страница 142: ...k continuity of EFI fuse OK Continuity NG Check for short in all the harness and compo nents connected to EFI fuse See attached wir ing diagram OK Check for open in harness and connector be tween main relay and battery main relay and ECU CLICK HERE TO VIEW CHAPTER INDEX Pages From Supplement TO MODEL INDEX 3RZ F 3RZ FE ...

Страница 143: ...cuit CIRCUIT DESCRIPTION Battery positive voltage is supplied to terminal BATT of the ECU even when the ignition switch is OFF for use by the diagnostic trouble code memory air fuel ratio adaptive control value memory etc WIRING DIAGRAM DI1HZ 01 CLICK HERE TO VIEW CHAPTER INDEX Pages From Supplement TO MODEL INDEX CONTINUED 3RZ F 3RZ FE ...

Страница 144: ...I fuse See attached wir ing diagram OK 2 Check voltage between terminal BATT of engine ECU connector and body ground PREPARATION Remove the glove compartment See page FI 61 CHECK Measure voltage between terminal BATT of engine ECU con nector and body ground OK Voltage 9 14 V NG Check and repair harness or connector be tween engine ECU and EFI fuse EFI fuse and battery OK CLICK HERE TO VIEW CHAPTER...

Страница 145: ...des still in the memory when the ignition switch is turned OFF NO Check and replace engine ECU YES Proceed to next circuit inspection shown on problem symptoms table See page DI 18 CLICK HERE TO VIEW CHAPTER INDEX Pages From Supplement TO MODEL INDEX 3RZ F 3RZ FE ...

Страница 146: ...20 10 E01 E02 Junction Connector Engine Room J B DIAGNOSTICS ENGINE 1RZ E DI 57 Injector Circuit CIRCUIT DESCRIPTION The injectors are situated in the intake manifold They inject fuel into the cylinders based on the signals from the engine ECU Reference INSPECTION USING OSCILLOSCOPE INJECTOR SIGNAL WAVEFORM With the engine idling measure waveform between terminals 10 20 and E01 of engine ECU HINT ...

Страница 147: ...p 3 NG 2 Check EFI fuse PREPARATION Remove EFI fuse from engine room J B CHECK Check continuity of EFI fuse OK Continuity NG Check for short circuits in all the harness and components connected to EFI fuse OK Check for open in harness and connector be tween engine ECU and battery 3 Check for open in harness and connector between terminals E01 E02 of engine ECU connector and body ground See page IN...

Страница 148: ...ctors OK Resistance At 20 C 68 F 13 4 14 2 Ω CHECK Check injection volume of injectors OK Injection volume 44 54 cm3 3 3 3 4 cu in 15 sec Difference between each injector Less than 10 cm3 0 3 cu in Leakage 1 drop or less per 3 minutes NG Replace injector s OK Check and replace engine ECU CLICK HERE TO VIEW CHAPTER INDEX Pages From Supplement TO MODEL INDEX 3RZ F 3RZ FE ...

Страница 149: ... to the starter relay coil and also current flows to terminal STA of ECU STA signal When the STA signal and NE signal are input to the ECU Tr is turned ON current flows to coil of the circuit opening relay the relay switches on power is supplied to the fuel pump and the fuel pump operates While the NE signal is generated engine running the ECU keeps Tr ON circuit opening relay ON and the fuel pump...

Страница 150: ... 5 8 6 1J 1H 10A IGN B W B R Ignition Switch B R J14 J14 C C junction Connector W R 2 2 2 2 1 30A AM2 15A EFI 2 1 Battery Y W 4 22 Circuit Opening Relay Passenger Side R B EFI Relay Engine Room J B Drive Side J B 7 6 A A R L A A DIAGNOSTICS ENGINE 1RZ E DI 61 WIRING DIAGRAM CLICK HERE TO VIEW CHAPTER INDEX Pages From Supplement TO MODEL INDEX CONTINUED 3RZ F 3RZ FE ...

Страница 151: ...page FI 61 b Turn ignition switch ON CHECK Measure voltage between terminal FC of engine ECU connec tor and body ground OK Voltage 9 14 V OK Check and replace engine ECU NG 2 Check for ECU power source circuit See page DI 49 NG Repair or replace OK CLICK HERE TO VIEW CHAPTER INDEX Pages From Supplement TO MODEL INDEX CONTINUED 3RZ F 3RZ FE ...

Страница 152: ... Apply battery positive voltage between terminals 1 and 2 b Check continuity between terminals 3 and 5 OK Terminals 3 and 5 Continuity NG Replace circuit opening relay OK 4 Check for open in harness and connector between EFI main relay and circuit opening relay circuit opening relay and engine ECU See page IN 21 NG Repair or replace harness or connector OK 5 Check fuel pump See page FI 11 NG Repla...

Страница 153: ...and TE2 are located in the check connector The check connector is located in the engine compartment When these terminals are connected with the E1 terminal diagnostic trouble codes in normal mode or test mode can be read from the check engine warn ing light in the combination meter WIRING DIAGRAM DI1I2 01 CLICK HERE TO VIEW CHAPTER INDEX Pages From Supplement TO MODEL INDEX CONTINUED 3RZ F 3RZ FE ...

Страница 154: ...the likely cause is an open or short in the wire harness or malfunction inside the ECU 1 Check voltage between terminals TE1 TE2 and E1 of check connector PREPARATION Turn ignition switch ON CHECK Measure voltage between terminal TE1 TE2 and E1 of check connector OK Voltage 9 14 V OK Check and replace engine ECU NG 2 Check continuity between terminal E1 of check connector and body ground NG Repair...

Страница 155: ...t in harness and connector between terminal TE1 TE2 of engine ECU and check connector See page IN 21 NG Repair or replace harness or connector OK Check and replace engine ECU CLICK HERE TO VIEW CHAPTER INDEX Pages From Supplement TO MODEL INDEX 3RZ F 3RZ FE ...

Страница 156: ... adjusted using this resistor Turning the idle mixture adjusting screw clockwise moves the contacts inside the resistor raising terminal VAF voltage Conversely turning the screw counterclockwise lowers the terminal VAF voltage When the terminal VAF voltage rises the ECU increases the injection volume slightly making the air fuel mixture a little richer WIRING DIAGRAM DI1I3 01 CLICK HERE TO VIEW CH...

Страница 157: ...t the tachometer f Ignition timing check correctly g Idle speed check correctly h Check that the CO meter is properly calibrated i Race the engine at 2 500 rpm about 2 minutes CHECK Insert a tester probe at least 40 cm 1 3 ft into the tailpipe Measure the concentration with 1 3 minutes after racing the engine to allow the the concentration to stabilize OK Idle CO concentration 1 5 0 5 OK CO concen...

Страница 158: ...ration 1 5 0 5 NG type I Change in CO concentration NG type II No change in CO concentration HINT Always check idle speed after turning the idle mixture adjusting screw If it is incorrect readjust idle speed Adjustable range of the idle mixture adjust to turn this screw is 180 degrees Do not turn this screw more than it Type I See step EM 3 and go on troubleshooting TypeII Go to step 3 OK Adjustme...

Страница 159: ... between terminals 1 and 2 of the variable resistor OK Resistance 4 6 kΩ Check Resistance Between 2 and 3 CHECK Measure resistance between terminals 2 and 3 when turning the idle mixture adjusting screw fully clockwise and counter clockwise using SST SST 09243 00020 OK Resistance Change from about 5 kΩ to 0 kΩ accordingly NG Replace variable resister OK CLICK HERE TO VIEW CHAPTER INDEX Pages From ...

Страница 160: ...le slowly turning the idle mixture adjusting screw first fully counterclockwise and then fully clockwise using SST SST 09243 00020 OK Voltage changes smoothly from 0 V to about 5 V i e does not suddenly jump up to 5 V or down to 0 V OK Check and replace engine ECU NG 5 Check for open and short in harness and connector between variable resistor and engine ECU See page IN 21 NG Repair or replace har...

Страница 161: ...7 Problem Symptom Table P DI 92 Circuit Inspection P DI 94 Adjustment Repair DTC Check P DI 75 Titles inside are titles of pages in in the bottom portion See the indicated pages for detailes explanations this manual with the page number indicated Malfunction occurs Malfunction does not occur Parts Inspection Check for Intermittent Problems P DI 80 Identification of Problem Confirmation Test End 1 ...

Страница 162: ...ptom Simulation P DI 92 DTC Check P DI 75 Basic Inspection P DI 75 DTC Chart P DI 87 Problem Symptoms Table P DI 92 Parts Inspection Identification of Problem Check for Intermittent Problem Adjustment Repair 8 11 Malfunction occurs Normal code Malfunction code Circuit Inspection Malfunction does not occur DIAGNOSTICS ENGINE 2RZ FE 3RZ FE DI 73 When not using hand held tester troubleshooting in acc...

Страница 163: ...Occurred Problem Frequency Condition When Problem Occurs Weather Engine Operation Engine Temp Place Outdoor Temperature Constant Sometimes times per day month Once only Other Fine Cloudy Rainy Snowy Various Other Hot Warm Cool Cold approx F C Highway Suburbs Inner City Uphill Downhill Rough road Other Cold Warming up After Warming up Any temp Other Starting Just after starting min Idling Racing Dr...

Страница 164: ...U memory S To check the DTCs connect the hand held tester to Data Link Connector 3 DLC3 on the vehicle or read the number of blinks of the check engine warn ing light when TC and CG terminals on the DLC3 are connected The hand held tester also enables you to erase the DTCs and activate the several ac tuaters and check freezed frame data and vaious forms of engine data For operating instructions se...

Страница 165: ...mining whether the vehicle was running or stopped the engine warmed up or not the air fuel ratio lean or rich etc at the time of the malfunction 7 Bus Line Pulse generation During transmission 4 Chassis Ground Body Ground 1 Ω or less Always 16 Battery Positive Body Ground 9 14 V Always HINT If your display shows UNABLE TO CONNECT TO VEHICLE when you have connected the cable of the hand held tester...

Страница 166: ...stem b Check the DTC using hand held tester NOTICE Hand held tester only When the diagnosis system is switched from normal mode to check test mode it erases all DTCs and freezed frame data recorded in normal mode So before switching modes always check the DTCs and freezed frame data and note them down 1 Prepare the hand held tester 2 Connect the hand held tester to DLC3 3 Turn the ignition switch ...

Страница 167: ...nition switch OFF after the symptom is simulated the first time Then repeat the simulation process again When the prob lem has been simulated twice the check engine warning light Iights up and the DTCs are recorded in the ECU 3 INSPECT DIAGNOSIS Check Test Mode Hand held tester only Compared to the normal mode the check mode has an in creased sensitivity to detect malfunctions Furthermore the same...

Страница 168: ... DTCs inspect the applicable cir cuit b Clear the DTC The following actions will erase the DTCs and freezed frame data S Operating the hand held tester to erase the codes See the hand held tester s instruc tion book for operating in structions S Disconnecting the battery terminals or EFI fuse NOTICE If the hand held tester switches the ECU from normal mode to check mode or vice versa or if the ign...

Страница 169: ...he vehicle s ECU in check test mode 1 trip detection logic is possible instead of 2 trip detection logic and sensitivity to detect open circuits is increased This makes it easier to detect intermittent problems 1 Clear the DTC See step 3 2 Set the check test mode See step 3 3 Perform a simulation test See page IN 9 4 Check the connector and terminal See page IN 21 5 Check the visual check and cont...

Страница 170: ...step 7 YES 4 Check air filter PREPARATION Remove the air filter CHECK Visually check that the air filter is not excessively dirty or oily HINT If necessary clean the filter with compressed air First blowfrom inside thoroughly then blow from outside of filter NG Repair or replace OK CLICK HERE TO VIEW CHAPTER INDEX Pages From Supplement TO MODEL INDEX CONTINUED 3RZ F 3RZ FE ...

Страница 171: ... to DLC3 on the vehicle f If you have no hand held tester connect tachometer test prove to terminal 9 TACH of DLC3 SST 09843 18020 NOTICE As some tachometer are not compatible with this ignition system we recommend that you confirm the compatibility of your until before use CHECK Check the idle speed OK Idle speed 650 750 rpm NG Proceed to problem symptoms table on page DI 92 OK CLICK HERE TO VIEW...

Страница 172: ...ansmission into the N position e Using SST connect terminals 13 TC and 4 CG of DLC3 SST 09843 18020 f Using a timing light connect the tester to No 1 high tension cord CHECK Check ignition timing OK Ignition timing 5 BTDC at idle NG Proceed to page IG 1 and continue to troubleshoot OK Proceed to problem symptoms table on page DI 92 CLICK HERE TO VIEW CHAPTER INDEX Pages From Supplement TO MODEL IN...

Страница 173: ...FI 6 and continue to troubleshoot OK 8 Check for spark PREPARATION a Remove ignition coil b Remove the spark plug c Install the spark plug to the ignition coil and connect the ignition coil connector d Hold the end about 12 5 mm 0 5 in from the ground e Disconnect the injector connector CHECK Check if spark occurs while engine is being cranked NOTICE To prevent excess fuel being injected from the ...

Страница 174: ... 20 ENGINE SPD Engine Speed Idling 650 750 rpm VEHICLE SPD Vehicle Speed Vehicle Stopped 0 km h 0 mph IGN ADVANCE Ignition Advance Ignition Timing of Cylinder No 1 Idling BTDC 7 13 INTAKE AIR Intake Air Temp Sensor Value Equivalent to Ambient Temp AIR FLOW Air Flow Rate Through Mass Air Flow Meter Idling 2 7 3 8 gm sec Racing without load 2 500 rpm 9 2 13 3 gm sec THROTTLE POS Voltage Output of Th...

Страница 175: ...ach cylinder 0 IGNITION 1 Total number of ignition for every 1 000 revolu tions 0 2 000 rpm EGRT GAS 1 EGR Gas Temp Sensor Value EGR not operating Temp between intake air temp and engine coolant temp EGR SYSTEM EGR System Operating Condition Idling OFF A C CUT SIG A C Cut Signal A C S W OFF ON FUEL PUMP Fuel Pump Signal Idling ON EVAP PURGE VSV EVAP VSV Signal Idling OFF TOTAL FT B1 Total Fuel Tri...

Страница 176: ...ition sensor S Engine ECU f P0130 21 28 DI 119 Oxygen Sensor Circuit Malfunction Bank 1 Sensor 1 S Open or short in oxygen sensor circuit S Oxygen sensor S Engine ECU f P0135 21 28 P0141 27 29 DI 125 Oxygen Sensor Heater Circuit Malfunction Bank 1 Sensor 1 Bank 1 Sensor 2 S Open or short in heater circuit of oxygen sensor S Oxygen sensor S Engine ECU f P0136 27 29 DI 127 Oxygen Sensor circuit Malf...

Страница 177: ...ntrol System Malfunction S ISC valve is stuck or closed S Open or short in ISC valve circuit S Air intake hose loose S A C signal circuit f f P1300 14 15 P1310 14 15 DI 151 Igniter Circuit Malfunction S Open or short in IGF or IGT circuit from igniter to ECU S Ignition S Engine ECU f f P1335 13 DI 157 Crankshaft Position Sensor Circuit Malfunction during idling S Open or short in crankshaft positi...

Страница 178: ...rcuit Opening Relay Starter Relay Marking STARTER EFI Main Relay Marking EFI VSV for EGR 2RZ FE Knock Sensor Crankshaft Position Sensor Ignition Coil Camshaft Position Sensor Injector Water Temp Sensor Throttle Position Sensor DLC3 ISC Valve Engine ECU DIAGNOSTICS ENGINE 2RZ FE 3RZ FE DI 89 PARTS LOCATION CLICK HERE TO VIEW CHAPTER INDEX Pages From Supplement TO MODEL INDEX 3RZ F 3RZ FE ...

Страница 179: ... THW E5 4 E2 E5 9 G R LG B Idling Engine coolant temp 80 C 176 F 0 2 1 0 STA E6 11 E1 E4 14 P R M T BR V Y A T BR Cranking 6 0 or more IG switch ON 9 14 10 E4 12 E01 E4 13 R L BR Idling Pulse generation See page DI 158 IG switch ON 9 14 20 E4 11 E01 E4 13 L BR Idling Pulse generation See page DI 158 IG switch ON 9 14 30 E4 25 E01 E4 13 W BR Idling Pulse generation See page DI 158 IG switch ON 9 14...

Страница 180: ...in engine speed at 2 500 rpm for 2 min after warning up Pulse generation See page DI 119 HT1 1 E5 8 E1 E4 14 G B BR Idling Below 3 0 HT1 1 E5 8 E1 E4 14 G B BR IG switch ON 9 14 HT2 1 E4 14 E1 E4 14 R W BR Idling Below 3 0 HT2 1 E4 14 E1 E4 14 R W BR IG switch ON 9 14 KNK E5 13 E1 E4 14 GR BR Idling Pulse generation See page DI 134 NSW 2 E 1 E1 E 1 IG switch ON Other shift position in P N position...

Страница 181: ... Starter signal circuit 2 ISC valve circuit 3 Fuel pump control circuit 4 Injector circuit 5 Ignition coil w igniter 6 Spark plug DI 162 DI 146 DI 174 DI 158 IG 1 IG 1 Hot engine Difficuil to start 1 Starter signal circuit 2 ISC valve circuit 3 Fuel pump control circuit 4 Injector circuit 5 Ignition coil w igniter 6 Spark plug DI 162 DI 146 DI 174 DI 158 IG 1 IG 1 Incorrect first idle Poor idling ...

Страница 182: ...ctor circuit IG 1 IG 1 DI 158 Surging Poor drefveability 1 Fuel pump control circuit 2 Variable resistor circuit 1 3 Spark plug 4 Injector circuit DI 174 DI 183 IG 1 DI 158 Engine stall Soon after starting 1 Fuel pump control circuit 2 Air flow meter circuit 3 ISC valve circuit DI 174 DI 94 DI 146 Engine stall After accelerator pedal depressed 1 Air flow meter circuit DI 94 Engine stall After acce...

Страница 183: ...CONFIRMATION DRIVING PATTERN DI 121 INSPECTION PROCEDURE DI 122 124 DTC P0135 21 28 HEATED OXYGEN SENSOR HEATER CIRCUIT MALFUNCTION BANK 1 SENSOR 1 2RZ FE DI 125 DTC P0141 27 29 HEATED OXYGEN SENSOR HEATER CIRCUIT MALFUNCTION BANK 1 SENSOR 2 2RZ FE DI 125 CIRCUIT DESCRIPTION DI 125 WIRING DIAGRAM DI 125 INSPECTION PROCEDURE DI 125 126 DTC P0136 27 29 HEATED OXYGEN SENSOR CIRCUIT MALFUNCTION BANK 1...

Страница 184: ...TC P1335 13 CRANKSHAFT POSITION SENSOR CIRCUIT MALFUNCTION DURING ENGINE RUNNING DI 157 CIRCUIT DESCRIPTION DI 157 WIRING DIAGRAM DI 157 INSPECTION PROCEDURE DI 157 INJECTOR CIRCUIT DI 158 CIRCUIT DESCRIPTION DI 158 WIRING DIAGRAM DI 158 INSPECTION PROCEDURE DI 159 161 STARTER SIGNAL CIRCUIT DI 162 CIRCUIT DESCRIPTION DI 162 WIRING DIAGRAM DI 162 163 INSPECTION PROCEDURE DI 164 BACK UP POWER SOURC...

Страница 185: ...EM 2RZ FE DI 178 CIRCUIT DESCRIPTION DI 178 INSPECTION PROCEDURE DI 179 182 VARIABLE RESISTOR CIRCUIT 3RZ FE DI 183 CIRCUIT DESCRIPTION DI 183 WIRING DIAGRAM DI 183 INSPECTION PROCEDURE DI 184 187 PAGE 3 OF 3 CLICK HERE TO VIEW CHAPTER INDEX TO MODEL INDEX Pages From Supplement DIAGNOSTICS ENGINE 2RZ FE 3RZ FE 3RZ F 3RZ FE ...

Страница 186: ...so that the platinum hot wire and thermistor provide a bridge circuit with the power transistor controlled so that the potential of A and B remains equal to maintain the set temp DTC No DTC Detecting Condition Trouble Area P0100 31 Open or short in air flow meter circuit for 3 sec engine speed S Open or short in air flow meter circuit Ai fl t P0100 31 Open or short in air flow meter circuit for 3 ...

Страница 187: ...4 C C Driver Side J B Engine Room R B B B 3 3 DIAGNOSTICS ENGINE 2RZ FE 3RZ FE DI 95 WIRING DIAGRAM INSPECTION PROCEDURE HINT Read freed frame data using hand held tester Because freeze frame records the engine conditions when the malfunction is detected when troubleshooting it is useful for determining whether the vehicle was run ning or stopped the engine warmed up or not the air fuelratio lean ...

Страница 188: ...LT Type I Type II Air flow rate gm sec 0 0 gm sec 271 0 gm sec or more Type I Type II Go to step 5 2 Check voltage of air flow meter power source PREPARATION a Disconnect the air flow meter connector b Turn ignition switch ON CHECK Measure voltage between terminal 3 of airflow meterconnector and body ground OK Voltage 9 14 V NG Check for open in harness and connector be tween EFI main relay Markin...

Страница 189: ...erminal VG of engine ECU and body ground while engine is idling OK Voltage 1 1 1 5 V P or N position and A C switch OFF OK Check and replace engine ECU See page IN 21 NG 4 Check for open and short in harness and connector between air flow meter and engine ECU See page IN 21 NG Repair or replace harness or connector OK Replace air flow meter CLICK HERE TO VIEW CHAPTER INDEX Pages From Supplement TO...

Страница 190: ...tinuity between terminal E3 of engine ECU connec tor and body ground OK Continuity 1 Ω or less NG Check and replace engine ECU See page IN 21 OK 6 Check for open in harness and connector between air flow meter and engine ECU See page IN 21 NG Repair or replace harness or connector OK Replace air flow meter CLICK HERE TO VIEW CHAPTER INDEX Pages From Supplement TO MODEL INDEX CONTINUED 3RZ F 3RZ FE...

Страница 191: ...5 V P or N position and A C switch OFF OK Check and replace engine ECU See page IN 21 OK 2 Check voltage of air flow meter power source PREPARATION Disconnect the air flow meter connecter Turn the ignition switch ON CHECK Measure voltage between terminal 3 of airflow meterconnector and body ground OK Voltage 9 14 V NG Check for open in harness and connecter between EFI main relay Marking EFI and a...

Страница 192: ...Check for open in harness and connector between air flow meter and engine ECU See page IN 21 NG Repair or replace harness or connector OK Replace air flow meter CLICK HERE TO VIEW CHAPTER INDEX Pages From Supplement TO MODEL INDEX 3RZ F 3RZ FE ...

Страница 193: ... series When the resistance value of the intake air temp sensor changes in accordance with changes in the intake air temp the potential at terminal THA also changes Based on this signal the engine ECU increases the fuel injection volume to improve driveability during cold engine operation If the engine ECU detects the DTC P0110 24 it operates the fail safe function in which the intake air temp is ...

Страница 194: ...tion is detected when troubleshooting it is useful for determining whether the vehicle was running or stopped the engine warmed up or not the air fuel ratio lean or rich etc at the time of the malfunction S If DTC P0110 24 Intake Air Temp Circuit Malfunction P0115 22 Water Temp Circuit Malfunc tion P0120 41 Throttle Position Sensor Circuit Malfunction are output simultaneously E2 Sensor Ground may...

Страница 195: ...s open circuit hand held tester indicates 40 C 40 F S If there is short circuit hand held tester indicates 140 C 284 F or more NG 40 C 40 F Go to step 2 140 C 284 F Go to step 4 OK Check for intermittent problem See gage DI 80 2 Check for open in harness or engine ECU PREPARATION a Disconnect the air flow meter connector b Connect sensor wire harness terminals together c Turn ignition switch ON CH...

Страница 196: ...visual and contact pressure check for the engine ECU connector See page IN 22 c Turn ignition switch ON CHECK Read temp value on the hand held tester OK Temp value 140 C 284 F or more OK Open in harness between terminals E2 or THA repair or replace harness NG Confirm good connection at engine ECU If OK replace engine ECU 4 Check for short in harness and engine ECU See page IN 21 PREPARATION a Disc...

Страница 197: ...ent See page FI 61 b Disconnect the E5 connector of engine ECU HINT Intake air temp sensor connector is disconnected c Turn ignition switch ON CHECK Read temp value on the OBD II scan tool or hand held tester OK Temp value 40 C 40 F OK Repair or replace harness or connector NG Check and replace engine ECU See page IN 21 CLICK HERE TO VIEW CHAPTER INDEX Pages From Supplement TO MODEL INDEX CONTINUE...

Страница 198: ... THA and E2 of engine ECU connector Intake air temp C F Voltage V 20 68 0 5 3 4 60 140 0 2 1 0 OK OK Check for intermittent problem See page DI 80 NG 2 Check air flow meter See page FI 29 NG Replace air flow meter OK 3 Check for open and short in harness and connector between engine ECU and air flow meter See page IN 21 NG Repair or replace harness or connector OK Check and replace engine ECU CLIC...

Страница 199: ...or more Water temp sensor S Engine Engine ECU HINT After confirming DTC P0115 22 use the hand held tester to confirm the water temp from CURRENT DATA Temp Displayed Malfunction 40 C 40 F Open circuit 140 C 284 F or more Short circuit WIRING DIAGRAM INSPECTION PROCEDURE HINT S Read freed frame data using hand held tester Because freeze frame records the engine conditions when the malfunction is det...

Страница 200: ...HINT S If there is open circuit hand held tester indicates 40 C 40 F S If there is short hand held tester indicates 140 C 284 F or more NG 40 C 40 F Go to step 2 140 C 284 F Go to step 4 OK 2 Check for short in harness or engine ECU PREPARATION a Disconnect the water temp sensor connector b Connect sensor wire harness terminals together c Turn ignition switch ON CHECK Read temp value on the hand h...

Страница 201: ... a visual and contact pressure check for the engine ECU connector See page IN 22 c Turn ignition switch ON CHECK Read temp value on the hand held tester OK Temp value 140 C 284 F or more OK Open in harness between terminals E2 or THW repair or replace harness NG Confirm good connection at engine ECU If OK replace engine ECU 4 Check for short in harness or engine ECU PREPARATION a Disconnect the wa...

Страница 202: ...ve compartment See page FI 61 b Disconnect the E5 connector of Engine ECU HINT Water temp sensor connector is disconnected c Turn ignition switch ON CHECK Read temp value on the hand held tester OK Temp value 40 C 40 F OK Repair or replace harness or connector NG Check and replace Engine ECU See page IN 21 CLICK HERE TO VIEW CHAPTER INDEX Pages From Supplement TO MODEL INDEX CONTINUED 3RZ F 3RZ FE...

Страница 203: ...onnecter OK Water Temp C F Voltage V 20 68 Engine is cool 0 5 3 4 80 176 Engine is hot 0 2 1 0 OK Check for intermittent problems See page DI 80 NG 2 Check water temp sensor PREPARATION a Disconnect the water temp sensor connecter CHECK Measure resistance between terminals OK Resistance is within Acceptable Zone on chart Water Temp C F Resistance kΩ 20 68 Engine is cool 2 3 80 176 Engine is hot 0 ...

Страница 204: ...d short in harness and connector between engine ECU and water temp sensor See page IN 21 NG Repair or replace harness or connector NG Check and replace Engine ECU See page IN 21 CLICK HERE TO VIEW CHAPTER INDEX Pages From Supplement TO MODEL INDEX 3RZ F 3RZ FE ...

Страница 205: ...itions from these signals input from terminal VTA uses them as one of the condititions for deciding the air fuel ratio correction pow er inctease correction and fuel cut control etc DTC No DTC Detecting Condition Trouble Area P0120 41 Open or short in throttle position sensor circuit for 0 5 sec or more S Open or short in throttle position sensor S Throttle position senor S Engine ECU HINT S After...

Страница 206: ...e records the engine conditions when the malfunction is detected when troubleshooting it is useful for determining whether the vehicle was running or stopped the engine warmed up or not the air fuel ratio lean or rich etc at the time of the malfunction S If DTC P0110 24 P0115 22 and P0120 41 are output simultaneously E2 Sensor Ground may be open CLICK HERE TO VIEW CHAPTER INDEX Pages From Suppleme...

Страница 207: ...ottle valve Throttle valve opening position expressed as percentage Fully open Approx 70 Fully closed Approx 10 OK Check for intermittent problems See page DI 80 NG 2 Check voltage between terminal 2 of wire harness side connector and body ground PREPARATION a Disconnect the throttle position sensor connector b Turn ignition switch ON CHECK Measure voltage between terminals VC of wire harness side...

Страница 208: ...eplace throttle position sensor OK 4 Check voltage between terminals VTA and E2 of engine ECU connector PREPARATION a Remove the glove compartment See page FI 61 b Turn ignition switch ON CHECK Measure voltage between terminals VTA and E2 of engine ECU connector OK Throttle valve Voltage Fully closed 0 3 1 0 V Fully open 2 7 5 2 V NG Check for open and short in harness and connector between engine...

Страница 209: ...ngine ECU See page IN 21 OK Check for open in harness and connector be tween engine ECU and sensor VC line See page IN 21 When not using hand held tester 1 Check voltage between terminals VTA and E2 of engine ECU PREPARATION a Remove glove compartment See page FI 61 b Turn ignition switch ON CHECK Measure voltage between terminals VTA and E2 of engine ECU OK Throttle valve Voltage V Fully open 0 3...

Страница 210: ...ensor OK terminals Throttle valve Resistance kΩ 1 1 2 5 5 9 2 3 Fully closed 0 2 5 7 2 3 Fully open 2 0 10 2 NG Replace throttle position sensor OK 3 Check for open and short in harness and connector between engine ECU and throttle position sensor VC VTA E2 line See page IN 21 NG Repair or replace harness or connector OK Check and replace engine ECU See page IN 21 CLICK HERE TO VIEW CHAPTER INDEX ...

Страница 211: ...ndition small electromotive force 0 V When the air fuel ratio is RICHER than the stoichiometric air fuel ratio the oxygen concentration in the ex haust gas in reduced and the oxygen sensor informs the engine ECU of the RICHcondition large electromo tive force 1V The engine ECU judges by the electromotive force from the oxygen sensor whether the air fuel ratio is RICH or LEAN and controls the injec...

Страница 212: ...2 1 Europe 2 Except Europe Engine Room R B Drive Side R B Engine Room R B B B J1 A A DI 120 DIAGNOSTICS ENGINE 2RZ FE 3RZ FE HINT S Bank 1 refers to the bank that includes cylinder No 1 S Sensor 1 is the oxygen sensor of front side S The heated oxygen sensor s output voltage and the short term fuel trim value can be read using the hand held tester S If voltage output of heated oxygen sensor is 0 V...

Страница 213: ...km h 31 40 mph for 1 3 min to warm up the heated oxygen sensor 5 Let the engine idle for 1 min HINT S If you have no hand held tester do step 1 to 5 again S If a malfunction exists the check engine warning CHK ENG will light up during step 5 NOTICE If the conditions in this test are not strictly followed detection of the malfunction will not be possible If you do not have a hand held tester turn t...

Страница 214: ...ead the heated oxygen sensor output voltage and short term fuel trim RESULT Pattern Heated oxygen sensor output voltage Short term fuel trim 1 Lean condition Changes at 0 7 V or less Changes at about 20 2 RIch condition Changes at 0 35 V or more Changes at about 20 3 Except 1 and 2 1 2 Check fuel trim system See page DI 129 3 2 Check the output voltage of heated oxygen sensor during idling PREPARA...

Страница 215: ...rom is as shown oscillating between approx 0 1 V and 0 9 V If the oxygen sensor has deteriorated the amplitude of the volt age will be reduced as shown on the left OK Perform confirmation driving pattern NG 3 Check for open and short in harness and connector between engine ECU and heated oxygen sensor See page IN 21 OK Replace or replace harness or connector NG Replace heated oxygen sensor CLICK H...

Страница 216: ...rt See page DI 119 NO Replace heated oxygen sensor Refernce INSPECTION USING OSCILLOSCOPE S With the engine racing 4 000 rpm measure waveform between terminals OX1 and E1 of engine ECU HINT The correct wavefrom is as shown oscillating between approx 0 1 V and 0 9 V If the oxygen sensor has deteriorated the amplitude of the volt age will be reduced as shown on the left CLICK HERE TO VIEW CHAPTER IN...

Страница 217: ...t of heated oxygen sensor S Heated oxygen sensor heater P0141 27 29 more Heated oxygen sensor heater S Engine ECU HINT S Sensor 1 refers to the sensor closer to the engine body S Sensor 2 refers to the sensor farther away from the engine body WIRING DIAGRAM Refer to DTC P0130 21 28 Oxygen Sensor Circuit Malfunction on page DI 119 INSPECTION PROCEDURE HINT Read freed frame data using hand held test...

Страница 218: ...and body ground HINT S Connect terminal HT1 to bank 1 sensor 1 Fr 02 sensor S Connect terminal HT2 to bank 1 sensor 2 Rr 02 sensor OK Voltage 9 14 V OK Check and replace engine ECU See page IN 21 NG 2 Check resistance of heated oxygen sensor heater See page FI 59 NG Replace heated oxygen sensor OK Check and repair harness or connector between EFI main relay Marking EFI and heatedoxygen sensor and ...

Страница 219: ...from the engine body WIRING DIAGRAM Refer to DTC P0130 21 28 Oxygen Sensor circuit Malfunction on page DI 119 INSPECTION PROCEDURE HINT Read freed frame data using hand held tester Because freeze frame records the engine conditions when the malfunction is detected when troubleshooting it is useful for determining whether the vehicle was run ning or stopped the engine warmed up or not the air fuelr...

Страница 220: ...form quick racing to 4 000 rpm 3 min using accelerator pedal OK Heated oxygen sensor output voltage Alternates from 0 4 V or less to 0 5 V or more OK Check that each connector is properly connected NG Replace heated oxygen sensor bank 1 sensor 2 When not using hand held tester 1 Are these any other codes besides code DTC P0136 27 29 being output YES Go to relerant DTC chart NO Replace heated oxyge...

Страница 221: ...t is de tected as a malfunction and the check engine warning CHK ENG lights up DTC No DTC Detecting Condition Trouble Area P0171 25 Oxygen sensor voltage is 0 45 V or less lean for 90 sec under conditions a and b c 2 trip detection logic a Water temp 70 C 158 F or more b Engine speed 1 500 rpm or more c Vehicle speed 100 km h or less S Air intake hose loose S Fuel line pressure S Injector blockage...

Страница 222: ...ensor output voltage Short term fuel trim 1 Lean condition Changes at 0 55 V or less Changes at about 20 2 RIch condition Changes at 0 4 V or more Changes at about 20 3 Except 1 and 2 3 Check for heated oxygen sensor See page FI 59 1 2 3 Check fuel pressure See page FI 14 NG Check and repair fuel pump pressure regulator fuel pipe line and filter See page FI 1 OK 4 Check injector injection See page...

Страница 223: ... NG Repair or replace OK Check and replace engine ECU See page IN 21 When not using hand held tester 1 Check air induction system See page FI 1 NG Repair or replace OK 2 Check fuel pressure See page FI 14 NG Check and repair fuel pump fuel pipe line and filter See page FI 1 OK CLICK HERE TO VIEW CHAPTER INDEX Pages From Supplement TO MODEL INDEX CONTINUED 3RZ F 3RZ FE ...

Страница 224: ...ector OK 4 Check air flow meter See page FI 29 NG Repair or replace OK 5 Check water temp sensor See page FI 55 NG Repair or replace OK 6 Check for spark and ignition See page IG 1 NG Repair or replace OK CLICK HERE TO VIEW CHAPTER INDEX Pages From Supplement TO MODEL INDEX CONTINUED 3RZ F 3RZ FE ...

Страница 225: ... FE DI 133 7 Does malfunction disappear when a good oxygen sensor installed YES Replace oxygen sensor NO Check and replace engine ECU See page IN 21 CLICK HERE TO VIEW CHAPTER INDEX Pages From Supplement TO MODEL INDEX 3RZ F 3RZ FE ...

Страница 226: ... brates due to knocking If engine knocking occurs ignition timing is retarded to suppress it DTC No DTC Detecting Condition Trouble Area N k k 1 i l t i ECU ith i d S Open or short in knock sensor circuit P0325 52 No knock sensor 1 signal to engine ECU with engine speed between 1 700 rpm and 5 200 rpm S Open or short in knock sensor circuit S Knock sensor looseness P0325 52 between 1 700 rpm and 5...

Страница 227: ...ne ECU connector and body ground PREPARATION a Remove the glove compartment See page FI 61 b Disconnect the E5 connector of engine ECU CHECK Measure resistance between terminal KNK of engine ECU con nector and body ground OK Resistance 1 MΩ or higher Reference INSPECTION USING OSCILLOSCOPE S With the engine racing 4 000 rpm measure between ter minal KNK of engine ECU and body ground HINT The corre...

Страница 228: ...rness and connector between engine ECU and knock sensor See page IN 21 NG Repair or replace harness or connector OK 4 Does malfunction disappear when a good knock sensor is installed YES Replace knock sensor NO Check and replace engine ECU See page IN 21 CLICK HERE TO VIEW CHAPTER INDEX Pages From Supplement TO MODEL INDEX 3RZ F 3RZ FE ...

Страница 229: ...The engine ECU detects the standard crankshaft angle based on the G2 signals and the actual crankshaft angle the engine speed by the NE signals DTC No DTC Detecting Condition Trouble Area S Open or short in crankshaft position sensor circuit P0335 12 No crankshaft position sensor signal to engine ECU during S Open or short in crankshaft position sensor circuit S Crankshaft position sensor P0335 12...

Страница 230: ...ch etc at the time of the malfunction S Perfrom troubleshooting of DTC P0335 12 first If no trouble is found troubleshoot the following me chanical system 1 Check resistance of crankshaft position sensor See page IG 12 Reference INSPECTION USING OSCILLOSCOPE During cranking or idling check between terminals G2 and NE NE and NE of engine ECU HINT The correct waveforms are as shown NG Replace cranks...

Страница 231: ...DI 139 3 Inspect sensor installation and teeth of signal plate NG Tighten the sensor Replace signal plate OK Check and replace engine ECU See page IN 21 CLICK HERE TO VIEW CHAPTER INDEX Pages From Supplement TO MODEL INDEX 3RZ F 3RZ FE ...

Страница 232: ...d is mounted on the crankshaft The NE signal sensor generates 34 signals for every engine revolution The engine ECU detects the standard crankshaft angle based on the G2 signals and the actual crankshaft angle and the engine speed by the NE signals DTC No DTC Detecting Condition Trouble Area P0340 12 No camshaft position sensor signal to engine ECU during cranking S Open or short in camshaft posit...

Страница 233: ... engine warmed up or not the air fuelratio lean or rich etc at the time of the malfunction 1 Check resistance of camshaft position sensor Signal generator See page IG 8 Reference INSPECTION USING OSCILLOSCOPE During cranking or idling check between terminals G2 and NE NE and NE of engine ECU HINT The correct waveform are as shown NG Replace camshaft position sensor OK 2 Check for open and short in...

Страница 234: ...GNOSTICS ENGINE 2RZ FE 3RZ FE 3 Inspect sensor installation NG Tighten the sensor OK Check and replace engine ECU See page IN 21 CLICK HERE TO VIEW CHAPTER INDEX Pages From Supplement TO MODEL INDEX 3RZ F 3RZ FE ...

Страница 235: ...haping circuit inside the combination meter it is then transmitted to the engine ECU The engine ECU determines the vehicle speed based on the frequency of these pulse signals DTC No DTC Detecting Condition Trouble Area S Combination meter P0500 42 No vehicle speed sensor signal to engine ECU during vehicle S Combination meter S Open or short in vehicle speed sensor circuit P0500 42 No vehicle spee...

Страница 236: ...e vehicle and check if the operation of the speedometer in the combination meter is normal HINT The vehicle speed sensor is operating normally if the speedometer display is normal NG Check speedometer See Pub No RM585E OK 2 Check for short in harness and connector between terminal SPD of engine ECU and body ground PREPARATION a Remove the glove compartment See page FI 61 b Disconnect the E6 engine...

Страница 237: ...gnition switch ON CHECK Measure voltage between terminal SPD of engine ECU and body ground OK Voltage 9 14 V NG Check for open in harness and connector be tween J B and engine ECU See page IN 21 OK 4 Check for open in harness and connector between J B and combination meter See page IN 21 NG Repair or replace harness or connector OK Check and replace engine ECU See page IN 21 CLICK HERE TO VIEW CHA...

Страница 238: ...IT DESCRIPTION The rotary solenoid type ISC valve is located in front of the in take air chamber and intake air bypassing the throttle valve is directed to the ISC valve through a passage In this way the intake air volume bypassing the throttle valve is regulated controlling the engine speed The engine ECU operates only the ISC valve to performidle up and provide feedback for the target idling spe...

Страница 239: ...ARATION a Warm up engine to normal operating temp b Switch off all accessories c Switch off air conditioning d Shift transmission into N or neutral position e Connect hand held tester to DLC3 on the vehicle f Using SST connect terminals 13 TC and 4 CG of the DLC3 SST 09843 18020 CHECK Check the difference of engine speed between the ones less than 5 sec and more than 5 sec after connecting termina...

Страница 240: ...ON CHECK Measure voltage between terminals RSO RSC of engine ECU connector and body ground OK Voltage 9 14 V OK Go to step 4 NG 3 Check ISC valve See page FI 48 NG Replace ISC valve OK Check for open andshort inharness andcon nector between E G Room J B and ISC valve ISC valve and ECU See page IN 21 4 Check operation of the ISC valve See page FI 48 NG Repair or replace ISC valve OK CLICK HERE TO V...

Страница 241: ...ine ECU and body ground PREPARATION a Remove glove compartment See page FI 61 b Disconnect the E4 connector of engine ECU c Turn ignition switch ON CHECK Measure voltage between terminals RSO RSC of engine ECU connector and body ground OK Voltage 9 14 V OK Go to step 5 NG 2 Check ISC valve NG Replace ISC valve OK Check for open andshort inharness andcon nector between J B and ISC valve and engine ...

Страница 242: ... valve NG Replace ISC valve OK 4 Check the blockage of ISC valve and the passage to bypass the throttle valve NG Repair or replace ISC valve OK Check and replace engine ECU See page IN 21 CLICK HERE TO VIEW CHAPTER INDEX Pages From Supplement TO MODEL INDEX 3RZ F 3RZ FE ...

Страница 243: ...f the secondary winding High voltage generated in the secondary winding is applied directly to the 2 spark plugs The sparks of the 2 spark plugs pass simultaneously from the center electrode to the ground electrode The engine ECU determines ignition timing and outputs the ignition signals IGT for each cylinder Based on IGT signals the power transistors in the igniter cuts off the current to the pr...

Страница 244: ... the malfunction is detected when troubleshooting it is useful for determining whether the vehicle was run ning or stopped the engine warmed up or not the air fuelratio lean or rich etc at the time of the malfunction DTC P1300 14 15 is for the ignition circuit of No 1 and No 4 cylinders DTC P1310 14 15 is for the ignition circuit of No 2 and No 3 cylinders 1 Check spark plug and spark See page IG ...

Страница 245: ...c Turn ignition switch ON CHECK Measure voltage between terminal IGF of engine ECU connec tor and body ground OK Voltage 4 5 5 5 V OK Replace ignition coil w igniter NG Check and replace ECU See page IN 21 4 Check for open and short in harness and connector in IGT1 and IGT2 signal cir cuit between engine ECU and ignition coil w igniter See page IN 21 NG Repair or replace harness or connector OK CL...

Страница 246: ...g check waveform between terminals IGT1 and E1 of engine ECU HINT The correct waveform are as shown IGT2 signal waveform is same as the IGT1 signal waveform NG Check and replace engine ECU See page IN 21 OK 6 Disconnect ignition coil w igniter connector and check voltage between termi nals IGT1 and IGT2 of engine ECU connector and body ground PREPARATION a Disconnect the ignition coil w igniter co...

Страница 247: ...body ground when ignition switch is turned to ON and STA position OK Voltage 9 14 V NG Repair ignition coil w igniter power source cir cuit OK 8 Check for open and short in harness and connector between ignition switch and ignition coil w igniter See page IN 21 NG Repair or replace harness or connector OK 9 Check ignition coil w igniter See page IN 21 NG Replace ignition coil w igniter OK CLICK HE...

Страница 248: ...INE 2RZ FE 3RZ FE 10 Check EFI main relay Marking EFI See page IN 21 NG Replace EFI main relay Marking EFI OK Replace ignition coil w igniter CLICK HERE TO VIEW CHAPTER INDEX Pages From Supplement TO MODEL INDEX 3RZ F 3RZ FE ...

Страница 249: ...ion sensor S Starter S Engine ECU WIRING DIAGRAM Refer to DTC P0335 12 Crankshaft Position Sensor Circuit Malfunction on page DI 137 for the WIRING DIAGRAM INSPECTION PROCEDURE HINT Read freed frame data using hand held tester Because freeze frame records the engine conditions when the malfunction is detected when troubleshooting it is useful for determining whether the vehicle was run ning or sto...

Страница 250: ...2 2 30A AM2 W Battery 2RZ FE J13 J4 A A J3 B B Junction Connector Engine Room R B DI 158 DIAGNOSTICS ENGINE 2RZ FE 3RZ FE Injector Circuit CIRCUIT DESCRIPTION The injectors are located in the intake manifold They inject fuel into the cylinders based on the signals from the engine ECU WIRING DIAGRAM DI1IQ 01 CLICK HERE TO VIEW CHAPTER INDEX Pages From Supplement TO MODEL INDEX CONTINUED 3RZ F 3RZ F...

Страница 251: ...FI 61 b Turn ignition switch ON CHECK Measure voltage between terminals 10 40 of engine ECU and body ground OK Voltage 9 14 V OK Go to step 4 NG 2 Check AM2 fuse PREPARATION Remove AM2 fuse from J B No 2 CHECK Check continuity of AM2 fuse OK Continuity NG Check for short in the harness and all the com ponents connected to AM2 fuse OK CLICK HERE TO VIEW CHAPTER INDEX Pages From Supplement TO MODEL ...

Страница 252: ... repair harness and connector be tween engine ECU and battery 4 Check for open in harness and connector between terminal E01 E02 of engine ECU connector and body ground See page IN 21 NG Repair or replace harness or connector OK CLICK HERE TO VIEW CHAPTER INDEX Pages From Supplement TO MODEL INDEX CONTINUED 3RZ F 3RZ FE ...

Страница 253: ... page FI 20 OK S Injection Volume 2RZ FE 64 78 cm3 15 sec 4 0 4 8 cu in 15 sec Difference between each injector Less than 14 cm3 0 3 cu in 3RZ FE 72 86 cm3 15 sec 4 4 5 2 cu in 15 sec Difference between each injector Less than 14 cm3 0 3 cu in S Leakage Fuel drop 1 drop or less per 3 minutes NG Replace injector OK Proceed to next circuit inspection shown on problem symptoms table See page DI 92 CL...

Страница 254: ... DI 162 DIAGNOSTICS ENGINE 2RZ FE 3RZ FE Starter Signal Circuit CIRCUIT DESCRIPTION When the engine is cranked the intake air flow is slow so fuel vaporization is poor A rich mixture is therefore necessary in order to achieve good startability While the engine is being cranked the battery voltage is ap plied to terminal STA of the engine ECU The starter signal is mainly used to increase the fuel i...

Страница 255: ...A J1 J2 W B W B B W B W 2 EB1 EB S3 S2 1 1 AM1 AM2 ALT 2 2 2 Battery P B 7 5A STA C Engine Room J B Engine Room J B B R B L W 1 Coil Weather package 1 Except Coil Weather package DIAGNOSTICS ENGINE 2RZ FE 3RZ FE DI 163 CLICK HERE TO VIEW CHAPTER INDEX Pages From Supplement TO MODEL INDEX CONTINUED 3RZ F 3RZ FE ...

Страница 256: ...signal on the hand held tester during crank ing OK Starter signal ON When not using hand held tester PREPARATION Remove glove compartment see page FI 61 CHECK Measure voltage between terminal STA of engine ECUconnec tor and body ground during cranking OK Voltage 6 0 V or more OK Proceed to next circuit inspection shown on problem symptoms table See page DI 92 NG 2 Check for open in harness and con...

Страница 257: ...Z FE DI 165 Back Up Power Source Circuit CIRCUIT DESCRIPTION Battery voltage is supplied to terminal BATT of the engine ECU even when the ignition switch is OFF for use by the DTC memory and air fuel ratio adaptive control value memory etc WIRING DIAGRAM DI1IS 01 CLICK HERE TO VIEW CHAPTER INDEX Pages From Supplement TO MODEL INDEX CONTINUED 3RZ F 3RZ FE ...

Страница 258: ...rminal BATT of engine ECU con nector and body ground OK Voltage 9 14V OK Check and replace engine ECU See page IN 21 NG 2 Check EFI fuse PREPARATION Remove EFI fuse from J B No 2 CHECK Check continuity of EFI fuse OK Continuity NG Check for short in all the harness and components connected to EFI fuse OK Check and repair harness or connector be tween battery EFI fuse and engine ECU CLICK HERE TO V...

Страница 259: ...S ENGINE 2RZ FE 3RZ FE DI 167 Neutral Start Switch Circuit 3RZ FE CIRCUIT DESCRIPTION The neutral start switch goes on when the shift lever is in the N or P shift position When it goes on terminal NSW of the engine ECU is grounded to body ground via the starter relay thus the terminal NSW voltage be comes 0V When the shift lever is in the D 2 L or R position the neutral start switch goes off so th...

Страница 260: ...ter main switch ON CHECK Shift the shift lever to the P N 2 or positions and read the NSW 2 and L signal on the hand held tester OK Shift position Signal P N NSW OFF ON 2 2 OFF ON L L OFF ON When not using hand held tester PREPARATION Turn the ignition switch ON CHECK Measure the voltage between the terminals NSW 2 L of engine ECU and body ground when the shift lever is shifted to the fol lowing p...

Страница 261: ...K Shift position Terminal No to continuity Terminal No to continuity P 5 6 2 7 R 2 8 N 5 6 2 9 D 2 10 2 2 3 L 2 4 NG Replace neutral start switch OK 3 Check harness and connector between battery and neutral start switch neutral start switch and engine ECU See page IN 21 NG Repair or replace harness and connector OK Check and replace engine ECU CLICK HERE TO VIEW CHAPTER INDEX Pages From Supplement...

Страница 262: ...unction Connector 3 B 3 B J3 J3 1 Europe 2 Except Europe 3 2RZ FE DI 170 DIAGNOSTICS ENGINE 2RZ FE 3RZ FE ECU Power Source Circuit CIRCUIT DESCRIPTION When the ignition switch is turned ON battery positive voltage is applied to the coil closing the contacts of the EFI main relay and supplying power to the terminal B of the engine ECU WIRING DIAGRAM DI1IU 01 CLICK HERE TO VIEW CHAPTER INDEX Pages F...

Страница 263: ...ween terminals B and E1 of engine ECU connector OK Voltage 9 14V OK Proceed to next circuit inspection shown on problem symptoms table See page DI 92 NG 2 Check for open in harness and connector between terminal E1 of engine ECU and body ground See page IN 21 NG Repair or replace harness or connector OK 3 Check EFI main relay See page FI 50 NG Replace EFI main relay OK CLICK HERE TO VIEW CHAPTER I...

Страница 264: ...r between main relay and battery main relay and engine ECU See page IN 21 NG Repair or replace harness or connector OK 6 Check IGN fuse PREPARATION Remove IGN fuse J B No 1 CHECK Check continuity of IGN fuse OK Continuity NG Check for short in all the harness and compo nents connected to IGN fuse OK CLICK HERE TO VIEW CHAPTER INDEX Pages From Supplement TO MODEL INDEX CONTINUED 3RZ F 3RZ FE ...

Страница 265: ...ck ignition switch NG Replace ignition switch OK Check for open in harness and connector be tween IG switch and main relay main relay and body ground See page IN 21 CLICK HERE TO VIEW CHAPTER INDEX Pages From Supplement TO MODEL INDEX 3RZ F 3RZ FE ...

Страница 266: ...p Control Circuit CIRCUIT DESCRIPTION In the diagram below when the engine is cranked current flows from terminal ST of the ignition switch to the starter relay coil and also current flows to terminal STA of engine ECU STA signal When the STA signal and NE signal are input to the engine ECU Tr is turned ON current flows to coil of the circuit opening relay the relay switches on power is supplied t...

Страница 267: ...eld tester connect the positive and negative leads from the battery to the fuel pump connector See page FI 11 CHECK Check that the pulsation damper screw rises up when the fuel pump opetrates OK The pulsation damper screw rises up OK Proceed to next circuit inspection shown on problem symptoms table See page DI 92 NG 2 Check for engine ECU power source circuit See page DI 170 NG Repair or replace ...

Страница 268: ...ositive voltage between terminals 1 and 2 b Check continuity between terminals 3 and 5 OK Terminals 3 and 5 Continuity NG Replace circuit opening relay OK 4 Check voltage between terminal FC of engine ECU and body ground PREPARATION a Remove glove compartment See page FI 61 b Turn ignition switch ON CHECK Measure voltage between terminal FC of engine ECU and body ground OK Voltage 9 14 V NG Check ...

Страница 269: ...mp OK 6 Check for open in harness and connector between circuit opening relay and fuel pump fuel pump and body ground See page IN 21 NG Repair or replace harness or connector OK Check and replace engine ECU See page IN 21 CLICK HERE TO VIEW CHAPTER INDEX Pages From Supplement TO MODEL INDEX 3RZ F 3RZ FE ...

Страница 270: ... the proper quantity to suit the driving conditions into the in take air mixture to slow down combustion reduce the combus tion temperature and reduce NOx emissions The amount of EGR is regulated by the EGR vacuummodulator according to the engine load If even one of the following conditions is fulfilled the VSV is turned ON by a signal from the engine ECU This results in at mospheric air acting on...

Страница 271: ...valve and VSV for EGR at 3 000 rpm PREPARATION a Using a 3 way connector connect a vacuumgauge to the hose between VSV and EGR valve b Warm up the engine to above 80 C 176 F CHECK Check the vacuum at 3 000 rpm OK Vacuum 10 kPa 75 mmHg 3 0 in Hg OK Prceed to next circuit inspection shown on problem symptoms table See page DI 92 NG CLICK HERE TO VIEW CHAPTER INDEX Pages From Supplement TO MODEL INDE...

Страница 272: ... Type Vacuum I 0 kPa 0 mmHg 0 in Hg II 0 kPa 0 mmHg in Hg 40 kPa 300 mmHg 11 8 in Hg III 40 kPa 300 mmHg 11 8 in HG Type I Replace EGR vacuum modulator Type II Go to step 4 Type III Check the EGR valve and repair or replace EGR valve 4 Check the VSV circuit for EGR PREPARATION Select the ACTIVE TEST mode on the hand held tester CHECK Check operation of VSV when it is operated by the hand held test...

Страница 273: ...Repair or replace harness or connector Check and replace engine ECU When not using hand held tester 1 Check the connection of vacuum hose NG Repair or replace OK 2 Check the vacuum between EGR valve and VSV for EGR at 2 800 rpm OK Proceed to next circuit inspection shown on problem symptoms table See page DI 92 NG CLICK HERE TO VIEW CHAPTER INDEX Pages From Supplement TO MODEL INDEX CONTINUED 3RZ ...

Страница 274: ... Check the EGR valve and repair or replace EGR valve 5 Check VSV for EGR See page FI 53 NG Replace VSV for EGR OK 6 Check for open and short in harness and connector between VSV for EGR and engine ECU See page IN 21 NG Repair or replace harness or connector OK Check and replace engine ECU CLICK HERE TO VIEW CHAPTER INDEX Pages From Supplement TO MODEL INDEX 3RZ F 3RZ FE ...

Страница 275: ...adjusted using this resistor Turning the idle mixture adjusting screw clockwise moves the contacts inside the resistor raising the terminal VAF voltage Conversely turning the screw counterclockwise lowers the terminal VAF voltage When the terminal VAF voltage rises the engine ECU increases the injection volume slightiy marking the air fuel mixture a little richer WIRING DIAGRAM DI1IX 01 CLICK HERE...

Страница 276: ...nd held tester or tachometer f Ignition timing check correctly g Idle speed check correctly h Check that the CO meter is properly calibrated i Race the engine at 2 500 rpm about 2 minutes CHECK Insert a tester probe at least 40 cm 1 3 ft into the tailpipe Mea sure the concentration with 1 3 minutes after racing the en gine to allow the concentration to stabilize OK Idle CO concentration 1 5 0 5 OK...

Страница 277: ...entration 1 5 0 5 NG type I Change in CO concentration NG type II No change in CO concentration HINT Always check idle speed after turning the idle mixture adjusting screw If it is incorrect readjust idle speed Adjustable range of the idle mixture adjust to turn this screw is 180 degrees Do not turn this screw more than it NG Type I See page EM 3 and go on troubleshooting NG Type II Go to step 3 O...

Страница 278: ...istance between terminals 1 and 2 the variable resister OK Resistance 4 6 Ω Check Resistance Between 1 and 3 CHECK Measure resistance between terminals 1 and 3 when turning the idle mixture adjusting screw fully clockwise and counter clockwise using SST SST 09243 00020 OK Resistance Change from about 5 kΩ to 0 kΩ accordingly NG Replace variable resister OK CLICK HERE TO VIEW CHAPTER INDEX Pages Fr...

Страница 279: ...connector while slowly turning the idle mixture adjusting screw first fully counterclockwise and then fully clockwise using SST SST 09243 00020 OK Voltage changes smoothly from 0 V to about 5 V i e does not suddenly jump up to 5 V down to 0 V OK Check and replace engine ECU NG 5 Check for open and short in harness and connector between variable resistor and engine ECU See page IN 21 NG Repair or r...

Страница 280: ...AIN 3RZ F 3RZ FE EM 28 CYLINDER HEAD 1RZ E EM 29 CYLINDER HEAD 2RZ FE EM 31 CYLINDER HEAD 3RZ FE EM 60 CYLINDER BLOCK 2RZ FE 3RZ F EM 62 REFER TO FOLLOWING REPAIR MANUALS Manual Name Pub No 1RZ 2RZ 2RZ E Engine Repair Manual RM167E 2RZ 2RZ E Engine Repair Manual RM558E 3RZ F 3RZ FE Engine Repair Manual RM521E 1RZ E Engine Repair Manual Suplement RM467E NOTE The above pages contain only the points ...

Страница 281: ...l accessories switched off e All vacuum lines connected f Ignition timing set correctly g Transmission in the neutral range h Fuel level should be about even with the correct level in the sight glass i CO meter operates normally 3 W DISCONNECT HOT AIR INTAKE HAI VACUUM HOSE AND PLUG HOSE END 4 ADJUST IDLE SPEED AND IDLE MIXTURE HINT Use SST if necessary SST 09243 00020 a Start the engine b Using a...

Страница 282: ...nt is complete S If the CO concentration is not within specification turn the idle mixture adjusting screw to obtain the specified concentration value S If the CO concentration cannot be corrected by ad justing the idle mixture see table below for other possible causes e Reconnect the HAI vacuum hose 6 TROUBLESHOOTING CO Problems Causes High Rough idle 1 Restricted air filter High Rough idle Black...

Страница 283: ...CHECK AND ADJUST CO CONCENTRATION AT IDLE NOTICE Always use a CO meter when adjusting the idle mixture It is not necessary to adjust with the idle mixture screw in most vehicles if they are in good condition If a CO meter is not available DO NOT ATTEMPT TO ADJUST IDLE MIXTURE a Race the engine at 2 500 rpm for approx 180 seconds b Insert a tester probe at least 40 cm 1 3 ft into the tailpipe c Wai...

Страница 284: ...line S Clogged fuel return line S Defective water temperature sensor S Defective water temperature sensor S Defective intake air temperature sensor Defective intake air temperature sensor S Faulty engine ECU Faulty engine ECU S Faulty injectors Faulty injectors S Faulty air flow meter y S Faulty throttle position sensor S 3RZ FE CO Problems Causes High Rough idle 1 Clogged air filter High Rough id...

Страница 285: ...tral position i Tachometer and CO HC meter calibrated by hand 2 START ENGINE 3 RACE ENGINE AT 2 500 RPM FOR APPROX 180 SE CONDS 4 INSERT CO HC METER TESTING PROBE INTO TAILPIPE AT LEAST 40 cm 1 3 ft DURING IDLING 5 CHECK CO HC CONCENTRATION AT IDLE Idle CO concentration 0 0 5 Idle HC concentration Applicable local regulation 6 TROUBLESHOOTING If the CO HC concentration does not conform to specific...

Страница 286: ...idle Fluctuating HC reading 1 Vacuum Leaks S PCV hose S Intake manifold S Throttle body S Vacuum hose S Intake chamber High High Rough idle Black smoke from exhaust 1 Restricted air filter 2 Plugged PCV valve 3 Faulty EFI system S Faulty fuel pressure regulator S Clogged fuel return line S Defective water temperature sensor S Defective intake air temperature sensor S Faulty engine ECU S Faulty inj...

Страница 287: ...or each cylinder NOTICE This measurement must be done in as short a time as possible Compression pressure 1 230 kPa 12 5 kgf cm2 178 psi or more Minimum pressure 880 kPa 9 0 kgf cm2 127 psi Difference between each cylinder 98 kPa 1 0 kgf cm2 14 psi or less e If the cylinder compression in one or more cylinders is low pour a small amount of engine oil into the cylinder through the spark plug hole a...

Страница 288: ...coolant temperature sender gauge connector S Disconnect the 4 engine wire clamps and engine wire 4 REMOVE CYLINDER HEAD COVER Remove the 10 bolts seal washers cylinder head cover and gasket 5 SET NO 1 CYLINDER TO TDC COMPRESSION a Turn the crankshaft pulley clockwise and align its groove with the 0 mark on the timing chain cover b Check that the timing marks 1 and 2 dots of the camshaft drive and ...

Страница 289: ...nd align its groove with timing mark 0 of the timing chain cover c Check only the valves indicated as shown Measure the valve clearance See procedure in step a 7 ADJUST VALVE CLEARANCE a Remove the adjusting shim S Turn the crankshaft to position the cam lobe of the camshaft on the adjusting valve upward S Position the notch of the valve liftertoward the spark plug side S Using SST A press down th...

Страница 290: ...omes within the specified value T Thickness of removed shim A Measured valve clearance N Thickness of new shim Intake N T A 0 20 mm 0 008 in Exhaust N T A 0 30 mm 0 012 in S Select a new shim with a thickness as close as pos sible to the calculated value HINT Shims are available in 17 sized in increments of 0 05 mm 0 0020 in from 2 50 mm 0 0984 in to 3 30 mm 0 1299 in CLICK HERE TO VIEW CHAPTER IN...

Страница 291: ...ance Cold 0 15 0 25 mm 0 006 0 01 in EXAMPLE The 2 800 mm 0 1102 in shim is installed and measured clearance is 0 440 mm 0 0173 in Replace the 2 800 mm 0 1102 in shim with a No 12 shim Shim No Shim No Thickness Thickness ENGINE MECHANICAL VALVE CLEARANCE 2RZ FE EM 11 CLICK HERE TO VIEW CHAPTER INDEX Pages From Supplement TO MODEL INDEX CONTINUED 3RZ F 3RZ FE ...

Страница 292: ...lve clearance Cold 0 25 0 35 mm 0 01 0 014 in EXAMPLE The 2 800 mm 0 1102 in shim is installed and measured clearance is 0 440 mm 0 0173 in Replace the 2 800 mm 0 1102 in shim with a No 10 shim Installed shim thickness mm in mm in Measured clearance EM 12 ENGINE MECHANICAL VALVE CLEARANCE 2RZ FE CLICK HERE TO VIEW CHAPTER INDEX Pages From Supplement TO MODEL INDEX CONTINUED 3RZ F 3RZ FE ...

Страница 293: ...LEARANCE 2RZ FE EM 13 8 INSTALL CYLINDER HEAD COVER 9 RECONNECT ENGINE WIRE 10 REINSTALL HIGH TENSION CORDS TO SPARK PLUGS 11 REINSTALL PCV HOSES CLICK HERE TO VIEW CHAPTER INDEX Pages From Supplement TO MODEL INDEX 3RZ F 3RZ FE ...

Страница 294: ... and or ignition coil As some tachometers are not compatible with this ignition system we recommend that you confirm the compatibility of your unit before use 3 INSPECT AND ADJUST IGNITION TIMING a Using SST connect terminals TE1 and E1 of the check connecter SST 09843 18020 b Using a timing light check the ignition timing Ignition timing 5 BTDC idle c Loosen the 2 bolt and adjust by turning the I...

Страница 295: ... FURTHER CHECK IGNITION TIMING Ignition timing 7 17 BTDC idle HINT The timing mark moves in range between 7 and 17 5 DISCONNECT TACHOMETER AND TIMING LIGHT FROM ENGINE CLICK HERE TO VIEW CHAPTER INDEX Pages From Supplement TO MODEL INDEX 3RZ F 3RZ FE ...

Страница 296: ...ght to the No 1 high ten sion cord for No 4 cylinder 4 CHECK IDLE SPEED See page EM 18 5 DISCONNECT HAND HELD TESTER 6 INSPECT IGNITION TIMING a Using SST connect terminals 13 TC and 4 CG of the DLC3 SST 09843 18020 b Using a timing light check the ignition timing Ignition timing 5 BTDC idle Transmission in neutral position c Remove the SST from the check connector SST 09843 18020 7 FURTHER CHECK ...

Страница 297: ...FI system wiring connectors fully pugged f AII operating accessories switched OFF g Ignition timing set correctly 2 CONNECT TACHOMETER See page EM 14 3 INSPECT AIR VALVE OPERATION See page FI 31 4 INSPECTION AND ADJUST IDLE SPEED a Race the engine at 2 500 rpm for approx 90 seconds b Check the idle speed Idle speed 700 800 rpm c Adjust the idle speed by turning the speed adjusting screw 5 DISCONNE...

Страница 298: ... fully plugged g Ignition timing checks correctly h Transmission in neutral position 2 CONNECT HAND HELD TESTER See page EM 16 If you have no hand held tester connect tachometer test prove to terminal 9 TACH of DLC3 SST 09843 18020 3 INSPECTION IDLE SPEED a Race the engine speed at 2 500 rpm for approx 90 se conds b Check the idle speed Idle speed 650 750 rpm If the idle speed is not as specified ...

Страница 299: ...pass hose z Gasket z Gasket 25 9 265 19 Oil Nozzle 18 185 33 Timing Chain 27 270 20 Crankshaft Timing Gear Spacer Alternator Pivot Bolt Oil Strainer 18 185 33 18 185 33 29 300 21 Chain Vibration Damper Oil Pan z Gasket Drain Plug x 16 12 5 130 9 N m kgf cm ft lbf Specified Torque z Non reusable Part ENGINE MECHANICAL TIMING CHAIN 1RZ 1RZ E EM 19 TIMING CHAIN 1RZ 1RZ E COMPONENTS CLICK HERE TO VIEW...

Страница 300: ...l Seal X 9 z Oil Seal Crank shaft Position Sensor Cr ank s haf t P os it ion Sensor Rotor No 1 Timing Chain Crank shaft Timing Gear 27 270 20 29 300 22 z Gasket Oil Strainer Oil Pan No 1 Timing Chain Tensioner Slipper No 1 Vibration Damper 2W D 4W D EM 20 ENGINE MECHANICAL TIMING CHAIN 2RZ FE TIMING CHAIN 2RZ FE COMPONENTS CLICK HERE TO VIEW CHAPTER INDEX Pages From Supplement TO MODEL INDEX 3RZ F...

Страница 301: ...ST between the cylinder block and oil pan cut off applied sealer and remove the oil pan SST 09032 00100 NOTICE Be careful not to damage the oil pan flanges of the oil pan and cylinder block 5 REMOVE OIL STRAINER Remove the 2 bolts 2 nuts oil strainer and gasket 6 REMOVE CRANKSHAFT PULLEY a Using SST remove the pulley bolt SST 09213 54015 09330 00021 b Remove the crankshaft pulley HINT If necessary...

Страница 302: ...n cover and 3 gasket 8 REMOVE NO 1 TIMING CHAIN AND CAMSHAFT TIMING GEAR 9 REMOVE CRANKSHAFT TIMING GEAR HINT If necessary remove the gear with SST and crankshaft pulley bolt SST 09950 40010 09951 04010 09952 04010 09953 04010 09954 04010 09955 04060 10 REMOVE NO 1 TIMING CHAIN TENSIONER SLIPPER AND NO 1 VIBRATION DAMPER a Remove the bolt and slipper b Remove the 2 bolts and No 1 damper 11 REMOVE ...

Страница 303: ...P22266 ENGINE MECHANICAL TIMING CHAIN 2RZ FE EM 23 12 REMOVE TIMING CHAIN OIL JET Remove the bolt oil jet and gasket CLICK HERE TO VIEW CHAPTER INDEX Pages From Supplement TO MODEL INDEX 3RZ F 3RZ FE ...

Страница 304: ...e timing gear and tim ing sprocket diameter with the chain NOTICE Vernier calipers must contact the chain rollers for measur ing Minimum gear diameter Camshaft 113 8 mm 4 480 in Crankshaft 59 4 mm 2 339 in If the diameter is less than minimum replace the chain gears and sprocket 2 INSPECT CHAIN TENSIONER SLIPPER AND VIBRATION DAMPERS Measure the chain tensioner slipper and vibration damper wears M...

Страница 305: ...ith the bolt and nut Torque 29 N m 300 kgf cm 22 ft lbf b Install the slipper with the bolt Torque 27 N m 270 kgf cm 20 ft lbf c Check that the slipper moves smoothly 4 INSTALL CRANKSHAFT TIMING GEAR HINT If necessary install the gear with SST SST 09636 20010 5 INSTALL NO 1 TIMING CHAIN AND CAMSHAFT TIMING GEAR a Align the timing mark between the mark link of the No 1 timing chain and installthe N...

Страница 306: ...nstall the 2 timing chain cover bolts Torque 18 N m 185 kgf cm 13 ft lbf d Install the 2 water bypass pipe nuts Torque 20 N m 200 kgf cm 14 ft lbf e Remove the cord from the chain 7 INSTALL CRANKSHAFT PULLEY a Align the pulley set key with the key groove of the pulley and slide on the pulley b Using SST install and torque the pulley bolt SST 09213 54015 09330 00021 Torque 260 N m 2 650 kgf cm 193 ...

Страница 307: ...nt S Install a nozzle that has been cut to a 2 3 mm 0 08 0 12 in opening or 3 4 mm 0 012 0 016 in opening HINT Avoid applying an excessive amount to the surface S Parts must be assembled within 5 minutes of ap plication Otherwise the material must be removed and reapplied S Immediately remove nozzle from the tube and rein stall cap c Install the oil pan with the 16 bolts and 2 nuts Torque 12 5 N m...

Страница 308: ...o 1 Timing Chain Tensioner Slipper Camshaft Timing Gear 27 270 20 No 1 Timing Chain 29 300 22 Balanceshaft Drive Gear Shaft No 2 Chain Tensioner No 2 Timing Chian No 3 Vibration Damper Crankshaft Timing Gear No 1 Vibration Damper No 2 Crankshaft Timing Sprocket 18 185 13 N m kgf cm ft lbf Specified torque z Non reusable part EM 28 ENGINE MECHANICAL TIMING CHAIN 3RZ F 3RZ FE TIMING CHAIN 3RZ F 3RZ ...

Страница 309: ...e z Gasket 21 210 15 Semi Circular Plug Chain Tensioner 21 210 15 z Cylinder Head Gasket Check Connecter Water Temperature Sensor Connector Camshaft Timing Gear and Timing Chain Thrust Plate Distributor Drive Gear 73 750 54 Intake Manifold Stay Water Bypass Hose IIA and High Tension Cord Spark Plug z O Ring Fuel Pressure Pulsation Damper Cap ENGINE MECHANICAL CYLINDER HEAD 1RZ E EM 29 CYLINDER HEA...

Страница 310: ...fold Camshaft x 8 49 500 36 Water Outlet z Gasket Cylinder Head Rear Cover z Gasket Engine Wire Bracket z Gasket Engine Wire Bracket Plug Plate Cylinder Head Valve z O Ring Throttle Body 18 185 13 x 7 29 300 21 19 5 200 14 Injector and Delivery Pipe Assembly Intake Manifold Water Bypass Hose 15 160 11 EM 30 ENGINE MECHANICAL CYLINDER HEAD 1RZ E CLICK HERE TO VIEW CHAPTER INDEX Pages From Supplemen...

Страница 311: ...O 1 CYLINDER TO TDC COMPRESSION EM 37 19 REMOVE CHAIN TENSIONER EM 37 20 REMOVE SEMI CIRCULAR PLUGS EM 37 21 REMOVE CAMSHAFT TIMING GEAR EM 37 38 22 REMOVE CAMSHAFTS EM 38 39 23 DISASSEMBLE EXHAUST CAMSHAFT EM 39 24 REMOVE CYLINDER HEAD EM 40 DISASSEMBLY 1 REMOVE VALVE LIFTERS AND SHIMS EM 41 2 REMOVE VALVES EM 41 INSPECTION 1 CLEAN TOP SURFACES OF PISTONS AND CYLINDER BLOCK EM 42 2 REMOVE GASKET ...

Страница 312: ...AD BOLTS EM 54 3 ASSEMBLE EXHAUST CAMSHAFT EM 55 4 INSTALL CAMSHAFTS EM 55 56 5 SET NO 1 CYLINDER TO TDC COMPRESSION EM 56 6 INSTALL CAMSHAFT TIMING GEAR EM 56 7 INSTALL CHAIN TENSIONER EM 57 8 SET CHAIN TENSIONER EM 57 9 CHECK VALVE TIMING EM 58 10 CHECK AND ADJUST VALVE CLEARANCE EM 58 11 INSTALL SEMI CIRCULAR PLUGS EM 58 12 INSTALL CYLINDER HEAD COVER EM 58 13 INSTALL ENGINE WIRE BRACKETS EM 58...

Страница 313: ...S EM 59 29 FILL WITH ENGINE COOLANT EM 59 30 START ENGINE AND CHECK FOR LEAKS EM 59 31 VEHICLE ROAD TEST EM 59 32 RECHECK ENGINE COOLANT LEVEL EM 59 PAGE 3 OF 3 CLICK HERE TO VIEW CHAPTER INDEX TO MODEL INDEX Pages From Supplement ENGINE MECHANICAL CYLINDER HEAD 2RZ FE 3RZ F 3RZ FE ...

Страница 314: ...Cover 13 5 130 10 Delivery Pipe 21 210 15 Engine Wire Bracket Ignition Coil Bracket z Gasket Water Outlet z Gasket Fuel Inlet Pipe Gromet z O Ring Injector z Insulator Intake Manifold z Gasket 29 300 22 Intake Chamber Stay Fuel Return Pipe z Gasket Fuel pressure Pulsation Damper Cap ENGINE MECHANICAL CYLINDER HEAD 2RZ FE EM 31 CYLINDER HEAD 2RZ FE COMPONENTS CLICK HERE TO VIEW CHAPTER INDEX Pages ...

Страница 315: ... Circular Plug 15 5 160 12 x 10 X 10 PCV Valve Camshaft Bearing Cap Exhaust Camshaft Intake Camshaft Bushing Shim Valve x 10 21 210 15 74 750 54 Cylinder Head Camshaft Position Sensor z Cylinder Head Gasket z Spark Plug Tube Gasket Spark Plug Camshaft Bearing Cap Camshaft Gear spring Camshaft sub Gear Wave Washer Snap Ring EM 32 ENGINE MECHANICAL CYLINDER HEAD 2RZ FE CLICK HERE TO VIEW CHAPTER IND...

Страница 316: ...ct order 3 DISCONNECT ENGINE WIRE a Remove the ignition coil bracket and ground b Disconnect these connectors and clamps 1 w A C A C compressor connector 2 Oil pressure sensor connector and clamp 3 Engine coolant sender gauge connector 4 3 engine wire clamps and engine wire 5 ECT sensor connector 6 VSV connector for EGR c Disconnect the 4 engine wire clamps and engine wire d Remove the engine wire...

Страница 317: ... EGR pipe and 2 gasket 6 REMOVE INTAKE CHAMBER STAY Remove the 2 bolts and intake chamber stay 7 REMOVE AIR INTAKE CHAMBER ASSEMBLY a Disconnect these hoses S EVAP hose from throttle body S Brake booster vacuum hose from union S Water bypass hose from water bypass pipe S Water bypass hose from cylinder head rear cover b Remove the 3 bolts 2 nuts air intake chamber assembly and gasket CLICK HERE TO...

Страница 318: ... 10 REMOVE DELIVERY PIPE AND INJECTORS a Remove the 2 bolts and delivery pipe together with the 4 injectors NOTICE Be careful not to drop the injectors when removing the de livery pipe b Remove the 4 insulators from the 4 spacers c Pull out the 4 injectors from the delivery pipe d Remove the O ring and grommet from each injector e Using a screwdriver pry out the 4 spacers 11 REMOVE INTAKE MANIFOLD...

Страница 319: ...sket 13 REMOVE WATER OUTLET a Remove the 2 bolts water outlet and gasket b Remove the camshaft position sensor 14 REMOVE CYLINDER HEAD REAR COVER Remove the 3 bolts cylinder head rear cover and gasket 15 REMOVE SPARK PLUGS 16 REMOVE ENGINE WIRE BRACKETS Remove the 4 bolts 4 wire brackets and ground strap CLICK HERE TO VIEW CHAPTER INDEX Pages From Supplement TO MODEL INDEX CONTINUED 3RZ F 3RZ FE ...

Страница 320: ...ver b Check that the timing marks 1 and 2 dots of the camshaft drive and driven gears are in straight line on the cylinder head surface as shown in the illustration If not turn the crankshaft 1 revolution 360 and align the marks as above 19 REMOVE CHAIN TENSIONER Remove the 2 nuts chain tensioner and gasket 20 REMOVE SEMI CIRCULAR PLUGS 21 REMOVE CAMSHAFT TIMING GEAR a Place the matchmarks on the ...

Страница 321: ...r upward by turning the hexagon wrench head por tion of the exhaust camshaft with a wrench 2 Secure the exhaust camshaft sub gear to the main gear with a service bolt Recommended service bolt Thread diameter 6 mm Thread pitch 1 0 mm Bolt length 16 20 mm 0 63 0 79 in HINT When removing the camshaft make sure that the torsional spring force of the sub gear has been eliminated by the above operation ...

Страница 322: ...n and remove the 2 bearing cap bolts with the camshaft gear pulled up NOTICE Do not pry on or attempt to force the camshaft with a tool or other object 23 DISASSEMBLE EXHAUST CAMSHAFT a Mount the hexagon wrench head portion of the camshaft in a vise NOTICE Be careful not to damage the camshaft b Using SST turn the sub gear clockwise and remove the service bolt SST 09960 10010 09962 01000 09963 005...

Страница 323: ...ylinder head warpage or cracking could result from re moving bolts in incorrect order c Lift the cylinder head from the dowels on the cylinder block and place the cylinder head on wooden blocks on a bench HINT If the cylinder head is difficult to lift off pry between the cylinder head and cylinder block with a screwdriver NOTICE Be careful not to damage the contact surfaces of the cylin der head a...

Страница 324: ...e valve spring and remove the 2 keepers SST 09202 70020 09202 00010 b Remove the spring retainer valve spring and valve c Using needle nose pliers remove the oil seal d Using compressed air and a magnetic finger remove the spring seat by blowing air HINT Arrange the valves valve springs spring seats and spring re tainers in correct order CLICK HERE TO VIEW CHAPTER INDEX Pages From Supplement TO MO...

Страница 325: ...om the bolt holes CAUTION Protect your eyes when using high compressed air 2 REMOVE GASKET MATERIAL Using a gasket scraper remove all the gasket material from the cylinder block contact surface NOTICE Be careful not to scratch the cylinder block contact sur face 3 CLEAN COMBUSTION CHAMBERS Using a wire brush remove all the carbon from the combustion chambers NOTICE Be careful not to scratch the cy...

Страница 326: ...age Cylinder block side 0 05 mm 0 0020 in Manifold side 0 10 mm 0 0039 in If warpage is greater than maximum replace the cylinder head 7 INSPECT FOR CRACKS Using a dye penetrant check the combustion chambers intake ports exhaust ports and cylinder block surface for cracks If cracked replace the cylinder head 8 CLEAN VALVES a Using a gasket scraper chip off any carbon from the valve head b Using a ...

Страница 327: ...e bushing inside diameter measurement Standard oil clearance Intake 0 025 0 060 mm 0 0010 0 0024 in Exhaust 0 030 0 065 mm 0 0012 0 0026 in Maximum oil clearance Intake 0 08 mm 0 0031 in Exhaust 0 10 mm 0 0039 in If the clearance is greater than maximum replace the valve and guide bushing 10 IF NECESSARY REPLACE VALVE GUIDE BUSHINGS a Gradually heat the cylinder head to 80 100 C 176 212 F b Using ...

Страница 328: ...nder head to 80 100 C 176 212 F f Using SST and a hammer tap in a new guide bushing to where there 8 2 8 6 mm 0 323 0 339 in protruding from the cylinder head SST 09201 10000 09201 01060 09950 70010 09951 07150 g Using a sharp 6 mm reamer ream the guide bushing to obtain the standard specified clearance See step 9 on the previous page between the guide bushing and valve stem 11 INSPECT AND GRIND V...

Страница 329: ...de cutter resurface the valve seats Remove only enough metal to clean the seats b Check the valve seating position Apply a light coat of prussian blue or white lead to the valve face Lightly press the valve against the seat Do not rotate valve c Check the valve face and seat for these S If blue appears 360 around the face the valve is concentric If not replace the valve S If blue appears 360 aroun...

Страница 330: ...e deviation is greater than maximum replace the valve spring b Using a spring tester measure the tension of the valve spring at the specified installed length Installed tension 162 190 N 16 5 19 4 kgf 36 4 42 8 lbf at 40 3 mm 1 580 in If the installed tension is not as specified replace the valve spring 14 INSPECT CAMSHAFT FOR RUNOUT a Place the camshaft on V blocks b Using a dial indicator measur...

Страница 331: ...EAR SPRING Using a vernier caliper measure the free distance between the spring ends Free distance 22 5 22 9 mm 0 886 0 902 in If the free distance is not as specified replace the gear spring 19 INSPECT CAMSHAFT JOURNAL OIL CLEARANCE a Clean the bearing caps and camshaft journals b Place the camshafts on the cylinder head c Lay a strip of Plastigage across each of the camshaft jour nals d Install ...

Страница 332: ...lash is greater than maximum replace the cam shafts 22 INSPECT VALVE LIFTERS AND LIFTER BORES a Using a caliper gauge measure the lifter bore diameter of the cylinder head Lifter bore diameter 31 000 31 016 mm 1 2205 1 2211 in b Using a micrometer measure the lifter diameter Lifter diameter 30 966 30 976 mm 1 1578 1 2195 in c Subtract the lifter diameter measurement from the lifter bore diameter m...

Страница 333: ...25 INSPECT EXHAUST MANIFOLD Using a precision straight edge and thickness gauge measure the surface contacting the cylinder head for warpage Maximum warpage 0 50 mm 0 0197 in If warpage is greater than maximum replace the manifold 26 INSPECT CHAIN TENSIONER a Check that the plunger moves smoothly when the ratchet pawl is raised with your finger b Released the ratchet pawl and check that the plunge...

Страница 334: ...ion c 28 INSPECT CYLINDER HEAD BOLTS Using vernier calipers measure the minimum diameter of the elongated thread at the measuring point Standard outside diameter 10 76 10 97 mm 0 4236 0 4319 in Minimum outside diameter If the diameter is less than minimum replace the bolt CLICK HERE TO VIEW CHAPTER INDEX Pages From Supplement TO MODEL INDEX SST09950 60010 09951 00260 09951 00490 09952 06010 09950 ...

Страница 335: ...ndard protrusion 47 0 mm 1 850 in b Apply adhesive to the spark plug tube hole of the cylinder head Sealant Part No 08833 00070 Adhesive 1324 THREE BOND1324 or equivalent c Using a press press in a new spark plug tube until there is 47 0 mm 1 850 in protruding from the camshaft bear ing cap installation surface of the cylinder head NOTICE Avoid pressing a new spark plug tube in too far by measur i...

Страница 336: ...lve spring and place the 2 keepers around the valve stem SST 09202 70020 09202 00010 d Using a plastic faced hammer lightly tap the valve stem tip to ensure a proper fit 3 INSTALL VALVE LIFTERS AND SHIMS a Install the valve lifter and shim b Check that the valve lifter rotates smoothly by hand CLICK HERE TO VIEW CHAPTER INDEX Pages From Supplement TO MODEL INDEX 3RZ F 3RZ FE ...

Страница 337: ...ps b and d S If any cylinder head bolt is broken or deformed re place it a Apply a light coat of engine oil on the threads and under the heads of the cylinder head bolts b Install and uniformly tighten the 10 cylinder head bolts and plate washers in several passes in the sequence shown Torque 39 N m 400 kgf cm 29 ft lbf If any of the cylinder head bolts does not meet the torque speci fication repl...

Страница 338: ...ce the thrust clearance of the camshaft is small the camshaft must be kept level while it is being installed If the camshaft is not kept level the portion of the cylinder head receiving the shaft thrust may crack or be damaged caus ing the camshaft to seize or break To avoid this these steps should be carried out a Install intake camshaft 1 Apply MP grease to the thrust portion of the intake camsh...

Страница 339: ...ring cap bolts 6 Install and uniformly tighten the 10 bearing cap bolts in several passes in the sequence shown Torque 15 5 N m 160 kgf cm 12 ft lbf 7 Remove the service bolt 8 Check that the intake and exhaust camshafts turn smoothly 5 SET NO 1 CYLINDER TO TDC COMPRESSION a Turn the crankshaft pulley clockwise and align its groove with the timing mark 0 of the timing chain cover b Turn the camsha...

Страница 340: ...nstall the 2 nuts e Tighten the 2 nuts Torque 21 N m 210 kgf cm 15 ft lbf f Check that the hook of the tensioner is not released NOTICE If the plunger springs out during installation of the chain tensioner repeat the operation in step b before installing the tensioner 8 SET CHAIN TENSIONER Turn the crankshaft to the left so that the hook of the chain ten sioneris released from the pin of the plung...

Страница 341: ... installation sur face of the semi circular plugs Seal packing Part No 08826 00080 or equivalent c Install the semi circular plug to the cylinder head 12 INSTALL CYLINDER HEAD COVER 13 INSTALL ENGINE WIRE BRACKETS 14 INSTALL SPARK PLUGS 15 INSTALL CYLINDER HEAD REAR COVER Install a new gasket and the rear cover with the 3 bolts Torque 13 5 N m 135 kgf cm 10 ft lbf 16 INSTALL WATER OUTLET a Install...

Страница 342: ...rottle body S Brake booster vacuum hose to union S Water bypass hose to water bypass pipe S Water bypass hose to cylinder head rear cover 23 INSTALL INTAKE CHAMBER STAY Torque 20 N m 200 kgf cm 15 ft lbf 24 INSTALL EGR PIPE Install 2 new gaskets and EGR pipe with the bolt and 4 nuts Torque Bolt 18 N m 185 kgf cm 13 ft lbf Nut A 19 N m 195 kgf cm 14 ft lbf Nut B 20 N m 200 kgf cm 15 ft lbf 25 CONNE...

Страница 343: ...e Ignition Coil z Gasket Fuel Inlet Pipe Gromet z O Ring Injector z Insulator Intake Manifold z Gasket z Gasket Fuel Return Pipe Intake Chamber Stay Ignition Coil Bracket 21 210 15 z Gasket Bracket 29 300 22 21 210 15 49 500 36 x6 13 5 130 10 Fuel Pressure Pulsation Damper Cap EM 60 ENGINE MECHANICAL CYLINDER HEAD 3RZ FE CYLINDER HEAD 3RZ FE COMPONENTS CLICK HERE TO VIEW CHAPTER INDEX Pages From S...

Страница 344: ...ust Camshaft Intake Camshaft Bushing Shim Valve x 10 21 210 15 74 750 54 Cylinder Head z Cylinder Head Gasket z Spark Plug Tube Gasket Spark Plug Camshaft Bearing Cap Camshaft Position Sensor z Non reusable part L Precoated part Valve Lifter Spring Seal z Valve Guide Camshaft Gear Spring Camshaft Sub Gear Wave Washer Snap Ring ENGINE MECHANICAL CYLINDER HEAD 3RZ FE EM 61 CLICK HERE TO VIEW CHAPTER...

Страница 345: ...NECTING ROD ASSEMBLIES EM 66 19 CHECK CRANKSHAFT THRUST CLEARANCE EM 67 20 REMOVE MAIN BEARING CAPS AND CHECK OIL CLEARANCE EM 67 68 21 REMOVE CRANKSHAFT EM 68 22 CHECK FIT BETWEEN PISTON AND PISTON PIN EM 69 23 REMOVE PISTON RINGS EM 69 24 DISCONNECT CONNECTING ROD FROM PISTON EM 69 INSPECTION 1 REMOVE GASKET MATERIAL EM 70 2 CLEAN CYLINDER BLOCK EM 70 3 INSPECT TOP SURFACE OF CYLINDER BLOCK FOR ...

Страница 346: ...AND CONNECTING ROD ASSEMBLIES EM 80 12 PLACE CONNECTING ROD CAP ON CONNECTING ROD EM 80 13 INSTALL CONNECTING ROD CAP NUTS EM 81 14 INSTALL REAR OIL SEAL RETAINER EM 81 82 15 INSTALL CRANKSHAFT POSITION SENSOR CONNECTOR BRACKET EM 82 16 INSTALL ENGINE WIRE BRACKET EM 82 17 INSTALL RH AND LH ENGINE MOUNTING EM 82 18 INSTALL OIL PRESSURE SWITCH EM 82 19 INSTALL ENGINE COOLANT DRAIN COCK EM 82 20 OIL...

Страница 347: ...mbly LH Engine Mounting Connector Bracket Crankshaft Position Sensor Knock Sensor Rear End Plate Flywheel z x 10 Cylinder Block Assembly 1st 256 270 19 2nd Turn 90 N m kgf cm ft lbf Specified torque z Non reusable part EM 62 ENGINE MECHANICAL CYLINDER BLOCK 2RZ FE 3RZ F CYLINDER BLOCK 2RZ FE 3RZ F COMPONENTS CLICK HERE TO VIEW CHAPTER INDEX Pages From Supplement TO MODEL INDEX CONTINUED 3RZ F 3RZ ...

Страница 348: ...ton Ring No 2 Compression N m kgf cm ft lbf Specified torque z Non reusable part 1st 45 460 33 2nd Turn 90 Main Bearing Cap Crankshaft Main Bearing Upper Crankshaft Thrust Washer Upper 13 5 135 97 Crankshaft Thrust Washer Lower Main Bearing Lower 1st 39 400 29 2nd Turn 90 ENGINE MECHANICAL CYLINDER BLOCK 2RZ FE 3RZ F EM 63 CLICK HERE TO VIEW CHAPTER INDEX Pages From Supplement TO MODEL INDEX 3RZ F...

Страница 349: ...pe 8 REMOVE OIL FILTER See page LU 1 9 REMOVE OIL FILTER BRACKET a Remove the nut union bolt gasket and oil filter bracket b Remove the O ring from the union bolt 10 REMOVE ENGINE COOLANT DRAIN PLUG 11 REMOVE OIL PRESSURE SWITCH Using SST remove the oil pressure switch SST 09816 30010 12 REMOVE RH AND LH ENGINE MOUNTING ASSEMBLIES Remove the 4 bolts and mounting assembly 13 REMOVE ENGINE WIRE BRAC...

Страница 350: ... nuts c Using a plastic faced hammer lightly tap the connecting rod bolts and lift off the connecting rod cap HINT Keep the lower bearing inserted with the connecting rod cap d Cover the connecting rod bolts with a short piece of hose to protect the crankshaft from damage e Clean the crank pin and bearing f Check the crank pin and bearing for pitting and scratches If the crank pin or bearing is da...

Страница 351: ...n STD Mark 6 56 012 56 018 mm 2 2052 2 2054 in U S 0 25 56 000 56 018 mm 2 2047 2 2054 in Crankshaft crank pin diameter STD 52 987 53 000 mm 2 0861 2 0866 in U S 0 25 52 745 52 755 mm 2 0766 2 0770 in Standard sized bearing center wall thickness STD Mark 4 1 482 1 485 mm 0 0583 0 0585 in STD Mark 5 1 485 1 488 mm 0 0585 0 0586 in STD Mark 6 1 488 1 491 mm 0 0586 0 0587 in U S 0 25 1 601 1 607 mm 0...

Страница 352: ...ove the main bearing caps lower bearings and No 3 main bearing cap only lower thrust washers HINT S Keep the lower bearing and main bearing cap to gether S Arrange the main bearing caps and lower thrust washers in correct order c Lift out the crankshaft HINT Keep the upper bearings and upper thrust washers together with the cylinder block d Clean each main journal and bearing e Check each main jou...

Страница 353: ... 1 64 004 64 010 mm 2 5198 2 5201 in STD Mark 2 64 011 64 016 mm 2 5201 2 5203 in STD Mark 3 64 017 64 022 mm 2 5203 2 5205 in U S 0 25 64 000 64 024 mm 2 5197 2 5206 in Crankshaft Journal diameter STD No 3 59 981 59 994 mm 2 2615 2 3620 in STD Others 59 987 60 000 mm 2 3617 2 3622 in U S 0 25 No 3 59 740 59 750 mm 2 3520 2 3524 in U S 0 25 Others 59 745 59 755 mm 2 3522 2 3526 in Bearing center w...

Страница 354: ... the 2 side rails and oil ring by hand HINT Arrange the rings in correct order only 24 DISCONNECT CONNECTING ROD FROM PISTON a Using a small screwdriver pry out the 2 snap rings b Gradually heat the piston to 80 90 C 176 194 F c Using plastic faced hammer and brass bar lightly tap out the piston pin and remove the connecting rod HINT S The piston and pin are a matched set S Arrange the pistons pin...

Страница 355: ...0 in If warpage is greater than maximum replace the cylinder block 4 INSPECT CYLINDER FOR VERTICAL SCRATCHES Visually check the cylinder for vertical scratches If deep scratches are present rebore all the 4 cylinders If nec essary replace the cylinder block 5 INSPECT CYLINDER BORE DIAMETER Using a cylinder gauge measure the cylinder bore diameter at positions A B and C in the thrust and axial dire...

Страница 356: ...the piston diameter at right angles to the piston pin center line 35 5 mm 1 40 in from the piston head Piston diameter STD 2RZ FE 94 923 94 933 mm 3 7371 3 7375 in 3RZ F 94 933 94 943 mm 3 7375 3 7379 in O S 0 50 2RZ FE 95 423 95 433 mm 3 7568 3 7572 in 3RZ F 95 433 95 443 mm 3 7572 3 7576 in b Measure the cylinder bore diameter in the thrust direc tions c Subtract the piston diameter measurement ...

Страница 357: ...300 0 400 mm 0 0118 0 0157 in 3RZ F 0 300 0 430 mm 0 0118 0 0169 in No 2 2RZ FE 0 400 0 500 mm 0 0157 0 0197 in 3RZ F 0 450 0 600 mm 0 0177 0 0236 in If the end gap is not as specified replace the piston ring If the end gap is not as specified even with a new piston ring rebore all the 4 cylinders or replace the cylinder block 12 INSPECT PISTON PIN FIT At 80 90 C 176 194 F you should be able to pu...

Страница 358: ...tandard oil clearance 0 005 0 011 mm 0 0002 0 0004 in Maximum oil clearance 0 015 mm 0 0006 in If the oil clearance is greater than maximum replace the bush ing If necessary replace the piston and piston pin as a set 15 IF NECESSARY REPLACE CONNECTING ROD BUSHING a Using SST and a press press out the bushing SST 09207 76010 b Align the oil holes of a new bushing and the connecting rod c Using SST ...

Страница 359: ... If the location of minimum diameter can not be judged by visual inspection measure the outer diameter at the loca tion shown in the illustration S If the outside diameter is less than limit replace the con necting rod bolt and nut as a set 17 CYLINDER BORING HINT Bore all the 4 cylinders for the oversized piston outside diame ter Replace all the piston rings with ones to match the oversized pisto...

Страница 360: ...t 0 03 mm 0 0012 in If the circle runout is greater than maximum replace the crank shaft 19 INSPECT MAIN JOURNALS AND CRANK PINS a Using a micrometer measure the diameter of each main journal and crank pin Main journal diameter STD No 3 59 981 59 994 mm 2 2615 2 3620 in Others 59 987 60 000 mm 2 3617 2 3622 in U S 0 25 No 3 59 740 59 750 mm 2 3520 2 3524 in Others 59 745 59 755 mm 2 3522 2 3526 in...

Страница 361: ...e taper and out of round is greater than maximum replace the crankshaft 20 IF NECESSARY GRIND AND HONE MAIN JOURNALS AND OR CRANK PINS S Grind and hone the main journals and or crank pins to the finished undersized diameter See procedure S Install new main journal and or crank pin undersized bearings CLICK HERE TO VIEW CHAPTER INDEX Pages From Supplement TO MODEL INDEX 3RZ F 3RZ FE ...

Страница 362: ...l seal until its surface is flush with the oil seal retainer edge SST 09223 15030 09950 70010 09951 07150 3 Apply MP grease to the oil seal lip b If rear oil seal retainer is installed to cylinder block 1 Using a knife cut off the oil seal lip 2 Using a screwdriver pry out the oil seal NOTICE Be careful not to damage the crankshaft Tape the screw driver tip 3 Apply MP grease to a new oil seal lip ...

Страница 363: ...n the piston pin with your thumb e Install a new snap ring on the other side of the piston pin hole 4 INSTALL PISTON RINGS a Install the oil ring expander and 2 side rails by hand b Using a piston ring expander install the 2 compression ring with the corde mark facing upward Code mark 2RZ FE No 1 T or 1N 2RZ FE No 2 2T or 2N 3RZ F No 1 1R 3RZ F No 2 2R c Position the piston rings so that the ring ...

Страница 364: ...nd push in the 5 lower bearings HINT A number is marked on each main bearing cap to indicate the installation position 7 INSTALL UPPER THRUST WASHERS Install the 2 thrust washers under the No 3 journal position of the cylinder block with the oil grooves facing outward 8 PLACE CRANKSHAFT ON CYLINDER BLOCK 9 PLACE MAIN BEARING CAPS AND LOWER THRUST WASHERS ON CYLINDER BLOCK a Install the 2 thrust wa...

Страница 365: ...n bearing cap bolts does not meet the torque specification replace the main bearing cap bolt c Mark the front of the main bearing cap bolt with paint d Retighten the main bearing cap bolts by 90 in the numer ical order shown above e Check that the painted mark is now at a 90 angle to the front f Check the crankshaft thrust clearance See page EM 64 11 INSTALL PISTON AND CONNECTING ROD ASSEMBLIES a ...

Страница 366: ...s shown e Check that the painted mark on the nut is at a 90 angle in relation to the mark on the bolt f Check that the crankshaft turns smoothly g Check the connecting rod thrust clearance See page EM 64 14 INSTALL REAR OIL SEAL RETAINER a Remove any old packing FIPG material and be careful not to drop any oil on the contact surfaces of the retainer and cylinder block S Using a razor blade and gas...

Страница 367: ...ly adhesive to 2 or3 threads of the oil pressure switch Adhesive Part No 08833 00080 THREE BOND 1344 LOCTITE 242 or equivalent b Using SST install the oil pressure switch SST 09816 30010 19 INSTALL ENGINE COOLANT DRAIN COCK Torque 24 5 N m 250 kgf cm 18 ft lbf 20 OIL FILTER BRACKET a Install a new O ring to the union bolt b Install a new gasket the union bolt nut and oil filter brack et Torque Uni...

Страница 368: ...ENGINE STAND 27 INSTALL REAR END PLATE Install the rear end plate with the 3 bolts Torque Bolt A 18 N m 185 kgf cm 13 ft lbf Bolt B 20 N m 200 kgf cm 14 ft lbf 28 INSTALL FLYWHEEL Install and uniformly tighten 10 new bolts to the flywheel in sev eral passes in the sequence shown Torque 26 5 N m 270 kgf cm 19 ft lbf CLICK HERE TO VIEW CHAPTER INDEX Pages From Supplement TO MODEL INDEX 3RZ F 3RZ FE ...

Страница 369: ...ON EGR SYSTEM 2RZ FE EC 7 THREE WAY CATALYTIC CONVERTER TWC SYSTEM 2RZ FE EC 10 REFER TO FOLLOWING REPAIR MANUALS Manual Name Pub No 1RZ 2RZ E Engine Repair Manual For Emission Control ERM103E 3RZ F Engine Repair Manual For Emission Control RM055E NOTE The above pages contain only the points which differ from the above listed manuals BACK TO MAIN INDEX Pages From Supplement TO MODEL INDEX 3RZ F 3R...

Страница 370: ...mission control systems are installed to reduce the amount of CO HC and NOx exhausted from the engine 3 4 and 5 to prevent the atmospheric release of blow by gas containing HC 1 and evaporated fuel containing HC being released from the fuel tank 2 The function of each system is shown in these table System Abbreviation Function 1 Positive Crankcase Ventilation 2 Evaporative Emission Control 3 Exhau...

Страница 371: ...lator 2RZ FE TWC Charcoal Canister VSV for EVAP VSV for EGR 2RZ FE EC 2 EMISSION CONTROL PARTS LAYOUT AND SCHEMATIC DRAWING PARTS LAYOUT AND SCHEMATIC DRAWING LOCATION 1 1RZ FE 2 2RZ FE 3RZ FE CLICK HERE TO VIEW CHAPTER INDEX Pages From Supplement TO MODEL INDEX CONTINUED 3RZ F 3RZ FE ...

Страница 372: ...er Oxygen Sensor 2RZ FE ECU VSV for EGR 2RZ FE EGR Vacuum Modulator 2RZ FE EGR Valve 2RZ FE TWC 2RZ FE EMISSION CONTROL PARTS LAYOUT AND SCHEMATIC DRAWING EC 3 DRAWING 1 1RZ E 2 2RZ FE 3RZ FE CLICK HERE TO VIEW CHAPTER INDEX Pages From Supplement TO MODEL INDEX 3RZ F 3RZ FE ...

Страница 373: ...nder head cover side and check that air passes through easily CAUTION Do not suck air through the valve Petroleum substances inside the valve are harmful b Blow air into the air intake chamber side and check that air passes through with difficulty If operation is not as specified replace the PCV valve 4 REMOVE CLEAN HOSE FROM PCV VALVE 5 REINSTALL PCV VALVE 6 VISUALLY INSPECT HOSES AND CONNECTIONS...

Страница 374: ...repair or replace the cap 4 1RZ FE 2RZ FE 3RZ FE REMOVE CHARCOAL CANISTER 5 2RZ FE 3RZ FE REMOVE VSV 6 VISUALLY INSPECT CHARCOAL CANISTER Look for cracks or damage 7 CHECK FOR CLOGGED FILTER AND STUCK CHECK VALVE AND DIAPHRAGM a Using low pressure compressed air 6 66 kPa 68 gf cm2 0 97 psi blow into tank pipe and check that air flows with out resistance from the other pipes b Blow air 6 66 kPa 68 ...

Страница 375: ...kPa 3 kgf cm2 43 psi of compressed air into tank pipe while holding purge pipe closed NOTICE S S S S Do not attempt to wash the canister S S S S No activated carbon should come out 9 2RZ FE 3RZ FE REINSTALL VSV 10 1RZ E 2RZ FE 3RZ FE REINSTALL CHARCOAL CANISTER CLICK HERE TO VIEW CHAPTER INDEX Pages From Supplement TO MODEL INDEX 3RZ F 3RZ FE ...

Страница 376: ...nect a vacuum gauge to the hose between the EGR valve and EGR vacuum modulator 3 INSPECT SEATING OF EGR VALVE Start the engine and check that the engine starts and runs at idle 4 CONNECT HAND HELD TESTER a Connect the hand held tester to the DLC3 b Please refer to the hand held tester operators manual for further details 5 INSPECT VSV OPERATION WITH COLD ENGINE a The engine coolant temperature sho...

Страница 377: ...irectly to the EGR valve with the engine idling b Check that the engine runs rough or dies c Reconnect the vacuum hoses to the proper locations IF NO PROBLEM IS FOUND WITH THIS INSPECTION SYSTEM IS NORMAL OTHERWISE INSPECT EACH PART 10 REMOVE EGR PIPE Remove the bolt 4 nuts EGR pipe and 2 gaskets HINT At the time of assembly please refer to the following items Install the EGR pipe with a 2 new gas...

Страница 378: ...PECT EGR VACUUM MODULATOR OPERATION a Block ports P and R with your finger b Blow air into port Q and check that the air passes through to the air filter side freely c Start the engine and maintain speed at 3 000 rpm d Repeat the above test Check that there is a strong resis tance to air flow If operation is not as specified replace the EGR vacuum modu lator 15 RECONNECT VACUUM HOSES TO EGR VACUUM...

Страница 379: ... is damaged or dented to the extent that it touches the three way catalytic convert er repair or replace it 2 CHECK EXHAUST PIPE CONNECTIONS FOR LOOSENESS OR DAMAGE 3 CHECK EXHAUST PIPE CLAMPS FOR WEAKNESS CRACKS OR DAMAGE 4 CHECK HEAT INSULATOR FOR DAMAGE 5 CHECK FOR ADEQUATE CLEARANCE BETWEEN TWC AND HEAT INSULATOR CLICK HERE TO VIEW CHAPTER INDEX Pages From Supplement TO MODEL INDEX 3RZ F 3RZ F...

Страница 380: ...rter is cool c Remove the oxygen sensor d Remove the bolts and nuts at the front pipe e Remove the converter and gasket 2 REINSTALL CONVERTER a Place new gaskets on the front pipe Torque 48 N m 490 kgf cm 35 ft lbf b Install oxygen sensor Torque 20 N m 200 kgf cm 14 ft lbf CLICK HERE TO VIEW CHAPTER INDEX Pages From Supplement TO MODEL INDEX 3RZ F 3RZ FE ...

Страница 381: ... FI 53 VSV FOR EVAPORATIVE EMISSION EVAP 2RZ FE 3RZ FE FI 54 WATER TEMPERATURE SENSOR 2RZ FE FI 55 VARIABLE RESISTOR FI 56 KNOCK SENSOR 2RZ FE 3RZ FE FI 58 OXYGEN SENSOR 2RZ FE FI 59 ENGINE CONTROL UNIT ECU FI 60 FUEL CUT RPM FI 64 REFER TO FOLLOWING REPAIR MANUALS Manual Name Pub No 1RZ 2RZ 2RZ E Engine Repair Manual RM167E 2RZ 2RZ E Engine Repair Manual RM558E 3RZ F 3RZ FE Engine Repair Manual R...

Страница 382: ...r minal IG of the check connector b In the event of engine misfire these precautions should be taken 1 Check proper connection of battery terminals etc 2 Handle high tension cords carefully 3 After repair work check that the ignition coil termi nals and all other ignition system lines are recon nected securely 4 When cleaning the engine compartment be espe cially careful to protect the electrical ...

Страница 383: ... and even slight terminal con tact can further troubles g Do not open the ECU cover h When inspecting during rainy weather take care to pre vent entry of water Also when washing the engine compartment prevent water from getting on the EFI parts and wiring connectors i Parts should be replaced as an assembly j Care is required when pulling out and inserting wiring con nectors 1 Release the lock and...

Страница 384: ...ted pipe and clean it away 7 Prevent the disconnected pipe and connector from damagiing and mixing foreing objects by covering them with a vinyl bag 8 Do not reuse the retainer removed from the pipe 9 Must use hands without using tools when to remove the retainer from the pipe 10 Check if these is any damage or foreing objects on the connected part of the pipe 11 Match the axis of the connectorwit...

Страница 385: ... not to damage it in any way 3 Coat a new O ring with spindle oil or gasoline be fore installing never use engine gear or brake oil c Install the injector to the delivery pipe and cylinder head as shown in the illustration d 1RZ E Check that these are no fuel leaks after performing main tenance any where on the fuel system 1 Using SST connect terminals B and FP the check connector SST 09843 18020 ...

Страница 386: ...ter operator s manual for further details 5 If you have no hand held tester connect the posi tive and negative leads from the battery to the fuel pump connector See page FI 6 6 Pinch the fuel return hose The pressure in high pressure line will rise to approx 400 kPa 4 kgf cm2 57 psi In this state check to see that there are no leaks from any part of the fuel system NOTICE Always pinch the hose Avo...

Страница 387: ...EFI main relay S Circuit opening relay S Fuel pump S Fuel pump wiring connections d Turn the ignition switch OFF e Remove the SST from the check connector SST 09843 18020 2 2RZ FE 3RZ FE CHECK FUEL PUMP OPERATION a Connect the hand held tester to the DLC3 b Turn the ignition switch ON and hand held tester main switch ON NOTICE Do not start the engine c Select the active test mode on the hand held ...

Страница 388: ...12 V b Disconnect the negative terminal cable from the bat tery c Purchase the newfuel pipe and take out the fuel tube con nector from its pipe Part No 1RZ FE 23801 75060 2RZ FE 23801 75070 3RZ FE 23801 75080 d Remove the fuel hose from the clamp e Disconnect the fuel pipe fuel tube connector from the fuel filter outlet CAUTION S S S S Perform disconnecting operations of the fuel tube connector qu...

Страница 389: ...tions S Fuel pump S Fuel filter S Fuel pressure regulator l 2RZ FE 3RZ FE Disconnect the hand held tester from the DLC3 m 1RZ E Reconnect the SST from the check connector SST 09843 18020 n Start the engine o Measure the fuel pressure at idle Fuel pressure 206 255 kPa 2 1 2 6 kgf cm2 31 37psi p Stop the engine q Check that the fuel pressure remains as specified 5 min utes after the engine has stopp...

Страница 390: ...cket z Gasket Fuel Hose Fuel Pump Fuel Pump Filter z Non reusable part z Clip Rubber Cushion X7 ELECTRONIC FUEL INJECTION FUEL PUMP FI 9 COMPONENTS CLICK HERE TO VIEW CHAPTER INDEX Pages From Supplement TO MODEL INDEX 3RZ F 3RZ FE ...

Страница 391: ...OVE FUEL PUMP BRACKET ASSEMBLY FROM FUEL TANK a Remove the 7 bolts Torque 4 N m 35 kgf cm 40 in lbf b Pull out the pump bracket assembly c Remove the gasket from the pump bracket HINT At the time of assembly please refer to the following items Install the pump bracket with a new gasket CLICK HERE TO VIEW CHAPTER INDEX Pages From Supplement TO MODEL INDEX 3RZ F 3RZ FE ...

Страница 392: ... the coil from burning out S S S S Keep the fuel pump as far away from the battery as possible S S S S Always do the switching at the battery side If operation is not as specified replace the fuel pump and or lead wire 3 REMOVE FUEL PUMP LEAD WIRE 4 REMOVE FUEL PUMP FROM FUEL PUMP BRACKET a Pull off the lower side of the fuel pump from the pump bracket b Disconnect the fuel hose from the fuel pump...

Страница 393: ...U 01 FI 12 ELECTRONIC FUEL INJECTION FUEL PUMP REASSEMBLY Reassembly is in the reverse order of disassembly See page FI 11 CLICK HERE TO VIEW CHAPTER INDEX Pages From Supplement TO MODEL INDEX 3RZ F 3RZ FE ...

Страница 394: ...V 01 ELECTRONIC FUEL INJECTION FUEL PUMP FI 13 INSTALLATION Installation is in the reverse order of removal See page FI 10 CLICK HERE TO VIEW CHAPTER INDEX Pages From Supplement TO MODEL INDEX 3RZ F 3RZ FE ...

Страница 395: ...sing Hose z O Ring Fuel Pressure Regulator Fuel Return Hose FI 14 ELECTRONIC FUEL INJECTION FUEL PRESSURE REGULATOR 2RZ FE FUEL PRESSURE REGULATOR 2RZ FE COMPONENTS CLICK HERE TO VIEW CHAPTER INDEX Pages From Supplement TO MODEL INDEX 3RZ F 3RZ FE ...

Страница 396: ...HINT Put a suitable container or shop towel under the pressure regu lator 3 REMOVE FUEL PRESSURE REGULATOR a Remove the 2 bolts and fuel pressure regulator Torque 8 0 N m 80 kgf cm 69 in lbf b Remove the O ring HINT At the time of assembly please refer to the following items Install the pressure regulator with the new O ring CLICK HERE TO VIEW CHAPTER INDEX Pages From Supplement TO MODEL INDEX 3RZ...

Страница 397: ... ELECTRONIC FUEL INJECTION FUEL PRESSURE REGULATOR 2RZ FE INSTALLATION Installation is in the reverse order of removal See page FI 25 CLICK HERE TO VIEW CHAPTER INDEX Pages From Supplement TO MODEL INDEX 3RZ F 3RZ FE ...

Страница 398: ...k the injector transmission operation with your finger If no sound or unusual sound is heard check the wiring connec tor injector or injection signal from the ECM 2 INSPECT INJECTOR RESISTANCE a Remove the throttle body See page FI 42 b Disconnect the injector connectors c Using an ohmmeter measure the resistance between the terminals Resistance At 20 C 68 F 12 16 Ω If the resistance is not as spe...

Страница 399: ...se Water Bypass Hose ISC Valve Connector Fuel Return Hose Delivery Pipe z Grommet Injector z O Ring zNon reusable part PCV Hose 3RZ FE z Insulator Cap Fuel Pressure Pulsation Damper z Gasket Fuel Inlet Hose FI 18 ELECTRONIC FUEL INJECTION INJECTOR 2RZ FE 3RZ FE COMPONENTS CLICK HERE TO VIEW CHAPTER INDEX Pages From Supplement TO MODEL INDEX 3RZ F 3RZ FE ...

Страница 400: ... sensor connector 4 Camshaft position sensor b Disconnect the DLC1 and wire clamp from the brackets 4 REMOVE DELIVERY PIPE AND INJECTORS a Disconnect the vacuum sensing hose from the fuel pres sure regulator b Disconnect the fuel return hose from the fuel pressure regulator c Remove the union bolt and 2 gaskets and disconnect the fuel inlet pipe from the delivery pipe HINT S Put a suitable contain...

Страница 401: ...3801 75070 3RZ FE 23801 75080 b Connect SST hose and fuel tube connector to the fuel filter outlet SST 09268 41046 CAUTION Perform connecting operations of the fuel tube connector quick type after observing the precautions HINT Use the vehicle s fuel filter c Remove the fuel pressure regulator from the delivery pipe d Install the O ring to the fuel inlet of pressure regulator e Connect SST hose to...

Страница 402: ...ctor 2 or 3 times SST 09842 30070 2RZ FE Volume 64 78 cm3 4 0 4 8 cu in per 15 seconds Difference between each injector 14 cm3 0 3 cu in or less 3RZ FE Volume 72 78 cm3 4 4 5 2 cu in per 15 se condsDifference between each injector 14 cm3 0 3 cu in or less If the injection volume is not as specified replace the injector CLICK HERE TO VIEW CHAPTER INDEX Pages From Supplement TO MODEL INDEX 2 INSPECT...

Страница 403: ...pe in position on the cylinder head c Temporarily install the 2 bolts holding the delivery pipe to the cylinder head d Check that the injectors rotate smoothly HINT If injectors do not rotate smoothly the probable cause is incor rect installation of O rings Replace the O rings e Position the injector connector upward f Tighten the 2 bolts holding the delivery pipe to the cylinder head Torque 21 N ...

Страница 404: ...onnect the fuel inlet pipe fuel tube connector to the fuel filter CAUTION Perform connecting operations of the fuel tube connector quick type after observing the precautions b Install the fuel hose to the clamp CLICK HERE TO VIEW CHAPTER INDEX Pages From Supplement TO MODEL INDEX 3RZ F 3RZ FE ...

Страница 405: ...Fuel Pressure Pulsation Damper FI 24 ELECTRONIC FUEL INJECTION FUEL PRESSURE PULSATION DAMPER 2RZ FE 3RZ FE FUEL PRESSURE PULSATION DAMPER 2RZ FE 3RZ FE COMPONENTS CLICK HERE TO VIEW CHAPTER INDEX Pages From Supplement TO MODEL INDEX 3RZ F 3RZ FE ...

Страница 406: ...ve the pulsation damper and upper gas ket SST 09612 24014 09617 24011 b Disconnect the fuel inlet pipe from the fuel delivery pipe and lower gasket HINT At the time of assembly please refer to the following items Install the pressure pulsation damper with the new 2 gaskets CLICK HERE TO VIEW CHAPTER INDEX Pages From Supplement TO MODEL INDEX 3RZ F 3RZ FE ...

Страница 407: ...ONIC FUEL INJECTION FUEL PRESSURE PULSATION DAMPER 2RZ FE 3RZ FE INSTALLATION Installation is in the reverse order of removal See page FI 25 CLICK HERE TO VIEW CHAPTER INDEX Pages From Supplement TO MODEL INDEX 3RZ F 3RZ FE ...

Страница 408: ... Flow Meter Connector Air Flow Meter ELECTRONIC FUEL INJECTION AIR FLOW METER 2RZ FE 3RZ FE FI 27 AIR FLOW METER 2RZ FE 3RZ FE COMPONENTS CLICK HERE TO VIEW CHAPTER INDEX Pages From Supplement TO MODEL INDEX 3RZ F 3RZ FE ...

Страница 409: ... FLOW METER a Disconnect the air flow meter connecter b Remove the 2 screws air flow meter and gasket HINT At the time of assembly please refer to the following items Install the air flow meter with the new gasket CLICK HERE TO VIEW CHAPTER INDEX Pages From Supplement TO MODEL INDEX 3RZ F 3RZ FE ...

Страница 410: ...ce is not as specified replace the air flow meter 2 INSPECT AIR FLOW METER OPERATION a Connect the air flow meter connector b Turn the ignition switch ON c Using a voltmeter connect the positive tester probe to terminal VG and negative tester probe to terminal E2G d Blow air into the air flow meter and check that the voltage fluctuates If operation is not as specified replace the air flow meter e ...

Страница 411: ...0 ELECTRONIC FUEL INJECTION AIR FLOW METER 2RZ FE 3RZ FE INSTALLATION Installation is in the reverse order of removal See page FI 28 CLICK HERE TO VIEW CHAPTER INDEX Pages From Supplement TO MODEL INDEX 3RZ F 3RZ FE ...

Страница 412: ...ner c Using an ohmmeter check the continuity between each terminal Throttle valve condition Between terminals Resistance Fully closed VTA E2 0 2 5 7 kΩ Fully closed IDL E2 2 3 kΩ or less Open IDL E2 Infinity Fully open VTA E2 2 0 10 2 kΩ VC E2 2 5 5 9 kΩ d Reconnect the sensor connector 3 CHECK AIR VALVE OPERATION Check the engine rpmby closing the airvalve port on the throttle body S At low tempe...

Страница 413: ...ole with your finger 3 Release the throttle valve 4 Check that the dashpot is set Dashpot setting speed 2 000 200 rpm 5 Adjust the dashpot setting speed by turning the dashpot adjusting screw 6 Repeat steps from a to c and recheck the dash pot setting speed e Reinstall separator filter and cap to dashpot HINT Install the filter with the coarser surface facing the atmospheric side outside f Check V...

Страница 414: ...connect the vacuumhose fromthe throttle open er and plug the hose end 2 Check the throttle opener setting speed Throttle opener setting speed 1 200 1 500 rpm If the throttle opener setting is not as specified replace the throttle body 3 Stop the engine 4 Reconnect the vacuum hose to the throttle opener 5 Start the engine and check that the idle speed re turns to the correct speed CLICK HERE TO VIE...

Страница 415: ...tle Body Vacuum Hose zGasket 18 185 13 N m kgf cm ft lbf Water Bypass Hose z Non reusable part Specified tongue FI 34 ELECTRONIC FUEL INJECTION THROTTLE BODY 1RZ E COMPONENTS CLICK HERE TO VIEW CHAPTER INDEX Pages From Supplement TO MODEL INDEX 3RZ F 3RZ FE ...

Страница 416: ...SOR CONNECTOR 3 DISCONNECT VACUUM HOSES FROM THROTTLE BODY 4 DISCONNECT WATER BYPASS HOSES FROM NO 2 WATER BYPASS PIPE 5 REMOVE THROTTLE BODY a Remove the 2 bolts 2 nuts throttle body and gasket b Remove the 2 water bypass hoses from the throttle body CLICK HERE TO VIEW CHAPTER INDEX Pages From Supplement TO MODEL INDEX 3RZ F 3RZ FE ...

Страница 417: ...rance between the throttle stop screw and throttle lever when the closed throttle position 3 INSPECT THROTTLE POSITION SENSOR a Apply vacuum to the throttle opener b Insert a thickness gauge between the throttle stop screw and stop lever c Using an ohmmeter measure the resistance between each terminal Clearance between lever and stop screw Between terminals Resistance 0 mm 0 in VTA E2 0 2 5 7 kΩ 0...

Страница 418: ...tle stop screw and stop lever d Connect the test probe of an ohmmeter to the terminals IDL and E2 of the sensor e Gradually turn the sensor clockwise until the ohmmeter deflects and secure it with the 2 set screws f Recheck the continuity between terminals IDL and E2 Clearance between lever and stop screw Continuity IDL E2 0 57 mm 0 022 in Continuity 0 74 mm 0 029 in No Continuity CLICK HERE TO VI...

Страница 419: ...FI 38 ELECTRONIC FUEL INJECTION THROTTLE BODY 1RZ E INSTALLATION Installation is in the reverse order of removal see page FI 42 CLICK HERE TO VIEW CHAPTER INDEX Pages From Supplement TO MODEL INDEX 3RZ F 3RZ FE ...

Страница 420: ...HROTTLE POSITION SENSOR a Disconnect the sensor connector b Apply vacuum to the throttle opener c Using an ohmmeter measure the resistance between each terminal Throttle valve condition Between terminals Resistance Fully closed VTA E2 0 2 5 7 kΩ Fully open VTA E2 2 0 10 2 kΩ VC E2 2 5 5 9 kΩ d Connect the sensor connector 3 INSPECT THROTTLE OPENER a Warm up engine Allowthe engine to warmup to norm...

Страница 421: ... the throttle opener setting is not as specified replace the throttle body e Stop the engine f Connect the vacuum hose to the throttle opener g Start the engine and check that the idle speed returns to the correct speed h Disconnect hand held tester or OBDII scan tool CLICK HERE TO VIEW CHAPTER INDEX Pages From Supplement TO MODEL INDEX 3RZ F 3RZ FE ...

Страница 422: ...2RZ FE Throttle Cable EVAP Hose ISC Valve Connector Air Hose ISC Hose Throttle Body zNon reusable part zGasket Water Bypass Hose PCV Hose 3RZ FE ELECTRONIC FUEL INJECTION THROTTLE BODY 2RZ FE 3RZ FE FI 41 COMPONENTS CLICK HERE TO VIEW CHAPTER INDEX Pages From Supplement TO MODEL INDEX 3RZ F 3RZ FE ...

Страница 423: ...for PS idle up b Disconnect the throttle position sensor connector c Disconnect the ISC valve connector d Remove the 2 bolts 2 nuts and disconnect the throttle body form the air intake chamber Torque 20 N m 200 kgf cm 14 ft lbf e Remove the throttle body gasket HINT At the time of assembly please refer to the following items Install the throttle body with the new gasket f Disconnect the 2 water by...

Страница 424: ...NSPECT THROTTLE VALVE a Apply vacuum to the throttle opener b Check that there is no clearance between the throttle stop screw and throttle lever when the closed throttle position 3 INSPECT THROTTLE POSITION SENSOR a Apply vacuum to the throttle opener b Insert a thickness gauge between the throttle stop screw and stop lever c Using an ohmmeter measure the resistance between each terminal Clearanc...

Страница 425: ...4 ELECTRONIC FUEL INJECTION THROTTLE BODY 2RZ FE 3RZ FE INSTALLATION Installation is in the reverse order of removal See page FI 42 CLICK HERE TO VIEW CHAPTER INDEX Pages From Supplement TO MODEL INDEX 3RZ F 3RZ FE ...

Страница 426: ...ure S Idle speed check correctly S Transmission in neutral position b Using SST connect terminals 13 TC and 4 CG of the DLC3 SST 09843 18020 c After engine speed are kept at 1 000 1 500 rpm for 5 se conds check that they return to idle speed If the engine speed operation is not as specified check the ISC valve wiring and ECU d Remove the SST SST 09843 18020 CLICK HERE TO VIEW CHAPTER INDEX Pages F...

Страница 427: ... Vacuum Hose zGasket Connector Throttle Body Non reusable part EVAP Hose ISC Valve Air Hose ISC Hose zGasket ISC Valve Throttle Body FI 46 ELECTRONIC FUEL INJECTION IDLE SPEED CONTROL ISC VALVE 2RZ FE COMPONENTS CLICK HERE TO VIEW CHAPTER INDEX Pages From Supplement TO MODEL INDEX 3RZ F 3RZ FE ...

Страница 428: ...ECTION IDLE SPEED CONTROL ISC VALVE 2RZ FE FI 47 REMOVAL 1 REMOVE THROTTLE BODY See page FI 42 2 REMOVE ISC VALVE Remove the 4 screws ISC valve and gasket CLICK HERE TO VIEW CHAPTER INDEX Pages From Supplement TO MODEL INDEX 3RZ F 3RZ FE ...

Страница 429: ...to 100 C 212 F Using an ohmmeter measure the resistance between terminal B and other terminals RSC RSO Resistance Cold 17 0 24 5 Ω Hot 21 5 28 5 Ω If resistance is not as specified replace the ISC valve 2 INSPECT ISC VALVE OPERATION a Connect the positive lead from the battery to terminal B and negative lead to terminal RSC and check that the valve is closed b Connect the positive lead from the ba...

Страница 430: ...NTROL ISC VALVE 2RZ FE FI 49 INSTALLATION 1 INSTALL ISC VALVE a Place a new gasket on the throttle body b Install the ISC valve with the 4 screws 2 INSTALL THROTTLE BODY See page FI 44 CLICK HERE TO VIEW CHAPTER INDEX Pages From Supplement TO MODEL INDEX 3RZ F 3RZ FE ...

Страница 431: ...hat there is continuity be tween terminals 1 and 2 If there is no continuity replace the relay b Check that there is no continuity between terminals 3 and 4 If there is continuity replace the relay c Apply battery positive voltage across terminals 1 and 2 d Using an ohmmeter check that there is continuity be tween terminals 3 and 4 If operation is not as specified replace the relay 3 REINSTALL EFI...

Страница 432: ...g Relay Lower Finish No1 Panel Circuit Opening Relay Connecter ELECTRONIC FUEL INJECTION CIRCUIT OPENING RELAY FI 51 CIRCUIT OPENING RELAY COMPONENTS CLICK HERE TO VIEW CHAPTER INDEX Pages From Supplement TO MODEL INDEX 3RZ F 3RZ FE ...

Страница 433: ...en terminals 1 and 2 If there no continuity replace the relay b Check that there is no continuity between terminals 3 and 4 If there continuity replace the relay 3 INSPECT CIRCUIT OPENING RELAY OPERATION a Apply battery positive voltage across terminals 1 and 2 b Using an ohmmeter check that there is continuity be tween terminals 3 and 4 If operation is not as specified replace the relay 4 REINSTA...

Страница 434: ...meter check that there is continuity be tween terminals Resistance At 20 C 68 F 33 39 Ω If there is no continuity replace the VSV b Using an ohmmeter check that there is no continuity be tween each terminal and the body If there is continuity replace the VSV c Check that air does not flow from ports E to F d Apply battery positive voltage across the terminals e Check that air flows from ports E to...

Страница 435: ...inuity be tween the terminals Resistance At 20 C 68 F 30 34 Ω If there is no continuity replace the VSV b Using an ohmmeter check that there is no continuity be tween each terminal and the body If there is continuity replace the VSV c Inspect VSV operation S Check that air does not flow from ports E to F NOTICE Never apply more than 93 kPa 0 95 kgf cm2 13 5 psi of pressure compressed air to the VS...

Страница 436: ... INSPECT WATER TEMPERATURE SENSOR Using an ohmmeter measure the resistance between the ter minals Resistance Refer to the chart graph If the resistance is not as specified replace the water temperature sensor 4 REINSTALL WATER TEMPERATURE SENSOR a Using a 19 mm deep socket wrench install the water tem perature sensor and gasket Torque 25 N m 250 kgf cm 18 ft lbf b Connect the water temperature sen...

Страница 437: ... OUTPUT OF VARIABLE RESISTOR a Turn the ignition switch ON b Connect a voltmeter to terminals VAF and E2 of the ECU and measure the voltage while slowly turning the idle mix ture adjusting screw first fully counter clockwise and then fully clockwise using SST SST 09243 00020 c Check that voltage changes smoothly from 0 V to approx 5 V HINT These is no sudden jump up to 5 V or down to 0V 4 INSPECT ...

Страница 438: ...SST 09243 00020 d Connect the ohmmeter to terminals VAF and E2 of the variable resister and turn the idle mixture adjusting screw fully clockwise and check that the resistance value changes from approx 5 kΩ to 0 Ω accordingly e Reconnect the variable resistor connector CLICK HERE TO VIEW CHAPTER INDEX Pages From Supplement TO MODEL INDEX 3RZ F 3RZ FE ...

Страница 439: ...NOCK SENSOR Using an ohmmeter check that these is no continuity between the terminal and body If these is continuity replace the sensor 3 REINSTALL KNOCK SENSOR a Using SST install the knock sensor SST 09816 30010 Torque 44 N m 450 kgf cm 33 ft lbf b Connect the knock sensor connecter 4 REINSTALL FUEL FILTER SET BOLT Torque 20 N m 200 kgf cm 14 ft lbf 5 REINSTALL STATER CLICK HERE TO VIEW CHAPTER ...

Страница 440: ...HEATED OXYGEN SENSORS Using an ohmmeter measure the resistance between terminals B and HT Using an ohmmeter measure the resistance be tween terminals B and HT Resistance At 20 C 68 F 11 7 14 3 kΩ If resistance is not as specified replace the heated oxygen sen sor CLICK HERE TO VIEW CHAPTER INDEX Pages From Supplement TO MODEL INDEX 3RZ F 3RZ FE ...

Страница 441: ...sh No 2 Panel Glove Compartment Door ECU Connector ECU FI 60 ELECTRONIC FUEL INJECTION ENGINE CONTROL UNIT ECU ENGINE CONTROL UNIT ECU COMPONENTS CLICK HERE TO VIEW CHAPTER INDEX Pages From Supplement TO MODEL INDEX 3RZ F 3RZ FE ...

Страница 442: ...AL 1 REMOVE GLOVE COMPARTMENT DOOR 2 REMOVE LOWER FINISH NO 2 PANEL 3 REMOVE ECU a 1RZ E Disconnect the 2 ECU connecter b 2RZ FE 3RZ FE Disconnect the 3 ECU connector c Remove the 2 bolts and ECU CLICK HERE TO VIEW CHAPTER INDEX Pages From Supplement TO MODEL INDEX 3RZ F 3RZ FE ...

Страница 443: ...FI021 01 FI 62 ELECTRONIC FUEL INJECTION ENGINE CONTROL UNIT ECU INSPECTION See page DI 17 and DI 90 CLICK HERE TO VIEW CHAPTER INDEX Pages From Supplement TO MODEL INDEX ...

Страница 444: ...ECTRONIC FUEL INJECTION ENGINE CONTROL UNIT ECU FI 63 INSTALLATION Installation is in the reverse order of removal see page FI 61 CLICK HERE TO VIEW CHAPTER INDEX Pages From Supplement TO MODEL INDEX 3RZ F 3RZ FE ...

Страница 445: ... a Increase the engine speed to at least 3 500 rpm b Using a sound scope check for injector operating noise c Check that when the throttle lever is released injector op eration noise stops momentarily and then resumes HINT Measure with the A C OFF Fuel return rpm 1RZ E 1 200rpm 2RZ FE 1 400 rpm 3RZ FE M T 1 400 rpm A T 1 500 rpm 4 DISCONNECT HAND HELD TESTER OR OBDII SCAN TOOL CLICK HERE TO VIEW C...

Страница 446: ... 1RZ 2RZ 2RZ E Engine Repair Manual RM167E 2RZ 2RZ E Engine Repair Manual RM558E 3RZ F 3RZ FE Engine Repair Manual RM521E 1RZ E Engine Repair Manual Suplement RM467E NOTE The above pages contain only the points which differ from the above listed manuals BACK TO MAIN INDEX Pages From Supplement TO MODEL INDEX 3RZ F 3RZ FE ...

Страница 447: ...ee from oil If excessively dirty replace the coolant c Reinstall the radiator cap 3 REPLACE ENGINE COOLANT a Remove the radiator cap CAUTION To avoid the danger of being burned do not remove the ra diator cap while the engine and radiator are still hot as fluid and steam can be blown out under pressure b Drain the coolant from the radiator and cylinder drain plugs Engine coolant drain plug at the ...

Страница 448: ...liters 7 7 US qts 6 4 lmp qts 2RZ FE w Heater 7 4 liters 7 8 US qts 6 5 lmp qts w o Heater 6 9 liters 7 3 US qts 6 1 lmp qts 3RZ F w Heater 7 7 liters 8 1 US qts 6 8 lmp qts w o Heater 7 2 liters 7 6 US qts 6 3 lmp qts 3RZ FE 7 7 liters 8 1 US qts 6 8 lmp qts e Reinstall the radiator cap f Warm up the engine and check for leaks g Recheck the coolant level and refill as necessary CLICK HERE TO VIEW...

Страница 449: ...CO06Y 01 P22377 z Gasket z Non reusable part x10 Water Pump COOLING WATER PUMP CO 3 WATER PUMP COMPONENTS CLICK HERE TO VIEW CHAPTER INDEX Pages From Supplement TO MODEL INDEX 3RZ F 3RZ FE ...

Страница 450: ...move the 4 nuts fan with fluid coupling and pulley Torque 21 N m 210 kgf cm 16 ft lbf d Remove the 4 nuts and fan from the fluid coupling 3 REMOVE WATER PUMP Remove the 10 bolts water pump and gasket Torque 14 mm head bolt 24 5 N m 250 kgf cm 18 ft lbf 12 mm head bolt 8 9 N m 90 kgf cm 78 in lbf HINT At the time of assembly please refer to the following items Install the water pump with the new ga...

Страница 451: ...at the water pump bearing moves smoothly and quietly If necessary replace the water pump 2 INSPECT FLUID COUPLING a Remove the 4 nuts and fan from the fluid coupling b Check the fluid coupling for damage and silicon oil leak age If necessary replace the fluid coupling c Install the fan and fluid coupling with the 4 nuts Torque 5 5 N m 55 kgf cm 49 in lbf CLICK HERE TO VIEW CHAPTER INDEX Pages From...

Страница 452: ...CO071 01 CO 6 COOLING WATER PUMP INSTALLATION Installation is in the reverse order of removal See page CO 4 CLICK HERE TO VIEW CHAPTER INDEX Pages From Supplement TO MODEL INDEX 3RZ F 3RZ FE ...

Страница 453: ...CO072 01 P23587 z Non reusable part Water Inlet z Gasket Thermostat COOLING THERMOSTAT CO 7 THERMOSTAT COMPONENTS CLICK HERE TO VIEW CHAPTER INDEX Pages From Supplement TO MODEL INDEX 3RZ F 3RZ FE ...

Страница 454: ...engine tends to overheat 1 DRAIN ENGINE COOLANT 2 DISCONNECT WATER INLET WITH LOWER RADIATOR HOSE AND REMOVE THERMOSTAT a Remove the 2 nuts holding the water inlet to the inlet housing and disconnect the water inlet from the inlet housing b Remove the thermostat c Remove the gasket from the thermostat CLICK HERE TO VIEW CHAPTER INDEX Pages From Supplement TO MODEL INDEX 3RZ F 3RZ FE ...

Страница 455: ...ening temperature 80 84 C 176 183 F If the valve opening temperature is not as specified replace the thermostat c Check the valve lift Valve lift At 95 C 203 F 8 mm 0 31 in or more If the valve lift is not as specified replace the thermostat d Check that the valve is fully closed when the thermostat is at low temperatures below 40 C 104 F If not closed replace the thermostat CLICK HERE TO VIEW CHA...

Страница 456: ...g and insert the thermostat in the water inlet housing HINT The jiggle valve may be set within 15 of either side of the pre scribed position 2 CONNECT WATER INLET WITH LOWER RADIATOR HOSE Install the water inlet with the 2 nuts HINT Facing the top mark protrusion upward Torque 20 N m 200 kgf cm 15 ft lbf 3 FILL WITH ENGINE COOLANT 4 START ENGINE AND CHECK FOR LEAKS CLICK HERE TO VIEW CHAPTER INDEX...

Страница 457: ...remove any mud or dirt from the radiator core NOTICE If using a high pressure type cleaner be careful not to deform the fins of the radiator core i e Main tain a distance between the cleaner nozzle radiator core CLICK HERE TO VIEW CHAPTER INDEX Pages From Supplement TO MODEL INDEX 3RZ F 3RZ FE ...

Страница 458: ...nstant speed If air is not coming from the vacuum valve replace the radiator cap b Pump the tester and measure the relief valve opening pressure Pump speed 1 push within 1 second NOTICE This pump speed is for the first pump only in order toclose the vacuum valve After this the pump speed can be re duced Standard opening pressure 93 123 kPa 0 95 1 25 kgf cm2 13 1 18 2 psi Minimum opening pressure 5...

Страница 459: ...r Support Radiator Support Core z O Ring Lower Tank Drain Plug z O Ring 1RZ E Oil Cooler z O Ring Oil Cooler Pipe Plate Washer z O Ring Lower Tank COOLING RADIATOR CO 13 COMPONENTS1 CLICK HERE TO VIEW CHAPTER INDEX Pages From Supplement TO MODEL INDEX 3RZ F 3RZ FE ...

Страница 460: ... dimension B shown in the diagram is 0 2 0 3 mm 0 008 0 012 in NOTICE If this adjustment is not done the claw may be damaged 4 UNCAULK LOCK PLATES Using SST to release the caulking squeeze the handle until stopped by the stopper bolt SST 09230 01010 5 REMOVE TANKS AND O RINGS a Lightly tap the radiator port inlet or outlet with a soft faced hammer and remove the tank b Remove the O ring 6 1RZ E RE...

Страница 461: ... of the lock plate groove are deformed reas sembly of the tank will be impossible S Therefore first correct any deformation with pliers or simi lar object Water leakage will result if the bottom of the lock plate groove is damaged ordented Therefore repair or replace if necessary NOTICE The radiator can only be recaulked 2 times After the 2nd time the radiator core must be replaced 3 INSTALL NEW O...

Страница 462: ...mension B shown in the diagram Dimension B 8 4 mm 0 34 in 5 CAULK LOCK PLATE a Lightly press SST against the lock plate in the order shown in the illustration After repeating this a few times fully caulk the lock plate by squeezing the handle until stopped by the stopper bolt SST 09230 01010 HINT S Do not stake the areas protruding around the ports S The points shown in the rib sides near here can...

Страница 463: ...s Torque 13 N m 130 kgf cm 9 6 ft lbf 9 CHECK FOR WATER LEAKS a Using SST plug the inlet and outlet pipes of the radiator SST 09230 01010 b Using a radiator cap tester apply pressure to the radiator Test pressure 147 kPa 1 5 kgf cm2 21 psi c Check for water leaks HINT On radiators with resin tanks there is a clearance between the core plate and tank plate where a minute amount of air will re main ...

Страница 464: ...Z E Engine Repair Manual RM167E 2RZ 2RZ E Engine Repair Manual RM558E 3RZ F 3RZ FE Engine Repair Manual RM521E 1RZ E Engine Repair Manual Suplement RM467E NOTE The above pages contain only the points which differ from the above listed manuals BACK TO MAIN INDEX Pages From Supplement TO MODEL INDEX 3RZ F 3RZ FE ...

Страница 465: ...d F of the dipstick If low check for leakage and add oil up to F mark NOTICE S S S S Do not fill with engine oil above the F mark S S S S When inserting the dipstick insert the curved tip of the dipstick facing the same direction as the curve of the guide S S S S If the dipstick gets caught while inserting it do not force it in Reconfirm the direction of the dipstick CLICK HERE TO VIEW CHAPTER IND...

Страница 466: ...netrated by oil should be worn The skin should be thoroughly washed with soap and water or use water less hand cleaner to remove any used engine oil Do not use gasoline thinners or solvents S S S S In order to preserve the environment used oil and used oil filters must be disposed of only at desig nated disposal sites 11 DRAIN ENGINE OIL a Remove the oil filler cap b Remove the oil drain plug and ...

Страница 467: ...l filter change 4 0 liters 4 2 US qts 3 5 lmp qts 4WD Dry fill 6 3 liters 6 7 US qts 5 5 lmp qts Drain and refill w Oil filter change 6 0 liters 6 3 US qts 5 3 lmp qts w o Oil filter change 5 3 liters 5 6 US qts 4 7 lmp qts c Reinstall the oil filler cap 14 START ENGINE AND CHECK FOR LEAKS 15 RECHECK ENGINE OIL LEVEL CLICK HERE TO VIEW CHAPTER INDEX Pages From Supplement TO MODEL INDEX 3RZ F 3RZ F...

Страница 468: ...an 2WD Oil Pan 4WD z Gasket z Gasket z Gasket Water Inlet Housing z Gasket x 9 z O Ring Oil Pump Timing Chain Cover z O Ring Driven Rotor Oil Pump Cover Relief Valve Spring Retainer Snap Ring z Crankshaft Front Oil Seal x 9 Drive Rotor z Non reusable part N m kgf cm ft lbf Specified torque LU 4 LUBRICATION OIL PUMP OIL PUMP COMPONENTS CLICK HERE TO VIEW CHAPTER INDEX Pages From Supplement TO MODEL...

Страница 469: ...40 2 REMOVE OIL PAN 3 REMOVE WATER INLET AND WATER INLET HOUSING a Remove the 2 nut water inlet and thermostat b Remove the bolt and water inlet housing and gasket 4 REMOVE TIMING CHAIN COVER See page EM 22 CLICK HERE TO VIEW CHAPTER INDEX Pages From Supplement TO MODEL INDEX 3RZ F 3RZ FE ...

Страница 470: ...IVEN ROTORS Remove the 9 screws pump cover drive rotor driven rotor and O ring 2 REMOVE RELIEF VALVE a Using snap ring pliers remove the snap ring b Remove the retainer spring s and relief valve CLICK HERE TO VIEW CHAPTER INDEX Pages From Supplement TO MODEL INDEX 3RZ F 3RZ FE ...

Страница 471: ...cessary replace the oil pump assembly 3 INSPECT ROTOR SIDE CLEARANCE Using a thickness gauge and precision straight edge measure the clearance between the rotors and precision straight edge Standard side clearance 0 030 0 090 mm 0 0012 0 0035 in Maximum side clearance 0 15 mm 0 0059 in If the side clearance is greater than maximum replace the ro tors as a set If necessary replace the oil pump asse...

Страница 472: ...ntil its sur face is flush with the oil pump case edge SST 09223 50010 c Apply MP grease to the oil seal lip 2 IF OIL PUMP IS INSTALLED TO CYLINDER BLOCK a Using a screwdriver pry out the oil seal NOTICE Be careful not to damage the crankshaft Tape the screw driver tip b Apply MP grease to a new oil seal lip c Using SST and a hammer tap in the oil seal until its sur face is flush with the oil pump...

Страница 473: ...ese parts 1 Relief valve 2 Spring s 3 Retainer b Using snap ring pliers install the snap ring 2 INSTALL DRIVE AND DRIVEN ROTORS a Place the drive and driven rotors into the pump body b Place a new O ring to the pump body c Install the pump cover with the 9 screws CLICK HERE TO VIEW CHAPTER INDEX Pages From Supplement TO MODEL INDEX 3RZ F 3RZ FE ...

Страница 474: ...ATION 1 INSTALL TIMING CHAIN COVER See page EM 26 2 INSTALL WATER INLET AND WATER INLET HOUSING 3 INSTALL OIL PAN 4 INSTALL CYLINDER HEAD ASSEMBLY See page EM 54 CLICK HERE TO VIEW CHAPTER INDEX Pages From Supplement TO MODEL INDEX 3RZ F 3RZ FE ...

Страница 475: ...FER TO FOLLOWING REPAIR MANUALS Manual Name Pub No 1RZ 2RZ 2RZ E Engine Repair Manual RM167E 2RZ 2RZ E Engine Repair Manual RM558E 3RZ F 3RZ FE Engine Repair Manual RM521E 1RZ E Engine Repair Manual Suplement RM467E NOTE The above pages contain only the points which differ from the above listed manuals BACK TO MAIN INDEX Pages From Supplement TO MODEL INDEX 3RZ F 3RZ FE ...

Страница 476: ...switch to ignition coil and igniter Replace the ignition coil Replace the camshaft position sensor Replace the crankshaft position sensor with igniter and then try another ECM BAD BAD BAD BAD BAD BAD IGNITION IGNITION SYSTEM 2RZ FE 3RZ FE IG 1 IGNITION SYSTEM 2RZ FE 3RZ FE ON VEHICLE INSPECTION NOTICE Cold and Hot in the following sentences express the temper ature of the coils themselves Cold is ...

Страница 477: ... or bending the cords may damage the conduc tor inside S S S S Do not wipe any of the oil from the grommet after the high tension cord is disconnected e Using an ohmmeter measure the resistance Maximum resistance 25 kΩ per cord If the resistance is greater than the maximum check the termi nals If necessary replace the high tension cord f Connect the high tension cords to the ignition coils 1 Assem...

Страница 478: ...ended spark plugs ND K16R U NGK BKR5EYA e Carefully bend the outer electrode to obtain the correct electrode gap Correct electrode gap 0 8 mm 0 031 in f Using a 16 mm plug wrench install the spark plug Torque 20 N m 200 kgf cm 14 ft lbf g Connect the high tension cords to the spark plugs 4 INSPECT IGNITION COIL a Disconnect the high tension cords from the ignition coil b Disconnect the ignition co...

Страница 479: ...ector b Using an ohmmeter measure the camshaft position sen sor resistance between terminals Resistance Cold 835 1 400 Ω Hot 1 060 1 645 Ω If the resistance is not as specified replace the camshaft posi tion sensor c Connect the camshaft position sensor connector CLICK HERE TO VIEW CHAPTER INDEX Pages From Supplement TO MODEL INDEX 3RZ F 3RZ FE ...

Страница 480: ... Ignition Coil 10 100 7 N m kgf cm ft lbf Specified Torque High Tension Cords IGNITION IGNITION COIL 2RZ FE 3RZ FE IG 5 IGNITION COIL 2RZ FE 3RZ FE COMPONENTS CLICK HERE TO VIEW CHAPTER INDEX Pages From Supplement TO MODEL INDEX 3RZ F 3RZ FE ...

Страница 481: ...S See page IG 1 2 REMOVE IGNITION COILS a Disconnect the 2 connectors from the ignition coils b Remove the 4 bolts and 2 ignition coils from the bracket Torque 10 N m 100 kgf cm 7 ft lbf HINT Arrange the ignition coils in correct order CLICK HERE TO VIEW CHAPTER INDEX Pages From Supplement TO MODEL INDEX 3RZ F 3RZ FE ...

Страница 482: ...4E 01 IGNITION IGNITION COIL 2RZ FE 3RZ FE IG 7 INSTALLATION Installation is in the reverse order of removal See page IG 6 CLICK HERE TO VIEW CHAPTER INDEX Pages From Supplement TO MODEL INDEX 3RZ F 3RZ FE ...

Страница 483: ...se Vacuum Hose Throttle Cable ISC Connector Water Bypass Hose z Gasket Throttle Body z Non reusable part 2RZ FE PCV Hose 2RZ FE 3RZ FE IG 8 IGNITION CAMSHAFT POSITION SENSOR 2RZ FE 3RZ FE CAMSHAFT POSITION SENSOR 2RZ FE 3RZ FE COMPONENTS CLICK HERE TO VIEW CHAPTER INDEX Pages From Supplement TO MODEL INDEX 3RZ F 3RZ FE ...

Страница 484: ...OVE THROTTLE BODY See page FI 42 2 REMOVE CAMSHAFT POSITION SENSOR a Disconnect the camshaft position sensor connector b Remove the bolts and camshaft position sensor Torque 5 4 N m 55 kgf cm 48 in lbf CLICK HERE TO VIEW CHAPTER INDEX Pages From Supplement TO MODEL INDEX 3RZ F 3RZ FE ...

Страница 485: ...G 10 IGNITION CAMSHAFT POSITION SENSOR 2RZ FE 3RZ FE INSTALLATION Installation is in the reverse order of removal See page IG 11 CLICK HERE TO VIEW CHAPTER INDEX Pages From Supplement TO MODEL INDEX 3RZ F 3RZ FE ...

Страница 486: ...t lbf Bolt B 18 N m 180 kgf cm 13 ft lbf 4 DISCONNECT CRANKSHAFT POSITION SENSOR CONNECTOR 5 REMOVE CRANKSHAFT POSITION SENSOR a Remove the 2 bolts and crankshaft position sensor Torque 8 5 N m 85 kgf cm 74 in lbf b Remove the O ring HINT S At the time of assembly please refer to the following items S Apply a light coat of engine oil on the O ring S Install the crankshaft position sensor with the ...

Страница 487: ... from 10 C 14 F to 50 C 122 F and Hot is from 50 C 122 F to 100 C 212 F INSPECT CRANKSHAFT POSITION SENSOR RESISTANCE Using an ohmmeter measure the resistance between termi nals Resistance NE and NE Cold 1 630 2 740 Ω Hot 2 065 3 225 Ω If the resistance is not as specified replace the crankshaft posi tion sensor CLICK HERE TO VIEW CHAPTER INDEX Pages From Supplement TO MODEL INDEX 3RZ F 3RZ FE ...

Страница 488: ...NITION CRANKSHAFT POSITION SENSOR 2RZ FE 3RZ FE IG 13 INSTALLATION Installation is in the reverse order of removal See page IG 11 CLICK HERE TO VIEW CHAPTER INDEX Pages From Supplement TO MODEL INDEX 3RZ F 3RZ FE ...

Страница 489: ...STARTING STARTER ST 1 STARTER RELAY ST 15 BACK TO MAIN INDEX Pages From Supplement TO MODEL INDEX 3RZ F 3RZ FE ...

Страница 490: ...14 INSPECT CLUTCH PINION GEAR ST 8 15 INSPECT FRONT BEARING ST 8 16 IF NECESSARY REPLACE FRONT BEARING ST 8 17 INSPECT REAR BEARING ST 8 18 IF NECESSARY REPLACE REAR BEARING ST 8 9 19 DO PULL IN COIL OPEN CIRCUIT TEST ST 9 20 DO HOLD IN COIL OPEN CIRCUIT TEST ST 9 REPLACEMENT 1 REMOVE MAGNETIC SWITCH END COVER ST 10 2 INSPECT CONTACT PLATE FOR WEAR ST 10 3 REMOVE TERMINAL KIT PARTS ST 10 4 REINSTA...

Страница 491: ...ll Magnetic Switch Assembly Bearing Magnetic Switch Assembly Return Spring Steel Ball Starter Clutch Assembly Starter Housing Roller Retainer Roller Idle Gear Through Bolt z O Ring End Frame z O Ring Brush Spring Brush Holder Field Frame Field Coil z O Ring Bearing Armature Bearing z Non reusable part STARTING STARTER ST 1 STARTER COMPONENTS CLICK HERE TO VIEW CHAPTER INDEX Pages From Supplement C...

Страница 492: ...4kW O Ring Packing Terminal Insulator Contact Plate Wave Washer Terminal Nut Terminal Bolt 20 kW 1 2kW 1 4kW 2 0kW Terminal Insulator 2 0kW Insulator Paper 10 kW Insulator Paper 1 2kW 1 4 kW Insulator Paper Terminal Insulator 1 0kW 1 2kW 1 4kW Contact Plate 1 0kW z z Non reusable part Terminal C Kit Part z Terminal 30 Kit Part ST 2 STARTING STARTER CLICK HERE TO VIEW CHAPTER INDEX Pages From Suppl...

Страница 493: ...e magnet ic switch assembly d 1 2kW 1 4kW 2 0kW Remove the O ring HINT S At the assembly please refer to the following items S Assembly the field frame with the new O ring S Align the protrusion of the field frame with the cutout of the magnetic switch 2 REMOVE STARTER HOUSING CLUTCH ASSEMBLY AND GEAR a Remove the 2 screws Torque 1 2 kW 1 4 kW type 5 9 N m 60 kgf cm 52 in lbf 1 0 kW 2 0 kW type 9 ...

Страница 494: ...cm 13 in lbf 2 0 kW type 3 8 N m 39 kgf cm 34 in lbf b 1 2kW 1 4kW 2 0 kW Remove the O ring from the field frame HINT S At the assembly please refer to the following items Assembly the brush holder with the new O ring c Using a screwdriver hold the spring back and disconnect the brush from the brush holder Disconnect the 4 brushes and remove the brush holder 5 REMOVE ARMATURE FROM FIELD FRAME CLIC...

Страница 495: ...paper No 400 or on a lathe 4 INSPECT COMMUTATOR CIRCLE RUNOUT a Place the commutator on V blocks b Using a dial indicator measure the circle runout Maximum circle runout 0 05 mm 0 0020 in If the circle runout is greater than the maximum correct it on a lathe 5 INSPECT COMMUTATOR DIAMETER Using vernier calipers measure the commutator diameter Standard diameter 1 0kW 1 2 kW 1 4kW type 30 mm 1 18 in ...

Страница 496: ...at there is continuity between the lead wire and field coil brush lead If there is no continuity replace the field frame 8 INSPECT FIELD COIL FOR GROUND Using an ohmmeter check that there is no continuity between the field coil end and field frame If there is continuity repair or replace the field frame 9 2 0 kW type INSPECT SHUNT COIL FOR RESISTANCE Using an ohmmeter check that the resistance bet...

Страница 497: ...ng the instant the brush spring sepa rates from the brush Spring installed load 1 2 kW type 13 7 19 6 N 1 40 2 00 kgf 3 1 4 4 lbf 1 0kW 1 4 kW type 17 6 23 5 N 1 80 2 40 kgf 4 0 5 3 lbf 2 0 kW type 21 5 27 5 N 2 20 2 80 kgf 4 9 6 2 lbf Minimum spring installed load 1 2 kW type 9 8 N 1 0 kgf 2 2 lbf 1 0k w 1 4 kW type 11 8 N 1 2 kgf 2 6 lbf 2 0 kW type 12 7 N 1 30 kgf 2 7 lbf If the installed load ...

Страница 498: ...ks If necessary replace the clutch assembly 15 INSPECT FRONT BEARING Turn the bearing by hand while applying inward force If resistance is felt or the bearing sticks replace the bearing 16 IF NECESSARY REPLACE FRONT BEARING a Using SST remove the bearing SST 09286 46011 b Using a press press in a new rear bearing NOTICE Be careful of the bearing installation direction SST 09201 41020 17 INSPECT RE...

Страница 499: ...EST Using an ohmmeter check that there is continuity between ter minals 50 and C If there is no continuity check and replace the magnetic switch 20 DO HOLD IN COIL OPEN CIRCUIT TEST Using an ohmmeter check that there is continuity between ter minal 50 and the switch body If there is no continuity replace the magnetic switch CLICK HERE TO VIEW CHAPTER INDEX Pages From Supplement TO MODEL INDEX 3RZ ...

Страница 500: ...minal nut wave washer terminal insulator outside O ring terminalbolt contact plate and terminal insulator inside c Terminal 30 Remove the terminal nut wave washer terminal insulator outside packing O ring terminal bolt contact plate terminal insulator inside and insulation paper 4 REINSTALL TERMINAL KIT PARTS a Install these new parts Terminal 30 1 Insulation paper 2 Terminal insulator inside NOTI...

Страница 501: ... block on the contact plate and press it down with a hand press Dimensions of wooden block 20 x 37 x 40 mm 0 79 x 1 46 x 1 57 in Press force 981 N 100 kgf 221 lbf NOTICE S S S S Check the diameter of the hand press ram Then cal culate the gauge pressure of the press when 981 N 100 kgf 221 lbf of force is applied Gauge pressure S S S S If the contact plate is not pressed down with the spe cified pr...

Страница 502: ...nd plunger with a dry shop rag 7 REINSTALL MAGNETIC SWITCH END COVER Install the plunger new gasket end cover and lead clamp 1 0 kW 2 0 kW type with the 3 bolts Torque 1 2 kW 1 4 kW type 2 5 N m 26 kgf cm 23 in lbf 1 0 kW 2 0 kW type 3 6 N m 37 kgf cm 32 in lbf CLICK HERE TO VIEW CHAPTER INDEX Pages From Supplement TO MODEL INDEX 3RZ F 3RZ FE ...

Страница 503: ...ST03W 01 STARTING STARTER ST 13 REASSEMBLY Assembly is in the reverse order of disassembly See page ST 3 CLICK HERE TO VIEW CHAPTER INDEX Pages From Supplement TO MODEL INDEX 3RZ F 3RZ FE ...

Страница 504: ...inion gear out disconnect the negative lead from terminal C Check that the pinion gear remains out 3 INSPECT CLUTCH PINION GEAR RETURN Disconnect the negative lead from the switch body Check that the clutch pinion gear returns inward 4 DO NO LOAD PERFORMANCE TEST a Connect the battery and ammeter to the starter as shown b Check that the starter rotates smoothly and steadily with the pinion gear mo...

Страница 505: ...ity be tween terminals 1 and 2 If there is no continuity replace the relay b Check that there is no continuity between terminals 3 and 5 If there is continuity replace the relay 3 INSPECT RELAY OPERATION a Apply battery voltage across terminals 1 and 2 b Using an ohmmeter check that there is continuity be tween terminals 3 and 5 If operation is not as specified replace the relay 4 REINSTALL STARTE...

Страница 506: ...CHARGING CHARGING SYSTEM CH 1 ALTERNATOR CH 5 BACK TO MAIN INDEX Pages From Supplement TO MODEL INDEX 3RZ F 3RZ FE ...

Страница 507: ...tage insulation resistance tester 4 Never disconnect the battery while the engine is running 5 Check that the battery cables are connected to the correct terminals 6 Disconnect the battery cables when the battery is given a quick charge 7 Do not perform tests with a high voltage insulation resistance tester 8 Never disconnect the battery while the engine is running CLICK HERE TO VIEW CHAPTER INDEX...

Страница 508: ...ion charge the bat tery 3 Maintenance Free Battery CHECK BATTERY VOLTAGE a After having driven the vehicle and in the case that 20 minutes have not passed after having stopped the en gine turn the ignition switch ON and turn on the electrical system headlight blower motor rear defogger etc for 60 seconds to remove the surface charge b Turn the ignition switch OFF and turn off the electricalsys tem...

Страница 509: ...elt tension is not as specified adjust it HINT S New belt refers to a belt which has been used less than 5 minutes on a running engine S Used belt refers to a belt which has been used on a running engine for 5 minutes or more S After installing a belt check that it fits properly in the ribbed grooves S Check with your hand to confirm that the belt has not slipped out of the groove on the bottom of...

Страница 510: ...oltmeter Standard amperage 10 A or less Standard voltage 13 8 14 7 V at 25 C 77 F If the voltmeter reading is more than the standard voltage re place the voltage regulator If the voltmeter reading is less than the standard voltage check the voltage regulator and generator as follows S With terminal F grounded start the engine and check the voltmeter reading of terminal B S If the voltmeter reading...

Страница 511: ...H 10 6 INSPECT EXPOSED BRUSH LENGTH CH 11 7 IF NECESSARY REPLACE BRUSHES CH 11 8 INSPECT POSITIVE RECTIFIER CH 11 9 INSPECT NEGATIVE RECTIFIER CH 11 10 INSPECT FRONT BEARING CH 12 11 IF NECESSARY REPLACE FRONT BEARING CH 12 12 INSPECT REAR BEARING CH 12 13 IF NECESSARY REPLACE REAR BEARING CH 12 13 REASSEMBLY 1 PLACE DRIVE END FRAME ON PULLEY CH 14 2 INSTALL ROTOR TO DRIVE END FRAME CH 14 3 INSTAL...

Страница 512: ... Bearing Cover Rear Bearing Bearing Cover Rotor Retainer Front Bearing Drive End Frame Pully Bush Rear end Cover 110 1 125 81 N m kgf cm ft lbf Specified Torque 70A Alternator Washer CHARGING ALTERNATOR CH 5 ALTERNATOR COMPONENTS CLICK HERE TO VIEW CHAPTER INDEX Pages From Supplement CONTINUED TO MODEL INDEX 3RZ F 3RZ FE ...

Страница 513: ...er Alternator Washer N m kgf cm ft lbf Specified Torque Rear End Cover Bush Holder Cover Spring Bush Rectifier Holder IC Regulator Rectifier End Frame Alternator Washer Bearing Cover Rear Bearing Bearing Cover Rotor Retainer Front Bearing Drive End Frame Pully 110 1 125 81 Terminal Insulator 45A 55A Bush Holder Rubber Insulator CH 6 CHARGING ALTERNATOR CLICK HERE TO VIEW CHAPTER INDEX Pages From S...

Страница 514: ...r b Remove the 3 nuts and end cover 2 REMOVE BRUSH HOLDER AND IC REGULATOR a Remove the 5 screws brush holder and IC regulator b Remove the brush holder cover from the brush holder 3 55A 70 A REMOVE RECTIFIER HOLDER a Remove the 4 screws and the bolts CLICK HERE TO VIEW CHAPTER INDEX Pages From Supplement CONTINUED TO MODEL INDEX 3RZ F 3RZ FE ...

Страница 515: ...en SST B clockwise to the specified torque SST 09820 63010 Torque 39 N m 400 kgf cm 29 ft lbf b Check that SST A is secured to the rotor shaft c Mount SST C in a vise d Install SST B into SST C and attach the pulley nut to SST C e To loosen the pulley nut turn SST A in the direction shown in the illustration NOTICE To prevent damage to the rotor shaft do not loosen the pulley nut more than one hal...

Страница 516: ... B h Remove the pulley nut and pulley 6 REMOVE RECTIFIER END FRAME a 55A 70A Remove the 4 nuts b 45A Remove the 2 nuts and 2 bolts c Using SST remove the rectifier end frame SST 09286 46011 7 REMOVE ROTOR FROM DRIVE END FRAME CLICK HERE TO VIEW CHAPTER INDEX Pages From Supplement TO MODEL INDEX 3RZ F 3RZ FE ...

Страница 517: ...ECT SLIP RINGS a Check that the slip rings are not rough or scored If rough or scored replace the rotor b Using a vernier caliper measure the slip ring diameter Standard diameter 14 2 14 4 mm 0 559 0 567 in Minimum diameter 12 8 mm 0 504 in If the diameter is less than the minimum replace the rotor 4 INSPECT STATOR FOR OPEN CIRCUIT Using an ohmmeter check that there is continuity between the coil ...

Страница 518: ...eck that the brush moves smoothly in the brush holder e Cut off the excess wire f Apply insulation paint to the soldered area 8 INSPECT POSITIVE RECTIFIER a Using an ohmmeter connect one tester probe to the posi tive terminal and the other to each rectifier terminal b Reverse the polarity of the tester probes and repeat step a c Check that one shows continuity and the other shows no continuity If ...

Страница 519: ...60 09952 06010 c Using SST and a press press in a new bearing SST 09950 60010 09951 00500 d Install the bearing retainer with the 4 screws Torque 2 5 N m 27 kgf cm 23 in lbf 12 INSPECT REAR BEARING Check that the bearing is not rough or worn 13 IF NECESSARY REPLACE REAR BEARING a Using SST remove the bearing covers and bearing SST 09820 00021 NOTICE Be careful not to damage the fan b Place the bea...

Страница 520: ...HARGING ALTERNATOR CH 13 c Using SST and a press press in a new bearing SST 09820 00030 d Using SST push in the bearing cover SST 09285 76010 CLICK HERE TO VIEW CHAPTER INDEX Pages From Supplement TO MODEL INDEX 3RZ F 3RZ FE ...

Страница 521: ...ll the 4 nuts Torque 4 5 N m 46 kgf cm 40 in lbf d 45A Install the 2 nut and 2 bolts Torque 4 5 N m 46 kgf cm 40 in lbf 4 INSTALL PULLEY a Install the pulley to the rotor shaft by tightening the pulley nut by hand b Hold SST A with a torque wrench and tighten SST B clockwise to the specified torque SST 09820 63010 Torque 39 N m 400 kgf cm 29 ft lbf c Check that SST A is secured to the pulley shaft...

Страница 522: ...d remove SST A and B 5 55A 70A INSTALL RECTIFIER HOLDER a 55A Install the 4 rubber insulators on the lead wires NOTICE Be careful of the rubber insulators installation direction b Install the rectifier holder with the 4 screws Torque 2 0 N m 20 kgf cm 17 4 in lbf 6 45A INSTALL RECTIFIER HOLDER a Install the rectifier holder b Bend the 4 stator lead wires as shown in the illustration CLICK HERE TO ...

Страница 523: ...ontally on the rectifier end frame c Install the 5 screws until there is a clearance of approx 1 mm 0 04 in between the brush holder and connector d 2 0 N m 20 kgf cm 17 4 in lbf e 55A 70A Install the bolt the rectifier holder to rectifier end frame Torque 3 9 N m 40 kgf cm 35 in lbf 8 INSTALL REAR END COVER a Install the end cover with the 3 nuts Torque 4 5 N m 46 kgf cm 40 in lbf b Install the t...

Страница 524: ...T ECU FI 60 ENGINE MECHANICAL PREPARATION PP 1 ENGINE MECHANICAL SERVICE SPECIFICATIONS SS 3 Page ENGINE SERIAL NUMBER IDENTIFICATION INFORMATION IN 3 EVAPORATIVE EMISSION EVAP CONTROL SYSTEM EC 5 EXHAUST GAS RECIRCULATION EGR SYSTEM 2RZ FE EC 7 F FOR ALL OF VEHICLES IN 7 FUEL CUT RPM FI 64 FUEL PRESSURE PULSATION DAMPER 2RZ FE 3RZ FE FI 24 FUEL PRESSURE REGULATOR 2RZ FE FI 14 FUEL PUMP FI 6 G GEN...

Страница 525: ...T SERVICE SPECIFICATIONS SS 1 STARTER ST 1 STARTER RELAY ST 15 STARTING PREPARATION PP 22 STARTING SERVICE SPECIFICATIONS SS 24 T TERMINALS OF ECU ENGINE 1RZ E DIAGNOSTICS DI 17 TERMINALS OF ECU ENGINE 2RZ FE 3RZ FE DIAGNOSTICS DI 90 TERMS IN 26 THERMOSTAT CO 7 THREE WAY CATALYTIC CONVERTER TWC SYSTEM 2RZ FE EC 10 THROTTLE BODY 1RZ E FI 31 THROTTLE BODY 2RZ FE 3RZ FE FI 39 TIMING CHAIN 1RZ 1RZ E E...

Отзывы: