13
❏
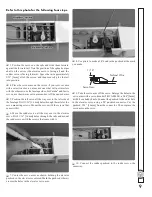
1. If you will be using a Great Planes C.G. Machine to balance
your model, set the rulers to 3-1/8" [80mm]. Place the plane on
the Machine. If you will not be using the C.G. Machine, use a
felt-tip pen or 1/8" [3mm]-wide tape to mark a line noting the
C.G. on the bottom of the wing 3-1/8" [80mm] back from the
leading edge.
This is where your model should balance for the
fi
rst
fl
ights.
Later, you may wish to experiment by shifting the C.G. up
to 3/8" [9.5mm] forward or 3/8" [9.5mm] back to change the
fl
ying characteristics. Moving the C.G. forward may improve
wind penetration and stability, but the model will then
fl
y
and land a little faster. Moving the C.G. aft makes the model
lighter and more responsive to thermals, but could also cause
it to become too dif
fi
cult to control. In any case,
start at the
recommended balance point
and do not at any time balance
the model outside the speci
fi
ed range.
❏
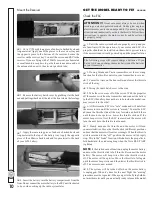
2. Attach the wing to the fuselage with a couple of rubber
bands. The model must be totally ready to
fl
y with all of the
components installed. Place the model on the Great Planes CG
Machine or lift it at the balance point you marked. You should
be able to feel the tape lines with your
fi
ngers.
❏
3. With the plane on the CG Machine or when lifting it
with your
fi
ngers at the balance point, if the nose drops the
model is nose-heavy and weight must be added to the tail to
get it to balance. If the tail drops the model is tail-heavy and
weight must be added in the nose to get it to balance. Without
actually sticking it on, rest the correct amount of Great Planes
Self-Adhesive Lead Weight on the nose or tail of the model to
fi
nd out how much is required.
❏
4. After determining the amount of weight required, remove
the model from the CG Machine and adhere the weight where
needed–to the side of the fuselage under the tail or inside the
fuselage behind the motor.
❏
5.
IMPORTANT:
If you found it necessary to add any weight,
recheck the C.G. after the weight has been installed.
PREFLIGHT –––––––––––––––––––––––––––––
Identify Your Model
No matter if you
fl
y at an AMA sanctioned R/C club site or if
you
fl
y somewhere on your own, you should always have your
name, address, telephone number and AMA number on or inside
your model. It is required at all AMA R/C club
fl
ying sites and
AMA sanctioned
fl
ying events. Fill out the identi
fi
cation tag on
the back cover page and place it on or inside your model.
Charge the Batteries
Follow the battery charging instructions that came with your
radio control system to charge the batteries. You should always
charge your transmitter and receiver batteries the night before
you go
fl
ying, and at other times as recommended by the radio
manufacturer.
CAUTION:
Unless the instructions that came with your radio
system state differently, the initial charge on
new
transmitter
and receiver batteries should be done for 15 hours
using the
slow-charger that came with the radio system
. This will
“condition” the batteries so that the next charge may be done
using the fast-charger of your choice. If the initial charge is
done with a fast-charger, the batteries may not reach their
full capacity and you may be
fl
ying with batteries that are
only partially charged.
Range Check
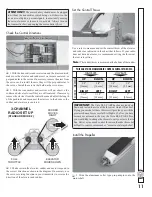
Check the operational range of your radio on the ground before
the
fi
rst
fl
ight of each day. With the transmitter antenna collapsed
and the receiver and transmitter on, you should able to walk at
least 100 feet away from the model and still have control. Perform
this same check with the motor running at various speeds as
well. Have an assistant stand by your model and, while you
work the controls, tell you what the control surfaces are doing.
If the control surfaces do not respond correctly, do not
fl
y! Find
and correct the problem
fi
rst. Look for loose servo connections,
broken wires, or corroded wires on old servo connectors.

