14
Note:
When the Bread Maker is operating open the lid only at the prescribed
places in the baking cycle. Failure to observe this will affect the quality of the
bread.
11. When the program is completed the display shows 0:00 and the appliance will
beep 10 times.
12. The “keep warm” function will now operate for a further hour. After this period
the Bread Maker will again beep 10 times and then switch off. For best results,
stop the Bread Maker with the START/STOP button and remove the baking pan
within the keep warm period.
13. Use oven gloves to remove the pan.
14. Let the pan cool for about 10 minutes out of the machine in normal
orientation. This is particularly important for the heavier breads.
15. Turn the pan upside down and gently tap or shake the bread from the pan.
Occasionally, the paddle will stay in the loaf; wait until the loaf is cool and then
remove the paddle with a wooden utensil to avoid damage to the non-stick
surface. If you need to aid removal of bread from the pan use only wooden or
heatproof plastic utensils.
16. Leave the bread on a rack to cool. Make sure the paddle has been removed
before slicing the bread.
17. Always unplug the appliance after use.
Weighing and Measuring Ingredients:
•
The Bread Maker can bake a 2lb (1000g) loaf, or raise the equivalent amount of
dough for baking.
•
Do not exceed this amount or the mechanism may be damaged, and/or the
dough may rise through the appliance lid.
Baking with your Bread Maker:
1. The next few pages contain a series of recipes to help you get acquainted
with the facilities available on your new Bread Maker. If you are to get the best
results it is vital that your measurements are careful and accurate as small
differences in key ingredients can have a huge effect on the final result.
2. Use a clear container for measuring liquids and measure at eye level. If
you measure from above or below you will not get an accurate reading. A
measuring cup is provided with the unit for this purpose.
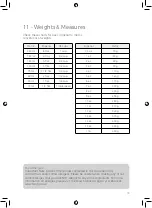
3. The measuring cup provided has scales marked in cups, millilitres (ml) and
fluid ounces (fl.oz.) to help you measure the ingredients correctly.
4. Always fill the liquid exactly to the marked line.
Note:
Where the abbreviations tsp. (teaspoon) and tbsp. (tablespoon) appear in
the recipes they refer to the supplied measuring spoon. Use this spoon as other
utensils may not yield the correct amounts.
Spoon measurements must be level. Rounded or heaped measures may not yield
the proper results.
Содержание T11003
Страница 30: ...30 Notes ...
Страница 31: ...31 Notes ...


