background image

10

4.  Clean off any spills around the outside of the bread barrel and lower it into the 

Bread Maker, reversing the process described earlier. Push down at the sides 

and ensure the barrel is firmly held in the side clips.

Controls and programs:

1.  Ensure that you understand the functions of your Bread Maker before use as an 

incorrect selection will affect the quality of the bread.

2.  Plug the Bread Maker into the mains. The Control Panel display will light up 

and the unit is now operational.

3.  When you first power up the Bread Maker, the unit will automatically be set 

to the Basic and Medium Crust settings. The default loaf size will be set to 2lb 

(1000g) and the display will indicate 3:00, which means that the Bread Maker 

will take 3 hours to complete the program.

Basic Sequence of Operations:

A.  Choose a Program with the MENU button.

B.  Select the Loaf Size (as needed).

C.  Select the Crust Colour (as needed).

D.  Press the Start/Stop button to start the machine.

Menu selection:

1.  Press the MENU button repeatedly to select a Program.

2.  Most programs offer you the choice to bake 1.5lb (700g) or 2lb (1000g) loaves. 

Press the Loaf Size button once you have selected your desired program to 

select your preferred loaf size.

3.  Press the Colour button to choose Light, Medium or Dark crust.

1: BASIC

For baking white and mixed grain bread. Standard Program: Light, Medium, or Dark 

crust.

1.5lb (700g) loaf  

2h 53m

2lb (1000g) loaf  

3h 00m

The Bread Maker kneads the dough three times. After the second kneading the

Bread Maker beeps to indicate that additional ingredients may now be added.

2: FRENCH

For preparing French white bread. Standard Program: Light, Medium, or Dark crust.

1.5lb (700g) loaf 

3h 40m

2lb (1000g) loaf  

3h 50m.

The Bread Maker has longer rising and baking times, so the bread gets a thicker 

crust.

Содержание T11003

Страница 1: ...T11003 2lb Digital Bread Maker SAFETY AND INSTRUCTION MANUAL PLEASE READ CAREFULLY Subject to registering your Extended Guarantee online at www towerhousewares co uk ...

Страница 2: ...nd beyond During the 1960s the rise in popularity of pressure cooking saw Tower become the UK s largest producer of pressure cookers right through into the late 1980s In recent years the Tower brand has been reborn with an exciting and varied range of housewares and electrical appliances that have quickly reinstated the brand s richly deserved status as a household name Visit www towerhousewares c...

Страница 3: ...ck pan and kneading blade Viewing window to allow you to check on your bread without opening the lid and disturbing the baking process Includes a Quick program function to make baking bread quicker and easier than ever 12 digital programs including a gluten free option 2 loaf sizes available 1 Specifications Components and structure 2 Technical Data 3 Important Safety Information 4 Before First Us...

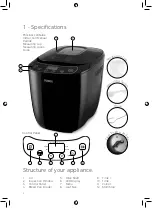
Страница 4: ...w 3 Control Panel 4 Bread Pan inside 5 Drive Shaft 6 LED Display 7 Menu 8 Loaf Size 9 Time 10 Time 11 Colour 12 Start Stop 1 Specifications Structure of your appliance Control Panel KNEAD LIGHT MEDIUM DARK 700g 1000g RISE BAKE WARM 7 8 9 10 11 12 6 M easuring Cu p M easuring Spo o n Hook D r i v e Shaft Pa d d l e ...

Страница 5: ...dom 2 Technical Data Should you encounter problems or require a replacement part contact the Tower Customer Support Team 44 0 333 220 6066 Some spare parts may be ordered from the Tower website Your warranty becomes void should you decide to use non Tower spare parts Spare parts can be purchased from www towerhousewares co uk Guarantee for spare parts The spares and accessories are guaranteed for ...

Страница 6: ...tal capabilities or lack of experience and knowledge if they have been given supervision or instruction concerning use of the appliance in a safe way and understand the hazards involved Children shall not play with the appliance Cleaning and user maintenance shall not be made by children without supervision Take care when any appliance is used near pets Switch off at the wall socket then remove th...

Страница 7: ...y damage the plug and or the cable DO NOT use this product for anything other than its intended use This appliance is for household use only VERY IMPORTANT DO NOT immerse in water or other liquids or use near wash basins or sinks any part of the motor assembly Ensure that the appliance base does not get wet water splashes etc and DO NOT operate it with wet hands Always fully unwind any cord to avo...

Страница 8: ...nstructions include details on how to safely clean surfaces in contact with food See Cleaning and Care section 8 When baking bread never bake amounts greater than the maximum recommended in the recipes accompanying this manual If you do the bread may not be baked evenly and the dough could overflow There are no user serviceable parts in your Bread maker Unauthorised dismantling or servicing will v...

Страница 9: ... are filled in the prescribed order otherwise the bread will not be properly baked IMPORTANT The capacity of the Bread Maker is sufficient to bake a 2lb 1000g loaf or to raise the equivalent amount of dough for baking elsewhere Do not exceed this amount otherwise the mechanism may be damaged or the dough may rise through the lid 1 The ingredients should be at a warm room temperature 20º 25ºC If th...

Страница 10: ...ations A Choose a Program with the MENU button B Select the Loaf Size as needed C Select the Crust Colour as needed D Press the Start Stop button to start the machine Menu selection 1 Press the MENU button repeatedly to select a Program 2 Most programs offer you the choice to bake 1 5lb 700g or 2lb 1000g loaves Press the Loaf Size button once you have selected your desired program to select your p...

Страница 11: ...a rubber spatula to avoid flour lumps 5 SWEET For preparation of sweet yeast breads 1 5lb 700g loaf 2h 50m 2lb 1000g loaf 2h 55m 6 ULTRA FAST I 1 5lb 700g Makes a 1 5lb 700g loaf in under 1 hour Total Program Time 58min 7 ULTRA FAST II 2lb 1000g Makes a 2lb 1000g loaf in under 1 hour The baking process is similar to the previous program but adjusted for the heavier sized bread Total Program Time 5...

Страница 12: ... that timer operation is in progress The timer display shows in hours and minutes the total time left until the bread is ready including any delay added and the program time Press the START button to commence the timer countdown If you set the timer incorrectly and press START you can switch off and set the delay period again provided the program has not started The START STOP Button The START STO...

Страница 13: ... you leave the bread to cool on a normal work surface water vapour in the bread will not evaporate and the bottom of the loaf may be spoiled Bread Maker Operating Sequence Below is a brief and abridged recap of the information given in the sections above on how to correctly use and operate your bread maker Refer to the relevant section above for more information on each of the steps detailed in th...

Страница 14: ...icing the bread 17 Always unplug the appliance after use Weighing and Measuring Ingredients The Bread Maker can bake a 2lb 1000g loaf or raise the equivalent amount of dough for baking Do not exceed this amount or the mechanism may be damaged and or the dough may rise through the appliance lid Baking with your Bread Maker 1 The next few pages contain a series of recipes to help you get acquainted ...

Страница 15: ...he water slightly Do not exceed the use by dates Use fresh flour for making your bread The bread deformed after baking The gluten content of the flour is too low Too much water Use fresh flour for proper bread Reduce the amount of water slightly The texture is lumpy or uneven The flour to water ratio is incorrect The flour is damp or out of date Check the quantity and quality of all the ingredient...

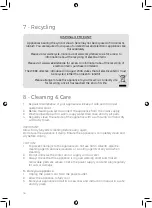
Страница 16: ...vable parts are secure Check the power supply cord and plug regularly for cuts or damage To store your appliance 1 Unplug the power cord from the power outlet 2 Allow the appliance to fully cool 3 Store your appliance and all its accessories and instruction manual in a safe and dry place 8 Cleaning Care DISPOSAL OF THE UNIT Appliances bearing the symbol shown here may not be disposed of in domesti...

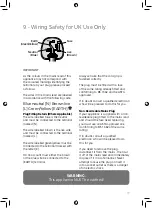
Страница 17: ...ARTH terminal Always ensure that the cord grip is fastened correctly The plug must be fitted with a fuse of the same rating already fitted and conforming to BS 1362 and be ASTA approved If in doubt consult a qualified electrician who will be pleased to do this for you Non Rewireable Mains Plug If your appliance is supplied with a non rewireable plug fitted to the mains lead and should the fuse nee...

Страница 18: ...one year guarantee is only extended to the maximum available for each particular product upon registration of the product within 28 days of purchase If you do not register the product with us within the 28 day period your product is guaranteed for 1 year only To validate your extended warranty please visit www towerhousewares co uk and register with us online Please note that length of extended wa...

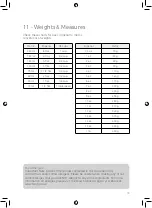
Страница 19: ...more information on allergies please visit the Food Standards Agency s website at www food gov uk 11 Weights Measures Metric Imperial US cups 250ml 8 floz 1 cup 180ml 6 fl oz 3 4 cup 150ml 5 floz 2 3 cup 120ml 4 floz 1 2 cup 75ml 2 1 2 floz 1 3 cup 60ml 2 floz 1 4 cup 30ml 1 floz 1 8 cup 15ml 1 2 floz 1 tablespoon Imperial Metric 1 2 oz 15g 1 oz 30g 2 oz 60g 3 oz 90g 4 oz 110g 5 oz 140g 6 oz 170g ...

Страница 20: ...20 For more great recipes and inspiration from the Tower Kitchen visit www towerhousewares co uk blog Recipes Recipes for use with the T11003 Digital Bread Maker ...

Страница 21: ...r 1 tablespoon Allow this to work in and re check if necessary If the dough is too dry add the same amount of lukewarm water Re check if necessary As you gain experience you will get to know the feel of good dough It should be soft and smooth with the faintest sticky feel but should leave no residue when turned out of the barrel as in our recipes for doughnuts and other recipes blended on the Doug...

Страница 22: ...e and improves flavour structure and colour Almost any kind of natural sweetener can be used all the various sugars corn and maple syrup honey etc Once again when using liquid sweeteners to replace sugar reduce the amount of water slightly to compensate Artificial sweeteners are not suitable for bread making Salt Salt in bread is NOT just a matter of taste Salt restrains the growth of the yeast an...

Страница 23: ...th our own recipes Bake in the coolest part of the day use water between 21 28 C Just Add Flour And Water These mixes have the necessary ingredients in separate sachets Remember strong white bread flour is required A packet of this mix will produce a 1 5lb 700g loaf Help My bread has gone wrong some easy remedies 1 Have all the ingredients been added 2 Have all the ingredients been accurately meas...

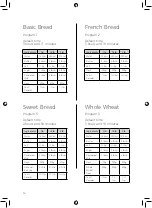
Страница 24: ...p Ingredients 1lb 1 5lb 2lb Water 155ml 230ml 310ml Butter 2 tbsp 2 tbsp 3 tbsp Salt tsp tsp 1 tsp Sugar 2 tbsp 3 tbsp 4 tbsp Powdered Milk 2 tbsp 3 tbsp 4 tbsp Flour 100g 150g 200g Whole Wheat Flour 200g 300g 400g Yeast Powder 1 tsp 1 tsp 1 tsp Ingredients 1lb 1 5lb 2lb Water 160ml 240ml 310ml Butter 2 tbsp 2 tbsp 4 tbsp Salt tsp tsp 1 tsp Sugar 4 tbsp 6 tbsp 8 tbsp Powdered Milk 2 tbsp 3 tbsp 4 ...

Страница 25: ...utes Ingredients Quantity Eggs 4 Butter 100g Sugar 150g Cake Flour 380g Salt 1 tsp Soda Powder 3 5g Raw Dough Program 8 Default time 23 minutes Ingredients Quantity Water 280ml Vegetable Oil 2 tbsp Eggs 2 Salt 1 1 3 tsp Sugar 1 tbsp Flour 560g Gluten Free Bread Program 9 Default time 2 hours and 55 minutes Ingredients 1lb 1 5lb 2lb Water 120ml 180ml 240ml Sugar 2 tbsp 3 tbsp 3 tbsp Salt tsp 1 tsp ...

Страница 26: ...water slightly if the cheese has a high moisture content cup grated cheese Dates Add after the second kneading when the machine beeps cup chopped dates Potato Add after the second kneading when the machine beeps 1 3 cup dried potato flakes 1 2 tsp dried parsley Ingredients 11 3 cups water at room temperature 1 tsp salt 1 tbsp powdered milk 31 3 cups strong white bread flour 1 3 cup dried onion fla...

Страница 27: ... garlic powder 2 tbsp chives dried tsp black pepper 2 tsp dried yeast Ingredients cup water at room temperature cup plain yoghurt 1 cup carrots grated 2 tbsp honey 2 tbsp molasses or dark brown muscovado sugar 2 cups strong white bread flour 1 cup wholemeal bread flour 1 tbsp dried milk 1 tsp salt cup walnuts chopped 1 tsp dried yeast Ingredients 1 cup water at room temperature 1 tsp salt 4 tsp ve...

Страница 28: ...r used to soak the tomatoes plus fresh water see below Firstly soak the tomatoes in a little hot water for 15 min Drain and chop into pieces reserving the water You can add the tomatoes together with all the other ingredients at the beginning of the program This will give a blended character to the loaf Alternatively you can add the tomatoes midway through the cycle This will retain their individu...

Страница 29: ...Table salt 3 tbsp Vegetable oil 450g Gluten free flour can be a mixed flour 11 2 tsp Yeast powder Ingredients 1 cups water at room temperature 2 tbsp olive oil 4 cups strong white bread flour 2 tbsp sugar 1 tsp salt 2 tsp dried yeast This should be sufficient for three 12 300mm pizza bases Roll into circles on a floured surface and pinch the edges up to form a rim Place on a greased baking sheet c...

Страница 30: ...30 Notes ...

Страница 31: ...31 Notes ...

Страница 32: ...extra 2 years guarantee register your appliance online within 28 days of purchase by visiting www towerhousewares co uk Should you have a problem with your appliance or need any spare parts please call our Customer Support Team 44 0 333 220 6066 0220 V3 Your warranty becomes void should you decide to use non Tower spare parts Spare parts can be purchased from www towerhousewares co uk ...

Отзывы: