background image


43 


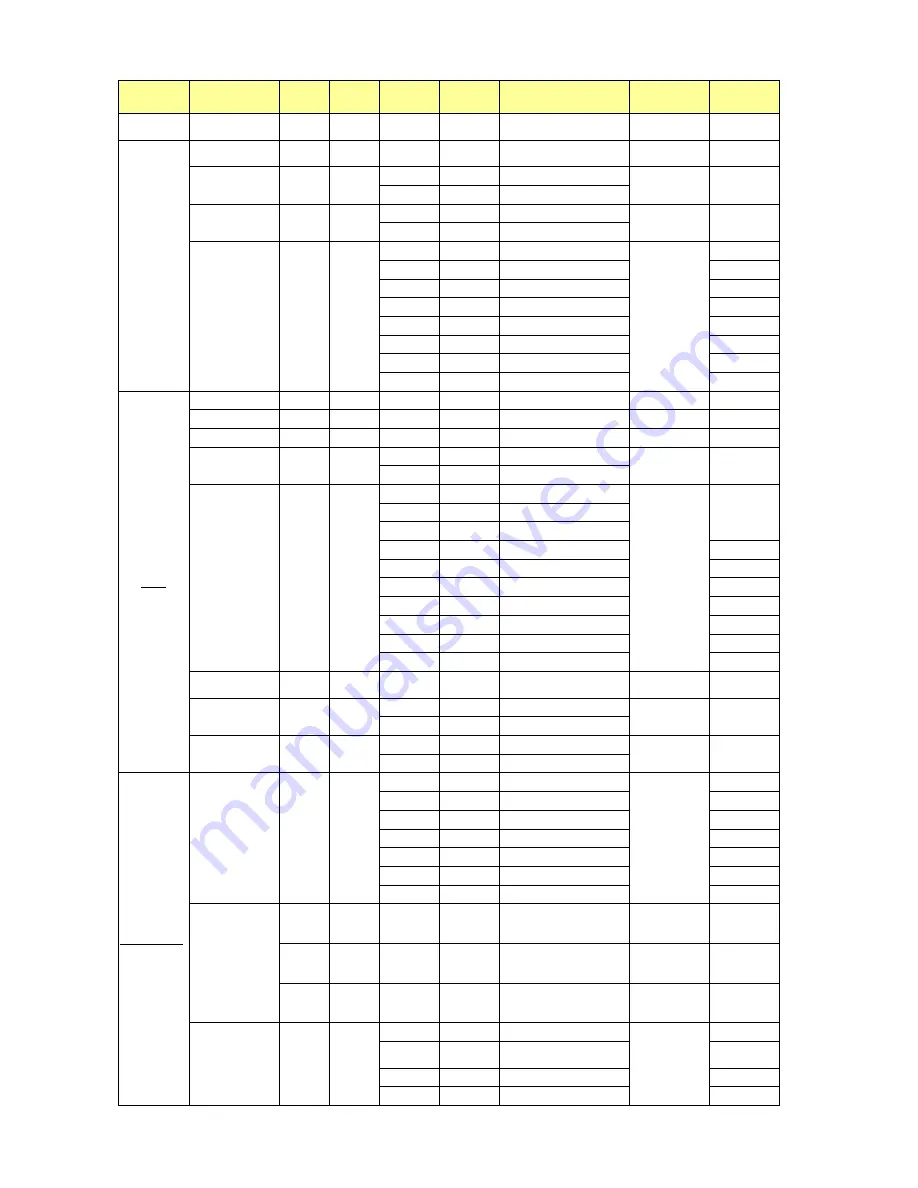
Main Item 

Control Item 

CMD 

Type 

Value 

(DEC) 

Reply 
(DEC) 

Content 

CMD (HEX) 

Remark 


Treble 

TRE 

W/R 

0~12 

Current 

value 

Treble (-6 ~ 6) 

54 52 45 


Audio 

Balance 

BAL 

W/R 

0~12 

Current 

value 

Balance (-6 ~ 6) 

42 41 4C 


Internal Speaker


INS 

W/R


00


00


Internal Speaker Off


49 4E 53 


01 

01 

Internal Speaker On 

Mute 

MUT 

W/R 

00 

00 

Mute Off 

4D 55 54 


01 

01 

Mute On 

Audio Source 

Select 

CAS 

W/R 

00 

00 

Line-In 

43 41 53 


01 

01 

HDMI1 


02 

02 

HDMI2 


03 

03 

HDMI3 


04 

04 

HDMI4 


05 

05 

DisplayPort 


06 

06 

DisplayPort2 


07 

07 

OPS 


OSD 

Transparency 

OST 

W/R 

0~4 

0~4 

OSD Transparency 

4F 53 54 


H Position 

OSH 

W/R 

0~100 

0~100 

OSD H Position 

4F 53 48 


V Position 

OSV 

W/R 

0~100 

0~100 

OSD V Position 

4F 53 56 


OSD Rotation 

OSR 

W/R 

00 

00 

Landscape 

4F 53 52 


01 

01 

Portrait 

OSD Language 

OSL 

W/R 

00 

00 

English 

4F 53 4C 


01 

01 

Japanese 

02 

02 

German 

03 

03 

French 


04 

04 

Italian 


05 

05 

Spanish 


06 

06 

Portuguese 


07 

07 

Swedish 


08 

08 

Polish 


09 

09 

Turkish 


OSD Timeout 

OSO 

W/R 

5~60 

Current 

value 

OSD Timeout (5, 10, 20, 

30, 60 sec) 

4F 53 4F 


Splash Screen 

SPS 

W/R 

Off 

53 50 53 


On 

Information 

Display 

MSB 

W/R 

Off 

4D 53 42 


On 

Multi-Source 

PIP Adjust 

PSC 

W/R 

00 

00 

PIP OFF 

50 53 43 


01 

01 

PIP Small 


02 

02 

PIP medium 


03 

03 

PIP large 


04 

04 

PbP (Side By Side) 


06 

06 

3 Windows 


07 

07 

4 Windows 


PIP source 

selection 

PIN 

W/R 

(refer to 

MIN) 

(refer to 

MIN) 

Select the input source 

of sub window 1 (refer to 

MIN) 

50 49 4E 


PIO 

W/R 

(refer to 

MIN) 

(refer to 

MIN) 

Select the input source 

of sub window 2 (refer to 

MIN) 

50 49 4F 


PIP 

W/R 

(refer to 

MIN) 

(refer to 

MIN) 

Select the input source 

of sub window 3 (refer to 

MIN) 

50 49 50 


PIP position 

PPO 

W/R 

00 

00 

PIP Position Bottom-left 

50 50 4F 


01 

01 

PIP Position 

Bottom-Right 


02 

02 

PIP Position Top-left 


03 

03 

PIP Position Top-right 


Содержание TD-U852

Страница 1: ...1 ...

Страница 2: ...cts have fallen into the apparatus the apparatus has been exposed to rain or moisture does not operate normally or has been dropped Additional Safety Precautions 13 CAUTION If the LCD display is dropped and the cabinet or enclosure surface has been damaged or the LCD display does not operate normally take the following precautions ALWAYS turn off the LCD display and unplug the power cord to avoid ...

Страница 3: ...e to avoid image persistence after image effects 23 WARNING NEVER expose batteries to excessive heat such as sunshine fire or the like 24 ALWAYS plug the product into an outlet that is located in such a manner that it can be easily unplugged in case the product requires service 25 NEVER route the product s power cord inside a wall or similar enclosed area 26 Never modify this equipment Changes or ...

Страница 4: ...r cord and contact a Toshiba Authorized Service Provider 48 Handle with care when transporting Save packaging for transporting Please clean the ventilation slots on the back of the cabinet to remove dirt and dust at least once a year to maintain reliable operation of the LCD display 49 If using the cooling fan continuously it s recommended to clean the ventilation slots at least once a month 50 Wh...

Страница 5: ...ontact your local city office or the dealer where you purchased the product Disposal of batteries and or accumulators The crossed out wheeled dust bin symbol indicates that batteries and or accumulators must be collected and disposed of separately from household waste If the battery or accumulator contains more than the specified values of lead Pb mercury Hg and or cadmium Cd defined in the Batter...

Страница 6: ...ion All rights reserved Notice The information contained in this manual including but not limited to any product specifications is subject to change without notice TOSHIBA LIFESTYLE PRODUCTS SERVICES CORPORATION TOSHIBA PROVIDES NO WARRANTY WITH REGARD TO THIS MANUAL OR ANY OTHER INFORMATION CONTAINED HEREIN AND HEREBY EXPRESSLY DISCLAIMS ANY IMPLIED WARRANTIES OF MERCHANTABILITY OR FITNESS FOR AN...

Страница 7: ...US 22 NAVIGATING THROUGH THE MENU SYSTEM 22 INPUT MENU 23 PICTURE MENU 24 PICTURE MENU CONTINUED RGB ADJUSTMENT 25 AUDIO MENU 26 OSD SETTINGS MENU 27 SETUP MENU 28 SETUP MENU CONTINUED REAL TIME CLOCK 29 ADVANCED SETUP MENU 30 ADVANCED SETUP MENU CONTINUED WAKE UP FROM SLEEP 31 COMMUNICATION MENU 32 INFORMATION MENU 33 CONTROLLING THE DISPLAY USING RS 232 33 Connection 33 RS 232C Communication Spe...

Страница 8: ...ATRIX 55 APPENDIX V RECOMMENDED IR EXTENDER POSITIONS 57 APPENDIX VI CONTROLLING THE DISPLAY THROUGH ETHERNET PORT 58 CONNECTION 58 SETTING IP ADDRESSES 59 Set the IP Addresses of the PC and Monitor 59 Checking the Connection 59 CONTROLLING THE MONITOR FROM A PC VIA LAN 60 Monitor Settings 60 CONFIGURING SETTINGS USING PC BROWSER SOFTWARE 61 Logging into the Monitor from the Browser 61 ...

Страница 9: ... slot TD U852TS only o Analog audio input o Analog audio output o IR extender input with IR extender included o Full range internal speakers o Signal source auto detection o Selectable OSD keypad lock o Landscape Portrait support o Flexible ON OFF scheduler o Low power consumption o RS232c and Ethernet control Package Contents Unpacking o The TD U852 series display is packed using cushions to prot...

Страница 10: ...10 Packing List Item No Description Quantity 1 Display 1 2 Carton 1 3 Cushion Bottom 1 4 Cushion Top 1 5 Poly Bag 1 6 Carton Lock White Handle 8 7 Accessory Bag 1 8 Packing Band 3 ...

Страница 11: ...11 Included Accessories IR Remote Control Battery included IR Extender HDMI Cable 6 ft USB Type B to A Cable 6 ft TD U852TS only Power Cord black 6 ft CD ROM Disk Content User Manual Touch Driver ...

Страница 12: ... an AC wall outlet Plug the power cord into the AC inlet on the side of the display The main power switch is located directly above the AC inlet press to turn power on and O to turn power off Power Switches o The on off switch is the top button on the display keypad o The on off switch is also located on the remote control OSD Keypad Main power Switch AC Inlet I is power on O is power off Status L...

Страница 13: ...13 Input and Output Connectors Power Input and Output Connectors ...

Страница 14: ...isplayPort Input 11 VGA D Sub 15 pin 12 PC Audio In Mini Jack 13 IR Extender Mini Jack 14 Audio Out Mini Jack 15 USB 2 0 TD U852TS only USB Type A 16 DisplayPort 2 TD U852 only DisplayPort Input Note 1 The drawings are only given as a better understanding of cable connections The I O sockets vary upon different models 2 USB 2 0 3 0 ports can only be used when an OPS module is connected 3 See Appen...

Страница 15: ... source device s Step 2 Plug in the signal source cables Step 3 Press the power key on the display s keypad or the power key on the remote control to turn on the display Step 4 Turn on the power of the signal source device s to begin sending a signal to the display Note The I O sockets vary upon different models I is power on O is power off ...

Страница 16: ...play will automatically go into power saving sleep mode Adjusting the Volume and Input Source Adjusting the Volume 1 Using the remote press the VOLUME or VOLUME to increase or decrease the volume 2 Press the MUTE button to temporarily turn off all sound To restore the sound press the MUTE button again Selecting the input source 1 Using the remote press the desired source button DP1 DP2 HDMI1 HDMI2...

Страница 17: ... OSD menu the status LED will not operate Key Descriptions Power on Power off Source Source selection Menu Right Menu Left Menu Up Menu Down Menu Exit Menu Exit selection LED Illumination Condition Green Normal operation Blinking Orange No signal Orange Power Saving Off Power off AC off ...

Страница 18: ...urs o Display dynamic moving images whenever possible o Avoid displaying static fixed images for long periods of time o Consider using a screen saver of signal source to avoid displaying static fixed video content continuously Set IRFM to ON To help avoid image retention it is recommended that the IRFM feature be set to ON This feature can be selected via the OSD on screen display under Advanced S...

Страница 19: ...to the top Do NOT rotate the display counter clockwise or upside down This will allow for proper ventilation for the display Improper ventilation may shorten the lifetime of the display After rotate the display change the OSD rotation setting from Landscape to Portrait in the OSD menu Tilt Setting Tilt angle limitation is within 10 degrees ...

Страница 20: ... specification feature TD U852TS only HDMI3 Selects the HDMI 3 source 6 PIP Turns the Picture in Picture feature on and off Blank HDMI4 Selects the HDMI 4 source 7 SWAP Swaps the main source and Picture in Picture Source 8 P SOURCE Selects the Picture in Picture Source 9 MENU Opens the display s on screen menu system When the menu system is already open pressing this button will select the previou...

Страница 21: ...it back into place i The drawings above are only given as a better understanding of actual operations ii Used batteries needed to follow the city rule to be discarded iii Avoid keeping used old batteries inside the remote control causing leakage of internal liquid resulting metal rust or fatal damage to the remote control hand unit iv Battery to be used according to the instruction About the remot...

Страница 22: ...e Menu System 1 With the power on press MENU The Image Settings menu will display 2 Within the menu use and ENTER to navigate through the menus and adjust options 3 Press MENU to return to the previous menu To exit the menu system press EXIT ...

Страница 23: ... Select the source for the primary PiP window Options DisplayPort1 DisplayPort2 TD U852 only HDMI1 HDMI2 HDMI3 HDMI4 VGA OPS TD U852TS only Note This function is only available when PiP Mode is set to PiP PbP 3Window or 4Window Sub2 Input Select the source for the secondary PiP window Options DisplayPort1 DisplayPort2 TD U852 only HDMI1 HDMI2 HDMI3 HDMI4 VGA OPS TD U852TS only Note This function i...

Страница 24: ...t High Bright Contrast Increase or decrease the contrast of picture Press or select the desired level and then press ENTER Range 0 100 Default 60 Brightness Increase or decrease the brightness of picture Press or select the desired level and then press ENTER Range 0 100 Default 30 Sharpness Adjust the definition of picture Press or select the desired level and then press ENTER Range 0 100 Default ...

Страница 25: ...MI input in the next following menu Options Auto Full Limited Default Auto Picture Menu continued RGB Adjustment Red Gain Adjust the red color in bright area Range 0 100 Default 100 Green Gain Adjust the green color in bright area Range 0 100 Default 100 Blue Gain Adjust the blue color in bright area Range 0 100 Default 100 Red Offset Adjust the red color in dark area Range 0 100 Default 50 Green ...

Страница 26: ...w tones bass Press or select the desired level and then press ENTER Range 6 6 Default 0 Balance Adjust the balance of the left and right speakers Press or select the desired level and then press ENTER Range 6 6 Default 0 Internal Speaker Turn the internal speaker on or off Default On Audio Source Select the audio source Options Line In DisplayPort 1 DisplayPort 2 TD U852 only HDMI1 HDMI2 HDMI3 HDM...

Страница 27: ...vel and then press ENTER Range 1 4 Off Default Off OSD Timeout Adjust the time in seconds before the OSD menu disappears Press or to select the desired level and then press ENTER Options 5 60 sec Default 30 sec OSD Rotation Select the OSD Rotation Press select the rotation Options Landscape Portrait Default Landscape Language Select the OSD language Options English Japanese German Spanish French I...

Страница 28: ... displayed signal VGA source only Press or select the desired level and then press ENTER Range 0 100 Zoom Adjust the zoom overscan of the image Press or select the desired level and then press ENTER Range 0 100 Power LED Enable or disable the status LED Options On Off Default On OPS Power Down Check TD U852TS only By enabling OPS power down check the system will inspect the power status of OPS mod...

Страница 29: ... 60 sec of month deviation When AC power is off settings can only be retained for 7 days and will be reset afterwards Time Mode Select how you want to set the time when the display turns on or off Options User Everyday and Workday modes Default User Mode Power On Time Set the time when the display will turn on Note This feature only functions when it is set to Enable Power Off Time Set the time wh...

Страница 30: ...om Sleep Options VGA Only Digital RS232 Ethernet Never Sleep Default VGA Only See next page for more details DP Ver Select DisplayPort version of the DisplayPort inputs Options 1 1 1 2 Default 1 2 Note DisplayPort 1 2 is the more modern standard and supports 3840x2160 60 Hz resolution However sometimes DisplayPort 1 1 is needed for compatibility with older graphics cards EDID Setup Select EDID Ext...

Страница 31: ...or of Sleep Mode change the Wake up from Sleep setting in the Advanced Setup menu i VGA Only default When VGA is selected as the main input the RS 232 DisplayPort HDMI and DVI inputs are inactive when the display is in sleep mode and the display will wake up when it receives a signal at the VGA input ii Digital RS232 Ethernet The RS 232 DisplayPort HDMI and DVI inputs stay active when the display ...

Страница 32: ...display is powered down Options No Yes Default No Note To use this function please contact your supplier Source Status Alert Enable an automatic alert via email when the source is changed Options No Yes Default No Note To use this function please contact your supplier Signal Lost Alert Enable an automatic alert via email when the video signal is lost Options No Yes Default No Note To use this func...

Страница 33: ...display can be controlled from a PC via the RS 232 serial interface Connection RS 232 cable Male Female straight cable Display RS 232C Communication Specifications Communication baud rate 115200 as default 38400 19200 9600 Data bits 8 Parity None Stop bit 1 Flow control None Note Most recent PCs do not have a serial port Use a USB serial interface adapter ...

Страница 34: ...1 0x01 CMD 0x08 7 bytes Write command 0x07 0x01 0x02 CMD Value 0x08 8 bytes Reply from the monitor 0x07 0x01 0x00 CMD Reply 0x08 8 bytes Communication Example Write command Power ON 0x07 0x01 0x02 0x50 0x4F 0x57 0x01 0x08 Reply from the monitor 0x07 0x01 0x00 0x50 0x4F 0x57 0x01 0x08 Read command Power 0x07 0x01 0x01 0x50 0x4F 0x57 0x08 Reply from the monitor 0x07 0x01 0x00 0x50 0x4F 0x57 0x01 0x0...

Страница 35: ... connect one side of USB cable Type B USB connector on the display side 3 Connect the other side of USB cable Type A USB to the USB port on PC See picture below 4 Then turn on the PC 5 When USB cable connected then wait for 5 seconds and the touch function is ready to go 6 To use the touch function from the OPS module change the source of touchscreen control to OPS in Advanced Setup Menu ...

Страница 36: ...tallation file mt_driver_kit version no exe located on the CD ROM provided with the display You can also download the most recent version of the Touch Screen Driver software from http www multitouch com support html 2 The Touch Screen Driver Setup Wizard appears Click Next then click Install to start the process 3 Click Finish to complete the installation Preferred Processor Quad Core 2 5G or bett...

Страница 37: ...hysical touch screen supports Status Show current status of a touch screen It may be a Working normal b Open bulk device failed c Open virtual digitizer failed d Open physic digitizer failed Calibration If touching the screen does not place the cursor in the desired position you may be able to correct this by performing a touch screen engine calibration To do this a Click Calibrate A white cross a...

Страница 38: ... Check the Status LED The image is not centered Check the input signal is compatible with this display The image is not locked correctly Check the input signal is compatible with this display The remote control doesn t work Ensure the batteries fresh and are installed correctly Ensure the remote is aimed at the IR sensor or IR extender Refer to Appendix V for more information about IR extender Som...

Страница 39: ... 00 74 25 O O 25 00 28 125 74 25 O O 30 00 33 75 74 25 O O 50 00 56 25 148 50 O O 60 00 67 50 148 50 O O O 4K2K 3840x2160 24 00 54 00 297 00 O O 25 00 56 25 297 00 O O 30 00 67 50 297 00 O O 49 977 110 50 442 00 O 59 997 133 313 533 25 O VGA 640x480 60 00 31 50 25 20 O O O SVGA 800x600 60 00 37 879 40 00 O O O XGA 1024x768 60 00 48 363 65 00 O O O WXGA 1360x768 60 015 47 712 85 50 O O O SXGA 1280x...

Страница 40: ...ightness Level 42 52 4C BLC W R 00 00 Off Backlight 42 4C 43 01 01 On Backlight CON W R 0 100 Current value Contrast 43 4F 4E SHA W R 0 100 Current value Sharpness 53 48 41 HUE W R 0 100 Current value Hue 48 55 45 SAT W R 0 100 Current value Saturation 53 41 54 Noise Reduction NOR W R 00 00 Off 4E 4F 52 01 01 Low 02 02 Medium 03 03 High Scheme SCM W R 00 00 Personal 53 43 4D 01 01 Standard 02 02 G...

Страница 41: ...4F 42 VGA Adjustment PHA W R 0 100 Current value Phase 50 48 41 CLO W R 0 100 Current value Clock 43 4C 4F HOR W R 0 100 Current value Horizontal Position 48 4F 52 VER W R 0 100 Current value Vertical Position 56 45 52 ADJ W 00 00 Auto Adjust 41 44 4A RTC Current Time Adjustment RTY W R 0 99 0 99 Year 52 54 59 RTM W R 1 12 1 12 Month 52 54 4D RTD W R 1 31 1 31 Day 52 54 44 RTH W R 0 23 0 23 Hour 5...

Страница 42: ...ute 4E 46 4D Tuesday ENH W R 0 23 0 23 Tuesday On Hour 45 4E 48 ENM W R 0 59 0 59 Tuesday On Minute 45 4E 4D EFH W R 0 23 0 23 Tuesday Off Hour 45 46 48 EFM W R 0 59 0 59 Tuesday Off Minute 45 46 4D Wednesday DNH W R 0 23 0 23 Wednesday On Hour 44 4E 48 DNM W R 0 59 0 59 Wednesday On Minute 44 4E 4D DFH W R 0 23 0 23 Wednesday Off Hour 44 46 48 DFM W R 0 59 0 59 Wednesday Off Minute 44 46 4D Thurs...

Страница 43: ...English 4F 53 4C 01 01 Japanese 02 02 German 03 03 French 04 04 Italian 05 05 Spanish 06 06 Portuguese 07 07 Swedish 08 08 Polish 09 09 Turkish OSD Timeout OSO W R 5 60 Current value OSD Timeout 5 10 20 30 60 sec 4F 53 4F Splash Screen SPS W R 0 0 Off 53 50 53 1 1 On Information Display MSB W R 0 0 Off 4D 53 42 1 1 On Multi Source PIP Adjust PSC W R 00 00 PIP OFF 50 53 43 01 01 PIP Small 02 02 PIP...

Страница 44: ...f 41 54 53 1 1 Main 2 2 Multi 3 3 All IRFM IRF W R 0 0 Off 49 52 46 1 1 On Smart Light Control SLC W R 0 0 Off 53 4C 43 1 1 DLC 2 2 Light Sensor Power LED LED W R 0 0 Off 4C 45 44 1 1 On DisplayPort Version DPM W R 0 0 DP 1 1 44 50 4D 1 1 DP 1 2 HDMI EDID EDH W R 00 00 4Kx2K 45 44 48 01 01 1080P DisplayPort EDID EDP W R 00 00 4Kx2K 45 44 50 01 01 1080P OPS Power Down Check OPC W R 00 00 Disable OP...

Страница 45: ...rsion 47 56 45 RTV R Current value Read RS232 table Version 52 54 56 Ethernet Setup Network Enable NWE W R 0 0 No 4E 57 45 1 1 Yes Dynamic IP DIP W R 0 0 Disable 44 49 50 1 1 Enable Default LDS W 0 0 Load default settings About 15 seconds 4C 44 53 E Mail Alert PSA W R 0 0 Off Power Status Alert 50 53 41 1 1 On Power Status Alert SSA W R 0 0 Off Source Status Alert 53 53 41 1 1 On Source Status Ale...

Страница 46: ...34 FD1 W R 0 255 0 255 DNS Address 1 46 44 31 FD2 W R 0 255 0 255 DNS Address 2 46 44 32 FD3 W R 0 255 0 255 DNS Address 3 46 44 33 FD4 W R 0 255 0 255 DNS Address 4 46 44 34 SNS W 0 0 Save Static IP Settings 53 4E 53 Self Diagnosis Operation Time OTT R 4 bytes Accumulated operation time 32bits in minutes 4F 54 54 Error Code ERR R 4 bytes Error code 45 52 52 The only available commands when the di...

Страница 47: ...P POSITION 9 40AF 15EA OPS 10 40AF 10EF HDMI3 11 40AF 11EE PIP 12 40AF 16E9 HDMI4 13 40AF 06F9 SWAP 14 40AF 13EC PIP SOURCE 15 40AF 02FD 16 40AF 01FE 17 40AF 0EF1 MENU 18 40AF 03FC 19 40AF 19E6 20 40AF 12ED ENTER 21 40AF 05FA EXIT 22 40AF 14EB SCALING 23 40AF 43BC FREEZE 24 40AF 00FF MUTE 25 40AF 17E8 BRIGHTNESS 26 40AF 18E7 CONTRAST 27 40AF 1EE1 AUTO 28 40AF 0FF0 SOURCE 29 40AF 1BE4 VOLUME 30 40A...

Страница 48: ...s 4 x HDMI 2 x DisplayPort VGA 4 x HDMI DisplayPort VGA 2 x USB 2 0 USB 3 0 Audio Audio Out PC Audio In Control IR Extender RS232 Ethernet IR Extender RS232 Ethernet Touch USB PHYSICAL SPECIFICATIONS Dimensions 1925 6 mm x 1108 2 mm x 103 7 mm 1925 6 mm x 1108 2 mm x 116 9 mm Weight Net 102 3 kg Gross 109 5 kg Net 106 3 kg Gross 121 0 kg Wall Mount 500mm x 400mm 500mm x 600mm VESA 500mm x 400mm 50...

Страница 49: ...49 Dimensions TD U852 ...

Страница 50: ...50 Dimensions TD U852TS ...

Страница 51: ...FR Title 47 Part 15 Subpart B Class A CISPR 22 ANSI C63 4 ICES 003 Issue 5 CE EN 55022 EN 55024 EN 61000 3 2 EN 61000 3 3 AS NZS CISPR 22 cTUVus UL 60950 1 CAN CSA C22 2 No 60950 1 07 CB IEC 60950 1 EN 60950 1 AS NZS 60950 1 ...

Страница 52: ...he display and or serious injury When moving a display in its shipping carton lift the carton using the white handles total 8 handles for 4 people However we strongly recommend using a pallet or trolley to move or carry the shipping carton Carrying the display This display is heavy please follow proper lifting technique as pictured below Failure to do so may cause injury OK AVOID ...

Страница 53: ...trong enough to hold the necessary weight of the display and the mount Step1 Keep the display facing the ground and place it on a flat object Step2 Remove the 8 screws M8 15 from the back of the display Step3 Align the wall brackets with the mounting holes and attach the brackets to the display using the screws removed in Step 2 Caution Longer screws will damage the display Remove the 8 screws fro...

Страница 54: ...moved Step2 Install the OPS module by sliding it into the OPS slot until you hear a click indicating the module is securely inserted Step3 Secure the OPS module in position by screwing it onto the display input panel using the screws that are removed earlier Note To disassemble the OPS module simply unscrew the two screws that fasten the OPS module on both sides and slide it out of the slot when l...

Страница 55: ...de The following signal matrix shows the mapping of input sources available for PiP function TD U852 Main Window DP1 DP2 HDMI1 HDMI2 HDMI3 HDMI4 VGA Sub Window DP1 o o o o o o o DP2 o o o o o o o HDMI1 o o o o o o o HDMI2 o o o o o o o HDMI3 o o o o o o o HDMI4 o o o o o o o VGA o o o o o o o o valid not available ...

Страница 56: ...Main Window DP1 HDMI1 HDMI2 HDMI3 HDMI4 VGA OPS HDMI Sub Window DP1 o o o o o o o HDMI1 o o o o o o HDMI2 o o o o o o o HDMI3 o o o o o o o HDMI4 o o o o o o o VGA o o o o o o o OPS o o o o o o o valid not available ...

Страница 57: ...endix V Recommended IR Extender Positions P1 and P2 are the most suggested positions to place the IR extender for best performance Note The performance of remote controller varies upon different surroundings ...

Страница 58: ...d PC via a hub as shown below Alternatively connect the PC and monitor without using a hub as shown below 1 1 connection PC Monitor RJ 45 LAN cable crossover Hub Monitor 1 Monitor 2 Monitor 3 RJ 45 RJ 45 RJ 45 LAN cable straight When connecting the PC to multiple monitors When connecting the PC to a single monitor ...

Страница 59: ...ically We recommend using a static IP address when controlling the monitor using a PC Example Settings Static IP address 192 168 2 1 When there are multiple monitors use 192 168 2 2 2 3 etc Subnet mask 255 255 255 0 Gateway 192 168 2 1 DNS 192 168 2 1 Example PC Settings Static IP address 192 168 2 10 Subnet mask 255 255 255 0 Gateway 192 168 2 1 Checking the Connection To check that the IP addres...

Страница 60: ...and TCP IP connection The commands are the same as for RS 232C Appendix VI Serial Command List Note 1 Leave 700 msec or more between sending the command and closing the communication stream and TCP IP connection Time is required to process the reply command from the monitor 2 When sending continuous commands leave 3 sec or more between each command 3 The monitor uses single thread processing Only ...

Страница 61: ...e ID admin and password system and log into the monitor The following part of the port number can be changed The default is 23 3 The following part of the IP address can be changed The default is 192 168 2 1 Note 1 The default ID is admin and the default password is system 2 The login ID and password can be changed If you change them be sure to set them carefully and make a note of them 3 If you c...

Отзывы: