background image

5

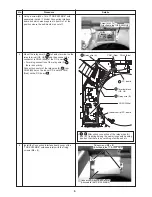
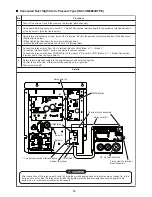
 6  Spacer (A)

1:1 Model
Connection Interface board box
(Attached to the TCB

́

PX30MUE)

 1  P.C. board

Bell mouth

Cut-off part

Bell mouth

Cut-off part

Fixing plate 
for terminal block

Upside

Direction of 
nameplate

10  Terminal 
 

nameplate

 8  Screw to fix 
 

terminal block

 2  Terminal block 
 

(U3/U4)

Fixing plate 
for terminal block

Upside

Direction of 
nameplate

10 Terminal 
 nameplate

 8  Screw to fix 
 terminal 

block

 2  Terminal block 
 (U3/U4)

No.

1

2

3

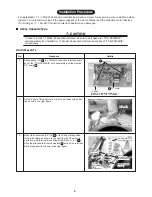
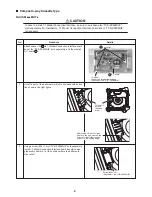
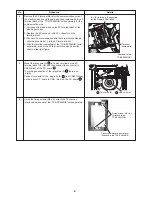
Cut off a part of the bell mouth, which is enclosed with dotted

line shown in the right figure.

Mount terminal block (U3, U4) 

2

 at the fixing plate position

for terminal block as shown in the right figure of the electric

parts box, with terminal block fixing screws (M4 × 14   ) 

8

.

Stick the attached terminal nameplate 

10

 at near the terminal

block along direction shown in the right figure.

Details

Installation Procedure

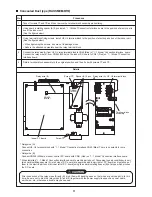
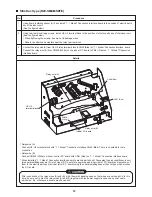
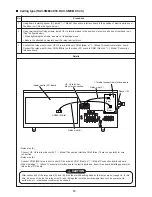
• For installation of “1 : 1 Model” Connection Interface board and removal of relay wire, be sure to wait for a while

(approx. 1 minute) after turning off the power supplies of the air conditioner and the collective control devices.

If not doing so, “1 : 1 Model” Connection Interface board may be damaged.

„

„

„

„

„

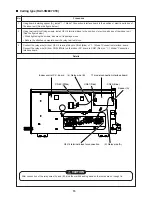
4-Way Cassette Type

 CAUTION

In case to install 1:1 Model Connection Interface, be sure to purchase also “TCB-PX30MUE”

sold separately. For installation, 1:1 Model Connection Interface board box of “TCB-PX30MUE”

is necessary.

RAV-SM 

∗∗

∗∗

∗∗

∗∗

∗∗

 4UT

∗∗∗∗∗

Procedure

Attach spacer (A) 

6

 to 1:1Model Connection Interface board

box of the “TCB-PX30MUE” sold separately, and then install

P.C. board 

1

.

Содержание TCB-PCNT30TLE2

Страница 1: ... use wires with correct current capacity otherwise leakage heating or fire will generate Do not apply an excessive force on the board body otherwise bending separation or disconnection gener ates resulted in heating or fire After installation work execute a test run to confirm there is no trouble And also ask the customers to keep this Manual by themselves Components When you will purchase the 4 w...

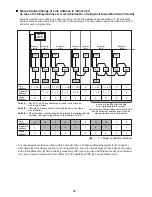
Страница 2: ...For the digital inverter air conditioner re setup of the address from the wired remote con troller is required after automatic addressing 1 U1 U3 U2 U4 Central control device U1 U3 U2 U4 Central control device 2 3 1 2 3 A B U3 U4 Remarks point 3 Remarks point 1 Remarks point 2 Central control device Max 10 units Refrigerant line 1 Outdoor unit Indoor unit 1 1 Model Connection Interface option Remo...

Страница 3: ...it Outdoor unit Outdoor unit Outdoor unit Indoor unit Remote controller Remote controller 1 2 3 1 2 3 A B U3 U4 Remote controller 1 2 3 1 2 3 A B 1 2 3 1 2 3 A B Remote controller Wiring of central control system 1 2 3 A B U3 U4 Header Header 1 1 Model Connection Interface Option Follower Follower Earth Group control Twin system 1 2 A B U3 U4 3 1 2 3 1 2 1 1 2 2 3 3 4 4 5 5 3 1 2 3 4 4 5 5 Black B...

Страница 4: ...3 1 2 3 A B U3 U4 Refrigerant line 2 Remote controller 1 2 3 1 2 3 A B Refrigerant line 3 Remote controller wiring 1 2 3 1 2 3 A B Refrigerant line 4 1 2 3 A B U3 U4 Remote controller Wiring between indoor and outdoor units Wiring of central control system Group control Max 8 units Wiring for No 1 and 2 only Header Header Follower Follower Twin system Line address SW01 bit 1 SW01 bit 2 Remarks Tur...

Страница 5: ...arts box with terminal block fixing screws M4 14 8 Stick the attached terminal nameplate 10 at near the terminal block along direction shown in the right figure Details Installation Procedure For installation of 1 1 Model Connection Interface board and removal of relay wire be sure to wait for a while approx 1 minute after turning off the power supplies of the air conditioner and the collective co...

Страница 6: ... TCB PX30MUE Connection Interface board cover Attached to the TCB PX30MUE Screw M4 Screw M4 14 14 Attached to the TCB PX30MUE Attached to the TCB PX30MUE Screw M4 14 Attached to the TCB PX30MUE Details After wiring connection of the relay wires A and B fix wirings along the near wirings with banding band so that there is no catching of wires and etc Install the Connection Interface board cover of ...

Страница 7: ...Red on 1 1 Model Connection Interface board Details Relay wire A Connect U3 U4 terminal block with 1 1 Model Connection Interface CN40 Blue There is no polarity for wire connection Relay wire B Connect CN50 White on indoor control P C board with CN51 Red on 1 1 Model Connection Interface board When installing 1 1 Model Connection Interface board to electric parts box insert three board installing ...

Страница 8: ...Shaded area Screw M4 14 Attached to the TCB PX30MUE After cutting off the slit of bell mouth on the unit clear up the surface of the slit that there is no burr on the cutting edge Cut off a part of the bell mouth which is enclosed with dotted line shown in the right figure Using a screw M4 14 of TCB PX30MUE sold separately install 1 1 Model Connection Interface board box which was prepared in item...

Страница 9: ... terminal block of the electric parts box 2 Replace the 2P connector with 4P connector on the terminal block 3 Connect the communication wire that are disconnected as shown above steps 1 to the 4P terminal block 4 Stick the terminal nameplate of the TCB PX30MUE sold separately at near the 4P terminal block along direction shown in the right figure Using the fixing screws M4 x 8 attach the Connecti...

Страница 10: ...ndoor P C board to CN51 Red on 1 1 Model Connection Interface board Details Relay wire A Connect U3 U4 terminal block with 1 1 Model Connection Interface CN40 Blue There is no polarity for wire connection Relay wire B Connect CN50 White on indoor control P C board with CN51 Red on 1 1 Model Connection Interface board When installing 1 1 Model Connection Interface board to electric parts box insert...

Страница 11: ...t with screws c and d Details Relay wire A Connect U3 U4 terminal block with 1 1 Model Connection Interface CN40 Blue There is no polarity for wire connection Relay wire B Connect CN050 White on indoor control P C board with CN51 Red on 1 1 Model Connection Interface board When installing 1 1 Model Connection Interface board to electric parts box of Concealed type air conditioner insert two board ...

Страница 12: ...lock with 1 1 Model Connection Interface CN40 Blue There is no polarity for wire connection Relay wire B Connect CN050 White on indoor control P C board with CN51 Red on 1 1 Model Connection Interface board When installing 1 1 Model Connection Interface board to electric parts box of Concealed type air conditioner insert two board installing spacers A into holes of P C board at upper side and lowe...

Страница 13: ...Model Connection Interface board Details Indoor control P C board Relay wire A Relay wire B CN050 White CN51 Red CN40 Blue U3 U4 terminal block for connection 1 1 model connection interface board Spacer A Relay wire A Connect U3 U4 terminal block with 1 1 Model Connection Interface CN40 Blue There is no polarity for wire connection Relay wire B Connect CN50 White on indoor control P C board with C...

Страница 14: ...terface board There is no polarity for wire connection Connect the relay wire B from CN50 White on the indoor P C board to CN51 Red on 1 1 Model Connection Interface board See the figure below Return terminal block assembly to the original position without pinching wires Confirm to hook the claw of terminal block assembly on the right side Then screw A and B Details CAUTION After connection of the...

Страница 15: ...to damage wires Adhere the attached nameplate near the relay terminal block Connect the relay wire A from U3 U4 terminal block to CN40 Blue of 1 1 Model Connection Interface board Connect the relay wire B from CN50 White on the indoor P C board to CN51 Red on 1 1 Model Connection Interface board Details CAUTION After connection of the relay wires A and B bind them with banding band so that wires a...

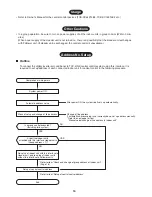
Страница 16: ...r central control in the following procedure Is a group control executed Including twin system Are all the indoor units attached with this interface Header units Group address 1 Re setup of indoor unit with this interface to Header unit and re setup of indoor units without this interface to Follower units YES YES NO NO Completion of wiring work End System power ON Setup of central control address ...

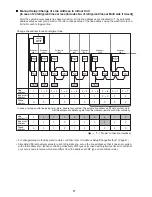
Страница 17: ...or unit Central control device Change line address for each refrigerant line 1 1 0 2 1 0 3 1 1 3 2 2 4 1 1 5 1 2 Line address 1 Indoor unit address Group address 2 6 1 1 2 6 3 2 2 Refrigerant line 6 Refrigerant line 7 Outdoor unit Indoor unit Remote controller Indoor unit 2 7 1 2 2 7 2 2 Outdoor unit Indoor unit Indoor unit 6 1 1 6 2 2 7 1 2 7 2 2 1 1 Model connection interface In case of group co...

Страница 18: ... so that the indoor unit numbers do not overlap Point 3 When the indoor unit attached with this interface is controlled with twin or system change also line address of the follower unit to 30 30 1 0 30 2 0 30 3 1 30 4 2 30 5 1 2 1 2 Line address 1 Indoor unit address Group address 30 6 1 30 7 2 2 1 2 2 2 2 1 1 Model connection interface Line address Indoor unit address Group address 1 30 1 0 1 30 ...

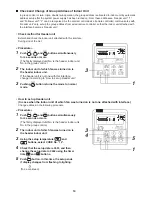
Страница 19: ...unit If the header unit is not one with this interface change it according to How to set up Header unit 3 Pushing TEST button returns the mode to normal mode How to set up Header unit In case when the indoor unit of which fan was turned on is not one attached with interface Change address in the following procedure Procedure 1 Push SET CL and TEST buttons simultaneously for 4 seconds or more The f...

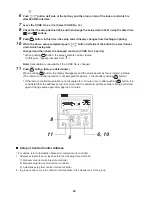
Страница 20: ...When pushing TEST button the display disappears and the status becomes the normal stop status The remote controller operation is not accepted for approx 1 minute after pushing TEST button If the remote controller operation is not accepted for 1 minute or more after pushing TEST button it is considered that the address setup is incorrect and the automatic address setup is being performed again Chan...

Страница 21: ...and buttons 3 Using timer setup time and buttons set up the central control address 4 Registration completes with SET button SETTING changes from flashing to lighting 5 Push TEST button 6 Initial setup starts For approx 1 minute 7 End Manual address setup with CODE No C1 of central remote controller 1 Push and ZONE buttons simultaneously for 4 seconds or more 2 Set C1 to CODE No with temperature s...

Страница 22: ...13 7 Using timer time and buttons set up the indoor unit address 8 Push SET button OK when display goes on Group address 9 Using the setup temperature and buttons select CODE No 14 10 Using timer time and buttons set up Individual 0000 Header unit 0001 and Follower unit 0002 11 Push SET button OK when display goes on 12 Using UNIT LOUVER button left side of the button select an indoor unit No to b...

Страница 23: ... Case 3 Wired remote controller side Line 1 No alarm Line 2 L20 Central remote controller side Line 1 No alarm Line 2 L20 or Line 1 P30 Line 2 No alarm Central control device Line 1 Outdoor Indoor Remote controller Line address 1 Indoor address 1 Group address 0 Central control address 1 Line 2 Outdoor Indoor Remote controller Line address 1 Indoor address 1 Group address 0 Central control address...

Страница 24: ...EH99845701 5 TOSHIBA CARRIER CORPORATION 336 TADEHARA FUJI SH SHIZUOKA KEN 416 8521 JAPAN ...

Отзывы: