background image

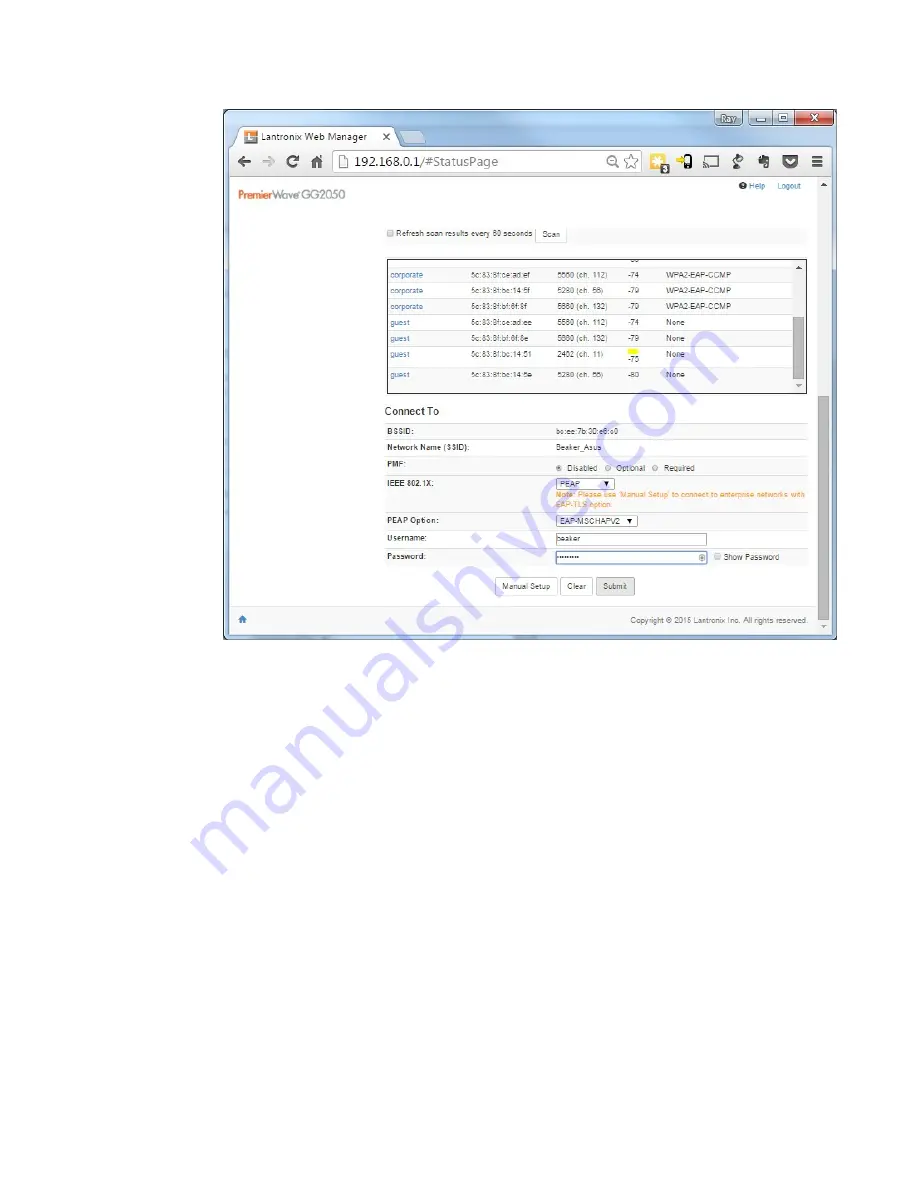
Setting WiFi IP parameters

By default IP parameters are obtained by DHCP. If this is the intended operating mode then no

further setup is required. However, if all settings are not obtained by DHCP, then IP parameters

may be set via the Quick Setup page or Wireless Network Interface Configuration page.
• To use the Quick Setup page, select or enter the required parameters and click Submit.

• To access the Wireless Network Interface Configuration page, select the Network tab and

then the Wireless Network - Interface - Configuration menu item.

Note: Host name configuration is only available on the Wireless Network Interface

Configuration page. If the default hostname is used, then the quick setup page probably

provides all the required settings.

Changing default passwords for WiFi

Default passwords must be changed to ensure that the network remains secure.
To change the Web Interface password, select the Administration tab and then the User

Management menu item.
To change the Access Point password and other settings, select the Network tab and then the

Access Point menu item

40 

Hardware Guide for Model 1NR

Содержание SureMark 4610 1NR

Страница 1: ...Toshiba Global Commerce Solutions SureMark 4610 Printers Hardware Guide Model 1NR TC62 0011 01 ...

Страница 2: ...e information under Notices June 2017 This edition applies to Toshiba SureMark Printer Model 1NR If you send information to Toshiba Global Commerce Solutions Toshiba you grant Toshiba a nonexclusive right to use or distribute whatever information you supply in any way it believes appropriate without incurring any obligation to you Copyright Toshiba Global Commerce Solutions Inc 2017 ...

Страница 3: ... Chapter 4 Using and maintaining the 4610 printer 45 Replenishing consumable supplies 45 Loading and replacing the paper roll 45 Supported thermal paper 45 Installing large paper rolls 46 Cleaning recommendations 46 Cleaning the thermal printhead 46 Retrieving printer statistics 47 Notices 49 Telecommunication regulatory statement 50 Electronic emission notices 50 Federal Communications Commission...

Страница 4: ...For the European Union 57 For California 58 Flat panel displays 58 Monitors and workstations 58 Trademarks 59 4 Hardware Guide for Model 1NR ...

Страница 5: ... 27 11 Installing the interface card 30 12 Cash drawer cable routing 31 13 RS 485 cable routing 31 14 Installed WiFi interface with cable routing 32 15 Position selector 33 16 Wall mount slots 34 17 Mount release button 35 18 Example of a test receipt 37 19 Wireless network icon 37 20 Select the printer network 38 21 Quick Setup Page 39 22 Overview page 42 23 Set printer IP parameters 43 24 Receip...

Страница 6: ...6 Hardware Guide for Model 1NR ...

Страница 7: ...source 17 3 OS printer interface options 20 4 Paper supply LED indicator 23 5 Printer ready LED indicator 23 6 Ethernet LED indicator 23 7 WiFi LED indicator 23 8 Summary of dimensions 27 9 Example of a test status receipt 37 Copyright Toshiba Global Commerce Solutions Inc 2017 7 ...

Страница 8: ...8 Hardware Guide for Model 1NR ...

Страница 9: ...turvaohjeet kohdasta Safety Information Avant d installer ce produit lisez les consignes de sécurité Vor der Installation dieses Produkts die Sicherheitshinweise lesen Prima di installare questo prodotto leggere le Informazioni sulla Sicurezza Les sikkerhetsinformasjonen Safety Information før du installerer dette produktet Antes de instalar este produto leia as Informações sobre Segurança Antes d...

Страница 10: ...10 Hardware Guide for Model 1NR ...

Страница 11: ...d password click Learn More 3 Enter your user ID and password 4 Click Submit Additional information The following publications provide additional information about the SureMark 4610 Models 1NR printer Click SureMark 4610 Printers Hardware Service Guide Models 1NR TC62 0001 SureMark 4610 Printers Programming Guide for Models 1xR and 2xR TC62 0005 Notice statements Notices in this guide are defined ...

Страница 12: ...situations that can be potentially lethal or extremely hazardous to you A danger statement is placed just before the description of a potentially lethal or extremely hazardous procedure step or situation 12 Hardware Guide for Model 1NR ...

Страница 13: ...e Model 1NR June 2017 This edition of the SureMark 4610 Printers Hardware Guide includes the addition of the following information Setting up and configuring a WiFi adapter WiFi configuration and management Setting up managing and configuring a network printer Copyright Toshiba Global Commerce Solutions Inc 2017 13 ...

Страница 14: ...14 Hardware Guide for Model 1NR ...

Страница 15: ...tures of the Model 1NR include Print speeds of 80 lines per second LPS One hand paper loading with the touch of a button 4 inch thermal paper roll System management sensors that alert you to Close the cover on the printer Replace the receipt paper Status of the printhead Printer usage statistics Beeper Quiet paper cutter USB RS 232 RS 485 Ethernet and WiFi interfaces 3 MB flash memory for storing ...

Страница 16: ...System Unit 24 V or 38 V interface card specific Brick 24 V Color Iron gray or pearl white two tone color not provided Controls and indicators Cover Open Paper Feed Beeper Status LED bi color Paper Status LED Power Switch Mounting Integrated Integration tray Distributed free standing Wall mount Operating systems POSReady 2009 POSReady 7 Windows 7 Windows 8 1 Windows 10 4690 OS Linux iOS Android Dr...

Страница 17: ...ing offline or online configuration Baud rate Separate power supply Ethernet 10 100 Ethernet port for connection to an industry standard Ethernet LAN Separate power supply WiFi 801 11 a b g n ac Wireless LAN Adapter Separate power supply Figure 2 illustrates the different communications connections on the USB interface card B A C D Figure 2 USB interface card Device Description A Cash drawer B Pow...

Страница 18: ...ower supply Figure 4 illustrates the communications connections on the RS 485 interface card H I Figure 4 RS 485 interface card Device Description H Cash drawer I RS 485 Figure 5 illustrates the communications connections on the Ethernet interface card 18 Hardware Guide for Model 1NR ...

Страница 19: ...supply Figure 6 illustrates the communications connections on the WiFi interface card Frequency Band of 802 11 b g n 2 4 Ghz power 18 30 dBm Frequency Band of 802 11 a n ac 5 Ghz power 19 12dBm N P Q O Figure 6 WiFi interface card Device Description N WiFi O WiFi status indicator Chapter 1 Introducing the 4610 Model 1NR 19 ...

Страница 20: ...el firmware or a MLC that does not support it the printer will indicate an error The ready light will blink amber with the internal LED 2 which indicates that the printer firmware is back level If the firmware is known to be at the minimum level identified then this condition indicates a failed adapter or other HW problem A message is printed in the receipt station that the MLC card does not suppo...

Страница 21: ... Pro Enterprise 64 bits only All All All USB RS232 Ethernet WiFi RS232 Ethernet WiFi Windows 10 Pro Enterprise All All All USB RS232 Ethernet WiFi RS232 Ethernet WiFi SUSE Linux Enterprise 11 SP1 SLE 11 All RS232 Ethernet WiFi PC DOS 2000 RS232 Note 1 Toshiba 4610 Ethernet Printer iOS SDK is supported with iOS 8 x or later for use with the Ethernet and WiFi interface adapters 2 Toshiba 4610 Ethern...

Страница 22: ...tems Self Checkout solution AnyPlace Kiosk TCx Wave TCx700 TCx300 TCxFlight iOS Android and Windows mobile devices Understanding the controls and indicators This section describes the controls and indicators B C D A Figure 7 Indicators and controls Device Description A Paper feed button press to advance the customer receipt paper B Paper supply LED indicator See Table 4 C Printer ready LED indicat...

Страница 23: ...inthead MLC or IFC problem Green On Station is ready Table 6 describes the Ethernet LED indicators that reflect printer status Table 6 Ethernet LED indicator Color State Function Green Off No link Ethernet Good Link Activity On Good link Blinking Network activity Amber Off 10 MB mode Ethernet 10 100Mb On 100 MB mode Table 7 describes the indicators that reflect the status of the WiFi connection Ta...

Страница 24: ... you call Toshiba for warranty information or service be sure to have the serial number and model number of the printer available The serial number and model number are located beside the flipper door see A in Figure 9 24 Hardware Guide for Model 1NR ...

Страница 25: ...A Figure 9 Location of serial number Chapter 1 Introducing the 4610 Model 1NR 25 ...

Страница 26: ...26 Hardware Guide for Model 1NR ...

Страница 27: ... 10 describes the physical dimensions 159 mm 6 26 in 177 mm 6 97 in 145 mm 5 71 in Figure 10 SureMark 4610 Model 1NR dimensions Table 8 Summary of dimensions Width 145 mm 5 71 in footprint Height Cover closed 159 mm 6 26 in Cover open 260 mm 10 24 in Depth 177 mm 6 97 in Weight 1 4 kg 3 09 lb Copyright Toshiba Global Commerce Solutions Inc 2017 27 ...

Страница 28: ...60 C 40 to 140 F with 5 to 100 relative humidity including condensation but excluding rain Storage 0 to 60 C 32 to 140 F with 5 to 80 relative humidity Operating 5 to 40 C 42 8 to 104 F with 8 to 80 relative humidity 28 Hardware Guide for Model 1NR ...

Страница 29: ...n different physical locations In an integrated configuration you install the printer on the input output tray option with the fillers to contain the printer and display on top of the wide footprint system units Other tray options include mounting the printer on the full size cash drawer or directly on the counter Verify your order Each order contains the following 4610 unit Interface card RS 232 ...

Страница 30: ... RS 232 RS 485 USB or Ethernet connector Note 1 You might prefer to plug all cables into the interface card before installation however do not plug in any power until after installation 2 If you are using an RS 485 interface card see Routing the cash drawer and RS 485 cables on page 30 5 If you have a power cord connect it to the printer Routing the cash drawer and RS 485 cables To route the cash ...

Страница 31: ... 1 Place the RS485 cable completely down on the base B 2 Route the cable under the notch C 3 Route the RS485 cablle through the back cable slot B and C this is the only possible route B C D Figure 13 RS 485 cable routing Chapter 3 Installing and configuring the 4610 printer 31 ...

Страница 32: ...tions Wall or 45 degree mounting Attention Printer must be powered off The following ESD handling procedure is recommended You should touch the metal on the printer frame with the back of your hand before making contact with the printer Also see Electrostatic discharge ESD on page 55 Follow these steps to wall or 45 degree mount the printer unit 1 Turn off the power to the 4610 2 Roll the bottom p...

Страница 33: ...ts on the base of the printer unit A in Figure 16 with the two D shaped posts on the mount Also ensure that the hook near the corner of the mount aligns with the slot at the corner of the printer unit B Chapter 3 Installing and configuring the 4610 printer 33 ...

Страница 34: ... snaps into place To remove the printer unit from the wall mount 1 Press the door release button D in Figure 7 and pull or push the door fully open 2 While pushing the mount release button B in Figure 17 lift or lower the printer unit off of the mount posts and hook 34 Hardware Guide for Model 1NR ...

Страница 35: ...er All new product will be at this level or later If upgrading an existing printer see your existing printer documentation for firmware update instructions 2 If DHCP is used for IP address assignment the DHCP server must support DHCP Option 61 Client Identifier If your DHCP server does not support Option 61 assign a static address to the WiFi adapter The 4610 printer with WiFi adapter requires 2 I...

Страница 36: ...tup the WiFi IP Parameters and other options Following completion of these steps see Configuring a network printer WiFi and Ethernet on page 41 for the Printer IP setup if not using DHCP for all IP parameter assignment Before you begin The information needed for many of the setup steps is provided by the Test Status Receipt This receipt should be printed prior to beginning setup Printing the Test ...

Страница 37: ...Point AP Perform the following steps using a personal computer or similar device with a WiFi interface and an Internet browser Note The details of connecting to a wireless network will vary from system to system The following examples and instructions are for Windows 7 without additional wireless tools 1 Click on the Wireless Network Icon which is typically located at the right of the taskbar Figu...

Страница 38: ...Logging into the WiFi configuration and management interface The printer provides web pages for setup and other management After connecting to the printer AP network log into the web pages for setup 1 Open the browser and enter the AP IP address shown on the test receipt 2 When prompted enter the username admin and the password Admin The Quick Setup page should open as shown below Note If the WiFi...

Страница 39: ... Select the target network from the list of available networks 2 Enter the required information and click Submit The data entry screens will vary based on the target network and its security settings The example screen below shows the data entry screen for a network using 802 1x security Chapter 3 Installing and configuring the 4610 printer 39 ...

Страница 40: ...ect the Network tab and then the Wireless Network Interface Configuration menu item Note Host name configuration is only available on the Wireless Network Interface Configuration page If the default hostname is used then the quick setup page probably provides all the required settings Changing default passwords for WiFi Default passwords must be changed to ensure that the network remains secure To...

Страница 41: ...Configuration and Management interface 2 Setup the Printer IP Parameters and other options Following completion of these steps the printer should be fully accessible via the network Before you begin If setting up a printer with a WiFi Adapter complete the WiFi setup as described in Configuring a WiFi adapter on page 35 and restart the printer before beginning The information needed for the setup s...

Страница 42: ...intended operating mode then no further setup is required however if all settings are not obtained by DHCP then IP parameters may be set via the Network page 1 Select the Network menu item to display the Network page 2 Select the required IP Mode and enter the applicable IP parameters 42 Hardware Guide for Model 1NR ...

Страница 43: ... to activate the settings Note If the printer is powered off on before resetting it via the menus all settings will be lost Change default passwords for printer Default passwords must be changed to ensure the network remains secure To change the Printer Web Interface password select the Admin Access menu item Chapter 3 Installing and configuring the 4610 printer 43 ...

Страница 44: ...44 Hardware Guide for Model 1NR ...

Страница 45: ...e paper should come from the bottom of the roll as shown in the diagram Note The thermal printhead will not print on paper with glue on it If the new paper roll was sealed by glue tear off the 6 to 8 inches of paper with glue on it before loading it 4 Close the paper cover 5 Press the customer receipt feed button to advance the paper to verify that the paper is feeding correctly Feed 30 cm about 1...

Страница 46: ...ommodate extra large rolls up to 15 in of paper below the printer Mounting hardware is necessary to avoid placing undue strain on the paper feed motor See your Toshiba representative for additional information Cleaning recommendations You should inspect your 4610 unit periodically and clean the cover as required Use a soft clean cloth with warm soapy water to clean the plastic parts Do not use abr...

Страница 47: ...addition to the Usage Statistics the printer stores statistics on errors or unexpected events for use in predicating problems See the SureMark Printers Programming Guide for Models 1xR and 2xR GA27 5005 for commands to retrieve this data The available statistics for the 4610 1NR printer include Number of Failed Flash Writes Unexpected Cover Open Count Thermal Print Head element failure Printer ser...

Страница 48: ... was opened Number of failed paper cuts Number of Flash Erase commands performed NVRAM write count Cash drawer opened successfully count Cash drawer failed to opened count Number of bar codes printed Number of times the max temperature of either the motors or the print heads have been reached 48 Hardware Guide for Model 1NR ...

Страница 49: ...TABILITY OR FITNESS FOR A PARTICULAR PURPOSE Some states do not allow disclaimer of express or implied warranties in certain transactions therefore this statement may not apply to you This information could include technical inaccuracies or typographical errors Changes are periodically made to the information herein these changes will be incorporated in new editions of the publication Toshiba Glob...

Страница 50: ...o correct the interference by one or more of the following measures 1 Reorient or relocate the receiving antenna 2 Increase the separation between the equipment and receiver 3 Connect the equipment into an outlet on a circuit different from that to which the receiver is connected 4 Consult the dealer or experienced radio TV technician for help Properly shielded and grounded cables and connectors m...

Страница 51: ...ion Technology Equipment according to CISPR 32 European Standard EN 55032 The limits for Class A equipment were derived for commercial and industrial environments to provide reasonable protection against interference with licensed communication equipment Attention This is a Class A product In a domestic environment this product may cause radio interference in which case the user may be required to...

Страница 52: ...ller Toshiba Global Commerce Solutions 3901 South Miami Blvd Durham NC 27703 United States of America Der verantwortliche Ansprechpartner des Herstellers in der EU ist Toshiba Global Commerce Solutions Inc Brand Manager Europe Middle East Africa Toshiba Court Weybridge Business Park Addlestone Road Weybridge Surrey KT15 2UL UK Generelle Informationen Das Gerät erfüllt die Schutzanforderungen nach ...

Страница 53: ...mpliance statement Japan Voluntary Control Council for Interference Class A statement Attention This is a Class A product based on the standard of the Voluntary Control Council for Interference VCCI If this equipment is used in a domestic environment radio interference may occur in which case the user may be required to take corrective actions Notices 53 ...

Страница 54: ...rmed Harmonics Guidelines with Modifications products greater than 20 A per phase Korean communications statement This is electromagnetic wave compatibility equipment for business Type A Sellers and users need to pay attention to it This is for any areas other than home Taiwan Class A compliance statement Taiwan contact information 54 Hardware Guide for Model 1NR ...

Страница 55: ...ttach tags or reports that must accompany the card to the outside of the container Product recycling and disposal This unit must be recycled or discarded according to applicable local and national regulations Toshiba Global Commerce Solutions encourages owners of information technology IT equipment to responsibly recycle their equipment when it is no longer needed Toshiba Global Commerce Solutions...

Страница 56: ...ue le produit sur lequel elle est apposée ne doit pas être jeté mais être récupéré en fin de vie In accordance with the European WEEE Directive electrical and electronic equipment EEE is to be collected separately and to be reused recycled or recovered at end of life Users of EEE with the WEEE marking per Annex IV of the WEEE Directive as shown above must not dispose of end of life EEE as unsorted...

Страница 57: ...ates go to the Battery disposal website or contact your local waste disposal facility For Taiwan Please recycle batteries For the European Union Notice This mark applies only to countries within the European Union EU Batteries or packaging for batteries are labeled in accordance with European Directive 2013 56 EU concerning batteries and accumulators and waste batteries and accumulators The Direct...

Страница 58: ...teries and accumulators on the environment and human health due to the potential presence of hazardous substances For proper collection and treatment contact your local Toshiba Global Commerce Solutions representative This notice is provided in accordance with Royal Decree 106 2008 of Spain The retail price of batteries accumulators and power cells includes the cost of the environmental management...

Страница 59: ...emarks of International Business Machines Corporation in the United States or other countries or both DB2 DB2 Universal Database IBM and the IBM logo PS 2 Wake on LAN WebSphere Linux is a trademark of Linus Torvalds in the United States other countries or both Magellan is a registered trademark of Datalogic Scanning Inc SYMBOL a registered trademark of Symbol Technologies Inc Microsoft Windows Win...

Страница 60: ...60 Hardware Guide for Model 1NR ...

Страница 61: ...29 interfaces communication 16 introduction 15 J Japan Electronics and Information Technology Industries Association statement 54 Japanese Electrical Appliance and Material Safety Law statement 53 Japanese power line harmonics compliance statement 53 Japanese VCCI Council Class A statement 53 K Korean communications statement 54 L loading and replacing the paper roll 45 locating the power button 2...

Страница 62: ...ifications 45 Toshiba Global Commerce Solutions support site website 11 trademarks 59 U understanding the controls and indicators 22 understanding your configuration 29 unpacking the printer 29 USB interface card 17 W wall mounting 32 weight all models 27 WiFi 19 WiFi interface card interface card 19 62 Hardware Guide for Model 1NR ...

Страница 63: ......

Страница 64: ...TC62 0011 01 ...

Отзывы: