ENG-12
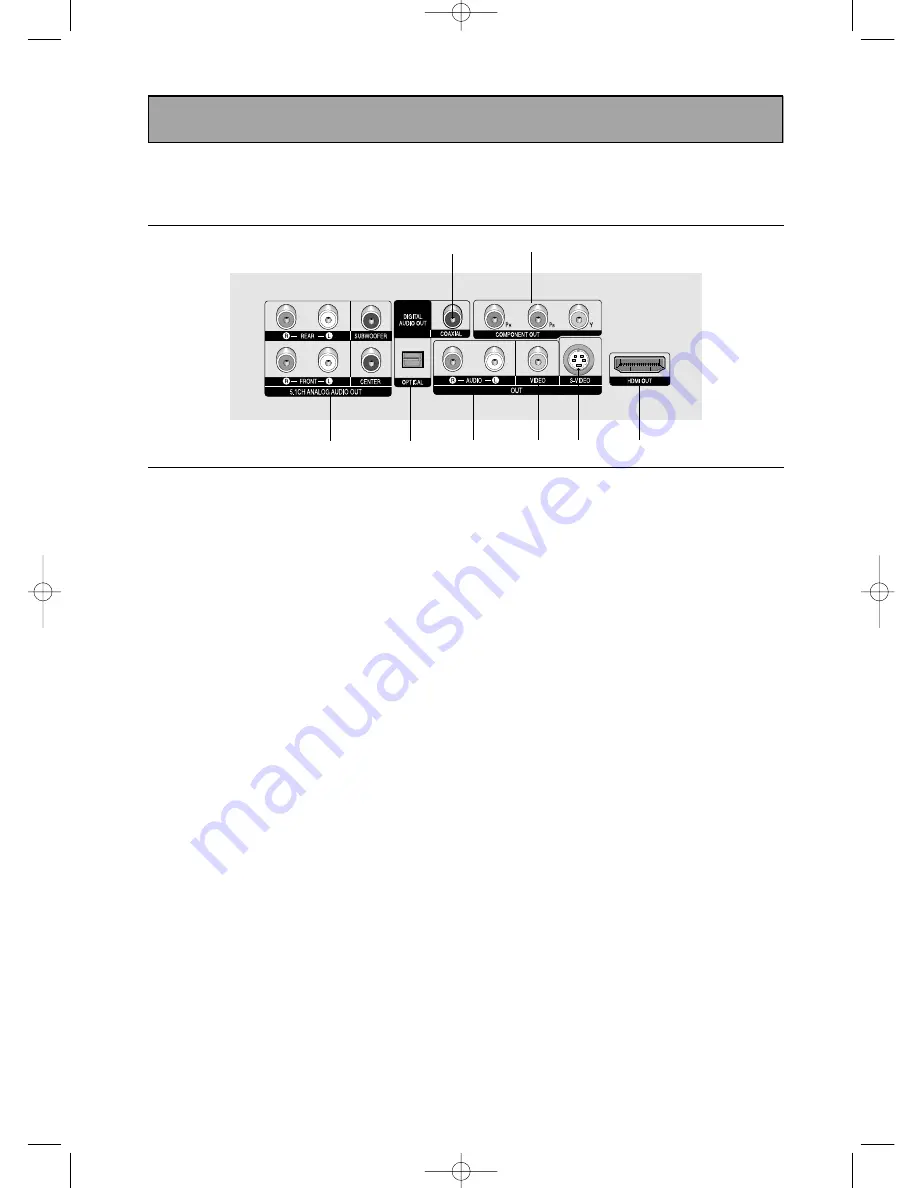
Rear Panel
1.
5.1CH ANALOG AUDIO OUT JACKS
- Connect to an amplifier with 5.1ch analog input jacks.
2.
DIGITAL AUDIO OUT JACKS
- Use either an optical or coaxial digital cable to connect
to a compatible Dolby Digital receiver.
- Use either an optical or coaxial digital cable to connect
to an A/V Amplifier that contains a Dolby Digital,
MPEG2 or DTS decoder.
3.
AUDIO OUT JACKS
Connect to the Audio input jacks of your television or
audio/video receiver.
4.
VIDEO OUT JACK
- Use a video cable to connect to the Video input jack on
your television.
- The Video Output in Setup Menu must be set to
COMPONENT(I-SCAN) or COMPOSITE/S-VIDEO.
5.
S-VIDEO OUT JACK
- Use the S-Video cable to connect this jack to the
S-Video jack on your television for higher picture
quality.
- The Video Output in Setup Menu must be set to
COMPOSITE/S-VIDEO.
6.
HDMI OUT JACK
- Use the HDMI cable to connect this jack to the HDMI
jack on your television for the best quality picture.
- If an HDMI cable is connected to an HDMI-compatible
TV, HDMI will be output automatically a maximum of 10
seconds later.
- If you want to use a Video, S-Video or Component
Output, unplug HDMI cable.
7.
COMPONENT VIDEO OUT JACKS
- Use these jacks if you have a TV with Component
Video in jacks. These jacks provide P
R
, P
B
and Y video.
- If HDMI/COMPONENT(P-SCAN) Video Output is
selected in Setup Menu, progressive scan mode will
work.
- If COMPONENT(I-SCAN) Video Output is selected in
Setup Menu, interlaced scan mode will work.
Note
-
Consult your TV User’s Manual to find out if your TV supports Progressive Scan (P-SCAN).
If Progressive Scan is supported, follow the TV User’s Manual regarding Progressive Scan settings in the
TV’s menu system.
-
If HDMI/COMPONENT(P-SCAN) Video Output is selected in Setup Menu, Video and S-Video Outputs do
not work.
-
There may be no image output if the DVD player is connected to a TV or display that is not compatible with
the above format.
-
Refer to the TV's instruction manual for detailed information regarding the HDMI terminal.
-
See pages 64 ~ 66 to get more information on how to use the setup menu.
2
1
2
3
4
5
6
7
Introduction
00873A-SD-6980SY-1 8/22/05 4:41 PM Page 12


