– 32 –
A
ØD
A (mm)
Nominal
diameter
1/4
3/8
1/2
5/8
Outer
diameter
(mm)
6.35
9.52
12.70
15.88
Thickness
(mm)
0.8
0.8
0.8
1.0
Flare tool for
R410A clutch type
0 to 0.5
0 to 0.5
0 to 0.5
0 to 0.5
Conventional flare tool
Clutch type
Wing nut type
1.0 to 1.5
1.5 to 2.0
1.0 to 1.5
1.5 to 2.0
1.0 to 1.5
2.0 to 2.5
1.0 to 1.5
2.0 to 2.5
A (mm)
Nominal
diameter
1/4
3/8
1/2
5/8
Outer
diameter
(mm)
6.35
9.52
12.70
15.88
Thickness
(mm)
0.8
0.8
0.8
1.0
Flare tool for
R22 clutch type
0 to 0.5
0 to 0.5
0 to 0.5
0 to 0.5
Conventional flare tool
Clutch type
Wing nut type
0.5 to 1.0
1.0 to 1.5
0.5 to 1.0
1.0 to 1.5
0.5 to 1.0
1.5 to 2.0
0.5 to 1.0
1.5 to 2.0
Nominal
diameter
1/4
3/8
1/2
5/8
Dimension (mm)
A
B
C
D
9.1
9.2
6.5
13
13.2
13.5
9.7
20
16.6
16.0
12.9
23
19.7
19.0
16.0
25
Outer diameter
(mm)
6.35
9.52
12.70
15,88
Thickness
(mm)
0.8
0.8
0.8
1.0
Flare nut
width (mm)
17
22
26
29
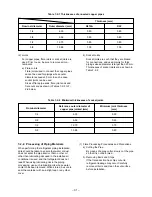
c) Insertion of Flare Nut
d) Flare Processing
Make certain that a clamp bar and copper
pipe have been cleaned.
By means of the clamp bar, perform the flare
processing correctly.
Use either a flare tool for R410A or conven-
tional flare tool.
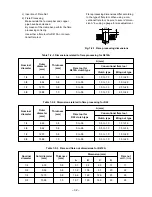
Flare processing dimensions differ according
to the type of flare tool. When using a con-
ventional flare tool, be sure to secure “dimen-
sion A” by using a gauge for size adjustment.
Fig. 7-2-1 Flare processing dimensions
Table 7-2-3 Dimensions related to flare processing for R410A
Table 7-2-4 Dimensions related to flare processing for R22
Table 7-2-5 Flare and flare nut dimensions for R410A


