background image

- 9 -

EN-17

EN-18

7

ELECTRICAL WORK

WARNING

1.

Using the specified wires, ensure that the wires 
are  connected, and fix wires securely so that 
the external tension to the wires does not affect 
the connecting part of the terminals. 

Incomplete connection or fixation may cause a fire, 
etc. 

2.

Be sure to connect the earth wire. (grounding 
work) 
Incomplete grounding may lead to electric 
shock. 

Do not connect ground wires to gas pipes, water 
pipes, lightning rods or ground wires for telephone 
wires. 

3.

The appliance shall be installed in accordance 
with national wiring regulations. 

Capacity shortages of the power circuit or an 
incomplete installation may cause an electric shock 
or fire. 

CAUTION

• Wrong wiring may cause a burn-out of some electrical 

parts. 

• Be sure to use the cord clamps attached to the 

product. 

• Do not damage or scratch the conductive core or inner 

insulator of the power and inter-connecting wires when 
peeling them. 

• Use the power and Inter-connecting wires with 

specified thicknesses, specified types and protective 
devices required. 

• Remove the panel, and you can see electric parts on 

the front side.

• A metal pipe can be installed through the hole for 

wiring. If the hole size does not fit the wiring pipe to be 
used, drill the hole again to an appropriate size. 

• Be sure to clamp the power wires and indoor/outdoor 

connecting wires with a banding band along the 
connecting pipe so that the wires do not touch the 
compressor or discharge pipe. 
(The compressor and the discharge pipe become hot.) 

Furthermore, be sure to secure these wires with the pipe 
valve fixing plate and cord clamps stored in the electric 
parts box. 

„

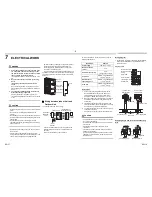
Wiring between Indoor Unit and 
Outdoor Unit

The dashed lines show on-site wiring.

• Connect the indoor/outdoor connecting wires to the 

identical terminal numbers on the terminal block of 
each unit.
Incorrect connection may cause a failure.

Electric 
parts box

Pipe valve 
fixing plate

Cord clamp

Pipe hole

Panel

L

N

1

2
3

1

2
3

(Main circuit)

(Indoor/outdoor 

connecting wires)

Outdoor unit

Remote 

controller

Indoor unit

Earth

Circuit 

breaker

Input power

220-240 V~, 

50 Hz

For the air conditioner, connect a power wire with the 
following specifications.

How to wire

1.

Connect the connecting wire to the terminal as 
identified with their respective numbers on the 
terminal block of the indoor and outdoor units.
H07 RN-F or 60245 IEC 66 (1.5 mm

2

 or more)

2.

When connecting the connecting wire to the outdoor 
unit terminal, prevent water from coming into the 
outdoor unit.

3.

Insulate the unsheathed cords (conductors) with 
electrical insulation tape. Process them so that they 
do not touch any electrical or metal parts.

4.

For interconnecting wires, do not use a wire joined 
to another on the way.
Use wires long enough to cover the entire length.

CAUTION

• An installation fuse must be used for the power supply 

line of this air conditioner. 

• Incorrect/incomplete wiring may lead to an electrical 

fire or smoke. 

• Prepare an exclusive power supply for the air 

conditioner. 

• This product can be connected to the mains power. 

Fixed wire connections: 
A switch that disconnects all poles and has a contact 
separation of at least 3 mm must be incorporated in 
the fixed wiring.

Wiring diagram

* For details on the remote controller wiring/installation, 

refer to the Installation Manual enclosed with the 
remote controller.

Single system

Stripping length power cord and connecting 
wire

Model RAV-

SM160

Power supply

220-240 V~, 50 Hz

Maximum running 
current

32 A

Installation fuse rating

40 A

 (all types can be used)

Power wire

H07 RN-F or 60245 IEC 66

(6.0 mm

2

 or more)

Indoor/outdoor 
connecting wires

H07 RN-F or 60245 IEC 66

(1.5 mm

2

 or more)

Earth wire

H07 RN-F or 60245 IEC 66

(1.5 mm

2

 or more)

A B

1

1

L N

2

2

3

3

Remote controller 
Remote controller 
wiring
Indoor side

Indoor/Outdoor 
connecting wires

Outdoor side

Power supply

L

N

1

2 3

1 2 3

To Indoor unit 
terminal block

Power supply 
terminal block

Earth screw

Earth screw

Connecting wire Pipe valve 

fixing plate

Power supply wire

(mm)

10

L N

60

10

50

10

30

10

40

L N

1 2 3

Earth line

Earth line

Connecting wire

Power supply wire

Содержание RAV-SM1603AT-A

Страница 1: ...English AIR CONDITIONER SPLIT TYPE Installation manual Outdoor Unit Model name RAV SM1603AT A For commercial use ...

Страница 2: ...SSORY PARTS AND REFRIGERANT Accessory Parts Refrigerant Piping Piping kit that is used for the conventional refrigerant cannot be used Use copper pipe with 0 8 mm or more thickness for Ø9 5 mm Use copper pipe with 1 0 mm or more thickness for Ø15 9 mm Flare nut and flare works are also different from those of the conventional refrigerant Take out the flare nut attached to the air conditioner and u...

Страница 3: ...llation work confirm that refrigerant gas does not leak If refrigerant gas leaks into the room and flows near a fire source such as a cooking range noxious gas may be generated Electrical work must be performed by a qualified electrician in accordance with the Installation Manual Make sure the air conditioner uses an exclusive power supply An insufficient power supply capacity or inappropriate ins...

Страница 4: ...pared newly Vacuum pump Vacuum drying Unusable Vacuum pump with backflow prevention function Vacuum drying R22 Conventional tools Flare tool Flare machining of pipes Usable if dimensions are adjusted Bender Bending pipes R22 Conventional tools Refrigerant recovery equipment Refrigerant recovery For R410A only Torque wrench Tightening flare nuts Exclusive for Ø12 7 mm and Ø15 9 mm Refrigerant Pipin...

Страница 5: ...le enough to support the weight of the outdoor unit Insufficient durability may cause the outdoor unit to fall which may result in injury CAUTION Do not install the outdoor unit in a location that is subject to combustible gas leaks Accumulation of combustible gas around the outdoor unit may cause a fire Install the outdoor unit in a location that meets the following conditions after the customer ...

Страница 6: ...00 or more 300 or more 300 or more The height of the obstacle should be lower than the height of the outdoor unit 200 or more 150 or more 500 or more Obstacle in front Above unit is free 1 Single unit installation 2 Serial installation of two or more units Obstacle also at the above unit Obstacles in both front and rear of unit Open above and to the right and left of the unit The height of an obst...

Страница 7: ...rface of the fixing leg that is in contact with and underneath the bottom plate of the outdoor unit NO GOOD If only the end of the fixing leg is supported it may deform Do not support the outdoor unit only with the fixing leg Foundation 15 or less Drain nipple Waterproof rubber cap 5 pcs Waterproof rubber cap Drain nipple Knockout hole 5 REFRIGERANT PIPING Knockout of Pipe Cover Knockout procedure...

Страница 8: ...e nut Externally threaded side Internally threaded side Fix with wrench Tighten with torque wrench 2 As shown in the figure be sure to use two wrenches to loosen or tighten the flare nut of the valve on the gas side If you use a single crescent the flare nut cannot be tightened to the required tightening torque On the other hand use a single crescent to loosen or tighten the flare nut of the valve...

Страница 9: ...L Tighten the valve and caps of the charge port securely 1 Use the vacuum pump vacuum pump adapter and gauge manifold correctly referring to the manuals supplied with each tool before using them Check that the vacuum pump oil is filled up to the specified line of the oil gauge 2 When air is not charged check again whether the connecting port of the discharge hose which has a projection to push the...

Страница 10: ...N 1 2 3 1 2 3 Main circuit Indoor outdoor connecting wires Outdoor unit Remote controller Indoor unit Earth Circuit breaker Input power 220 240 V 50 Hz For the air conditioner connect a power wire with the following specifications How to wire 1 Connect the connecting wire to the terminal as identified with their respective numbers on the terminal block of the indoor and outdoor units H07 RN F or 6...

Страница 11: ...essor during startup To protect the compressor power is supplied from the 220 240 VAC input to the unit to preheat the compressor Check the following before starting a test run That all pipes are connected securely without leaks That the valve is open If the compressor is operated with the valve closed the outdoor unit will become overpressurized which may damage the compressor or other components...

Страница 12: ... indoor unit operation with the remote controller 3 Press refrigerant recovery switch SW802 on the P C board of the outdoor unit to drive the air conditioner into the forced cooling mode for up to 10 minutes Open the valve to start refrigerant recovery 4 Upon completion of refrigerant recovery close the valve and press SW802 for at least 1 second to stop operation 5 Turn off the power DANGER Be ca...

Страница 13: ...that a large quantity of dirty oil or moisture remains inside the pipes 5 When a commercially available dryer is attached to the existing pipes There is the possibility that copper green rust has been generated 6 When the existing air conditioner is removed after refrigerant has been recovered Check if the oil is judged to be clearly different from normal oil The refrigerator oil is copper rust gr...

Страница 14: ...hanges to a muddy or black color If there is discharge of remains it is judged that a large quantity of remains are present Piping necessary to change the flare nut machining size due to pipe compression Clean the pipes or use new pipes In case of twin pipes also be sure to flush the branching pipe Note Turn the existing pipe switch on the cycle control PC board of the outdoor unit to ON side At s...

Страница 15: ... 14 MEMO EN 27 EN 28 ...

Страница 16: ... air conditioners is 0 3 kg m3 NOTE 1 If there are 2 or more refrigerating systems in a single refrigerating device the amounts of refrigerant should be as charged in each independent device For the amount of charge in this example The possible amount of leaked refrigerant gas in rooms A B and C is 10 kg The possible amount of leaked refrigerant gas in rooms D E and F is 15 kg Total amount of refr...

Отзывы: