background image

User’s Manual

1-1

Introduction

Chapter 1

Introduction

This chapter provides an equipment checklist, and it identifies the 

computer’s features, options and accessories.

Equipment checklist

Carefully unpack your computer, taking care to save the box and packaging 

materials for future use.

Hardware

Check to make sure you have all the following items:

TOSHIBA mini NB200 Portable Personal Computer

AC adaptor and power cord (2-pin plug or 3-pin plug)

Battery pack

Software

The following Windows

®

 operating system and utility software are 

pre-installed.

Windows

®

 7

Bluetooth Driver (Can be used only for Bluetooth models)

Display Drivers for Windows

TOSHIBA HWSetup

TOSHIBA Supervisor Password

LAN Driver

Pointing Device Driver

Sound Driver for Windows

Wireless LAN Driver (Can be used only for Wireless LAN models)

TOSHIBA Disc Creator

TOSHIBA Recovery Media Creator

TOSHIBA ConfigFree™

Some of the features described in this manual may not function properly if 

you use an operating system that was not pre-installed by TOSHIBA.

Содержание PLL23U-00C01C

Страница 1: ...computers toshiba europe com User s Manual TOSHIBA mini NB200 ...

Страница 2: ...uctions and descriptions it contains are accurate for the TOSHIBA mini NB200 Portable Personal Computers at the time of this manual s production However succeeding computers and manuals are subject to change without notice TOSHIBA assumes no liability for damages incurred directly or indirectly from errors omissions or discrepancies between the computer and the manual Trademarks IBM is a registere...

Страница 3: ...TOSHIBA cannot guarantee that this product still observes these EMC standards if options or cables not produced by TOSHIBA are connected or implemented In this case the persons who have connected implemented those options cables have to provide assurance that the system PC plus options cables still fulfils the required standards To avoid general EMC problems the following guidance should be noted ...

Страница 4: ... for general safety reasons the use of this product in environments with explosive atmospheres is not permitted Following information is only for EU member states Disposal of products The crossed out wheeled dust bin symbol indicates that products must be collected and disposed of separately from household waste Integrated batteries and accumulators can be disposed of with the product They will be...

Страница 5: ... recycling information please contact your local government The crossed out wheeled dust bin symbol indicates that batteries and or accumulators must be collected and disposed of separately from household waste If the battery or accumulator contains more than the specified values of lead Pb mercury Hg and or cadmium Cd defined in the Battery Directive 2006 66 EC then the chemical symbols for lead ...

Страница 6: ...tery can not be charged at all then it is a defect or failure The changes in battery time is not a defect or failure Your Computer model may be ENERGY STAR compliant If the model you purchased is compliant it is labeled with the ENERGY STAR logo on the computer and the following information applies TOSHIBA is a partner in the ENERGY STAR Program and has designed this computer to meet the latest EN...

Страница 7: ...User s Manual vii TOSHIBA mini NB200 GOST ...

Страница 8: ...10 Chapter 2 The Grand Tour Front with the display closed 2 1 System indicators 2 1 Left side 2 3 Right side 2 4 Back side 2 5 Underside 2 5 Front with the display open 2 7 AC adaptor 2 10 Chapter 3 Getting Started Connecting the AC adaptor 3 2 Opening the display 3 4 Turning on the power 3 5 Starting up for the first time 3 6 Turning off the power 3 7 Restarting the computer 3 10 System Recovery ...

Страница 9: ...7 Chapter 5 The Keyboard Typewriter keys 5 1 Function keys F1 F12 5 2 Soft keys FN key combinations 5 2 Hot keys 5 3 Windows special keys 5 5 Keypad overlay 5 6 Generating ASCII characters 5 7 Chapter 6 Power and Power up Modes Power conditions 6 1 Power indicators 6 2 Battery types 6 3 Care and use of the battery pack 6 4 Replacing the battery pack 6 9 Power up modes 6 11 Chapter 7 BIOS Setup and...

Страница 10: ...em 2 10 2 Battery Life 3 10 2 HDD drive capacity 4 10 2 LCD 10 2 Graphics Processor Unit GPU 10 2 Wireless LAN 7 10 3 Non applicable Icons 10 3 Copy Protection 10 3 USB Sleep and Charge 10 3 Appendix A Specifications Appendix B Display Controller Appendix C Wireless LAN Appendix D AC Power Cord and Connectors Appendix E TOSHIBA PC Health Monitor Appendix F If your computer is stolen Glossary Index...

Страница 11: ...ng the preface to learn how this manual is organized then become acquainted with this manual by browsing through its pages Be sure to read the Special features section of the Introduction to learn about features that are uncommon or unique to this computer and carefully read BIOS Setup and Passwords If you are going to install ExpressCards or connect external devices such as a printer be sure to r...

Страница 12: ...mputer The Glossary defines general computer terminology and includes a list of acronyms used in the text The Index quickly directs you to the information contained in this manual Conventions This manual uses the following formats to describe identify and highlight terms and operating procedures Abbreviations On first appearance and whenever necessary for clarity abbreviations are enclosed in pare...

Страница 13: ...ment as follows ABC When procedures require an action such as clicking an icon or entering text the icon s name or the text you are to type in is represented in the typeface you see to the left ABC Names of windows or icons or text generated by the computer that appear on its display screen are presented in the type face you see to the left Pay attention A caution informs you that improper use of ...

Страница 14: ...ng when the power is turned on or when an AC adaptor is connected to a power outlet even if your computer is in Sleep Mode In this condition observe the following Never cover your computer or AC adaptor with any object Never place your computer or AC adaptor near a heat source such as an electric blanket or heater Never cover or block the air vents including those located at the base of the comput...

Страница 15: ...ur hands and wrists that can be caused by extensive keyboard use Heat injury Avoid prolonged physical contact with the computer If the computer is used for long periods its surface can become very warm While the temperature will not feel hot to the touch if you maintain physical contact with the computer for a long time for example if you rest the computer on your lap or if you keep your hands on ...

Страница 16: ...be impaired in any way but it is recommended that a minimum distance of 30cm is maintained between the computer and a mobile phone that is in use Instruction Manual for Safety and Comfort All important information on the safe and proper use of this computer is described in the enclosed Instruction Manual for Safety and Comfort Be sure to read it before using the computer ...

Страница 17: ... power cord 2 pin plug or 3 pin plug Battery pack Software The following Windows operating system and utility software are pre installed Windows 7 Bluetooth Driver Can be used only for Bluetooth models Display Drivers for Windows TOSHIBA HWSetup TOSHIBA Supervisor Password LAN Driver Pointing Device Driver Sound Driver for Windows Wireless LAN Driver Can be used only for Wireless LAN models TOSHIB...

Страница 18: ...D Memory Card Format Utility and other SD functions are packaged into TOSHIBA SD Memory Utilities When uninstalling the SD utilities click Start Control Panel Uninstall a program and select TOSHIBA SD Memory Utilities Built in Your computer is equipped with one processor and processor type varies depending on model To check which type of processor is included in your model open the TOSHIBA PC Diag...

Страница 19: ...disk drive model is different HDD 120GB 160GB 250GB Please note that part of the hard disk drives overall capacity is reserved as administration space Additional Hard Disk drive sizes may be introduced Additional hard disk drive sizes may be introduced Legal Footnote Hard Disk Drive HDD Capacity 4 For more information regarding Hard Disk Drive HDD Capacity please refer to the Legal Footnotes secti...

Страница 20: ... from 100 to 240 volts however you should note that the output current varies among different models Using the wrong adaptor can damage your computer Refer to the AC adaptor section in Chapter 2 The Grand Tour External monitor This port provides 15 pin analog VGA port This port allows you to connect an external monitor to the computer Universal Serial Bus USB 2 0 The computer supports multiple Uni...

Страница 21: ...ication function which eliminates the need for cables between electronic devices such as computers and printers and mobile phones When it is enabled Bluetooth provides the wireless personal area network environment which is safe and trustworthy that is quick and easy to use Wireless LAN Some computers in this series are equipped with a Wireless LAN module that is compatible with other LAN systems ...

Страница 22: ... or other large object Operating system Windows 7 is available Refer to the preinstalled Software section at the front of this chapter TOSHIBA Utilities A number of utilities and drivers are preinstalled to make your computer more convenient to use Refer to the Utilities and Applications section in this chapter Plug and Play When you connect an external device to the computer or when you install a...

Страница 23: ... microprocessor in the computer s intelligent power supply detects the battery s charge automatically calculates the remaining battery capacity and protects electronic components from abnormal conditions such as a voltage overload from the AC adaptor This can be specified in the Power Options Battery save mode 1 This feature lets you configure the computer in order to save battery power This can b...

Страница 24: ...tting Started for more details Sleep Mode If you have to interrupt your work you can use this feature to allow you to turn off power to the computer without exiting from your software Data is maintained in the computer s main memory so that when you next turn on the power you can continue working right where you left off USB Wakeup function This function restores the computer from Sleep Mode depen...

Страница 25: ... supply managements TOSHIBA Zooming Utility This utility allows you to enlarge or reduce the icon size on the Windows Desktop or the zoom factor associated with specific supported applications TOSHIBA PC Diagnostic Tool The TOSHIBA PC Diagnostic Tool will display basic system configuration information and allow the functionality of some of the computer s built in hardware devices to be tested TOSH...

Страница 26: ... number of formats including audio CD s that can be played on a standard CD player and data CD s DVD s which can store copies of the files and folders on your computer s hard disk drive This software can be used on models with a DVD Super Multi drive To start this utility click Start All Programs TOSHIBA CD DVD Applications Disc Creator TOSHIBA SD Memory Card Format This utility allows you to form...

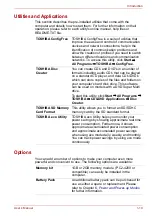
Страница 27: ...t at each site in order to remove the need to always carry the adaptor with you External SuperMulti Optical drive The External SuperMulti drive enables reading and burning CDs and DVDs through connection to one of the computer s USB ports It can be used to create copies recovery discs to recover your laptop No external power supply is needed Compatible with Windows 7 ...

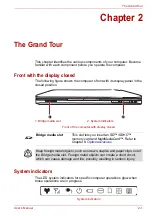
Страница 28: ... with display closed System indicators The LED system indicators for specific computer operations glow when those operations are in progress System indicators 1 Bridge media slot 2 System indicators 2 1 Bridge media slot This slot lets you insert an SD SDHC memory card and MultiMediaCard Refer to Chapter 8 Optional Devices Keep foreign metal objects such as screws staples and paper clips out of th...

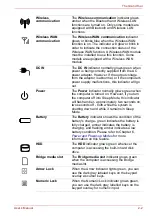
Страница 29: ...r indicator normally glows green when the computer is turned on However if you turn the computer off into Sleep Mode this indicator will flash amber approximately two seconds on two seconds off both while the system is shutting down and while it remains in Sleep Mode Battery The Battery indicator shows the condition of the battery s charge green indicates the battery is fully charged amber indicat...

Страница 30: ...cause damage and fire possibly resulting in serious injury Microphone jack A standard 3 5 mm mini microphone jack enables connection of a microphone or other device for audio input Headphone jack A standard 3 5 mm mini headphone jack enables connection of stereo headphones or other device for audio output When you connect headphones the internal speaker is automatically disabled LAN jack This jack...

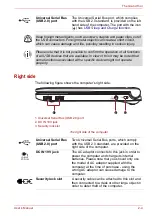
Страница 31: ...s of all USB devices that are available In view of this it may be noted that some functions associated with a specific device might not operate properly 1 Universal Serial Bus USB 2 0 port 2 DC IN 19V jack 3 Security lock slot 1 2 3 Universal Serial Bus USB 2 0 port Two Universal Serial Bus ports which comply with the USB 2 0 standard are provided on the right side of the computer DC IN 19V jack T...

Страница 32: ...ide Underside The following figure shows the underside of the computer You should ensure that the display is closed before the computer is turned over to avoid causing any damage The underside of the computer 1 Memory module slot 4 Battery safety lock 2 Battery release latch 5 Speaker 3 Battery pack 1 2 5 4 3 ...

Страница 33: ...removal For more detailed information on removing the battery pack please refer to Chapter 6 Power and Power up Modes Battery pack The battery pack provides power to the computer when the AC adaptor is not connected For more detailed information on the use and operation of the battery pack please refer to Chapter 6 Power and Power up Modes Battery safety lock Slide this latch into its Unlock posit...

Страница 34: ...position it at a comfortable viewing angle for you Appearance of the Keyboard may be different among models The front of the computer with the display open 1 Web Camera LED 6 Keyboard 2 Web Camera 7 Touch Pad 3 Microphone 8 Touch Pad control buttons 4 Display Screen 9 Wireless LAN antenna Not shown 5 Power Button Wireless WAN antenna for some models Not shown 4 5 6 7 9 8 1 2 3 9 ...

Страница 35: ...ating Basics for more information Display screen Please be aware that when the computer is operating on the AC adaptor the image displayed on the internal screen will be somewhat brighter than when it operates on battery power This difference in brightness levels is intended to save power when operating on batteries For more information on the computer s display please refer to the Display Control...

Страница 36: ...d indicators When the CAPS LOCK indicator glows the keyboard will produce capitals when any letter is typed 1 CAPS LOCK indicator Keypad indicators 1 CAPS LOCK This indicator glows green when letter keys are locked into their uppercase format ...

Страница 37: ...ug Depending on the model in question either a 2 pin or 3 pin adaptor power lead will be bundled with the computer Do not use a 3 pin to 2 pin conversion plug The supplied power cord conforms to safety rules and regulations in the region the product is bought and should not be used outside of this region In order to use the adaptor computer in other regions you should buy a power cord that conform...

Страница 38: ...ded to help you be more comfortable and productive while using a notebook computer By following the recommendations in it you may reduce your chance of developing a painful or disabling injury to your hand arms shoulders or neck Use a anti virus software and make sure it is updated regularly Never format storage media without checking its content formatting destroys all stored data It is a good id...

Страница 39: ...bles that comply with the legal voltage and frequency specifications and requirements in the country of use Failure to do so could result in a fire or electric shock possibly resulting in serious injury The supplied power cord conforms to safety rules and regulations in the region the product is bought and should not be used outside this region For use in other regions please buy power cords that ...

Страница 40: ...adaptor 3 pin plug 2 Connect the AC adaptor s DC output plug to the DC IN 19V jack on the right side of the computer Connecting the adaptor to the computer 3 Plug the power cord into a live wall outlet the Battery and DC IN indicators on the front of the computer should glow Either a 2 pin or 3 pin adaptor cord will be included with the computer depending on the model ...

Страница 41: ...m rest with one hand so that the main body of the computer is not raised slowly lift the display panel this will allow the angle of the display panel to be adjusted to provide optimum clarity 1 Display panel Opening the display 1 Use reasonable care when opening and closing the display panel Opening it vigorously or slamming it shut could damage the computer ...

Страница 42: ...ause damage Do not press or push on the display panel Do not lift the computer by the display panel Do not close the display panel with pens or any other objects left in between the display panel and the keyboard When opening or closing the display panel place one hand on the palm rest to hold the computer in place and use the other hand to slowly open or close the display panel Do not use excessi...

Страница 43: ...een displayed when you turn on the power Follow the on screen instructions on each screen in order to properly install the operating system 1 When it is displayed be sure to read the Software License Terms carefully After you turn on the power for the first time do not turn it off until you have set up the operating system OS and the OS has started up ...

Страница 44: ... does not save the status of any peripheral devices connected to the computer Make sure the Hard Disk Drive indicator is off If you turn off the power while a disk disc is being accessed you may lose data or damage the disk Never turn off the power while an application is running Doing so could cause loss of data Never turn off the power disconnect an external storage device or remove storage medi...

Страница 45: ...ode automatically In order to define these settings you can follow the steps as described below 1 Open the Control Panel 2 Open System and Security and open Power Options 3 Select Choose what the power button does 4 Enable the desired hibernation settings for When I press the power button and When I close the lid 5 Click the Save changes button Data save in Hibernation Mode When you turn off the p...

Страница 46: ... interfere with aviation or other systems possibly causing serious injury Before entering Sleep Mode be sure to save your data Do not install or remove a memory module while the computer is in Sleep Mode The computer or the memory module could be damaged Do not remove the battery pack while the computer is in Sleep Mode unless the computer is connected to an AC power source Data in memory could be...

Страница 47: ...ain computer settings An error occurs and the computer does not respond to your keyboard commands If you need to restart the computer there are two ways this can be achieved 1 Click Start then click the arrow button and select Restart from the menu 2 Press CTRL ALT and DEL simultaneously once to display the menu window then click th arrow button in the lower right corner of the screen then select ...

Страница 48: ...the computer 2 While holding the F8 key turn on the computer 3 The Advanced Boot Options menu will be displayed Use the arrow keys to select Repair Your Computer and press ENTER 4 Follow the on screen instructions Restoring the pre installed Software Depending on the model you purchased different ways for restoring the pre installed software are offered Creating optical Recovery Discs and restorin...

Страница 49: ...stalled software from the recovery HDD please use the bundled Recovery DVDs directly You can use TOSHIBA Recovery Disc Creator when you connect External ODD Be sure to connect the AC adaptor when you create Recovery Discs Be sure to close all other software programs except the Recovery Media Creator Do not run software such as screen savers which can put a heavy load on the CPU Operate the compute...

Страница 50: ...s If the pre installed files are damaged you are able to either use the Recovery Discs you have created or the hard disk drive recovery process to restore the computer to the state it was in when you originally received it To perform this restoration follow the steps below When the sound mute feature has been activated by pressing the Mute panel FN ESC be sure to disable this to allow sounds to be...

Страница 51: ...words for further information 4 A menu will be displayed from which you should follow the on screen instructions Ordering Recovery Discs from TOSHIBA You can order Product Recovery discs for your notebook from the TOSHIBA Europe Backup Media Online Shop Please note that this service is not free of charge 1 Visit https backupmedia toshiba eu on the Internet 2 Follow the on screen instructions You w...

Страница 52: ... your fingertip across it in the direction you want the on screen pointer to go Touch Pad and Touch Pad control buttons The two buttons below the Touch Pad are used like the buttons on a standard mouse press the left button to select a menu item or to manipulate text or graphics designated by the pointer and press the right button to display a menu or other function depending on the software you a...

Страница 53: ...ep and Charge function to charge certain USB compatible external devices such as mobile phones or portable digital music players However the USB Sleep and Charge function may not work with certain external devices even if they are compliant with the USB specification In those cases turn the power of the computer ON to charge the device You can also tap the Touch Pad to perform functions similar to...

Страница 54: ...ome external devices cannot be charged solely by supplying USB bus power DC5V As for the specifications of the external devices please contact the device manufacturer or check the specifications of the external devices thoroughly before use Using the USB sleep and charge function to charge external devices will take longer than charging the devices with their own chargers If USB Sleep and Charge f...

Страница 55: ... following limitations when you use the TOSHIBA Disc Creator DVD Video cannot be created using TOSHIBA Disc Creator DVD Audio cannot be created using TOSHIBA Disc Creator You cannot use TOSHIBA Disc Creator s Audio CD for Car or Home CD Player function to record music to DVD R DVD R Dual Layer DVD RW DVD R DVD R Double Layer or DVD RW media Do not use the Disc Backup function of TOSHIBA Disc Creat...

Страница 56: ...k up a DVD disc be sure that the source drive supports recording to DVD R DVD R Dual Layer DVD RW DVD R DVD R Double Layer or DVD RW media if this is not the case then the source disc might not be backed up correctly When you back up a DVD R DVD R Dual Layer DVD RW DVD R DVD R Double Layer or DVD RW disc be sure to use the same type of disc You cannot partially delete any data written to a CD RW D...

Страница 57: ...otective plastic film that covers the Web Camera before using it 1 2 3 Please unstick the protective plastic film before using the Web Camera Do not point the web camera directly at the sun Do not touch or press strongly on the web camera lens Doing so may reduce image quality Use an eyeglass cleaner cleaner cloth or other soft cloth to clean the lens if it becomes dirty Setting the image SIZE to ...

Страница 58: ...lick to capture a still image and see a preview of the captured image in preview area Open Close Preview Area Click to open Preview Area One more to close Preview Area Delete Recorded File Choose a thumbnail of recorded file and click this button to delete this file from hard disk Video Recording Click to start recording One more to stop recording and see preview of the video in preview area Camer...

Страница 59: ...ss communications The computer s wireless communication function supports both Wireless LAN and Bluetooth devices Wireless LAN The Wireless LAN is compatible with other LAN systems based on Direct Sequence Spread Spectrum Orthogonal Frequency Division Multiplexing radio technology that complies with the IEEE802 11 Wireless LAN standard Frequency Channel Selection of 2 4GHz for 802 11bg or n draft ...

Страница 60: ...ample printers and mobile phones You cannot use the computer s built in Bluetooth functions and an external Bluetooth adaptor simultaneously For reference Bluetooth wireless technology has the following features Worldwide operation The Bluetooth radio transmitter and receiver operate in the 2 4GHz band which is license free and compatible with radio systems in most countries in the world Radio lin...

Страница 61: ...ation agency regulations and airline policies typically require that you turn off your computer disable Wireless communication in BIOS setup and turn off any wireless devices before boarding an aircraft While it is foreseeable that during certain non critical phases of your flight certain computer and or wireless technologies might be permitted for use on board an aircraft use of wireless WAN comm...

Страница 62: ...the battery pack 5 Locate the SIM card slot 6 Slide your SIM card into the SIM card slot with the metal connectors facing up 7 Press SIM card gently to ensure a firm connection 8 Install the battery pack 9 Turn your computer over Removing a SIM Card To remove the SIM card follow the steps below 1 Shut down the computer ensure that the Power indicator is off 2 Remove the AC adaptor and all cables c...

Страница 63: ...just the Wi Fi module Enable or Disable BluetoothTM Enables or disables just the BluetoothTM module Enable or Disable Wireless WAN Enables or disables just the Wireless WAN module Never allow metal objects such as screws staples and paper clips to enter the computer Foreign metal objects can create a short circuit which can cause computer damage and fire possibly resulting in serious injury Do not...

Страница 64: ... Wi Fi and Bluetooth functionalities off when near a person who may have a cardiac pacemaker implant or other medical electric device Radio waves may affect pacemaker or medical device operation possibly resulting in serious injury Follow the instruction of your medical device when using any Wi Fi or Bluetooth functionality Always turn off Wi Fi or Bluetooth functionality if the computer is near a...

Страница 65: ...ble follow the steps as detailed below Do not install or remove a memory module while Wake up on LAN is enabled The Wake up on LAN function consumes power even when the system is off Leave the AC adaptor connected while using this feature The Link speed 10 100 megabits per second changes automatically depending on the network conditions connected device cable or noise and so on The computer must b...

Страница 66: ...AN cable To disconnect the LAN cable follow the steps as detailed below 1 Pinch the lever on the connector in the computer s LAN jack and pull out the connector 2 Disconnect the cable from the LAN hub or router in the same manner Check with your LAN administrator and hardware or software vendor before disconnecting from the hub 1 LAN jack 2 LAN cable 1 2 When the computer is exchanging data with t...

Страница 67: ...r While the computer is designed for rugged durability you should exercise a few simple precautions when moving it in order to help ensure trouble free operation Make sure all disk activity has ended before moving the computer check that the HDD and other indicators on the front of the computer are off Turn off shut down the computer Disconnect the AC adaptor and all peripherals before moving the ...

Страница 68: ...ecessary turning on the fan These functions are controlled within the Power Options When the processor temperature falls to a normal range the fan is turned off and the processor operation returns to standard speed Using the Hard Disk Drive HDD Protection The hard disk drive models have a function for reducing the risk of damage on the hard disk drive Using an acceleration sensor built into the co...

Страница 69: ...iting Set a lower detection level when the speed of Hard Disk Drive reading and writing is a priority Different detection levels can be set depending on whether the computer is used as handheld or mobile usages or whether it is used in a stable environment such as on a table in the workplace or at home By setting different detection levels for the computer depending on whether it runs with the AC ...

Страница 70: ...puter s internal Hard Disk Drive This representation may vary from the actual number of disks disk rotation head movement part size shape and direction This feature may use a large amount of CPU and memory on some models The computer may become slow or sluggish when attempting to run other applications while the 3D Viewer is displayed Intensely shaking the computer or other subjecting it to strong...

Страница 71: ...rks and special symbols that appear on the screen However there are some differences between using a typewriter and using a computer keyboard Letters and numbers produced in computer text vary in width Spaces which are created by a space character may also vary depending on line justification and other factors The lowercase l el and the number 1 one together with the uppercase O oh and the 0 zero ...

Страница 72: ... FN function is unique to TOSHIBA computers and is used in combination with other keys to form soft keys Soft keys are key combinations that enable disable or configure specific features Emulating keys on an enhanced keyboard A 104 key enhanced keyboard layout This computer s keyboard is designed to provide all the features of the 104 key enhanced keyboard Since the keyboard is smaller and has few...

Страница 73: ...he power on default for both settings is off Press FN F12 ScrLock to lock the cursor on a specific line The power on default is off Press FN ENTER to simulate ENTER on the enhanced keyboard s numeric keypad Hot keys Hot keys pressing FN a function or ESC key let you enable or disable certain features of the computer Mute Pressing FN ESC turns the volume on and off Lock Pressing FN F1 enters Lock c...

Страница 74: ...s Brightness Up Pressing FN F7 increases the computer s display panel brightness in individual steps Wireless Pressing FN F8 switches the active wireless devices Touch Pad Pressing FN F9 enables or disables the Touch Pad function Zoom Pressing FN Space changes the display resolution If no wireless communication device is installed no dialog box will appear This hot key is available only when the w...

Страница 75: ...ncrease the volume in increments FN Sticky key You can use the TOSHIBA Accessibility Utility to make the FN key sticky that is you can press it once release it and then press an F Number key To start the TOSHIBA Accessibility utility click Start All Programs TOSHIBA Utilities Accessibility Windows special keys The keyboard provides two keys that have special functions in Windows Windows Start Butt...

Страница 76: ...ard Turning on the overlays The numeric keypad overlay can be used for numeric data input or cursor and page control Arrow mode To turn on Arrow Mode press FN F10 the Arrow mode indicator lights and you are able to access cursor and page control functions by using the keys You are able to press FN F10 again to turn off this overlay function Numeric mode To turn on Numeric Mode press FN F11 the Num...

Страница 77: ...he overlay for numeric entry while if the Arrow Mode indicator lights you can use the overlay for cursor and page control function 3 Release FN to return to normal keyboard operation Temporarily changing modes If the computer is in Numeric Mode you can switch temporarily to Arrow Mode by pressing a SHIFT key while if it is in Arrow Mode you can switch temporarily to Numeric Mode by also pressing a...

Страница 78: ...are affected by different power conditions including whether an AC adaptor is connected whether a battery pack is installed and what the charge level is for that battery Power on Power off no operation AC adaptor connected Battery fully charged Operates LED Battery green and solid on DC IN green LED Battery green and solid on DC IN green Battery partially charged or no charge Operates Quick Charge...

Страница 79: ...nt Operates LED Battery off DC IN off Battery charge is exhausted Computer goes into Sleep Mode and shuts down No battery installed Cannot operate LED Battery off DC IN off Blinking amber The battery charge is low the AC adaptor must be connected in order to recharge the battery Amber Indicates the AC adaptor is connected and the battery is charging Green Indicates the AC adaptor is connected and ...

Страница 80: ...hould not change the battery pack while the AC adaptor is connected Before you remove the battery pack save your data and shut down the computer or place the computer into Hibernation Mode Please be aware that when placing the computer into Hibernation Mode the contents of memory will be saved to the hard disk drive although for safety sake it is best to also save your data manually Green Indicate...

Страница 81: ...ll help to ensure safe operation and maximum performance Refer to the enclosed Instruction Manual for Safety and Comfort for detailed precautions and handling instructions The battery pack is a lithium ion battery which can explode if not properly replaced used handled or disposed of Dispose of the battery as required by local ordinances or regulations Use only batteries recommended by TOSHIBA as ...

Страница 82: ...e battery pack to rupture Keep the battery pack out of reach of infants and children It can cause injury The battery pack is lithium ion battery which can explode if not replaced used handled or disposed of properly Dispose of the battery as required by local ordinances or regulations Use only batteries recommended by TOSHIBA as replacements Charge the battery pack only in an ambient temperature b...

Страница 83: ... in the computer for a long time A cool battery is installed in a warm computer In such cases you should follow the steps as detailed below 1 Fully discharge the battery by leaving it in the computer with the power on until the system automatically turns itself off 2 Connect the AC adaptor to the DC IN 19V jack of the computer and to a wall outlet that is supplying power 3 Charge the battery until...

Страница 84: ...r programs and data Whether you close the display panel when you are not using the keyboard closing the display saves power The environmental temperature operating time decreases at low temperatures The condition of the battery terminals you should always ensure the terminals stay clean by wiping them with a clean dry cloth before installing the battery pack You should wait at least 16 seconds aft...

Страница 85: ...4 4 Connect the AC adaptor to the DC IN 19V jack of the computer and to a wall outlet that is supplying power The DC IN indicator should glow green and the Battery indicator should glow amber to indicate that the battery pack is being charged however in the event that DC IN indicator does not glow this indicates that power is not being supplied check the connections for the AC adaptor and the powe...

Страница 86: ...discharged battery follow the steps as detailed below 1 Save your work 2 Turn the computer s power off ensure that the Power indicator is off 3 Remove all cables and peripherals that are connected to the computer 4 Close the display panel and turn the computer upside down 5 Slide the battery safety lock towards the release position to make the battery release latch movable Do not remove the batter...

Страница 87: ...leasing the battery pack 1 6 Slide and hold the battery release latch 1 to disengage the battery pack and then remove it from the computer 2 Releasing the battery pack 2 1 Battery safety lock 3 Battery pack 2 Battery release latch 1 4 5 3 1 2 1 4 5 ...

Страница 88: ... power up modes Boot Computer shuts down without saving data Always save your work before you turn the computer off in boot mode Hibernation Data in memory is saved to the hard disk Sleep Data is maintained in the computer s main memory Windows utilities You can configure various settings associated with both Sleep Mode and Hibernation Mode within the Power Options To access it Start Control Panel...

Страница 89: ...n you close the display panel and turned on again when you open it Please note that this function is only available for Sleep Mode or Hibernation Mode not for Boot Mode System auto off This feature turns the system off automatically if it is not used for a set duration The system shuts down in Sleep Mode or Hibernation Mode If the panel power off function is enabled and you manually shut down Wind...

Страница 90: ... set up user and supervisor passwords Accessing BIOS Setup Menu To start the utility please press F2 to enter the BIOS Setup Menu when booting up the computer BIOS Setup Menu Within the BIOS Setup Menu please select the Security menu in order to change or modify the User Password or Supervisor Password BIOS Setup Menu ...

Страница 91: ...word and re enter the password for verification in the section titled Confirm New Password If the verification is correct the following message is shown Setup Notice Changes have been saved Continue The supervisor password can be set after the user presses enter If the verification fails the following message is shown Setup Warning Password does not match Re enter Password Continue The formats of ...

Страница 92: ...ys to select boot device you want and press ENTER If you press a key other than one of those above or if the selected device is not installed the system will boot according to the current setting in BIOS Setup Menu USB Legacy USB Support Use this option to enable or disable USB Legacy Emulation If your operating system does not support USB you can still use a USB mouse and keyboard by setting the ...

Страница 93: ...the computer is started Please note that this setting is only available on standard VGA mode and is not available as part of the Windows Desktop properties Enabled Enables Wake up on LAN from shutdown Disabled Disables Wake up on LAN from shutdown Default Do not install or remove an optional memory module while Wake up on LAN is enabled Wake up on LAN does not work without the AC adaptor Leave it ...

Страница 94: ...emory module Power devices Battery packs Universal AC Adaptor Peripheral devices USB floppy diskette drive External monitor Other Security lock Bridge media slot The computer is equipped with a Bridge media slot that can accommodate some kinds of memory media with various memory capacities so that you can easily transfer data from devices such as digital cameras and Personal Digital Assistants To ...

Страница 95: ...nt so pay careful attention to the logo when purchasing The maximum capacity of SD memory cards is 2GB The maximum capacity of SDHC memory cards is 16G Keep foreign objects out of the Bridge media slot Never allow metal objects such as screws staples and paper clips to enter the computer or Keyboard Foreign metal objects can create a short circuit which can cause computer damage and fire possibly ...

Страница 96: ...der to to increase the amount of system memory that is available This section describes how to install and remove optional memory modules Card Type Capacities SD 8MB 16MB 32MB 64MB 128MB 256MB 512MB 1GB 2GB SDHC 4GB 8GB 16GB The TOSHIBA SD Memory Card Format utility does not format the protected area of the SD SDHC memory card if you need to format all areas of the memory card including the protec...

Страница 97: ...N is enabled d The wireless communication is enabled Be careful not to let screws or other foreign matter fall into the computer It could cause malfunction or electric shock Additional memory modules are precision electronic components that may be fatally damaged by static electricity Since the human body can carry static electricity it is important that you discharge yourself before touching or i...

Страница 98: ...y pressing until the latches on either side snap into place 1 Align the grooves along the edges of the memory module with the locking tabs on the connector and insert the memory module into the connector firmly if you find it difficult to install the memory module gently prise the locking tabs outwards using the tip of your finger Please also ensure that you hold the memory module along its left a...

Страница 99: ...as detailed below 1 Turn the computer off and remove all cables connected to the computer 2 Turn the computer upside down and remove the battery pack refer to Chapter 6 Power and Power up Modes 3 Remove one screw securing the memory module cover Never allow metal objects such as screws staples and paper clips to enter the computer or keyboard Foreign metal objects can create a short circuit which ...

Страница 100: ...ease refer to Chapter 6 Power and Power up Modes for further information Universal AC Adaptor If you frequently use your computer at more than one site it may be convenient to purchase an additional AC adaptor to be kept at each site in order to remove the need to always carry the adaptor with you External SuperMulti Optical drive The external optical disc drive module can be connected to one of t...

Страница 101: ... computer has a security lock slot on its right side into which you can attach one end of the security cable while the other end attaches to a desk or similar object The methods used for attaching security cables differ from product to product Please refer to the instructions for the product you are using for more information Connecting the security lock In order to connect a security cable to the...

Страница 102: ... attached print a copy of the screen using the PRTSC Print Screen key The questions and procedures offered in this chapter are meant as a guide they are not definitive problem solving techniques Many problems can be solved simply but a few may require help from your dealer If you find you need to consult your dealer or others be prepared to describe the problem in as much detail as possible Prelim...

Страница 103: ...er attached Look up the messages in the software and operating system documentation Check that all connecting cables are correctly and firmly attached Loose cables can cause erroneous or intermittent signals Do any icons light Which ones What color are they Do they stay on or blink Write down what you see Record your observations so you can describe them to your dealer Software The problems may be...

Страница 104: ...ating system Depending on how the Boot Priority is set in the Hardware Setup the computer tries to load first from drive A then from drive C or first from drive C then from drive A If any of the following conditions are present the self test failed The computer stops and does not proceed to display information or messages Random characters appear on the screen and the system does not function norm...

Страница 105: ...y shut down AC power If you have trouble turning on the computer with the AC adaptor connected Please refer to Chapter 6 Power and Power up Modes for more information Battery If you suspect a problem with the battery check the DC IN and the battery indicator For information on indicators and battery operation see Chapter 6 Power and Power up Modes Problem Procedure AC adaptor doesn t power the com...

Страница 106: ...ce the battery Make sure it is securely seated Check the Battery indicator If it does not glow make the computer charge the battery for at least 20 minutes If the Battery indicator glows after 20 minutes let the battery continue to charge for at least another 20 minutes before turning on the computer If the indicator still does not glow the battery may be at the end of its operating life Replace i...

Страница 107: ...ur dealer Problem Procedure No display Press hot keys FN F5 to change the display priority to make sure it is not set for an external monitor Markings appear on the LCD screen They might have come from contact with the keyboard or touch pad Try wiping the LCD gently with a clean dry cloth If markings remain use LCD cleaner Be sure to let the LCD dry before closing it Problems above remain unresolv...

Страница 108: ...ill unable to resolve the problem contact your reseller dealer or service provider Problem Procedure Problem Procedure On screen pointer does not respond to Touch Pad operation The system might be busy If the pointer is shaped as an hourglass wait for it to resume its normal shape and try again to move it Double tapping does not work Try changing the double click speed setting in the mouse control...

Страница 109: ...ed as instructed and click OK The mouse pointer moves too fast or too slow Try changing the speed setting in the mouse control utility 1 Click Start Control Panel Hardware and Sound Mouse to access the mouse control utility 2 Click the Pointer Options tab 3 Set the speed as instructed and click OK The mouse pointer moves erratically The mouse might be dirty Refer to your mouse documentations for i...

Страница 110: ...lume settings Make sure the headphone connection is secure Check Sound Preferences Make sure the sound function is enabled and that settings for I O address Interrupt level and DMA are correct for your software and do not conflict with other hardware devices that you may have connected to the computer If problems persist contact your dealer Problem Procedure USB device does not work Check for a fi...

Страница 111: ... external device because its current is over the acceptable value of this computer Some external devices may not be able to use the USB Sleep and Charge function In this case please try one or more of the following methods Change the Power supply mode settings in the TOSHIBA USB Sleep and Charge Utility Turn OFF the computer while external devices are connected If this function can not be still us...

Страница 112: ...harge Utility the USB WakeUp function does not work for ports that support the USB Sleep and Charge function In that case use an USB port that does not have the USB Sleep and Charge function compatible icon or uncheck the USB Sleep and Charge check box to disable this function in the TOSHIBA USB Sleep and Charge Utility Problem Procedure Problem Procedure The system will not enter sleep hibernatio...

Страница 113: ...less LAN Make sure the computer s wireless communication service is turned on If problems persist consult your LAN administrator Problem Procedure Cannot access Bluetooth device Make sure the computer s wireless communication service is turned on Make sure the Bluetooth Manager is running and the power to the Bluetooth device is turned on Make sure no optional Bluetooth adaptors are installed in t...

Страница 114: ...ng sections in the documentation supplied with your software and or peripheral devices If a problem occurs when you are running software applications consult the software documentation for troubleshooting suggestions and consider calling the software company s technical support department for assistance Consult the dealer where you purchased your computer and or software They are your best resourc...

Страница 115: ...computer at temperatures outside the range of 5 C to 30 C 41 F to 86 F or 25 C 77 F at high altitude all temperature references are approximate and may vary depending on the specific computer model please refer to your PC documentation or visit the Toshiba website at http www pcsupport toshiba com for details CPU performance may also vary from specifications due to design configuration Under some ...

Страница 116: ...ming full power After a period of time the battery will lose its ability to perform at maximum capacity and will need to be replaced This is normal for all batteries To purchase a new battery pack see the accessories information that shipped with your computer HDD drive capacity 4 One Gigabyte GB means 109 1 000 000 000 bytes using powers of 10 The computer operating system however reports storage...

Страница 117: ...i Fi equipment Non applicable Icons Certain notebook chassis are designed to accommodate all possible configurations for an entire product series Therefore please be aware that your selected model may not have all the features and specifications corresponding to all of the icons or switches shown on the notebook chassis unless you have selected all those features Copy Protection Copy protection te...

Страница 118: ...meters not including parts that extend beyond the main body With 6 cell Battery 263 0 w 211 5 d 25 4 front 30 8 rear millimeters not including parts that extend beyond the main body Operating Non operating Ambient tempera ture 5 C 41 F to 35 C 95 F 20 C 4 F to 60 C 140 F Relative humidity 20 to 80 10 to 90 Altitude from sea level 0 to 3 000 meters 0 to 10 000 meters Power Requirements AC adaptor 1...

Страница 119: ... mode which uses industry standard rules to govern the screen resolution and the maximum number of colors that can be displayed on screen Software written for a given video mode will run on any computer that sup ports the mode Some of display modes might not be supported depending on the external monitor which you use If you are running some application for example a 3D application or video playba...

Страница 120: ...radio regulations Although Wireless LAN wireless networking products have been designed for operation in the license free 2 4 GHz local radio regulations may impose a number of limitations to the use of wireless communication equipment Form Factor Mini Card Compatibility IEEE 802 11 Standard for Revision B and G Wireless LANS Wi Fi Wireless Fidelity certified by the Wi Fi Alliance The Wi Fi CERTIF...

Страница 121: ...that apply in your country region Table Wireless IEEE 802 11 Channels Sets Revision B and G When installing Wireless LAN cards the channel configuration is managed as follows For wireless clients that operate in a Wireless LAN infrastructure the Wireless LAN card will automatically start operation at the channel identified by the Wireless LAN Access Point When roaming between different access poin...

Страница 122: ...onfiguration must be 2 15P 250V or 1 15P 125V while three pin be 6 15P 250V or 5 15P 125V as designated in the U S National Electrical code handbook and the Canadian Electrical Code Part II Length Minimum 1 7 meters Wire size Minimum 0 75 mm2 Current rating Minimum 2 5 amperes Voltage rating 125 or 250 VAC depending on country region s power standards Europe Austria OVE Italy IMQ Belgium CEBEC The...

Страница 123: ...he following illustrations show the plug shapes for USA Australia Canada United Kingdom Europe and China USA Australia Europe United Kingdom Canada China UL approved BS approved AS approved Approved by the appropriate agency CSA approved CCC approved ...

Страница 124: ...system and software information e g OS version OS install date DirectX version Internet Explorer version installed update program and driver lists The stored data uses a very small portion of the total hard disk capacity approximately 10MB or less per year This information is used to identify and provide a notification of system conditions which may effect the performance of your Toshiba computer ...

Страница 125: ...e information displayed Selecting ACCEPT and clicking OK will enable the program By enabling the TOSHIBA PC Health Monitor software you agree with these terms and conditions and to the use and sharing of the collected information Once the program is enabled the TOSHIBA PC Health Monitor screen is displayed and the program will begin monitoring system functions and collecting information This messa...

Страница 126: ...form to the address below To register the theft online please follow these procedures Visit http www toshiba europe com on the Internet In the product area choose Computer Systems In the Computer Systems page open the Support Downloads menu and choose the Stolen Units Database option Your entries are used to track your computer at our service points Always take care of your computer and try to pre...

Страница 127: ...al Service and Support Leibnizstr 2 93055 Regensburg Germany Fax number 49 0 941 7807 921 Owner s details Country stolen Machine type e g TOSHIBA mini NB200 Model number e g PSA30EYXT Serial number e g 12345678G Date stolen Year Month Day Last name first name Company Street Postal Code City Country Phone Fax ...

Страница 128: ...ct Disc ReWritable CMOS complementary metal oxide semiconductor CPU central processing unit CRT cathode ray tube DC direct current DDC display data channel DDR double data rate DIMM dual inline memory module DVD digital versatile disc DVD R Digital Versatile Disc Recordable DVD RAM Digital Versatile Disc Random Access Memory DVD R Dual Layer Digital Versatile Disc Recordable Dual Layer DVD ROM Dig...

Страница 129: ...IMM small outline dual in line memory module TFT thin film transistor UART universal asynchronous receiver transmitter USB Universal Serial Bus VESA Video Electronic Standards Association VGA video graphics array XGA extended graphics array A adaptor A device that provides a compatible connection between two units For example the computer s internal display adapter receives information from the so...

Страница 130: ... right most digit of a binary number has a value of 1 the next a value of 2 then 4 8 16 and so on For example the binary number 101 has a value of 5 See also ASCII BIOS Basic Input Output System The firmware that controls data flow within the computer See also firmware bit Derived from binary digit the basic unit of information used by the computer It is either zero or one Eight bits is one byte S...

Страница 131: ...to The CD ROM drive uses a laser rather than magnetic heads to read data from the disc CD RW A Compact Disc ReWritable disc can be rewritten many times See also CD ROM character Any letter number punctuation mark or symbol used by the computer Also synonymous with byte chassis The frame containing the computer chip A small semiconductor containing computer logic and circuitry for processing memory...

Страница 132: ...rdware and software that controls the functions of a specific internal or peripheral device e g keyboard controller co processor A circuit built into the processor that is dedicated to intensive math calculations CPU Central Processing Unit The portion of the computer that interprets and executes instructions CRT Cathode Ray Tube A vacuum tube in which beams projected on a fluorescent screen produ...

Страница 133: ...er system or application Computer system documentation typically includes procedural and tutorial information as well as system functions double click To press and release the pointing device s primary button rapidly twice without moving the pointing device In the Windows operating system this refers to the pointing device s left button unless otherwise stated driver A software program generally p...

Страница 134: ...cape guard time A time before and after an escape code is sent to the modem which distinguishes between escapes that are part of the transmitted data and escapes that are intended as a command to the modem escape 1 A code ASCII code 27 signaling the computer that what follows are commands used with peripheral devices such as printers and modems 2 A means of aborting the task currently in progress ...

Страница 135: ...s and writes a hard disk See also hard disk hard disk A storage device composed of a rigid platter or platters that can be magnetically coded with data Hard disks hold much more information than diskettes and are used for long term storage of programs and data The primary or only hard disk in a computer is usually fixed but some computers have secondary hard disks that are removable By default the...

Страница 136: ...on 3 The point of contact between user the computer and the program for example the keyboard or a menu interrupt request A signal that gives a component access to the processor IrDA 1 1 An industry standard that enables cableless infrared serial data transfer at speeds of up to 4 Mbps K K Taken from the Greek word kilo meaning 1000 often used as equivalent to 1024 or 2 raised to the 10th power See...

Страница 137: ...arily such as RAM or it can be nonvolatile and hold data permanently such as ROM A computer s main memory is RAM See RAM ROM menu A software interface that displays a list of options on the screen Also called a screen microprocessor A hardware component contained in a single integrated circuit that carries out instructions Also called the central processing unit CPU one of the main parts of the co...

Страница 138: ...al state of a peripheral device when it is ready to receive or transmit data operating system A group of programs that controls the basic operation of a computer Operating system functions include interpreting programs creating data files and controlling the transmission and receipt input output of data to and from memory and peripheral device output The results of a computer operation Output comm...

Страница 139: ...instructions a computer can execute that enables it to achieve a desired result See also application prompt A message the computer provides indicating it is ready for or requires information or an action from you R Radio frequency interference RFI shield A metal shield enclosing the printed circuit boards of the printer or computer to prevent radio and TV interference All computer equipment genera...

Страница 140: ...y used in a variety of digital devices such as digital cameras and Personal Digital Assistants SECAM L SECAM Sequential Color Memory is a broadcasting standard used in France SIO Serial Input Output The electronic methodology used in serial data transmission soft key Key combinations that emulate keys on the IBM keyboard change some configuration options stop program execution and access the numer...

Страница 141: ...s an industry standard video adaptor that lets you run any popular software volatile memory Random access memory RAM that stores information as long as power is supplied to the computer W warm start Restarting or resetting a computer without turning it off Wi Fi A registered trademark term of the Wi Fi Alliance that stands for Wireless Fidelity and is another term for the communication protocol to...

Страница 142: ...leaning the computer 4 16 Cooling vents 2 3 2 6 D DC IN indicator 2 2 6 3 Display 2 7 brightness down 5 4 brightness up 5 4 controller B 1 opening 3 4 Documentation list 1 2 E Enable Disable Wireless communication with hot key 4 13 Equipment checklist 1 1 External monitor 1 5 2 3 8 7 F FN 1 TOSHIBA Zooming Utility reduce 5 5 FN 2 TOSHIBA Zooming Utility enlarge 5 5 FN ENTER 5 3 FN ESC Mute 5 3 FN ...

Страница 143: ...ard 1 5 5 1 emulating keys on enhanced 5 2 FN Sticky key 5 5 Function keys F1 F12 5 2 Hot keys 5 3 problems 9 5 9 6 Typewriter keys 5 1 Windows special keys 5 5 Keypad overlay 1 7 5 6 arrow mode 5 6 numeric mode 5 6 temporarily using normal keyboard overlay on 5 7 temporarily using overlay overlay off 5 7 turning on the overlays 5 6 L LAN 1 5 4 14 cable types 4 14 connecting 4 14 disconnecting 4 1...

Страница 144: ...st 9 3 Sound system 9 9 System start up 9 3 TOSHIBA support 9 13 Touch Pad 9 7 USB mouse 9 7 Wireless LAN 9 12 Processor 1 2 R Recovery Discs 3 13 Recovery hard disk drive 3 13 Restarting the computer 3 10 S Security lock attaching 8 8 Sleep Mode 1 9 setting 3 9 System automatic 1 7 Soft keys emulating keys on enhanced keyboard 5 2 ENTER 5 3 ScrLock 5 3 Sound system 1 5 Headphone S PDIF jack 1 5 2...

Отзывы: