15
Connections
Connecting to optional equipment
Before connecting the unit to other equipment, be sure to turn off the power and
unplug all of the equipment from the wall outlet before making any connections.
You can enjoy the camcorder or high quality dynamic sounds of DVD video discs or
audio CDs by connecting the unit to optional audio equipment.
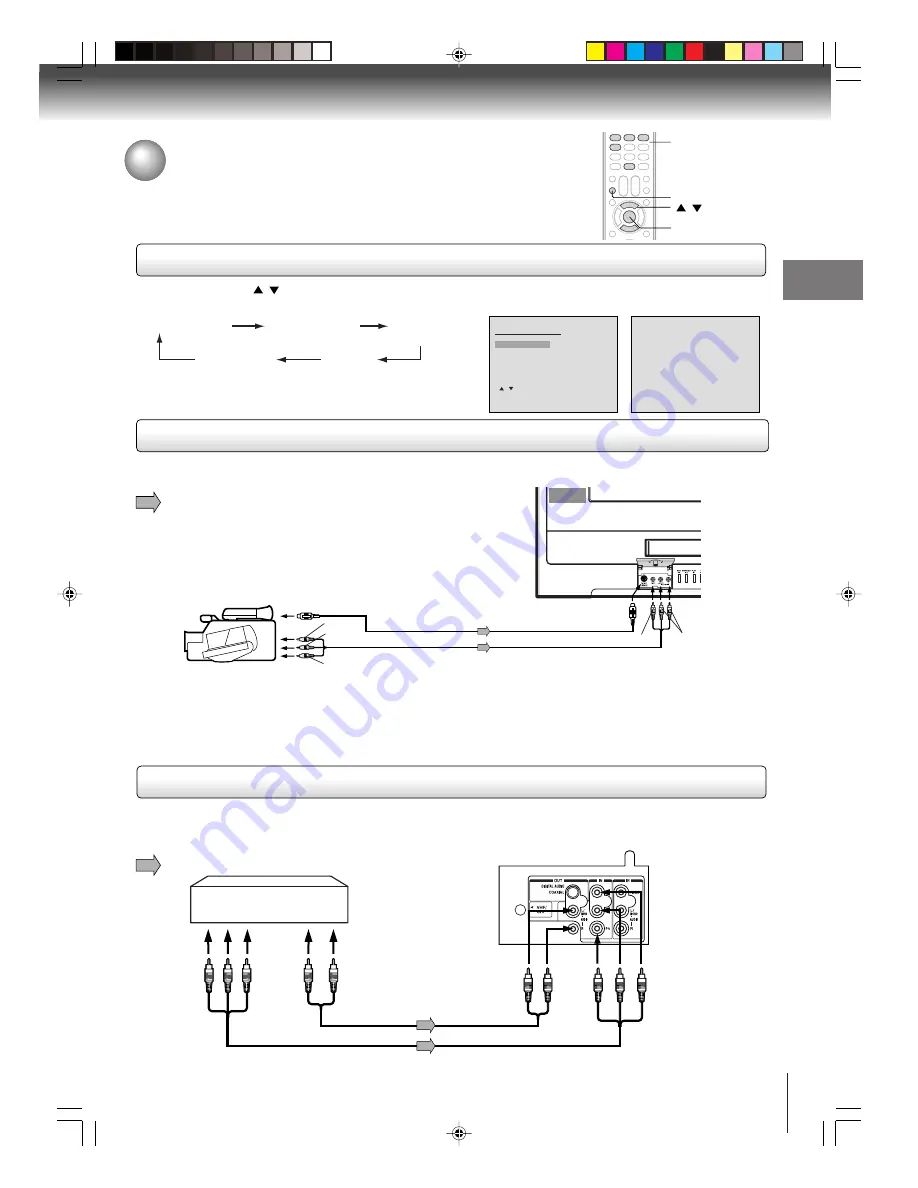
Connecting to a camcorder
Using the audio/video inputs
Press
INPUT
. Press
/
or
Number buttons (0-4)
to select the desired mode, then press
ENTER
.
“VIDEO1”, “VIDEO2”, “ColorStream”, Analog channel or Digital channel will display on the screen for 4 seconds.
VIDEO1
INPUT
ENTER
0–4
/
To playback from the camcorder, connect the camcorder to the unit as shown. And select “VIDEO2” input source.
Signal flow
To Audio/Video out
(red)
(white)
(yellow)
Audio/Video cable (not supplied)
To S-Video out
S-Video cable (not supplied)
To S-Video IN
To Video IN
(yellow)
To AUDIO (L/R)
IN
(white, red)
Notes:
• If your camcorder has S-video, you can use an S-video cable (plus the standard audio cables) instead of a standard video
cable for better picture quality. Do not connect both a standard video cable and an S-video cable at the same time, or the
picture performance will be unacceptable.
• You can also use the AUDIO(L/R)/VIDEO IN jacks on the rear of the unit.
Connecting to a DTV receiver / set-top box with ColorStream
®
(component video)
This connection allows you to watch DTV (digital TV) and TV programs, and record DTV and TV programs.
Your TV has ColorStream
®
(component video) inputs. Connecting your TV to a DTV receiver with component video can greatly
enhance picture quality and realism.
Rear of the unit
DTV receiver / set-top box
To audio out
To
component
video out
To
COMPONENT
AUDIO IN
To COMPONENT
VIDEO IN jacks
(Y)
(P
B
)
(P
R
)
Component video cable (not supplied)
Signal flow
5V60101A [E]p13-18
2/22/06, 1:02 PM
15


