background image

10

Introduction

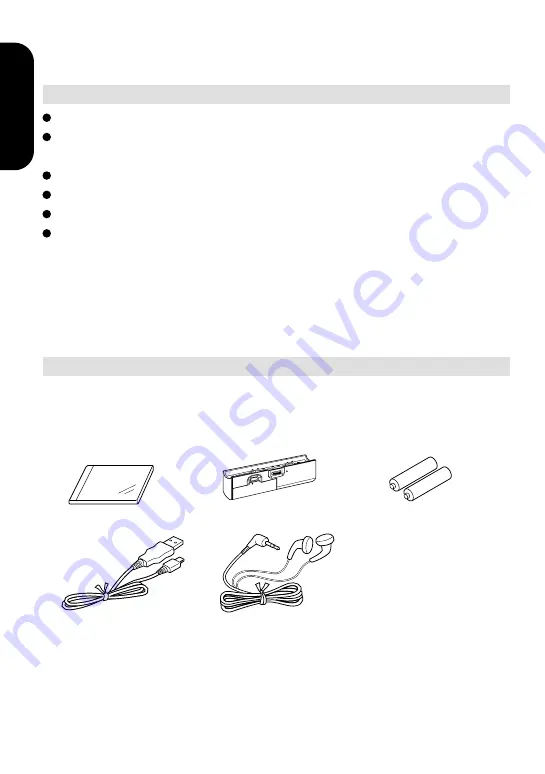
Accessories

Check that the following items are supplied to the player.

• Battery housing

• TOSHIBA Audio

Manager CD-ROM

• AAA Battery (2)

• Interface cable

• Headphones

System Outline (continued)

LOCK

OPEN

• End User License Agreement
• REGISTRATION CARD

Minimum PC Requirements

OS:

Microsoft

®

 Windows

®

 98 (Windows

®

 98 preinstalled)

CPU:

Pentium

®

 MMX

®

 233MHz or higher processor

(Pentium

®


II 300MHz or higher processor recommended)

Memory:

32MB minimum (64MB or more recommended)

Sound:

Sound card 16bit or more

Hard Disk: 10MB free space except for audio data

CD-ROM Drive: (SCSI) ANSI X3T10-1048D Standard drive

(ATAPI) SFF-8020 Standard drive

Microsoft, Windows are registered trademarks of Microsoft Corporation.

MMX, Pentium are registered trademarks of Intel Corporation.

Содержание MEA110

Страница 1: ...MOBILE AUDIO PLAYER MEA110 OWNER S MANUAL XZ2029P002B ...

Страница 2: ...termined by turning the equipment off and on the user is encouraged to try to correct the interference by one or more of the following measures Reorient or relocate the receiving antenna Increase the separation between the equipment and receiver Connect the equipment into an outlet on a circuit different from that to which the receiver is connected Consult the dealer or an experienced radio TV tec...

Страница 3: ...ly and follow all the operating and other instructions 2 Heat The product should be situated away from heat sources such as radiators heat registers stoves or other products that produce heat 3 Water and Moisture Do not use this product near water for example near a bath tub wash bowl kitchen sink or laundry tub in a wet basement or near a swimming pool and the like 4 Cleaning Remove all cables an...

Страница 4: ...vered by the operating instructions as an improper adjustment of other controls may result in damage and will often require extensive work by a qualified technician to restore the product to its normal operation d If the product has been dropped or damaged in any way e When the product exhibits a distinct change in performance this indicates a need for service 10 LCD When the LCD panel is broken a...

Страница 5: ...ified service personnel 15 Replacement Parts When replacement parts are required be sure the service technician has used replacement parts specified by the manufacturer or have the same characteristics as the original part Unauthorized substitutions may result in fire unit overheating or other hazards 16 Safety Check Upon completion of any service or repairs to this product ask the service technic...

Страница 6: ... may damage the surface of the unit If you use a chemical saturated cloth to clean the unit follow that product s instructions Notes on SD memory cards This unit can be used with an SD memory card inserted SD memory card An SD memory card is a rewritable media designed in compliance with the SDMI standards that protects copyrights of the authors It contains a semiconductor memory so that digital a...

Страница 7: ... card SD M32 32MB SD M64 64MB Copyrights It is forbidden by law to copy broadcast play in public or rent copyrighted material without permission Exemptions Toshiba is not liable for any damage caused by fire earthquake uses by a third person accidents owner s intentional or unintentional misuse or uses in other improper conditions Toshiba is not liable for incidental damages such as profit loss or...

Страница 8: ... on audio CDs and encodes them for storage Upon demand it plays the data or lends them to the player so that you can carry anywhere you want MP3 MPEG 1 Audio Layer3 An international standardized compression format of sound data This format can compress audio data into a 10th to 12th volume WAV Standard sound file format in Windows AAC MPEG 2 Advanced Audio Coding An international standardized comp...

Страница 9: ...eparation 3 Prepare audio data Write audio data to the player via the TOSHIBA Audio Manager Play the audio data on the player Page 28 Page 19 Page 14 Page 12 Preparations 1 to 3 are necessary for all users who use this TOSHIBA mobile audio player for the first time Once you operate the player you do not need to make preparations 1 and 2 every time Make preparation 3 when you want to change audio d...

Страница 10: ...ts OS Microsoft Windows 98 Windows 98 preinstalled CPU Pentium MMX 233MHz or higher processor Pentium II 300MHz or higher processor recommended Memory 32MB minimum 64MB or more recommended Sound Sound card 16bit or more Hard Disk 10MB free space except for audio data CD ROM Drive SCSI ANSI X3T10 1048D Standard drive ATAPI SFF 8020 Standard drive Microsoft Windows are registered trademarks of Micro...

Страница 11: ...ling the TOSHIBA Audio Manager 14 Connection to a computer 16 Using an SD memory card option 18 Using the TOSHIBA Audio Manager 19 Operation Playing a song 28 To stop playback 30 To turn the power off 30 To play fast in forward or reverse direction 30 To locate a song 31 Changing the function settings 32 Others Error messages 36 Formatting mode 37 Troubleshooting 39 Specifications 40 Identificatio...

Страница 12: ...Do not use different types of batteries together or mix old and new batteries Neglecting the above may cause battery leakage and corrosion resulting in burns or injury If your fingers or clothes touch the battery acid wash them immediately If your eyes come in contact with battery acid wash them and immediately consult your doctor If the surface of an object becomes soiled use a cloth to wipe if o...

Страница 13: ...hen using nickel metal hydride rechargeable batteries the battery indicator on the player may not correspond to an actual battery consumption If exhausted batteries are used the battery indicator on the player may show full temporarily when you turn the player on However the player will turn off the moment you begin operating it For a use of long duration If you want to use this player for a prolo...

Страница 14: ...not have to do them at every time Preparation Startup your computer Turn off all applications including virus protection software Confirm that batteries are loaded into the player page 12 Leave a USB connector on your computer unconnected Installing the TOSHIBA Audio Manager 1 Insert the supplied TOSHIBA Audio Manager CD ROM into a CD ROM drive on your computer TOSHIBA Audio Manager Setup Menu app...

Страница 15: ...an USB connector on your computer using the supplied interface cable Found New Hardware Wizard appears Be sure to confirm that batteries are loaded into the player before connecting it to your computer 3 Follow the instructions on screen Initializing the TOSHIBA Audio Manager 1 Launch SD Applications on the start menu of your computer 2 Follow the instructions on screen During the procedure you wi...

Страница 16: ...he first time When you transfer audio data to the player When you take out audio data from the player When the TOSHIBA Audio Manager requests you to do Preparation When you connect the player to your computer for the first time Found New Hardware Wizard appears on the screen of your computer Follow the instructions on screen to install the USB driver page 15 To the I F connector To the USB connect...

Страница 17: ... player cannot turn on if it is connected to a computer with no batteries loaded The player connected to a computer is powered from a USB connector of your computer or USB hub Never remove the interface cable while exchanging data between the player and the computer Doing so may damage the data Cap the I F connector while it is not being used Notes If the player does not receive any operational co...

Страница 18: ...Preparation 1 Open the card slot on the player Push the tab down 2 Insert an SD memory card into the card slot Slowly and fully insert an SD memory card in the correct direction 3 Pull the tab up to close the card slot 1 Open the card slot 2 Slide the EJECT switch The SD memory card is half ejected Pull out the SD memory card straight and slowly 3 Pull the tab up to close the card slot SD memory c...

Страница 19: ... titles and dates of imported audio data By utilizing these information you can create an index of specific songs stored in the computer or the player and play them in the desired order The TOSHIBA Audio Manager calls this index PlayList By making your own PlayLists for example Driving time My Beetles you can enjoy an original collection of your favorite songs For details on making editing a PlayL...

Страница 20: ...s the network drive s position will be void Assign your network drive a position except one for the player If you cannot click a window of TOSHIBA Audio Manager your system may be running short of resource available application memory Quit unnecessary applications Refer to the README TXT for CD ROM drives on which the TOSHIBA Audio Manager has been proved to run If you use a CD ROM drive not inclu...

Страница 21: ...has been copied there 2 The TOSHIBA Audio Manager cannot read data that contains copy protection signals in compliance with the terms and conditions of SDMI 3 Data which contains no restrictions on usage such as CD is limited to 3 transfers according to the terms and conditions of SDMI SDMI Secure Digital Music Initiative an organization established to construct technology specifications to protec...

Страница 22: ...ard into the player page 18 1 Launching the TOSHIBA AUDIO Manager Choose Audio Manager from the start menu The following window player window appears Important To use the TOSHIBA Audio Manager for the first time it is necessary to initialize the software If a message appears connect the player to your computer and follow the instructions on the program to initialize the software Using the TOSHIBA ...

Страница 23: ...OSHIBA Audio Manager 1 Insert an audio CD into a CD ROM drive on your computer 2 Click on the window The LIBRARY MANAGER window appears 3 Click CD on the menu then click Refresh Contents of the audio CD are displayed Note Depending on the operation status of the CD ROM drive the LIBRARY MANAGER may not show the entire contents of the audio CD In this case click Refresh again continued Step 3 Step ...

Страница 24: ... a song you want to import and click Import The process indicator starts counting The LIBRARY list shows imported songs Before clicking Import you can enter a name in PlayList for songs you selected Making a PlayList here will help you designate many songs to transfer or play later ...

Страница 25: ...o a computer 2 Click PD SD on the menu bar Contents in the PD player or the SD SD memory card inserted in the player are displayed 3 Choose the location where you transfer the songs Internal memory to transfer to the internal memory of the player SD card to transfer to an SD memory card in the player continued Step 3 ...

Страница 26: ...choose all songs in it at a time Choose PlayList from the Search menu then choose a desired PlayList using the Keyword menu Click the check box of Include playlist information then click Add All 5 Click Export Transferring starts The process indicator starts counting When transferring is complete the indicator disappears Important Never remove the interface cable while transferring audio data Step...

Страница 27: ...nsfer it to the player For the procedure to delete songs refer to the online help of the TOSHIBA Audio Manager To play MP3 audio data on this player be sure to use the TOSHIBA Audio Manager to transfer it The player cannot play MP3 data which did not come from the TOSHIBA Audio Manager 4 Quitting the TOSHIBA Audio Manager Click on the right of the menu bar Remove the interface cable from your comp...

Страница 28: ...audio data to play page 19 Connect the supplied headphones to the headphone jack of the player Operation Headphones To the headphone jack Jog switch 1 Jog switch 2 Display Using the jog switch The following are the main actions of the jog switch Use each jog switch properly for various commands according to the instructions on this manual Press in Push up Push down ...

Страница 29: ...s you ejected the SD memory card you changed the audio data in the SD memory card or the internal memory of the player you formatted the SD memory card or the internal memory of the player the player turned on by power from the connected computer 2 Push the jog switch 2 up and down to select a PlayList If PlayLists do not appear skip to step 3 3 Press the jog switch 1 in Playback starts 4 Adjustin...

Страница 30: ... operate it for about 1 minute after playback is stopped To turn the power off Press the jog switch 1 in for more than 1 second To play fast in forward or reverse direction Fast forward push down and hold the jog switch 1 Fast reverse push up and hold the jog switch 1 While holding the switch fast forward or fast reverse playback continues If you release the switch the playback speed returns to no...

Страница 31: ...o this action repeatedly until you find the desired song number Notes If you push up and release the jog switch 1 one time you will only locate the beginning of the current song To locate a more previous song repeat this action as necessary To start playback of a song you located while playback was stopped press the jog switch 1 in You can locate a desired point page 35 Quick return function mode ...

Страница 32: ...ress and hold the jog switch 2 in the display returns to normal Operation Volume control mode To adjust the volume page 29 PlayList selection mode To select a specific PlayList page 33 Playback selection mode To select the playback order page 34 Quick return function mode To turn the function on and off page 35 Display selection mode To select a display pattern page 35 Quick return function This f...

Страница 33: ...e treble to prevent noise leakage from headphones Select a PlayList you want to play The display shows PlayLists in the internal memory and then those in the SD memory card Besides PlayLists you made you will find an ALL SONGS PlayList for each of the internal memory and an SD memory card PlayList selection mode To select To go to another mode To select To go to another mode For Playlists in the i...

Страница 34: ... PlayList or RANDOM ALL during playback this playback mode will become active after the current song is finished If you change the PlayList during playback the player stops and begins playback from the first song of the selected PlayList when RANDOM PlayList or RANDOM ALL has been selected the player stops and plays the first song of the selected PlayList and then plays songs choosing at random Yo...

Страница 35: ...the memorized point Push up and then release the jog switch 1 to locate the memorized point Ex To repeat a chorus To select To go to another mode Display selection mode TITLE LEVEL Displays song titles and the artist s name Displays the left and right volume levels To select To go to another mode Note The memory of the location is erased when the player turns off you inserted or ejected an SD memo...

Страница 36: ...card and format it page 37 Formatting an SD memory card erases all data in it Insert an SD memory card then start formatting The SD memory card may be damaged Others An SD memory card that the player does not support is inserted The inserted SD memory card is not formatted or the format is not supported on this system The inserted SD memory card is not available on this player The data is of a fil...

Страница 37: ...mory card insert it into the player and turn the player off 1 While pushing down the jog switch 2 press in and hold the jog switch 1 until the power turns on The player turns on and enters the formatting mode 2 Push the jog switch 1 up and down to select a formatting item SD MEMORY CARD to format an SD memory card INTERNAL MEMORY to format the internal memory 3 Press the jog switch 1 in The confir...

Страница 38: ...rtant Improper formatting may result from the use of an incompatible computer Use this player whenever formatting Never eject an SD memory card while formatting Doing so may damage the SD memory card Note An error message may be displayed during these steps Refer to page 36 To cancel the procedure push the jog switch 1 or 2 up or down to restore the display to the one in step 2 then perform steps ...

Страница 39: ...a playable on this player page 19 It is while exchanging audio data between the player and the computer Playback is not possible while you are exchanging audio data Start playback after having finished exchanging audio data page 16 No sound The supplied headphones are not connected firmly Connect the supplied headphones firmly page 28 The volume is set to the minimum Adjust the volume page 29 Cann...

Страница 40: ...rox 80 minutes bit rate 96 kbps Approx 120 minutes bit rate 64 kbps Playback duration Main unit Battery housing Duration Alkaline not loaded Approx 5 hours Nickel Metal Hydride rechargeable not loaded Approx 4 hours Alkaline Alkaline Approx 12 hours Nickel Metal Hydride rechargeable Alkaline Approx 10 hours Measured at 25 C bit rate 128 kbps with alkaline batteries TOSHIBA LR03G R nickel metal hyd...

Страница 41: ...ard Fast reverse 32 29 Display 28 Headphone jack 16 I F connector Take off the cover when using this connector Pull up here PHONES I F POWER MENU HOLD S N EJECT 12 Battery door HOLD switch 18 Card slot 18 EJECT switch Setting this switch in the direction of the arrow can hold the unit unresponsive to any jog switch action so that you can avoid unintended operation by contact with other objects con...

Страница 42: ...er indicator Shows the power supply condition Tone control 33 35 Playback order 34 35 Full Nearing the end Replace the batteries Powered from a connected computer via an USB connector The elapsed time is only for reference it may be different from the actual play time Playing AAC data Playing MP3 data Pause Fast forward Fast reverse Locating in the forward direction Locating in the reverse directi...

Страница 43: ...inal retail purchase During this period TACP THI will repair or replace a defective unit without charge to you except that if a defective unit is replaced after ninety 90 days from the date of the original retail purchase you pay labor charges involved in the replacement You must also deliver the entire product to a TACP THI Authorized Service Station You are responsible for all transportation and...

Страница 44: ...improper installation improper maintenance or use in violation of instructions furnished by us or to units which have been altered or modified without authorization of TACP THI TCL or to damage to products or part thereof which have had the serial number removed altered defaced or rendered illegible 7 Physically damaged products are not acceptable for repair or exchange whether in or out of warran...

Страница 45: ...ed the defect This limitation does not apply to implied warranties arising under state law This warranty gives you specific legal rights and you may have other rights which may vary from state to state Some states do not allow limitation on how long an implied warranty lasts when an action may be brought or the exclusion or limitation of incidental or consequential damages so the above provisions ...

Страница 46: ...Printed in Japan ...

Отзывы: