


163
Step Component
Procedure
Remarks
12
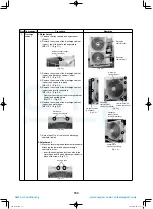
Compressor
replacement
1. Removing the malfunctioning compressor
1) Collect the refrigerant gas with the recovery
equipment.
2) Remove the front panels, upper panel,
discharge cabinets, side panels, reactor box,
and Inverter assembly. [Step.1, Step.2, Step.3,
Step.4, and Step.5]
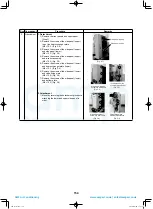
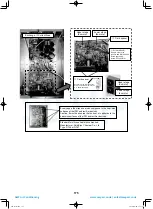
3)
Remove the screws the inverter fixing plate
(back), heat exchanger, and remove the
inverter fixing plate (back).
(M4×10, 3) (Fig. 12-1)
4) Remove the screws the partition plate and
inverter fixing plate (lower), and remove the
inverter fixing plate (lower).
(M4×10, 3) (Fig. 12-2)
5) Remove the screws the packed valve and ball
valve from the valve fixing plate.
(hexagonal screws: M5×16, each 2) (Fig. 12-4)
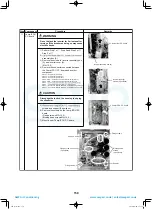
6) Remove the screws the partition plate (lower)
and valve fixing plate.
(M4×10, 2) (Fig. 12-3)
7) Remove the sound-insulation mat (outside,
inside).
8) Remove the screws the partition plate (lower),
bottom plate, and heat exchanger (lower), and
remove the partition plate (lower).
(M4×10, 4) (Fig. 12-5)
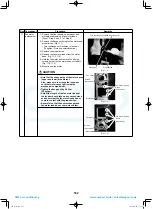
9) Remove the TD sensor and binding band the
discharge pipe. (Fig. 12-6)
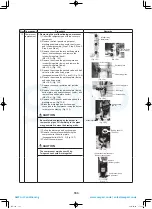
10) Braze the discharge and suction pipes
connected to the compressor using the burner
to remove the brazing. (Fig. 12-7)
CAUTION
Be careful when brazing by the burner to
remove the pipes. Oil remaining in the pipes
may generate fire when the brazing melts.
11) Pull up the discharge and suction pipes.
12)
Remove the compressor bolts fixing the
compressor to the bottom plate.
(hexagonal bolts: M6×15, 3) (Fig. 12-7)
13) Pull out the compressor.
CAUTION
The compressor weighs over 20 kg.
Two persons should work together.
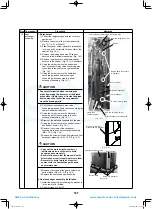
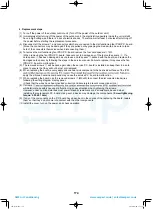
<Compressor replacement>
Remove (suction pipe)
Compressor bolts
(3 positions)
Valve fixing plate
Partition plate
Inverter fixing
plate (back)
(Fig. 12-1)
(Fig. 12-2)
(Fig. 12-3)
(Fig. 12-4)
Packed valve
Valve fixing plate
Ball valve
Partition plate
(lower)
Bottom plate
(Fig. 12-5)
(Fig. 12-7)
Inverter fixing
plate (lower)
Remove
(discharge pipe)
(Fig. 12-6)
Binding band for
TD sensor
100.indd 163
2016/04/08 17:32:58
AMP Air Conditioning
www.ampair.co.uk | [email protected]


