background image

Toshiba Pocket PC  e800/e805 User’s Guide

108

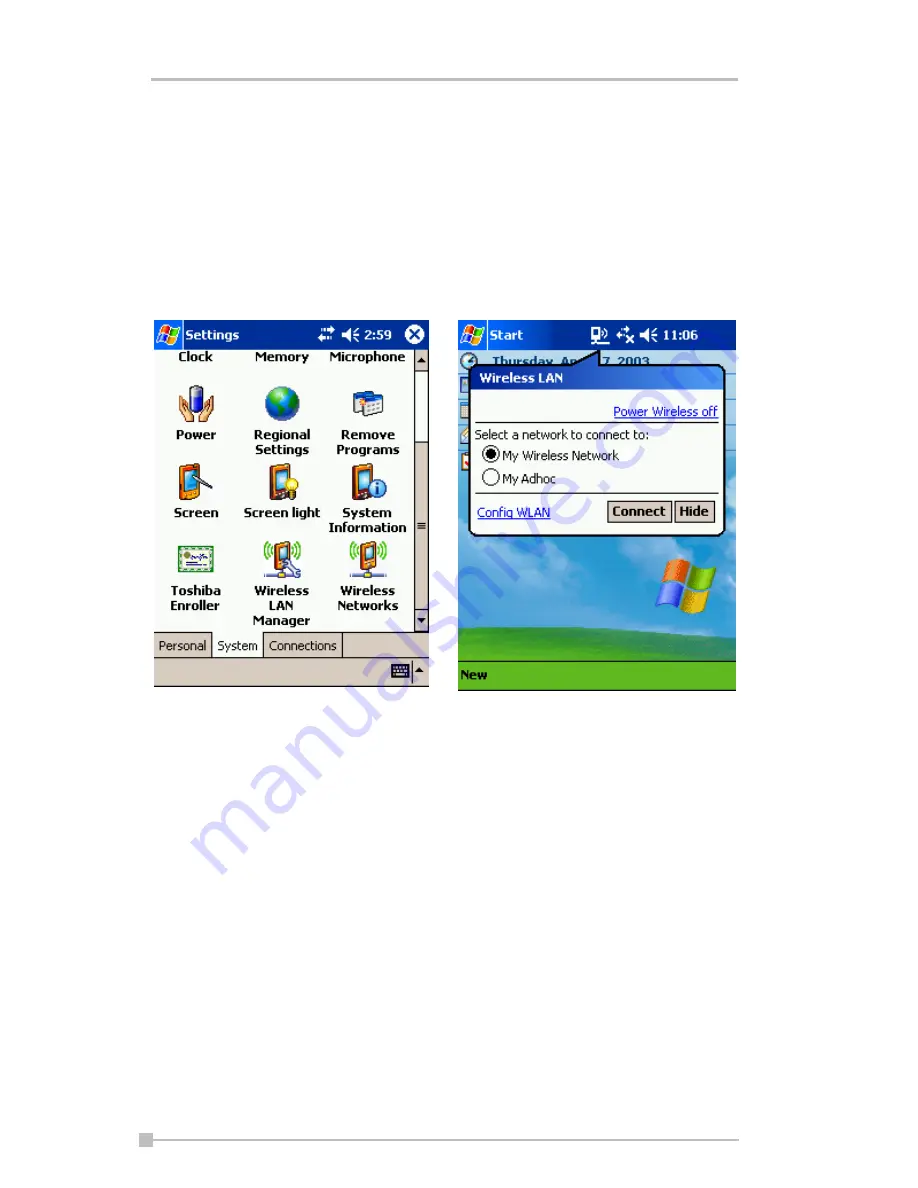
Launch a wireless LAN configuration

In order to launch a wireless LAN, you must use the Configure Wireless
Networks Screen to enable the correct settings within the Configure Wire-
less LAN Settings menu. To launch the Configure Wireless Networks
Screen, tap the TMU (Traffic Monitoring Utility) Wireless LAN Indicator
icon on the navigation bar, and then tap the 

Config WLAN

 link. You can

also launch by tapping 

Start

Settings

System

, then 

Wireless


Net-

works

.

Turn Off/On Wireless LAN connection

If you want to turn off/on the wireless LAN, tap the arrows icon on the navi-
gation bar and launch the Connectivity window. If you tap the 

Turn Wire-

less off/on 

link on the window you can turn off/on the wireless LAN module

Содержание e805

Страница 1: ...Pocket PC e800 e805 User s Guide Handling the cord on this product will expose you to lead a chemical known to the State of California to cause birth defects or other reproductive harm Wash hands after handling ...

Страница 2: ...STTEK LLC ATI and IMAGEON are registered trademarks of ATI Technologies Inc Microsoft Windows ActiveSync and PowerPoint are registered trademarks and Windows CE is a trademark of Microsoft Corporation in the United States and other countries IA Album IA Presenter and IA Screen Mirror are registered trade marks of IA Style Inc and Information In Action is a trademark of IA Style Inc The names of ot...

Страница 3: ...ust be observed in order to avoid potential hazards that could result in personal injuries or could damage your computer The safety instructions have been classified according to the seriousness of the Risk as follows Always request and obtain prior consent and approval of an authorized airline representative before using your Pocket PC aboard an aircraft Always follow the instructions of the airl...

Страница 4: ... Pocket PC in combination with a mobile cellular telephone Failure to do so could result in interference with the function of the pacemaker Never use a Pocket PC while driving an automobile or any other moving vehicle Always pull out of traffic and come to a stop in a legally permissi ble and safe location before using your Pocket PC Failure to do so could result in serious bodily injury in a traf...

Страница 5: ...uid come into contact with the eyes irrigate the eyes thoroughly with clean water and immediately seek medical attention In the event the liquid comes into contact with the skin or clothing wash it away immediately with clean water Never attempt to disassemble repair or make any modification to your Pocket PC Disassembly modification or any attempt at repair could cause bodily injury or property d...

Страница 6: ...ear the AC Adaptor Spilled liquid coming in contact with the AC Adaptor could cause a fire or electric shock Always ensure the power plug pins are clean and free of dust or other for eign material by wiping the pins with a clean dry cloth Dust or other for eign material accumulation on the power plug pins could cause fire Always unplug the power plug from an outlet by grasping the power plug itsel...

Страница 7: ... to avoid causing any damage to the cord Never plug the AC Adaptor into an overloaded multiple outlet power strip or surge protector to prevent blowing a fuse or tripping a circuit breaker Never place heavy objects on a Power Supply Cable as that could result in damage to the cord Always confirm that the AC Adaptor plug and the extension cord and plug if any have been fully inserted into the recep...

Страница 8: ...function loss and or the loss of data In the event of moisture condensation allow your Pocket PC to dry out completely It is normal for the AC Adaptor to become warm when charging Disconnect the power plug from the outlet when not in use Take care not to sit on your Pocket PC when it is located in the back pocket of trousers etc This could cause damage to your Pocket PC or malfunction of the Pocke...

Страница 9: ...s in no way liable for any damage including but not limited to change or loss of stored data loss of business profit loss of earnings interruption of business or lost communication opportunities that are caused by use or nonuse of this product Toshiba Corporation is in no way liable for any damage resulting from failure to comply with the contents of this user s guide Toshiba Corporation is in no ...

Страница 10: ...ibrillator implant Failure to maintain this distance can cause a malfunction of the pace maker due to radio interference Do not use the Bluetooth near an automated controlling device such as an automatic door or fire alarm Failure to do so can cause an accident due to radio interference with the automated controlling device Immediately discontinue use of the Bluetooth if it causes radio inter fere...

Страница 11: ...d working environments may be Interference with other devices or machines in the nearby surrounding area Malfunction of or data loss from this product caused by disturbances generated by other devices or machines in the nearby surrounding area Therefore Toshiba strongly recommends that the electromagnetic com patibility of this product be suitably tested in all non approved working Información com...

Страница 12: ... implemented Only best shielded cables should be connected FCC Notice Declaration of Conformity This equipment has been tested and found to comply with the limits for a Class B digital device pursuant to part 15 of the FCC Rules These limits are designed to provide reasonable protection against harmful interfer ence in a residential installation This equipment generates uses and can radiate radio ...

Страница 13: ...pherals complying with the FCC class B limits may be attached to this equipment Operation with non compliant peripherals or peripherals not recommended by Toshiba is likely to result in interference to radio and TV reception Shielded cables must be used between the external devices and the computer s USB ports external monitor port PS 2 keyboard port and PS 2 mouse port Changes or modifications ma...

Страница 14: ...Department of Communications DOC regulations provide that changes or modifications not expressly approved by TOSHIBA Corporation could void your authority to operate this equip ment This Class B digital apparatus meets all requirements of the Canadian Interference Causing Equipment Regulations Cet appareil numérique de la class B respecte toutes les exgences du Règlement sur le matériel brouilleur...

Страница 15: ...o or television reception which can be determined by turning the equipment off and on the user is encouraged to try to correct the interference by one of the following measures Reorient or relocate the receiving antenna Increase the separation between the equipment and receiver Connect the equipment into an outlet on a circuit different from that to which the receiver is connected Consult the deal...

Страница 16: ...HAPTER 4 Microsoft Pocket Outlook 66 CHAPTER 5 Companion Programs 75 CHAPTER 6 Pocket Internet Explorer 93 CHAPTER 7 Getting Connected 99 CHAPTER 8 Wi Fi Wireless LAN 107 CHAPTER 9 TOSHIBA IP Phone for Pocket PC 139 CHAPTER 10 Bluetooth 140 CHAPTER 11 Optional Functions 161 CHAPTER 12 Additional Information 208 ...

Страница 17: ...ocket PC Due to the size and capabilities of this device you can keep your most important busi ness and personal information up to date and close at hand Microsoft ActiveSync increases the power of your device by allowing you to syn chronize the information on your desktop or laptop computer with your device ...

Страница 18: ...rce Programs on your Pocket PC This User s Guide and device Help To view Help tap and then Help Additional programs that can be installed on the Pocket PC The Pocket PC Companion CD Connecting to and synchronizing with a computer The Quick Start Card or Active Sync Help on your computer To view Help open the Microsoft Active Sync applica tion and then click Help Last minute updates and detailed te...

Страница 19: ... Guide Pin Release Button Touch Screen Program Button 1 2 3 4 from the left Power Button Screen Light Stereo Headphone Recording Button Program Button 5 Cursor Button Navigation Button Lock Optional Presentation Pack Cradle Connection Port Program Button Initial Settings Program button 1 Calendar Program button 2 Tasks Program button 3 Home Program button 4 Contacts Program button 5 Voice recorder...

Страница 20: ... s Guide 20 Main unit end view DC IN Socket Battery Switch Cradle Connection Port Wireless Communication Switch Wireless LAN Bluetooth model only USB Port RGB Monitor Port Optional Presentation Pack Release Button Switch cover Cradle ...

Страница 21: ...ower is on Press and hold The power turns on The screen light alternately turns on off Press it quickly The power turns on The power turns off DC IN Socket Stereo Headphone Hold Switch SD Card Slot Microphone Input Stylus Reset Button CFII Release Button use Stylus to eject Removable Lithium Ion Battery Pack CFII Card Slot TOSHIBA Scroller Recording Button Battery Release ...

Страница 22: ...tery switch to the right Battery Alarm LED The Battery Alarm LED indicates the machine condition Switching the battery switch to the stop position at any time will lead to loss of data Flashing orange When the preset alarm time which was set through Cal endar or Tasks goes off the lamp starts flashing Orange Indicates charging of the battery Yellow The battery charging process is stopped due to th...

Страница 23: ... Mobile 2003 if the switch is turned on a window will popup to show the list of existing networks you can join Wireless LED Descriptions LED indicates the different status Hold Switch When the Hold switch is on Program Buttons 1 through 5 Cursor Button and Scroller will be disabled The Hold switch icon will be displayed on the navigation bar On the contrary when the Hold switch is off these button...

Страница 24: ...e action you want to perform About the Cursor Button There are 2 modes for cursor button control 4 direction upper lower right or left 8 direction oblique angles are added You can select the either of these two modes by tapping Settings and then Buttons In either mode you can move a cursor selection display on the screen by pressing the upper lower right or left part of the cursor When you operate...

Страница 25: ...the removable battery with the supplied AC adapter Assembling the Cradle Prior to charging the battery the back plate that supports the Toshiba Pocket PC e800 e805 while charging needs to be inserted into the base of the cradle To do this insert the transparent plate side A facing the cra dle connection port into the cradle base to cradle position P1 as shown below If your Toshiba Pocket PC e800 e...

Страница 26: ...ow to Charge the Battery You can use the following charging methods Turn the unit off before connecting the AC Adapter and your Toshiba Pocket PC e800 e805 Side A Side B Cradle connection port Standard battery pack High capacity battery pack NOTE ...

Страница 27: ...adle Handling the cord on this product will expose you to lead a chemical known to the State of California to cause birth defects or other reproductive harm Wash hands after handling For charging the battery maintain an ambient tempera ture from approximately 41 F to 104 F 5 C to 40 C When the lamp is lit in orange during the battery charging you can use the Toshiba Pocket PC e800 e805 When the ba...

Страница 28: ...t PC You cannot turn on the power if the Battery Pack Lock is in the Release Position You can change the main battery without data loss because the Toshiba Pocket PC e800 e805 has a rechargeable backup battery However the capacity of the backup battery is limited therefore when you change the main battery attach the new main battery and switch the Battery Pack Lock to the lock side as soon as poss...

Страница 29: ...You cannot turn on the power if Battery Pack Lock is at the Release side You can replace the main battery with the High Capacity Battery pack without data loss because Toshiba Pocket PC e800 e805 has a rechargeable backup battery How ever the capacity of the backup battery is limited there fore when you change the main battery attach the new main battery and switch the Battery Pack Lock to the loc...

Страница 30: ... Use your unit with an ambient temperature between 59 F and 77 F 15 C and 25 C This temperature range is the most effec tive for the battery When you use the Toshiba Pocket PC e800 e805 in high or low temperature environments the operable time is shortened due to the decrease of the battery capacity You can save power if the wireless communication module is off Battery Life The removable battery h...

Страница 31: ... PC e800 e805 s mem ory data to your computer or to a storage card The manufacturer is not responsible for data change or clearance due to battery discharge How to Use the Optional Presentation Pack You can use the Optional Toshiba Presentation Pack as shown on page 19 together with the Toshiba Pocket PC e800 e805 to connect to addi tional peripherals Parts and Functions of the Presentation Pack T...

Страница 32: ... the Presentation Pack and gently remove the Pack from the Toshiba Pocket PC e800 e805 How to use the Optional USB Host Client Cable The optional USB Host Cable allows you to connect a USB keyboard to the Pocket PC To connect a USB keyboard to the Pocket PC 1 Turn off the power 2 Plug the optional USB Host Cable to the Pocket PC 3 Connect a USB keyboard to the USB Port of the optional USB Host Cab...

Страница 33: ... Five taps completes the positioning correction The screen then changes to the Stylus screen If a finger or any other object touches the screen during correc tion the correction will be cancelled Repeat the correction pro cedure 3 Read how to use the stylus Read and understand the stylus operation and then tap NEXT 4 Learn the pop up menu operation Read the on screen explanation and then follow th...

Страница 34: ...apping the screen you can use the Toshiba Pocket PC e800 e805 Inserting a CF II Card 1 Turn off the power 2 Remove the dummy card 3 Insert the CF II Card To remove a card 1 Turn off the power 2 Lightly press down the release button with the stylus The button will pop out Press down on the release button again The card will with draw slightly from the slot When you tap the Complete screen the Today...

Страница 35: ...erting an SD Card 1 Turn off the power 2 Remove the dummy card 3 Insert the card with its contact surface metal contact surface facing the back of the Toshiba Pocket PC e800 e805 4 Press down on the card until it clicks into place Use stylus to release the CF card NOTE ...

Страница 36: ... Pull the card straight up to remove Connecting to a Computer Before connecting your Toshiba Pocket PC e800 e805 to a computer check the following ActiveSync has been installed on your computer See Chapter 3 The position of connecting port on the computer may differ according to the computer type To Connect Using the Supplied Cradle 1 Connect the USB cradle to your computer as shown below ...

Страница 37: ...cket PC e800 e805 directly to your computer using an optional Serial Client cable When the Toshiba Pocket PC e800 e805 is connected to another device via a USB Sync Cable do not plug the AC adapter directly into the Pocket PC as this may lead to interference Instead plug the AC adapter into the port on the USB Client cable connector ...

Страница 38: ...Today On the Today screen you can see at a glance important information for the day Tap to go to T T a program Tap to change volume or mute all sounds Tap to change date and time T T Tap to change owner information T T Your day at a Y Y glance Tap to open the associated program Tap to disconnect from T T ActiveSync Tap to create a new item T T Tap and hold to change time format Tap to view network...

Страница 39: ...atus Icon Meaning Turns all sounds on and off Main battery is charging Main battery is low Main battery is very low Main battery is full Connection is active Connection is inactive Synchronization is occurring Notification that one or more instant messages were received Notification that one or more email messages were received Traffic Monitoring Utility W LAN model only If more notification icons...

Страница 40: ...eate meeting requests Contacts Keep track of your friends and colleagues Inbox Send and receive email messages Pocket Internet Explorer Browse Web and WAP sites and download new programs and files from the Internet Notes Create handwritten or typed notes drawings and recordings Tasks Keep track of your tasks Pocket Excel Create new workbooks or view and edit Excel workbooks created on your compute...

Страница 41: ...to switch to programs and close screens Use the command bar at the bottom of the screen to perform tasks in pro grams The command bar includes menu names buttons and the Input Panel button To create a new item in the current program tap New To see the name of a button tap and hold the stylus on the button Drag the stylus off the button so that the command is not carried out ...

Страница 42: ...tions in the pop up menus vary from program to program To access a pop up menu tap and hold the stylus on the item name that you want to perform the action on When the menu appears lift the stylus and tap the action you want to perform Additionally you can tap anywhere outside the menu to close the menu without performing an action Tap and hold to display the pop up menu Lift the stylus and tap th...

Страница 43: ...er by using the soft key board or other input method Write directly on the screen Draw pictures on the screen Speak into your device microphone to record a message Use Microsoft ActiveSync to synchronize or copy information from your computer to your device For more information on ActiveSync see ActiveSync Help on your computer Entering Text Using the Input Panel Use the input panel to enter infor...

Страница 44: ...To use Block Recognizer With Block Recognizer you can input character strokes using the stylus that are similar to those used on other devices 1 Tap the arrow and then Block Recognizer To change word suggestion options such as the number of words suggested at one time tap Settings Per sonal tab Input and then the Word Completion tab To use larger keys tap the arrow Options select Keyboard in Input...

Страница 45: ...criber 2 Write anywhere on the screen For specific instructions on using Transcriber with Transcriber open tap the in the lower right hand corner of the screen To select typed text If you want to edit or format typed text you must select it first Drag the stylus across the text you want to select You can cut copy and paste text by tapping and holding the selected words and then tapping an editing ...

Страница 46: ...an also select text by tapping Pen to deselect it and then dragging the stylus across the screen You can cut copy and paste written text in the same way you work with typed text tap and hold the selected words and then tap an editing com mand on the pop up menu or tap the command on the Edit menu To convert writing to text Tap Tools and then Recognize If you want to convert only certain words sele...

Страница 47: ...rnates or return to the original writing To do so tap and hold the incor rect word tap one word at a time On the pop up menu tap Alternates A menu with a list of alternate words appears Tap the word you want to use or tap the writing at the top of the menu to return to the original writ ing The writing is turned into text Select the text you want to convert and tap Recognize on the pop up menu ...

Страница 48: ...l where words begin and end Hyphenated words foreign words that use special characters such as accents and some punctuation cannot be converted If you add writing to a word to change it such as changing a 3 to an 8 after you attempt to recognize the word the writing you add will not be included if you attempt to recognize the writing again Drawing on the Screen You can draw on the screen in the sa...

Страница 49: ... the selection handle appears To select multiple drawings deselect the Pen button and then drag to select the drawings you want You can cut copy and paste selected drawings by tapping and holding the selected drawing and then tapping an editing command on the pop up menu or by tapping the command on the Edit menu To resize a draw ing make sure the Pen button is not selected and drag a selection ha...

Страница 50: ...he Record Playback toolbar tap 2 Hold your mobile device s microphone near your mouth or other source of sound 3 Tap and make your recording 4 Tap when finished If you are recording in an open note an icon will appear in the note If you are creating a stand alone recording it will appear in the note list To play a recording tap the recording icon in the open note or tap the recording in the note l...

Страница 51: ...mation The Find feature on your device helps you quickly locate information On the menu tap Find Enter the text you want to find select a data type and then tap Go to start the search You can also use the File Explorer to find files on your device and to orga nize these files into folders 1 On the menu tap Programs and then select File Explorer You can add text after inserting a My Text message be...

Страница 52: ... or to set alarms Menus to customize what appears on the menu and to enable a pop up menu from New Owner Information to enter your contact information Password to limit access to your device Power to maximize battery life Today to customize the look and the information that is displayed on the Today screen Adding or Removing Programs Programs added to your device at the factory are stored in ROM r...

Страница 53: ...he pro gram designed for the Toshiba Pocket PC e800 e805 and your device processor type 3 Read any installation instructions Read Me files or documentation that comes with the program Many programs provide special installation instructions 4 Connect your device and computer 5 Double click the exe file If the file is an installer the installation wizard will begin Follow the directions on the scree...

Страница 54: ... the device to move the program to the Start Menu folder or use ActiveSync on the computer to create a shortcut to the program and place the shortcut in the Start Menu folder Using File Explorer on the device Tap Programs File Explorer and locate the program tap the folder list labeled My Doc uments by default and then Local Device to see a list of all folders on the device Tap and hold the progra...

Страница 55: ...rmation screen to return to the Personal tab screen it becomes necessary to enter the password even for displaying the Password setting screen In case you forget the password it is necessary to initialize the Pocket PC Please note that when initialization is executed data or settings stored in the Pocket PC are all deleted Setting the Screen Light You can set the screen brightness for better sight...

Страница 56: ...ower 3 Set the Brightness level 4 When finished tap OK to return to the System tab screen Setting Power You can set to confirm the battery remaining power and the time that elapses until the power turns off after the last operation 1 Tap and then Settings On the System tab tap Power ...

Страница 57: ...disable Record and Program buttons wake up Options are 1 2 3 4 and 5 minutes until device will turn off in battery powered mode if not used Check box to left to engage this feature Options are 1 2 5 10 15 and 30 minutes until device will turn off in external powered mode if not used Check box to left to engage this feature ...

Страница 58: ...decrease performance select 200 MHz 5 Tap Apply to change the setting then the confirmation screen is dis played If you tap Yes your LCD screen will become black and come back in a few seconds and then the setting has changed If you tap No the setting has not changed 6 When finished tap OK to return to the System tab screen ...

Страница 59: ...hed tap OK to return to the System tab screen To confirm usage status of a storage card 1 Tap Storage card tab on the Memory setting screen 2 When finished tap OK to return to the System tab screen To release memory If memory is running short of its capacity i e you will receive an error message display the following methods are available to release the mem ory Transfer data to a storage card and ...

Страница 60: ...Select a location for storage by tapping Tools Options and then select either CF card SD Card or Flash ROM Disk 2 Tap OK Data stored on the Flash ROM Disk are not backed up See Making a Backup on page 173 for information on how to make a backup of data on the Flash ROM Disk Periodic backups of data stored on the Flash ROM Disk is recommended Setting Advanced Sounds This program allows you to adjus...

Страница 61: ... select between Auto Gain Control AGC and man ual gain settings that either increase decrease or set a limit on the recording level 1 Tap Start then Settings On the System tab tap Microphone 2 Select one the three settings If you select Custom tap Configure to adjust the recording levels When Auto Gain Control is selected control over Volume Mute and Boost are is not available System Information T...

Страница 62: ...entification information for product service Memory Tab The Memory tab presents information about the systems RAM ROM and Flash ROM Disk Drivers Tab The Drivers tab displays the drivers used by the system s software appli cations System Tab The System tab displays CPU operating system and other system infor mation Wireless Tab The Wireless tab displays information about the Built in Wireless LAN a...

Страница 63: ... 63 Tools Menu The Tools menu displays the system information and allows it to be exported to a text txt file Export exports all system information param eters to a text txt and About displays the system information version ...

Страница 64: ...stall ActiveSync on your PC from the Toshiba Pocket PC Companion CD For more information on installing ActiveSync see your Quick Start card ActiveSync is already installed on your device After installation is complete the ActiveSync Setup Wizard helps you con nect your Pocket PC to your PC set up a partnership so you can synchro nize information between your device and your desktop computer and cu...

Страница 65: ...schedules Use the peak times schedule to synchronize during working hours or other times you experience higher mail volumes Use the off peak schedule to synchronize during times when you experience lower mail volumes In ActiveSync on the device tap Tools Options then select the Mobile Schedule tab 1 To synchronize periodically during peak times select the fre quency of synchronization in the Durin...

Страница 66: ...eSync Help on the desktop computer You can switch to any of these programs by tapping them on the menu Calendar Scheduling Appointments and Meetings Use Calendar to schedule appointments including meetings and other events You can check your appointments in one of several views Agenda Day Week Month and Year and set Calendar to remind you of appointments with a sound or other method To create an a...

Страница 67: ... by tapping Tools and then Options If you send and receive email messages through ActiveSync select ActiveSync To schedule a meeting 1 Create an appointment by tapping New 2 In the appointment details hide the input panel and then tap Attendees 3 From the list of email addresses you ve entered in Contacts select the meeting attendees The meeting notice is created automatically and placed in the Ou...

Страница 68: ...e Notes tab You can enter text draw maps or create directions or recordings For more information on creating notes see Notes Capturing Thoughts and Ideas on page 69 5 When finished tap OK to return to the contact list Finding a contact There are four ways to find a contact Tap then Find enter the contact name first last or middle phone number or address select Contacts for the type and then tap Go...

Страница 69: ...gories and select a cate gory from the list In the task list you can display tasks by category 5 To add notes tap the Notes tab You can enter text draw maps or create directions or recordings For more information on creating notes see Notes Capturing Thoughts and Ideas on page 69 6 When finished tap OK to return to the task list Using the Summary Screen When you tap a task in the task list a summa...

Страница 70: ...ing drawing typing and recording For more information about using the input panel writing and drawing on the screen and creating recordings see Notes Capturing Thoughts and Ideas on page 69 Tap to create a new item T T Tap to show or hide the T T Recording toolbar Tap to record T T Tap and hold to display a pop up T T menu of actions p Tap to open a note or play a T T recording Tap to change the s...

Страница 71: ...ectly to an email server through an Internet Service Provider ISP or a network Synchronizing Email Messages Email messages can be synchronized through a general synchronization process You will need to enable Inbox synchronization in ActiveSync For information on enabling Inbox synchronization see ActiveSync Help on the PC Tap to return to the note list the note is saved automatically Tap to show ...

Страница 72: ...age List Messages you receive are displayed in the message list By default the most recently received messages are displayed first in the list To read your messages 1 Tap Inbox to select the service and folder you want to display 2 Tap the message to open Tap and hold on the message to display a pop up menu of actions 3 Tapping Received Date allows you to sort the messages by ascend ing or descend...

Страница 73: ...ime you connect If you are working online it is sent imme diately Managing Email Messages and Folders Each email account has its own folder hierarchy with five default folders Inbox Outbox Deleted Items Drafts and Sent Items The messages you receive and send through the mail account are stored in these folders You can also create additional folders within each hierarchy The Deleted Items folder co...

Страница 74: ...esignated Fam ily for synchronization the server creates a copy of the Family folder and copies the messages into that folder You can then read the mes sages while away from your PC If you use POP3 and you move email messages to a folder you cre ated the link is broken between the messages on the device and their copies on the mail server The next time you connect the mail server will see that the...

Страница 75: ... up to date content in both locations Use Pocket Word to create documents such as letters meeting minutes and trip reports To create a new file tap Programs Pocket Word and then New A blank document appears Or if you ve selected a tem plate for new documents in the Options dialog box that template appears with appropriate text and formatting already provided You can open only one document at a tim...

Страница 76: ...ad of the mouse to drag through the text you want to select You can search a doc ument to find text by tapping Edit and then Find Replace You can change the zoom magnification by tapping View and then Zoom Then select the percentage you want Select a higher percentage to enter text and a lower one to see more of your document If you re opening a Word document created on a computer select Wrap to W...

Страница 77: ...ms 77 Tap and hold to see a pop up menu of actions T T Tap to return to the document T T list changes are saved p automatically g g Tap to change formatting T T options Tap to format text T T Tap to show or hide the toolbar T T ...

Страница 78: ...2 If you cross three ruled lines in a single stylus stroke the writing becomes a drawing and can be edited and manipulated as described in the following section Writ ten words are converted to graphics metafiles when a Pocket Word document is converted to a Word document on your computer With Space button selected drag to insert space An arrow appears showing the space direction and size Tap to hi...

Страница 79: ...e embed a recording into your document Recordings are saved as wav files For more information on recording see Chapter 2 For more information on using Pocket Word tap and then Help Pocket Excel Pocket Excel works with Microsoft Excel on your computer to give you easy access to copies of your workbooks You can create new workbooks on your device or you can copy workbooks from your computer to your ...

Страница 80: ...reate or edit in a variety of formats including Pocket Excel pxl and Excel xls Pocket Excel contains a list of the files stored on your device Tap a file in the list to open it To delete make copies of and send files tap and hold a file in the list Then select the appropriate action from the pop up menu Pocket Excel provides fundamental spreadsheet tools such as formulas functions sorting and filt...

Страница 81: ...s and columns To hide a hidden row or column select a cell in the row or column you want to hide Then tap Format then Row or Column and then Hide To show a hidden row or col umn tap Tools then Go To and then type a reference that is in the hidden row or column Then tap Format then Row or Column and then Unhide For more information on using Pocket Excel tap and then Help MSN Messenger MSN Messenger...

Страница 82: ...an account and sign in 1 In the Tools menu tap Options and then Accounts tab 2 Select Enable MSN Messenger Service and or Enable Exchange Instant Messaging 3 Enter your sign in name and password for the selected account s 4 If you selected both accounts under Sign in using this account first select which account to sign in to first 5 To sign in tap the sign in screen and then Sign in Sign up for a...

Страница 83: ...t from chatting with you or delete contacts from your list using the pop up menu To see others online without being seen in the Tools menu tap My Status and select Appear Offline If you block a contact you will appear offline but will remain on the blocked contact s list To unblock a contact tap and hold the contact then tap Unblock on the pop up menu Tap a contact to start a chat T T Tap and hold...

Страница 84: ... or tap My Text to enter a preset message and tap Send To invite another contact to a multi user chat in the Tools menu tap Invite and tap the contact you want to invite To switch back to the main window without closing a chat tap Contacts To revert back to your chat window tap Chats and select the person with whom you were chat ting Enter message Tap to send message T T NOTE ...

Страница 85: ...n Programs 85 To know if the contact you are chatting with is responding look for the message under the text entry area For more information on using MSN Messenger tap and then Help View full chat View status of the chat ...

Страница 86: ...Use Microsoft Windows Media Player on your computer to copy digital audio and video files to your Toshiba Pocket PC e800 e805 You can play Windows Media and MP3 files on your Toshiba Pocket PC e800 e805 For more information about using Windows Media Player for Toshiba Pocket PC e800 e805 tap and then tap Help Tap to play or pause T T Tap to stop T T Tap to play a previous song T T Tap to skip to t...

Страница 87: ...ngs Search for text and look up definitions for words The Guidebook contains all the information you ll need to use the soft ware To open the Guidebook tap Help on the Reader command bar Or on a book page tap and hold on the book title and then tap Help on the pop up menu To switch to Microsoft Reader tap Programs and then Microsoft Reader Getting Books on Your Device You can download book files f...

Страница 88: ...open the Library On the Reader command bar tap Library On a book page tap the book title and then tap Library on the pop up menu To open a book tap its title in the Library list Tap to select a sort order T T Tap to specify the books you T T want to display in the list y y Tap here to navigate to other T T parts of the Reader p g Tap to scroll through the Library list T T ...

Страница 89: ...e first page or to the table of contents if there is one Subsequently whenever you open the book you ll be automatically taken to the last page read In addition to the text each book page includes a page number and book title You can also page through a book by using the Up Down control on your device Tap to select a navigation option T T Drag to select text and then tap an option g Tap arrows to ...

Страница 90: ...d bookmark icon appears in the right margin You can add multiple bookmarks to a book Then from anywhere in the book tap the book mark icon to go to the bookmarked page Highlights When you highlight text it appears with a colored back ground Notes When you attach a note to text you enter the text in a note pad that appears on top of the book page A Note icon will display in the left margin To show ...

Страница 91: ...n rotate crop zoom and adjust the brightness and color contrast of your jpg pictures Tap to rotate a picture 90 degrees counter clockwise Tap to crop a picture by dragging and selecting the crop area Tap outside of the box to stop cropping Tap to display the Zoom panel from which you can zoom in or out of a picture or return a picture to full screen size Tap Edit and then Brightness and Contrast t...

Страница 92: ...e background on the Today screen and specify how you want it displayed on the screen such as adjusting the transparency level 1 In Pictures tap the picture you want to set as the background 2 Tap Tools and then Set as Today Wallpaper View Slideshow of Pictures You can view your jpg pictures as a slideshow on your device Pictures will display slides of the pictures shown in thumbnail view with 5 se...

Страница 93: ...lorer on your PC This folder was created when you selected the Favorites information type for synchronization in ActiveSync on your PC Favorites must be stored in this folder to be synchronized Favorite Links During synchronization the list of favorite links in the Mobile Favorites folder on your PC is synchronized with Pocket Internet Explorer on your device Both computers are updated with change...

Страница 94: ... the Download tab specify the num ber of links deep you want to download To conserve device memory only go one level deep To save device memory Mobile favorites take up storage memory on your device To minimize the amount of memory used In the settings for the Favorites information type in ActiveSync options turn off pictures and sounds or stop some mobile favorites from being downloaded to the de...

Страница 95: ...ectly from your device Then you synchronize your device and desktop computer or connect to the Internet to download the content For more information visit the AvantGo Web site Synchronize an AvantGo channel 1 In Pocket Internet Explorer on your device tap to display your list of favorites 2 Tap the AvantGo Channels link 3 Tap Activate 4 Follow the directions on the screen You will need to synchron...

Страница 96: ...use Pocket Internet Explorer to browse mobile favorites and channels that have been downloaded to your device without connecting to the Internet You can also connect to the Internet through an ISP or a net work connection and browse the Web Home button Refresh button Favorites button ...

Страница 97: ...You ll see the page that was downloaded the last time you synchronized with your PC If the page is not on your device the favorite will be dimmed You will need to synchronize with your PC again to download the page to your device or connect to the Internet to view the page Tap the favorite you want to view Tap to add or delete a favorite folder or add a link ...

Страница 98: ...owsing do one of the following Tap Favorites and then tap the favorite you want to view Tap View and then Address Bar In the address bar that appears at the top of the screen enter the Web address you want to visit and then tap Tap the arrow to choose from previously entered addresses To add a favorite link while using the device go to the page you want to add tap and hold on the page and tap Add ...

Страница 99: ...ounts If this is the method you want to use see Connect to an Internet Account Pro vider later in this chapter Connect to the network at your company or organization where you work Once connected you can send and receive email messages by using Inbox view Web or WAP pages by using Pocket Internet Explorer and synchronize with your computer If this is the method you want to use see Connect to Work ...

Страница 100: ...m connection to an ISP 1 Obtain the following information from your ISP ISP dial up access telephone number user name password and TCP IP settings Some ISPs require information in front of the user name such as MSN username 2 If your device does not have a built in modem install a modem card or use or use a NULL modem cable and appropriate adapters to con nect an external modem to your device thro...

Страница 101: ...lly assigned addresses and you need to enter your TCP IP settings To change advanced settings tap Advanced Otherwise tap Finish To start the connection simply start using one of the following programs Your device will automatically begin connecting Once connected you can Send and receive email messages by using Inbox Before you can use Inbox you need to provide the information it needs to communic...

Страница 102: ...nize your device and possibly access the Internet You can connect to work in one of two ways Create a modem connection by using a RAS account Before you can create this modem connection your network administrator will need to set up a RAS account for you If this is the method you want to use see To create a modem connection to a network Your network administrator may also give you VPN settings Use...

Страница 103: ...y start using one of the following programs Your device will automatically begin connecting Once connected you can Send and receive email messages by using Inbox Before you can use Inbox you need to provide the information it needs to communicate with the email server For specific instructions see Connect Directly to an Email Server on page 105 Visit Internet or intranet Web or WAP pages by using ...

Страница 104: ...tings and host name or IP address of the VPN server 2 Tap Settings Connections and then tab Connections 3 To create a new VPN server connection in My Work Network tap Add a new VPN server connection and follow the instructions in the New Connection wizard 4 In Name enter a name for the connection such as your company s name In Host name IP enter the VPN server name or IP address Next to VPN type s...

Страница 105: ...ngs End a Connection To disconnect do one of the following When connected via dial up or VPN tap the Connection icon on your navigation bar and then tap End When connected via cable or cradle detach your device from the cable or cradle When connected via Infrared move the device away from the PC or device When connected via a network Ethernet card remove the card from your device When connected vi...

Страница 106: ... Connect For more information on using the Inbox program see Inbox Sending and Receiv ing Email Messages on page 71 Get Help on Connecting More information on the procedures described here as well as informa tion on additional procedures can be found in the following locations Inbox Sending and Receiving Email Messages on page 71 Online Help on the device Tap and then Help Tap View All Installed H...

Страница 107: ...e complete mobile and high speed wireless Internet connectivity while in range of a Wi Fi compatible access point Configure Wireless LAN Network Join an existing network Pocket PC 2003 has a interface that enables you to join to a existing net work If Pocket PC 2003 detects a wireless network it will show the above menu Also if you join to encrypted network s Pocket PC 2003 will require entering a...

Страница 108: ...ess Networks Screen tap the TMU Traffic Monitoring Utility Wireless LAN Indicator icon on the navigation bar and then tap the Config WLAN link You can also launch by tapping Start Settings System then Wireless Net works Turn Off On Wireless LAN connection If you want to turn off on the wireless LAN tap the arrows icon on the navi gation bar and launch the Connectivity window If you tap the Turn Wi...

Страница 109: ...work TMU shows a Preferred network list where you can change wireless net work connections from this preferred list If you want to connect to wireless LAN network you have to make a network setting and store to the preferred network list See Wireless LAN Configuration later in this chapter to set up a wireless network IP Address IP Address Page Use the IP Address Page to view and edit the IP addre...

Страница 110: ...re an IP address For example 255 255 255 0 Default gateway This is a device used to forward IP packets to and form a remote destina tion Name Servers Page Use Name Servers Page to view and edit DNS Alt DNS WINS and Alt WINDS Tap the icon Settings Advanced Network Card Network Adapters IEEE 802 11b WLAN Adapter then Name Servers You can also launch by tapping Start Settings Connections Connections ...

Страница 111: ...ed to resolve computer names to IP addresses by provid ing a cache or database of translations The other one is to set the IP address of the host computer that you already construct the partnership for network adapter ActiveSync purpose Alt DNS Alt DNS stands for Alternative Domain Name System which is used to substitute for the main DNS when necessary Alt WINS Alt WINS stands for Alternative Wind...

Страница 112: ...can also launch this by tapping Start Settings System then Wireless Networks To change network settings within Wireless networks tap a network If you do not see a desired network tap Add new Settings and follow the instructions on the screen From Networks to access select All available Only access points or Only computer to computer depending on the type of connected net work s To connect only to ...

Страница 113: ...a name given to the groups that form the wire less LAN network up to 32 single byte English characters and sym bols may be used If the network was detected the network name is automatically entered and can t be changed Connect to Select what your network connects to Work or Internet This is a device to computer ad hoc connection Select to con nect to an ad hoc connection If you select to automatic...

Страница 114: ...ls can be entered in Network Key 128 bits ASCII 13 digit ASCII characters or symbols can be entered in Network Key 64 bits HEX Hexadecimal 10 digit English letters and numerals can be entered in Network Key Letters and numerals that can be entered are 0 9 and A a F f 128 bits HEX Hexadecimal 26 digit English letters and numerals can be Select to set WEP Wired Equivalent Privacy Default is Disable ...

Страница 115: ...toring Utility TMU Keeps users updated of current WLAN Module s activity status Icon Specification Wireless Communication switch off The Wireless Communication Switch on the bottom of the PDA is turned off Tapping on the icon gives you a warning message Please turn on Wireless communication switch Tap OK to close the dialog box Turn on the switch and you will see the icon turns to or depending on ...

Страница 116: ...dicator icon on the navigation bar and then tap the Info link You can also launch the Wireless LAN Manager by tapping Start Set tings System then Wireless LAN Manager Link Screen Link Quality The Link Quality tab shows the quality of wireless LAN signal Link Information The Link Information tab shows some information about your wireless LAN adapter SSID Displays the SSID currently connected to the...

Страница 117: ...ed power management functions from this pull down menu Default is Auto Enable Wireless Radio Power off Select this to run in power saving mode Radio Power is turned off if there is no transmission for the time specified Enable Wireless Radio off High responsitivity but high power consumption Enable Wireless Power off Low responsitivity but low power consumption Enable Power Saving Mode Select this...

Страница 118: ... after resuming Manager Screen Enable Wireless LAN Indicator If you select this the wireless LAN indicator is displayed in the navigation bar Transmission Rate Select transmission rate to be used from the pull down menu If you select Fully Auto the adapter is automatically set to the most suitable transmission rate Channel If you can join an ad hoc network select a channel from this list 802 11 Pr...

Страница 119: ...e of network Version Information Firmware Displays FW version that included Wireless LAN hardware Driver Displays the wireless LAN driver version Utility Displays the wireless LAN configuration utility version Toshiba Enroller Toshiba Enroller is the tool for obtaining and administering certificates used for 802 1x validation Please ask your network administrator for con figuration details ...

Страница 120: ...ertificate URLs with more than 255 characters will be blocked Submit After you have entered the user name password and CA server tap this button to request a certificate from the certifying server Certificate Import Wizard Config Wireless Use this to launch the Certificate Import Wizard Enter the user name of the person obtaining the certificate Enter the password of the user obtaining the certifi...

Страница 121: ... has been issued and the period of validity will be displayed The root certificate is provided by the cer file Install Certificate Registers the open root certificate in the system This button is enabled when the root certificate is opened normally Pocket PC 2003 supports cer DER encoded root certifi cate file as default You can install the root certificate if you double tap Root Certificate NOTE ...

Страница 122: ...e Deletes certificates Please use the greatest possible care when deleting certificates When using EAP TLS one client certificate and one root certificate are required as a minimum When using PEAP one root certificate is required as a minimum Please ask your network administrator for details of operational proce dures ...

Страница 123: ...es certificates Please use the greatest possible care when deleting certificates When using EAP TLS one client certificate and one root certificate are required as a minimum When using PEAP one root certificate is required as a minimum Please ask your network administrator for details of operational proce dures ...

Страница 124: ...Toshiba Pocket PC e800 e805 User s Guide 124 Advanced Page Identifying Information Key Options Web Templates Please ask your network administrator for details of operational proce dures ...

Страница 125: ...ease prepare the cradle and PC so that your Toshiba Pocket PC can connect to a Certification Authority CA server The Toshiba Certificate Import Wizard obtains a Certification Authority via an ActiveSync path through a network connection Start Screen Select 802 1x type from above menu and tap Next For more information on authentication procedures refer to Configure Network Authentication Screen on ...

Страница 126: ...S certificate from a CA server 1 Obtaining a TLS certificate always requires an ActiveSync connection Place your Toshiba Pocket PC e800 e805 into the cradle and tap Next After tapping if there are any active synchronizing prob lems the Import Wizard will alert you NOTE ...

Страница 127: ...ificate from a CA server 2 You have to enter your user name password and CA server name or IP to obtain certificates from server After entering the network parameters tap Next After tapping if there are any parameter problems the Import Wizard will alert you NOTE ...

Страница 128: ...rver the Toshiba Cer tificate completion screen will display If you tap Finish certificates are stored to the system Example Obtaining a PEAP certificate from a file 1 If your network supports PEAP authentication you can obtain a certificate from file Similar to the steps taken while obtaining a TLS certificate select From file recommended and tap Next ...

Страница 129: ...The certificate file should be provided from your network administrator If you don t have a certificate file please contact to your network administrator The Toshiba Certificate Import Wizard supports only DER encoded root certificates If you try to import another certificate file format the Import Wizard will alert you NOTE ...

Страница 130: ... are stored to the system Using ConfigFree ConfigFree is a suite of utilities used to set up a network ConfigFree includes the following utilities Profiles Settings Search for Wireless Devices Connectivity Doctor To start the above utilities tap Program ConfigFree and then tap the icon of the desired utility ConfigFree Launcher can also be used to start any of the ConfigFree utili ties ConfigFree ...

Страница 131: ...earch for Wireless Devices Search for Wireless Devices displays nearby active 802 11b access points and ad hoc networks Connectivity Doctor Connectivity Doctor helps resolve any networking issues that occur with your Pocket PC ConfigFree Launcher ConfigFree Launcher resides as an icon in the Command bar at the bot tom of the Today Screen ConfigFree Launcher also includes shortcuts to the ConfigFre...

Страница 132: ...ices Profiles Select a profile created using Profile Settings 2 Tap and Hold menu AutoSwitch Enables or disables AutoSwitch Version Displays the version information Help Displays help Exit Exits ConfigFree Launcher and removes it from the Command bar Profile Settings Profile Settings enables you to easily set up a network configuration You can save the network configuration as a profile which can ...

Страница 133: ...rofiles Edit Edits the profile Export Exports the profile Delete Deletes the profile Properties Displays the properties of the profile Add Used to add a profile AutoSwitch Used to configure the automatic switching among profiles Description of Command Bar Help menu Help Displays help About Displays the version information ...

Страница 134: ...rrent network settings or Import a profile Tap OK to start the Profile wizard Follow the Profile wizard instructions and enter the network settings to quickly and easily configure the network Description of Start Dialog Standard profile Select to create a standard profile You can also select one of the following check boxes to create a profile for a specific purpose ...

Страница 135: ...elect to create an ActiveSync profile Wireless projector profile Select to create a wireless projector profile Cancel Cancels the Profile wizard Continues to the next wizard page Returns to the previous wizard page When continuing to the next wizard page the final wizard screen appears as shown below Description of Finish Dialog Profile name Enter the profile name here Execute this program after s...

Страница 136: ...th of that access point are displayed Starting Search for Wireless Devices 1 Tap Programs and ConfigFree 2 Tap Search for Wireless Devices Description of Command Bar 1 File Exit Exit can be selected from this issue 2 View View option can be set from this menu 3 Help Help and the version information can be checked from this menu Connectivity Doctor Connectivity Doctor helps resolve any networking i...

Страница 137: ...s of the problem and a solution and then follow the instructions to solve the problem Starting Connectivity Doctor 1 Tap Programs and ConfigFree 2 Tap Connectivity Doctor Refresh Diagnoses the network and refreshes information on the screen Description of Command Bar 1 Settings Option Check connection to Internet Service Provider Select to ping servers Default Gateway Server Select to ping the def...

Страница 138: ...805 User s Guide 138 WINS Server Select to ping the WINS server when diagnosing the network Proxy Server Select to ping the proxy server when diagnosing the network 2 Help Displays Help Version Displays the version information ...

Страница 139: ...functions of TOSHIBA IP Phone for Pocket PC Sign up page of Gphone Buddy Service http www gphoneonline com Without the VLI Gphone Buddy Service you can call an IP Phone above by IP address answer a call and hang up a call Launching an application To launch Toshiba IP Phone for Pocket PC tap Start Program then TOSHIBA IP Phone When you launch it for the first time enter your G number password and n...

Страница 140: ...shiba Pocket PC s You can use the Bluetooth to connect your Toshiba Pocket PC e800 e805 to only one device at a time The Toshiba Pocket PC e800 e805 supports these Bluetooth services COM service Serial Port Profile This service enables you to connect to a computer via a serial port to send and receive data COM service is also used when connecting to a computer with ActiveSync and when chatting wit...

Страница 141: ...ate Bluetooth Service Contact address book Business card owner information vCard format vCard 2 1 Other than memo 1 022 characters Memo Approx 32 700 characters1 Schedule vCalendar format vCalendar 1 0 Subject 4 096 characters Location 1 023 characters Category 1 023 characters Attendees 1 022 characters per person Memo Approx 2 500 characters Task vToDo format Subject 4 095 characters Category 1 ...

Страница 142: ...r Toshiba Pocket PC e800 e805 Enable Bluetooth on the Toshiba Pocket PC by using the Wireless Com munication Switch The Bluetooth icon will appear The icon will also appear when the power is turned on using through a software switch using the antenna icon on top of the screen Bluetooth Icon ...

Страница 143: ...h Settings 2 Tap Options on the command bar The Options menu appears 3 Tap Security Settings on the Options menu The Change Security Setting screen appears To change the security setting tap the desired security setting and tap OK You can select from four security settings Office Mobile Home and Other The default setting is Home Advanced Settings To change an advanced setting select the desired se...

Страница 144: ... tap OK The default device name is Toshiba BT The device name can be a maximum of 248 alphanumeric charac ters If the device name exceeds 248 alphanumeric characters an error message appears The Bluetooth environmental settings are now complete Refer to the following for additional operations COM service see Using COM Service on page 148 DUN LAP service see Using DUN LAP Service on page 149 PAN se...

Страница 145: ...Bluetooth Settings screen appears You can also display the Bluetooth Settings screen by tapping Start Programs Bluetooth and then Bluetooth Settings 2 Tap Bluetooth icon on the command bar or tap the Tools menu and Devices Search The local Device searches for Bluetooth devices in the vicinity while a message is displayed on the screen indicating that Local Device is searching for peripheral device...

Страница 146: ...tooth Authentication screen appears on Local Device Enter the Bluetooth passkey PIN Code within 20 seconds and tap OK The Bluetooth passkey can be a maximum of 16 alphanumeric char acters Depending on the remote device the Bluetooth passkey may be a fixed value with a limit on the number of digits so be sure to confirm these conditions Types of displayed devices Devices selected using Filter in th...

Страница 147: ...If either device has already been authenticated or the Security Mode on either Local Device or the remote device is set to Non secure the Blue tooth Authentication screen does not appear A message is displayed on the screen indicating that the service informa tion is being updated It may take several minutes to complete the service update Now you are prepared to connect with Bluetooth ...

Страница 148: ...onnection Registration on the pop up menu after this selection an optional screen will appear If you select ActiveSync Auto Connect ActiveSync will be per formed automatically and continuously You need no more step When the connection registration is complete the device and service icons change to registered connection icons 2 Tap OK The screen closes and the Today screen appears 3 From the comput...

Страница 149: ...ervice When you disconnect from the Internet or exit your email application the Bluetooth connection is also terminated 2 Tap OK The screen closes and the Today screen appears For further operations please refer to Inbox Sending and Receiving Email Messages on page 71 When you disconnect from or exit the Internet or your email applica tion the Bluetooth connection is also terminated Using PAN Serv...

Страница 150: ...command bar The Bluetooth menu appears 4 Tap Start Personal Area Networking on the Bluetooth menu My Device connects to the remote device For further operations please refer to Inbox Sending and Receiving Email Messages on page 71 Ending PAN service 1 Tap on the Bluetooth icon on the command bar of the Today screen The Bluetooth menu appears 2 Tap End Personal Area Networking on the Bluetooth menu...

Страница 151: ...PC e800 e805 owner information Please be aware that you cannot send voice data or handwritten data entered in the memo section Sending a contact 1 Tap Start and Contacts then tap and hold on the contact you want to send A pop up menu appears You can select multiple contacts by dragging them You can also send a contact by tapping the Tools menu 2 Tap Send by BT on the pop up menu The device search ...

Страница 152: ...ose to return to the contact list screen A message is displayed on the remote device indicating that the con tact has been received 6 Tap Close to close the screen Sending a schedule 1 Tap Start and Calendar then tap and hold on the schedule that you want to send A pop up menu appears You can also send a schedule by tapping the Tools menu 2 Tap Send by BT on the pop up menu The device search scree...

Страница 153: ...ch you want to connect by tapping the device name then tap Connect A message is displayed indicating that Local Device is now con nected to the remote device If the Bluetooth Authentication screen appears enter the Bluetooth passkey PIN Code to perform authentication The exchange of business cards begins When the exchange of business cards is completed the name email address and phone number of th...

Страница 154: ...nection is terminated Using FTP Service This section explains how to use FTP service to transfer files to and from another Toshiba Pocket PC Starting Bluetooth FTP Tap Start Programs Bluetooth and then Bluetooth FTP The server selection screen appears 3 Tap Search Local Device searches for Bluetooth devices in the vicinity while a message is displayed on the screen indicating that Local Device is ...

Страница 155: ...ates a new folder in the Local Device window Delete This deletes a folder or file Rename This enables you to rename a folder or file 2 Tap Send on the pop up menu The message Sending appears 3 To exit tap the Tools menu and Exit Receiving a file 1 In the remote device window tap and hold on the folder or file that you want to receive A pop up menu appears When you tap the file that you want to rec...

Страница 156: ...enable OBEX Authentication and enter the FTP password A password protects the personal information on your Pocket PC from remote devices from unauthorized use Please refer to the Options menu of Bluetooth Settings The FTP password is not registered in initial setting Before using it we recommend you to set up the FTP password To perform FTP authentication enter a password here The password can be ...

Страница 157: ... the Bluetooth Settings screen Tap Connection Registration to register a connection The icons dis played in the device and service lists change to registered connection icons Tap Connecting Registrations in the pop up menu of item in the service list to register a connection Properties Tap Properties to display the detailed information of the selected remote device Delete Tap Delete to delete the ...

Страница 158: ...e of device Among the devices discovered using Devices Search in the Tools menu only the types of devices selected in this display menu are displayed in the device list Options menu Tap Options on the command bar to display the Options menu FTP Server Settings Tap FTP Sever Settings on the Options menu to display the FTP Server Settings screen You can enable OBEX Authentication and enter the FTP p...

Страница 159: ...y the Auto Con nection Registration History screen Tap on the Category selection box to display the list of category Each list displays the latest registration which can be a maximum of three items The selected item is current available connection registration You can change current available item if you mark other item by tap to select Discoverability Mode Connectability Mode Security Mode Encryp...

Страница 160: ... 248 alphanumeric characters If the device name exceeds 248 alphanumeric characters an error mes sage appears Function List Tap Function List on the Options menu to display the Function List screen of Local Device You can see the list of Bluetooth functions and current status of them visual And you can also change setting to disable or enable Version Information Tap About on the Options menu to di...

Страница 161: ... specific program The Home screen displays the remaining battery power Today information and frequently used setting icons and can be personalized by changing the background or by adding icons and tabs Launching an Application From the Home Screen 1 Tap Start Programs and then Home to display the Home screen 2 Tap the application icon you want to launch The selected application starts up You can a...

Страница 162: ...the date and time Tap to display the Clock setting screen Displays the number of current tasks as of today and the number of tasks finished or soon to be finished as of today Tap to launch Tasks Displays the number of unread mail and the sender of the latest unread mail Tap to launch Inbox Displays today s next appointment Tap to launch Calendar 1st window Information window Tab selection box Tap ...

Страница 163: ...Tap to display the Memory setting screen Screen light Tap to display the Screen light setting screen System Information Tap to display the system information Volume ON OFF Tap to toggle volume ON OFF This icon is interlocked with the display of volume ON OFF that has been switched using the icon on the navigation bar ...

Страница 164: ...g tab pop up menu tap and hold any portion of the screen other than the application name In this case only the Stop All is selectable Tap to activate the selected application Tap to quit the selected application When finished the application name disappears Tap to quit all running applications displayed in the Running tab You can select the View menu or the Tools menu on the Running tab screen You...

Страница 165: ...rograms File Explorer Main Pocket Internet Explorer DataBackup Windows Media Player MSN Messenger Notes Pocket Word Tasks Pocket Excel Inbox Calculator Calendar Pictures Contacts Solitaire Screen Resolution Jawbreaker ConfigFree Launcher W LAN model only Search for Wireless W LAN model only World Clock ClearVue Document ClearVue Worksheet ClearVue Presentation ClearVue Image ...

Страница 166: ...tion other than the icon and then tap Paste on the pop up menu The selected icon is pasted next to the last icon on the tab screen To move icons to another tab using drag and drop 1 Tap the icon you want to move 2 Drag the icon to the destination tab and then drop it The name of the destination tab is displayed inverted the icon is moved and that icon in the original tab screen is deleted Deleting...

Страница 167: ... When finished tap OK to close the Add Application screen and the new icon is added to the Home screen Renaming Icons You can rename icons applications 1 Tap and hold the icon to rename The pop up menu is displayed 2 Tap Rename from the pop up menu The icon can be renamed If the Application file is not designated or if the Applica tion name is not entered you cannot add a new icon You cannot launc...

Страница 168: ...ools and then Tab Settings 2 Tap New to display a box to enter the new tab name 3 Enter a new tab name up to a maximum of 10 characters When finished tap OK to return to the Tab Settings screen 4 Tap OK on the Tab Settings screen to return to the Home screen A new tab is added to the right of the existing tab To delete a tab 1 Tap Tools and then Tab Settings 2 Select the tab name to delete and the...

Страница 169: ... are sorted as launched order for all tabs check box 3 Tap OK on the Tab Settings screen to return to the Home screen To change a background 1 Tap Tools and then Tab Settings 2 Select the tab name you want to change and then tap Modify 3 Tap Browse The Browse screen is displayed Even if a storage card is inserted the files in the storage card will not be displayed 4 To return to the previous scree...

Страница 170: ...gs screen tap OK 6 Tap OK on the Tab Settings screen to return to the Home screen TOSHIBA Screen Resolution Using the TOSHIBA Screen Resolution you can change the screen dis play mode from Quarter Video Graphics Array QVGA which uses 240 x 320 pixels to Video Graphics Array VGA which uses 480 x 640 pixels The default mode is QVGA When a background image is set the background image will stay intact...

Страница 171: ... ClearVue Suites on your TOSHIBA Pocket PC e800 805 includes ClearVue Presentation Viewer for Microsoft Power Point presenta tion files ClearVue Document Viewer for Microsoft Word documents ClearVue Worksheet Viewer for Microsoft Excel worksheets ClearVue Image Viewer for image file jpg In the VGA mode Clear Vue and TOSHIBA Screen Reso lution are available Clear Vue is the only application that ca...

Страница 172: ...rVue tap Start Programs then the ClearVue application you want For more information about using ClearVue refer to the ClearVue manual included in Companion CD When you start this application at VGA mode tap the ClearVue application icon on the Home screen NOTE ...

Страница 173: ...store operations do the following Check that there is enough space in the main unit s memory and on the storage device If the storage device does not have enough free 1 Data such as the password in Settings cannot be restored 2 The data stored in the Flash ROM disk cannot be backed up 3 Before backing up or restoring data stop other appli cations and connect the AC adapter to the Toshiba Pocket PC...

Страница 174: ...screen for confirming that other applications have ended appears 5 To display the Backup password input screen tap OK 6 Enter a password You can enter a password up to a maximum of 16 characters Backup can be made even without entry of a password If a password is entered that password is required at the time of restore 7 When finished tap OK The progress bar is displayed during the backup process ...

Страница 175: ...a from the storage device If files exist in the main memory but not in the backup file they will not be overwritten 1 To restore from the CF SD card insert the CF SD card that contains the backup data into your Toshiba Pocket PC e800 e805 2 Tap Start Programs and then DataBackup to display the DataBackup screen shown on the following page The backup process will stop if the storage device becomes ...

Страница 176: ...ears 5 Tap OK to display the Restore password input screen 6 Enter the password used when backing up the data if the file was previously created without a password then a password is not required 7 When finished tap OK The progress bar is displayed during the restore process When the restore is completed the restore finish message appears Tap Restore Tap to select the storage destination ...

Страница 177: ...ime intervals Select the backup time occur rence and frequency that best suits your needs If your Toshiba Pocket PC e800 e805 memory becomes short of its capacity during restore the restore process stops Increase the memory allocation of the main mem ory of your Toshiba Pocket PC e800 e805 see Custom ize Your Toshiba Pocket PC on page 52 and then restart the restore procedure Data backed up on a l...

Страница 178: ...rt Programs then DataBackup 3 Tap Auto backup settings from the Tools menu The Settings screen is displayed 4 Set the desired items 5 Tap OK The settings data is saved and periodical backups will be made at the preset time Select Run an auto backup If required enter a password Tap to select the storage destination Select if power backups are required ...

Страница 179: ...ssage screen will be displayed and the backup will be started after about 10 seconds if your Pocket PC is off when the auto backup occurs Auto backups will only occur if the AC Adapter is con nected or the remaining battery charge is 50 or more You can confirm whether or not auto backups have occurred by checking when the last backup was made Depending on the conditions auto backups may not occur ...

Страница 180: ...ngs About The version information is displayed To select the city from a zoomed map 1 Tap Select from map from Tools menu 2 Select the city by tapping on the zoomed map The information of the selected city is displayed 3 Select Home City1 or City2 from the pull down list 4 Tap OK Toshiba Voice Recorder TVR The TOSHIBA Voice Recorder TVR is a media player for TOSHIBA Pocket PCs TVR offers a flexibl...

Страница 181: ...stop You can toggle between time recorded and time available to record given storage in current media at the current record quality level You can tap on the time display to toggle between time played and time left to play Clips recorded on the TVR can be played on computers with Windows 200 and Windows XP operating systems with Windows Media Player Enable disable AGC for built in microphone Record...

Страница 182: ...ct the function from the pop up menu Send a clip You can send a clip by tapping and holding the clip From the pop up menu select Send via E mail or Beam File To set the TVR options 1 On the TVR screen tap the Settings icon You can assign TOSHIBA Voice Recorder to the hardware recording button if the Assign TVR to Record button check box is selected You can play the wav files recorded with Notes if...

Страница 183: ...out text data on clipboard Speech Settings arranges the set tings of Mail Speech and Text Speech You can use one application of Text to Speech at a time Please exit the current one to start another appli cation To setup Text to Speech from Companion CD 1 Make sure your Pocket PC is connected to your computer and that an ActiveSync connection has been established 2 Start the Text to Speech installa...

Страница 184: ...email Pause Stops reading If you tap Play after Pause it will start from the position where it was paused Stop Stops reading the text Exit Exits Mail Speech 4 Tap Tools Select any of the following Refresh Refreshes the status of the email database Settings Starts the Speech Settings Exit Exits the program About Displays the version information screen 5 Tap and hold the selected words to display th...

Страница 185: ...n the lower area When there is an attached file the voice service announces with attached file It does not announce the TO or CC of a mail header While reading an email DO NOT synchronize your Toshiba Pocket PC e800 e805 with the PC The text may not be displayed correctly depending on the mailer of the sender US ASCII us ascii and 8 bit West ern Europe iso 8859 x character code are supported This ...

Страница 186: ...wing Folder Select the folder from the pull down menu Cancel Close the file selection screen and return to the Text Speech screen Type Only text file txt is available File list Display Name Folder Date Size Type and Location The file to read should be under My Documents 4 Tap the file you want read The text is displayed 5 Select any of the following Play Starts reading the text File list Text area...

Страница 187: ...ams then Text Speech If the Text Speech applica tion is already opened and a text data is displayed on text area tap and hold the text then Clear All from the pop up menu 3 Tap and hold the text area then select Paste from the pop up menu The data on the clipboard is displayed on text area 4 Tap Play Speech Settings To start Speech Setting tap Start Programs then Speech Settings You can also start...

Страница 188: ...f the voice default value 0 Speed Changes the reading out speed default value 0 Default Value Reset all values to the default Not read more than 2 3 marks If selected the continuous marks on the text are skipped when reading out You can define the skipping case continuous 2 or 3 marks from the pull down list ...

Страница 189: ...e message check box is cleared Default Value Resets all the values to the default Using Voice Command With Voice Command you can operate Pocket PC hands free without tapping or pressing buttons on your Toshiba Pocket PC e800 e805 The Voice Command application has 3 components Global Command the command always available User Command the command that users can assign freely always available Command ...

Страница 190: ...cation sound to start speaking 2 Say one of the available voice commands For example to launch Inbox say run Inbox When the command is successfully recog nized a confirmation tone sounds and the Inbox screen appears If The Voice Command cannot read without the TOSHIBA Text to Speech for Pocket PC installed Installation of the TOSHIBA Text to Speech for Pocket PC is highly recom mended Once Voice C...

Страница 191: ...Thank you for your email about is displayed on the screen To use the commands to launch applications 1 On the User Commands tab in the Voice Command Settings assign an application you like to a command For example assign Solitaire to the command run program one 2 Say run program one The Solitaire screen is displayed Using Voice Command for Each Application For example you can use voice commands in...

Страница 192: ...tment For other commands you can check the command from the Commands tab of the Voice Command Settings Voice Command Settings You can check the voice command list or arrange the settings of voice command To start the Voice Command Settings tap Start Programs and then Voice Command Settings The target term of appointment is one month before to one month after based on current time Tap to stop readi...

Страница 193: ...at is set the more sensitive the program is to the nuances of your voice and it makes it easier for your Toshiba Pocket PC e800 e805 to recognize the command On the other hand setting a higher level of recognition may decrease voice recognition within noisy environ ments It is recommended to set lower level within noisy environ ments Displays information for the selected command Tap Tools and then...

Страница 194: ...hen select Edit 2 Input the text you want to define at the text area For example input Thank you for your email about Tap OK To assign a program to the command 1 Tap and hold the command run program xxx then select Edit 2 Select the application you want to assign by tapping the Browse You can only clear the action for the command The com mand is not deleted Tap to clear the action that you defined...

Страница 195: ...to an LCD projector or a monitor you can create powerful pre sentations from your Pocket PC IA Screen Mirror The IA Screen Mirror with the Toshiba Presentation Pack projects the cur rent contents of your Pocket PC s LCD screen onto an external projector or monitor It can display up to nine different images from your LCD output at the same time on the second display See page 203 for information on ...

Страница 196: ...unning the Setup program 3 After accepting the license agreement choose the folder to which you want the ATI Presentation Pack to be installed Click Next to accept the default destination folder click Browse to specify a dif ferent folder 4 Check your Pocket PC screen for any additional steps required to complete the installation Using IA Presenter s Desktop Converter When you drag and drop a Powe...

Страница 197: ...only want to display the presentation on the LCD screen of your Pocket PC However if you have tried the 320 x 240 button and then find that images on the Pocket PC screen have been stretched to fit the screen and you do not want this effect try converting again using the User defined button After selecting User defined enter 240 in the first box and 320 in the second box If you want to prepare the...

Страница 198: ...lide Output Toggle icon at the rightmost side of the Toolbar To end the projection select the command again to toggle it off Slide Sorter Slide Sorter view fills the entire application space with either large or small thumbnails depending on whether Large Thumbnail or Small Thumb nail is active on the View Menu You can select One slide by tapping on it or Multiple adjacent slides by dragging your ...

Страница 199: ...d return to viewing the slide only on your mobile device screen just select the command again to toggle it off Quick Notes The Quick Notes command on the View Menu and the Quick Notes View icon on the Toolbar gives you a view mode that combines the thumbnail images of Slide Sorter view with the Notes pane of the Notes Page view When you tap on a thumbnail a border around it indicates it is selecte...

Страница 200: ... the direction you choose Left or Right Depending on the slide advancement setting specified in the Slide Transi tion dialog box you can tap to advance the slide or the next animated object use the navigation arrows buttons of your Pocket PC to advance back play the slides or IA Presenter will automatically advance slides based on the number of seconds delaytime you set Sound effects will also be ...

Страница 201: ...stroke or erase all of the Ink strokes VGA Pointer This mode works only when IA Presenter is in VGA Slide Show view After you select the VGA Pointer command your stylus movements on the LCD screen will simulate a laser pen light on the VGA screen during pre sentations To exit the VGA Pointer mode select Trigger Pen or VGA Zoom from the pop up menu VGA Zoom This mode works only when IA Presenter is...

Страница 202: ...be displayed on top of the already existing projection of the entire slide on the VGA screen After the rectangular zoom area exists on your screen you can drag it to any part of the screen you wish It can also be converted to any of the other pre defined sizes by pressing your stylus on the LCD screen to open the pop up menu again then selecting a different value from the VGA Zoom Size submenu The...

Страница 203: ...nd name changes to Restore Tap Restore when you are ready to return to the slide that was previously dis played Using the Blank Option with Pen Mode When the Blank option is active and IA Presenter is in Pen mode you can write or draw digital Ink on the screen and it will be output to the VGA device In effect this allows you to project an electronic blackboard which you might find useful when givi...

Страница 204: ...nly 256 colors available During VGA Slide Show mode the presentation output will be directed to both the Pocket PC s LCD screen and the external connected VGA device or video device The Pocket PC will always show the reduced size version while the VGA video device will view the original matching dimensions set dur ing ActiveSync conversion Or if your current presentation has a dimension specified ...

Страница 205: ...cket PC However IA Presenter also furnishes many attractive transition effects that can be assigned to the iap file You can assign a particular transition effect to an individual selected slide or to all slides in the current file After you select one or more slides tap Slide Transition on the Edit Menu or the icon on the Toolbar The Slide Transition screen will appear In it you can select a trans...

Страница 206: ...n the desired state and maintain one as the active viewport Flexible output control options let you control the allocation of CPU utilization orientation resolution and color optimi zation dithering of projected images Getting Started Tap the IA Screen Mirror icon in your Programs group to start the IA Screen Mirror program 1 Use the Layout tab to set up the viewports to which you will project ima...

Страница 207: ... the Help button in the About tab to access the main Help file Con text sensitive Help is also available If during some operations you can not open the Tools Menu you can access the context sensitive Help messages via the Windows Start Menu A Note about Updates to the ATI Presentation Pack Your copy of the ATI Presentation Pack contains the latest versions of IA Presenter and IA Screen Mirror For ...

Страница 208: ...attery is not attached Battery Pack Lock is at the Release side Charge the battery Attach the main battery High Capacity Battery and switch Battery Pack Lock to the Lock side Switch Battery Pack Lock to the Lock side The power was suddenly cut off The battery power is exhausted Charge the battery Automatic suspend is active Select Settings System Power to set to alter the power shut down time Even...

Страница 209: ...t there is no response The operation button does not work either Some malfunction Reset the system If no action is observed after resetting the system initialize the system However the data will be deleted The screen is dark The screen light is off Press and hold the power button until the screen light is turned on The screen is hard to see Brightness setting is incorrect Select Settings System Sc...

Страница 210: ...devices can not be used Because PDA s battery power is low The Battery power is too low to use USB devices Charge the battery or connect AC adapter Following message is displayed TOO MUCH USB CONNECTION Connecting USB devices are too much The total power consumption of connected USB devices is too large This USB port supports total 500mA USB device Confirm connected USB device Following message is...

Страница 211: ...r tapping the screen does not respond When your Toshiba Pocket PC e800 e805 is reset all data that was not stored during operation will be deleted When the power is on press the reset switch with the stylus then release If the function cannot be restored even if the reset button is pressed initialize your Toshiba Pocket PC e800 e805 NOTE ...

Страница 212: ...h the stylus and then release the power button 3 When a screen appears release the reset switch When initialization is completed the Welcome screen appears Set up the system according to the screen as in the case of startup procedure When you initialize your Toshiba Pocket PC e800 e805 all data stored in the memory is deleted Your Toshiba Pocket PC e800 e805 s initially installed programs are not ...

Страница 213: ...is in the range of 1 to 11 The host computer cannot wirelessly connect with my Toshiba Pocket PC e800 e805 Make sure you have setup the partnership for your Toshiba Pocket PC e800 e805 and your host computer Make sure you are within the range of a working network Make sure you have entered the IP address of the host computer as the WINS server on your Toshiba Pocket PC e800 e805 Reset your Handhel...

Страница 214: ...e Without Access Points you can still build a network where adapters communicate peer to peer using a shared SSID When you are not using Access Points change the operating mode to be 802 11Ad Hoc To set the operating mode click Start Set tings System Wireless LAN Utility then Config B2 How can I connect my Toshiba Pocket PC e800 e805 to the usable Wireless Network Click Start Settings System Wirel...

Страница 215: ...ocket PC has already con nected to an AP successfully 1 Check BSSID When there is a link the current Basic Service Set ID of the Access Point been used will be shown in the BSSID field in Link Page When the adapter is disconnected with the Access Point Non associated will appear in the BSSID field To view BSSID from your Toshiba Pocket PC e800 e805 click Start Settings System Wireless LAN Utility ...

Страница 216: ...oint s 802 11 Ad Hoc Mode allows your Toshiba Pocket PC e800 e805 to form its own local network where devices communicate peer to peer using a shared SSID without Access Points Under 802 11 Ad Hoc mode the SSID must be the same among stations so that the devices can communicate properly within the Wireless Net work If you want to form your network without any Access Points you should choose 802 11...

Страница 217: ...d your host computer 2 Make sure you are within the range of a working network 3 Make sure you have entered the IP address of the host com puter as the WINS server on your Toshiba Pocket PC e800 e805 4 Reset your Toshiba Pocket PC e800 e805 to make the TCP IP settings take effect 5 Make sure the SSID WEP keys and channel for all devices in the network are set the same 6 Make sure the channel been ...

Страница 218: ...kets to and from a remote destination DNS stands for Domain Name System a database system which translates addresses and domain names For example a numeric address like 232 245 021 54 can become something like cba com WINS stands for Windows Internet Naming Service which has two functions one is a Microsoft Net BIO name server that elimi nates the broadcasts needed to resolve computer names to IP ...

Страница 219: ...acters in the SSID field For the Infrastructure Mode you should set the SSID the same as the Access Point been connected with To create a 802 11 Ad Hoc Network the SSID must be the same among stations to enable the wireless communication within the local area network D2 Why can t I choose the Channel field in Infrastructure Mode For the Infrastructure Mode the Channel is decided by the Access Poin...

Страница 220: ...tically adjust the Best Communication Data Rate and to be compatible with other Low speed 802 11 Wireless Device E Security E1 What is WEP WEP stands for Wired Equivalent Privacy a security service used to prevent the unauthorized access to your wireless network E2 How many WEP security service modes does my Wireless LAN support WEP stands for Wired Equivalent Privacy that is the security service ...

Страница 221: ...ss Network The WEP Mode WEP KeyID and WEP Key value must be exactly the same as your Wireless Network s to enable the connection Example of setting the WEP You can choose 1 WEP Mode 64bit KeyID 1 and Key 1234567890 or 2 WEP Mode 128bit KeyID 1 and Key 12345678901234567890123456 or 3 WEP Mode Disable for connection NOTE ...

Страница 222: ... WLAN Adapter allows you to choose one of the six data rate options Fixed 1Mbps Fixed 2Mbps Fixed 5 5Mbps Fixed 11 Mbps Auto Select 1 or 2 Mbps and Fully Auto The farther the distance between two communicating devices the slower the data rate should be used Basically with slower data rate the data delivery will be more reliable If you don t know which data rate should be used simply choose Fully A...

Страница 223: ...he Bluetooth SD Card Confirm that the card is working properly Cause There was an error when loading the driver Solution Try reinserting the Card Unable to retrieve Local Device information Solution Reset the Toshiba Pocket PC Unable to retrieve Local Device information due to insufficient mem ory Check the amount of available memory 1 Turn off the Wireless LAN Switch will cause the dis connection...

Страница 224: ... deleting the remote device again or reset the Toshiba Pocket PC The device name that you entered exceeds the maximum byte count of 248 bytes Enter a different device name Cause The name of Local Device exceeds 248 bytes after UTF 8 code conversion Solution Enter a name that does not exceed 248 bytes The retrieved information contains invalid data Cause The device information contains invalid data...

Страница 225: ...ey was not entered within the 20 second time limit and as a result the program timed out An incorrect passkey was entered Solution Try updating the service information again with correct pass key Request was refused by security reason Please check remote set tings and try again Cause An error occurred while trying to update the service informa tion Connection request was refused by security reason...

Страница 226: ...ce name that you entered contains invalid characters Enter a different device name Cause The device name contains only spaces or nothing at all Solution Enter a device name that does not contain only spaces Unable to retrieve service information Solution Display the service list again Unable to register connection information Solution Close Bluetooth Settings turn off the power of the Toshiba Pock...

Страница 227: ...not been started Cause The Bluetooth Settings program has not been started because a Bluetooth device s power is not on in the Toshiba Pocket PC Solution Check the wireless switch to on position and turn on the Blue tooth power from utility Program cannot be started because Bluetooth receiving program is running Cause While the Bluetooth receiving program was running or the pop up menu was display...

Страница 228: ...at the remote device is operating properly This cannot be sent because it contains invalid data Cause An error has occurred in the data conversion at the time the object was sent Processing interrupted due to an internal error Cause The processing could not be continued due to an internal error Solution Reset the Toshiba Pocket PC Error messages during File Transfer Protocol FTP service The FTP se...

Страница 229: ...file folder using correct characters Cannot rename file folder Cause A processing error occurred because the entered name exceeded the maximum length Solution Enter a shorter name Enter the folder name Cause After creating or changing a folder either nothing has been entered for the name or the name consists of spaces or begins with a period Solution Enter a correct folder name The following chara...

Страница 230: ...aracters when entering the pass word Unable to move folder or obtain folder information Solution Try the operation again Registry problem Cause A problem occurred in the registry data required for processing There is no response from the partner device Ending application Cause Local Device tried to connect disconnect or perform a service search but there was no response from the remote device and ...

Страница 231: ...e sure you set your G Number and password properly Cannot call an IP phone Make sure you log on to VLI Buddy Server If you log on to it properly your status Online Offline Busy or Away is shown Check contact information in your buddy list or of your buddy icon Confirm your party s status is not offline Cannot call a phone Make sure you log on to VLI Buddy Server If you log on to it properly your s...

Страница 232: ...ned by the type of commu nications Graphical User Interface GUI Bluetooth terms Auto Connect For a COM service the program using COM is started and a connec tion is established with the connection registered Bluetooth device using the Serial Port Profile For a DUN service Dial up Networking is started and a connection is established with the connection registered Bluetooth device using the Dial up...

Страница 233: ...vice can be discovered by other Bluetooth devices Connectability Mode This setting determines whether Local Device can be connected to by other Bluetooth devices in response to a connection request Security Mode This setting determines whether authentication is performed when con necting to a remote Bluetooth device and whether data sent and received is encrypted Service Update This function is us...

Страница 234: ...rusted is displayed Service Name This indicates the type of service profile provided by a Bluetooth device PIN Code This is a password of up to 16 alphanumeric characters Depending on the remote device the PIN Code might be a fixed value with a limit on the number of digits so be sure to confirm these conditions It is also called a Bluetooth passkey Bluetooth authentication This is requested when ...

Страница 235: ... temperatures outside the range of 5 C to 35 C 41 F to 95 F or 25 C 77 F at high altitude all temperature references are approximate CPU performance may also vary from specifications due to design configuration Under some conditions your computer product may automatically shut down This is a normal protec tive feature designed to reduce the risk of lost data or damage to the product when used outs...

Страница 236: ...n port RGB USB Host Client RS232 Audio AC 97 codec mono record stereo playback 8 0 KHz 11 025 KHz 22 05 KHz and 44 1 KHz sample rate Full duplex record and playback On board microphone on board speaker Stereo earphone microphone jack Software volume control Accessories AC Adapter USB client cable serial client cable stylus pen cradle USB serial cradle with USB port battery pack high capacity batte...

Отзывы: