background image

10

Содержание e-STUDIO28

Страница 1: ......

Страница 2: ...n Directives Responsible for CE marking is TOSHIBA TEC GERMANY IMAGING SYSTEMS GmbH Carl Schurz Str 7 41460 Neuss Germany e mail customerservice toshibatec tgis com No part of this manual may be copied in whole or part without permission The contents of this manual may change without notification Trademarks described in this manual Ethernet is a registered trademark of US Xerox Corporation The off...

Страница 3: ...e setting up your e STUDIO45 35 28 with the GA 1040 Network Printer Board Keep this guide within easy reach and use it to configure quality printing environment and make the best of your printer s functions For further details of printing functions please see QUICK START GUIDE and other electrical manuals in the CD ROM such as GETTING STARTED PRINTING GUIDE CONFIGURATION GUIDE and JOB MANAGEMENT G...

Страница 4: ...NG UP THE TCP IP 16 Assigning the TCP IP Settings Automatically 17 Assigning the TCP IP Settings Manually 22 STARTING TOPACCESS 28 Starting TopAccess 28 Description of Screen 29 Loging on to the Administrator s Page 30 SETTING UP THE PROTOCOLS 33 SETTING UP THE IPX SPX AND NETWARE 34 Setting up from TopAccess 35 Setting up from Control Panel 39 SETTING UP THE APPLETALK 46 Setting up from TopAccess...

Страница 5: ...inting 78 Windows NT 4 0 79 Windows 2000 XP 85 Installing the Printer Driver for IPP Printing 92 Installing the Printer Driver for Novell Printing 97 Windows 95 98 Me 98 Windows NT 4 0 2000 XP 103 Installing the Agfa Monotype Font Manager 2000 107 Configuring the Options 109 Windows 95 98 Me 109 Windows NT 4 0 2000 XP 111 INSTALLING THE PRINTER DRIVER Macintosh 115 Installing the Printer Driver to...

Страница 6: ...4 AppleTalk Setting 126 Other Setting 126 ...

Страница 7: ...SETUP FLOW 5 SETUP FLOW ...

Страница 8: ...re the option settings on the printer driver P109 Configuring the Options For SMB Printing Connecting the GA 1040 Connect the GA 1040 to your network with a network cable P13 CONNECTING TO THE NETWORK Preparing to use the TopAccess Set the TCP IP protocol to use the TopAccess When the printer is connected to the TCP IP network you can use the TopAccess a web based utility to remotely set up the pr...

Страница 9: ...UP THE TCP IP Setting up the Printing Service Enable the LPD Printing Service using TopAccess P57 SETTING UP THE LPD PRINTING Installing the Printer Driver Install the printer drivers for the LPR Printing P78 Installing the Printer Driver for LPR Printing Configuring the Options Configure the option settings on the printer driver P109 Configuring the Options For IPP Printing The IPP Printing is on...

Страница 10: ...34 SETTING UP THE IPX SPX AND NETWARE Installing the Printer Driver Install the printer drivers for the Novell Printing P97 Installing the Printer Driver for Novell Printing Configuring the Options Configure the option settings on the printer driver P109 Configuring the Options Preparing to use the TopAccess Set the TCP IP protocol to use the TopAccess When the printer is connected to the TCP IP n...

Страница 11: ...the TCP IP network you can use the TopAccess a web based utility to remotely set up the printer from your computer P16 SETTING UP THE TCP IP Setting up the Protocol Set the AppleTalk P46 SETTING UP THE APPLETALK Installing the Printer Driver Install the printer drivers to Macintosh computer P115 Installing the Printer Driver to Macintosh The PostScript option PS3 Upgrade GE 1020 or PS3 HDD Upgrade...

Страница 12: ...10 ...

Страница 13: ...CONNECTING THE PRINTER 11 CONNECTING TO THE PRINTER ...

Страница 14: ...r of the printer and the power of the computer 2 Insert the printer cable all the way to the deep end of the parallel interface connector located on the rear side of the printer body and secure it with the latches on both sides of the connector 3 Connect the other end of the printer cable to the parallel port of your computer SUPPLEMENT The parallel port connector may vary depending on the model o...

Страница 15: ... describes how to connect the printer to a network PREPARATION The 10BASE T or 100BASE TX cable is an optional item Please obtain one that is compatible with your computer 1 Turn OFF the power of the printer 2 Insert the 10BASE T or 100BASE TX cable in the connector ...

Страница 16: ...14 ...

Страница 17: ...PREPARING TO USE THE TOPACCESS 15 PREPARING TO USE THE TOPACCESS ...

Страница 18: ...ning the TCP IP using the DHCP RARP or BOOTP server Where either DHCP RARP or BOOTP server is in the network the printer can be configured to get TCP IP settings automatically from the server P17 Assigning the TCP IP Settings Automatically Assigning the TCP IP manually Where neither DHCP RARP nor BOOTP server is in the network assign the static TCP IP settings manually P22 Assigning the TCP IP Set...

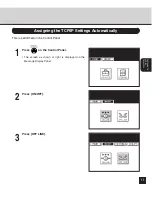
Страница 19: ...PACCESS 17 Assigning the TCP IP Settings Automatically This is performed on the Control Panel 1 Press on the Control Panel The screen as shown at right is displayed on the Message Display Panel 2 Press ON OFF 3 Press OFF LINE ...

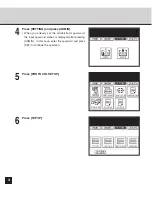
Страница 20: ...ess ADMIN When you already set the administrator password the input password screen is displayed after pressing ADMIN In this case enter the password and press SET to continue the operation 5 Press PROTOCOL SETUP 6 Press TCP IP ...

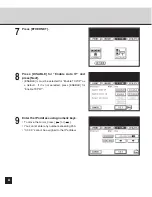
Страница 21: ... BOOTP ENABLE is must be selected for Enable TCP IP as a default If it is not selected press ENABLE for Enable TCP IP 9 Press SET to save the settings The display returns to the screen at Step 7 When the Gateway address is required to be set go to next step When the Gateway address is not required to be set skip to Step 12 10 Press GATEWAY ...

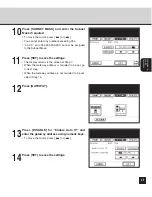
Страница 22: ... this case enter the gateway address using the numeric keys 12 Press UTILITY and press FUNCTION 13Press RESET NOTE Please reset the printer by turning off the power and then on when you change the settings at the first time since unpacking the GA 1040 printer kit You can use the RESET function to reset the printer from the second time ...

Страница 23: ...EPARING TO USE THE TOPACCESS 21 15 Wait for a few minutes until the printer completes initializing 14Press OK to reset the printer You must reset the printer to enable settings when you have changed them ...

Страница 24: ...igning the TCP IP Settings Manually This is performed on the Control Panel 1 Press on the Operation Panel The screen as shown at right is displayed on the Message Display Panel 2 Press ON OFF 3 Press OFF LINE ...

Страница 25: ... SETTING and press ADMIN When you already set the administrator password the input password screen is displayed after pressing ADMIN In this case enter the password and press SET to continue the operation 5 Press PROTOCOL SETUP 6 Press TCP IP ...

Страница 26: ...t ENABLE is must be selected for Enable TCP IP as a default If it is not selected press ENABLE for Enable TCP IP 9 Enter the IP address using numeric keys To move the cursor press or You cannot enter any number exceeding 255 0 0 0 0 cannot be assigned to the IP address ...

Страница 27: ... assigned to the Subnet Mask 11 Press SET to save the settings The display returns to the screen at Step 7 When the Gateway address is required to be set go to next step When the Gateway address is not required to be set skip to Step 15 12 Press GATEWAY 13 Press DISABLE for Enable Auto IP and enter the gateway address using numeric keys To move the cursor press or 14 Press SET to save the settings...

Страница 28: ...inter to enable settings when you have changed them 16Press RESET NOTE Please reset the printer by turning off the power and then on when you change the settings at the first time since unpacking the GA 1040 printer kit You can use the RESET function to reset the printer from the second time ...

Страница 29: ...PREPARING TO USE THE TOPACCESS 27 18Wait for a few minutes until the printer completes initializing ...

Страница 30: ... Microsoft Internet Explorer v4 0 1 and Service Pack 1 or later Protocol TCP IP must be installed on your computer SUPPLEMENTS Please use the latest version of Netscape Navigator or Microsoft Internet Explorer for best results Your browser must be Java enabled Starting TopAccess 1 Start the WWW browser on your computer 2 Enter http IP Address in the Address entry field of the WWW browser and press...

Страница 31: ...ink to access to each function When clicking on the menu the page displayed on the Control Panel frame will be changed Status Display Indicates the communication status and machine status Function Tab Click the tab to access to each function among the page displayed on the Control Panel frame When clicking on the tab the page displayed on the Control Panel frame will be changed Control Panel Displ...

Страница 32: ...TopAccess P28 Starting TopAccess 2 Click on the Administrator menu 3 Enter the password and click on OK The administrator password has not been set as the factory default When you have not set the password leave the Administrator Password field blank and click on OK The Administrator Password is the same password can be set from the Control Panel on the machine ...

Страница 33: ...PREPARING TO USE THE TOPACCESS 31 4 The Administrator Page is displayed ...

Страница 34: ...32 ...

Страница 35: ...SETTING UP THE PROTOCOLS 33 SETTING UP THE PROTOCOLS ...

Страница 36: ...le the TopAccess The NetWare server has been configured for the printer You can set up the IPX SPX and NetWare using TopAccess or the Control Panel on the printer Some settings cannot be operated from the Control Panel When you want set items for further particulars set up from TopAccess P35 Setting up from TopAccess When the printer is connected to your computer in local connection and you do not...

Страница 37: ... a frame type that the printer find first This is checked as a factory default Ethernet_802 3 Ethernet_802 2 Ethernet_II Ethernet_SNAP Instead of Auto check the frame types to be used The printer will use all frame types checked here These can be checked only when Auto is checked off SUPPLEMENT It is required to set the IPX SPX only when you want to change the frame types to be used The printer is...

Страница 38: ...ter the password if it has been set to the print server Search Root Enter the search root for the print queues The printer always searches the queues only in this root so that the printer can quickly find the queues 5 Click on the NetWare tab The NetWare SETUP page is displayed When using NetWare 4 x or NetWare 5 x in NDS NDPS mode go to Step 6 When using NetWare 3 x or NetWare 4 x in bindery mode...

Страница 39: ...nd print queue for the GA 1040 printer are created Bindery Print Server Enter the name of the print server that you have created for the GA 1040 printer on the file server Password Enter the password if it has been set to the print server 8 Reset the Printer to Enable Setting message is displayed on the page after clicking on SETUP 7 Check on Enable NDS and scroll down the page to enter each item ...

Страница 40: ...rinter Reset page is displayed 10Click on Printer Reset The confirmation screen appears 11 Click on OK to reset the printer You must reset the printer to enable settings when you have changed them 12Wait for a few minutes until the printer completes initializing ...

Страница 41: ...SETTING UP THE PROTOCOLS 39 Setting up from Control Panel 1 Press on the Control Panel The screen as shown at right is displayed on the Message Display Panel 2 Press ON OFF 3 Press OFF LINE ...

Страница 42: ...s PROTOCOL SETUP 6 Press IPX SPX When you want to set the printer to automatically find an appropriate frame type go to Step 7 When you want to specify the frame types to be used go to Step 8 SUPPLEMENT It is required to set the IPX SPX only when you want to change the frame types to be used The printer is configured to select an appropriate frame type automatically If you do not need to change th...

Страница 43: ...e button should be shown as right figure The screen returns to the PROTOCOL menu Go to Step 9 9 Press NETWARE When using NetWare 4 x or NetWare 5 x in NDS NDPS mode go to Step 10 When using NetWare 3 x or NetWare 4 x in bindery mode go to Step 12 8 Press AUTO to deselect and press the buttons of frame types to be used and then press SET The screen returns to the PROTOCOL menu ...

Страница 44: ...nt Server Enter the name of the print server object to be created on the NetWare server The name of the printer server must be entered with the NDS context i e CN GA1040_SRV OU GA1040 O ORG Password Enter the password if it has been set to the print server SUPPLEMENT The Search Root cannot be set when setting up from the Control Panel The Search Root setting allows the printer to search the queues...

Страница 45: ...d press SET to complete the entry The screen returns to the PROTOCOL menu File Server Enter the name of a file server that the print server and print queue for the GA 1040 printer are created Bindery Print Server Enter the name of the print server that you have created for the GA 1040 printer on the file server Password Enter the password if it has been set to the print server NOTE You should also...

Страница 46: ...44 14Press UTILITY and press FUNCTION 16Press OK to reset the printer You must reset the printer to enable settings when you have changed them 15 Press RESET ...

Страница 47: ...SETTING UP THE PROTOCOLS 45 17Wait for a few minutes until the printer completes initializing ...

Страница 48: ... set items for further particulars set up from TopAccess P47 Setting up from TopAccess When you do not have the TCP IP network to use TopAccess set up from the Control Panel on the printer P49 Setting up from Control Panel NOTE The AppleTalk has already been enabled as a factory default Operate the settings only when you want to set an AppleTalk zone that the printer belongs or AppleTalk is curren...

Страница 49: ...heckbox for Enable AppleTalk and click on SETUP When you have a zone in your AppleTalk network select the Zone Name that the printer belongs 4 Reset the Printer to Enable Setting message is displayed on the page after clicking on SETUP Setting up from TopAccess 1 Start the TopAccess and log in to the Administrator s page P28 STARTING TOPACCESS ...

Страница 50: ...Printer Reset page is displayed 6 Click on Printer Reset The confirmation screen appears 7 Click on OK to reset the printer You must reset the printer to enable settings when you have changed them 8 Wait for a few minutes until the printer completes initializing ...

Страница 51: ...SETTING UP THE PROTOCOLS 49 Setting up from Control Panel 1 Press on the Control Panel The screen as shown at right is displayed on the Message Display Panel 2 Press ON OFF 3 Press OFF LINE ...

Страница 52: ...s ADMIN When you already set the administrator password the input password screen is displayed after pressing ADMIN In this case enter the password and press SET to continue the operation 5 Press PROTOCOL SETUP 6 Press APPLETALK ...

Страница 53: ...SETTING UP THE PROTOCOLS 51 7 Press ENABLE for Enable AppleTalk and press SET The screen returns to the PROTOCOL menu 8 Press UTILITY and press FUNCTION 9 Press RESET ...

Страница 54: ...52 11 Wait for a few minutes until the printer completes initializing 10Press OK to reset the printer You must reset the printer to enable settings when you have changed them ...

Страница 55: ...SETTING UP THE PRINT SERVICE 53 SETTING UP THE PRINT SERVICE ...

Страница 56: ...TopAccess and log in to the Administrator s page P28 STARTING TOPACCESS 2 Click on the Network SETUP menu and click on the Other tab The Other SETUP page is displayed 3 Enter each item and click on SETUP Enable Windows Printing Service Check this to enable the SMB printing Enabling Windows Printing Service makes the print queue s listed on the network This is checked as a factory default Server Na...

Страница 57: ...heck this when you want to use WINS Windows Internet Name Service to name the GA 1040 printer When you check this set Enable Auto IP or IP Address to specify the IP address of the WINS server Enable Auto IP Check this when you want to obtain the IP address of the WINS server automatically IP Address Enter the IP address of the WINS server 4 Reset the Printer to Enable Setting message is displayed ...

Страница 58: ...56 7 Click on OK to reset the printer You must reset the printer to enable settings when you have changed them 8 Wait for a few minutes until the printer completes initializing ...

Страница 59: ... TopAccess 1 Start the TopAccess and log in to the Administrator s page P28 STARTING TOPACCESS 2 Click on the Network SETUP menu and click on the Other tab The Other SETUP page is displayed 3 Enter each item and click on SETUP Enable LPD Printing Service Check this to enable the LPR printing This is checked as a factory default Enable Port 9100 Check this to enable the LPR printing using a print q...

Страница 60: ...e with the job management tools Print print jobs are spooled to the hard disk in the GA 1040 printer and print out Use this queue for a general printing 4 Reset the Printer to Enable Setting message is displayed on the page after clicking on SETUP 5 Click on the Other menu and click on the Reset tab The Printer Reset page is displayed 6 Click on Printer Reset The confirmation screen appears The Ho...

Страница 61: ...TTING UP THE PRINT SERVICE 59 7 Click on OK to reset the printer You must reset the printer to enable settings when you have changed them 8 Wait for a few minutes until the printer completes initializing ...

Страница 62: ...60 ...

Страница 63: ...INSTALLING THE PRINTER DRIVER 61 INSTALLING THE PRINTER DRIVER ...

Страница 64: ...computer By installing the Internal Fonts to your computer you can displayed the Internal Fonts on your screen System Requirements To install the printer drivers the following environments are required For Windows Hardware PC AT compatible with an 80486 AMD or Pentium processor OS Windows 95 Windows 98 Windows Me Windows NT 4 0 Windows 2000 Windows XP Memory 16MB or more for Windows 95 24MB or mor...

Страница 65: ...nting for Windows 1 Installing the printer driver using the installer in the CD ROM and changing the port P78 Installing the Printer Driver for LPR Printing 2 Configuring the options P109 Configuring the Options IPP Printing for Windows 1 Installing the printer driver using the installer in the CD ROM and changing the port P92 Installing the Printer Driver for IPP Printing 2 Configuring the option...

Страница 66: ...RALLEL PORT 1 Insert the CD ROM into the CD ROM drive The installer automatically starts and the Welcome screen appears SUPPLEMENT When the installer does not automatically start double click on Setup exe in the Installr folder of the CD ROM 2 Click on Next The Software License Agreement screen appears 3 Click on Yes The Setup Type screen appears REQUIREMENT You must log in as a user who has the A...

Страница 67: ...der only If you want to change the folder which the software will be installed 6 Select the components to be installed and click on Next The Select Port screen appears PCL6 Driver Check this to install the PCL6 printer driver PostScript Driver Check this to install the PostScript printer driver AFM Check this to install the Agfa Monotype Font Manager 2000 ...

Страница 68: ...install the Agfa Monotype Font Manager 2000 the welcome screen appears In this case continue the installation P107 Installing the Agfa Monotype Font Manager 2000 10 Continue the operation to configure the option settings on the printer driver P109 Configuring the Options The PostScript option PS3 Upgrade GE 1020 or PS3 HDD Upgrade GE 1030 is required to use the PostScript Driver ...

Страница 69: ...NETWORK The TCP IP setting is completed correctly P16 SETTING UP THE TCP IP The Windows Printing is completed correctly P54 SETTING UP THE WINDOWS PRINTING The procedure to Install the printer driver for SMB printing is different depending on the version of the Windows P68 Windows 95 98 Me P72 Windows NT 4 0 2000 XP SUPPLEMENT When you want to install the Agfa Monotype Font Manager 2000 you should...

Страница 70: ...edure here describes an installation on Windows 98 The procedures are same when Windows 95 or Windows Me is used 2 Click on Yes The Add Printer Wizard screen appears The Hold queue and Print queue are only available when the HDD option PS3 HDD Upgrade GE 1030 is installed When the HDD option PS3 HDD Upgrade GE 1030 is installed on your GA 1040 printer the PostScript printer driver is automatically...

Страница 71: ... 95 98 Me is located select the oemsetup inf file and click on OK When you want to install the PCL6 printer driver locate CD ROM drive English Prntdrvr Pcl6_drvr Win_9x_ME When you want to install the PostScript printer driver locate CD ROM drive English Prntdrvr Ps_drvr Win_9x_ME 5 Click on Browse The Locate File screen appears 6 Insert the CD ROM into the CD ROM drive When inserting the CD ROM t...

Страница 72: ... you install the PostScript printer driver When the GA 1040 printer is an European version which the default paper size type is A4 system select TOSHIBA e STUDIO45srs PCL6EU when you install the PCL6 printer driver or TOSHIBA e STUDIO45srs PS3EU when you install the PostScript printer driver The PostScript option PS3 Upgrade GE 1020 or PS3 HDD Upgrade GE 1030 is required to use the PostScript Driv...

Страница 73: ... print queue screen appears 11 Select Yes to print a test page and click on Finish 12Make sure a test page is printed successfully and click on Yes to close the screen 14 Continue the operation to configure the option settings on the printer driver P109 Configuring the Options ...

Страница 74: ...same when Windows 2000 or Windows XP is used although the some screens differ from operating on Windows 2000 or Windows XP REQUIREMENT You must log in Windows as a user who has the Administrators or Power Users privilege 1 Click on Start and select Printers in Settings When using the Windows XP click on start and select Printers and Faxes The Printers folder is opened 2 Click on File and select Se...

Страница 75: ...INSTALLING THE PRINTER DRIVER 73 3 Click on the Ports tab and click on Add Port The Printer Ports screen appears 4 Select Local Port and click on New Port The Port Name screen appears ...

Страница 76: ...ect hold or print on the GA 1040 printer Enter a queue depending on how you operate the printing direct print jobs are sent straight to the printer without spooling hold print jobs are held until users operate copying or moving them to the Print queue with the job management tools print print jobs are spooled to the hard disk in the GA 1040 printer and print out Use this queue for a general printi...

Страница 77: ...the CD ROM into the CD ROM drive The installer automatically starts and the Welcome screen appears SUPPLEMENT When the installer does not automatically start double click on Setup exe in the Installr folder of the CD ROM 9 Click on Next The Software License Agreement screen appears 10 Click on Yes The Setup Type screen appears ...

Страница 78: ...want to change the folder which the software will be installed 13 Select the components to be installed and click on Next The Select Port screen appears PCL6 Driver Check this to install the PCL6 printer driver PostScript Driver Check this to install the PostScript printer driver AFM Check this to install the Agfa Monotype Font Manager 2000 ...

Страница 79: ...ted When you selected to install the Agfa Monotype Font Manager 2000 the welcome screen appears In this case continue the installation P107 Installing the Agfa Monotype Font Manager 2000 17 Continue the operation to configure the option settings on the printer driver P109 Configuring the Options The PostScript option PS3 Upgrade GE 1020 or PS3 HDD Upgrade GE 1030 is required to use the PostScript ...

Страница 80: ...he power P13 CONNECTING TO THE NETWORK The TCP IP setting is completed correctly P16 SETTING UP THE TCP IP The LPD Printing is completed correctly P57 SETTING UP THE LPD PRINTING The LPR printing is available only for Windows NT 4 0 Windows 2000 and Windows XP The procedure to Install the printer driver for LPR printing is different depending on the version of the Windows P79 Windows NT 4 0 P85 Wi...

Страница 81: ...ws NT 4 0 You must log in Windows as a user who has the Administrators or Power Users privilege To install the printer driver for LPR printing configure the LPR port first and then install the printer driver using the installer in the CD ROM 1 Click on Start and select Printers in Settings The Printers folder is opened 2 Click on File and select Server Properties The Printer Server Properties scre...

Страница 82: ...PR Port and click on New Port The Add LPR compatible printer screen appears SUPPLEMENT When LPR Port is not listed in the Available Printer Ports list make sure the TCP IP Printing Service is installed on your Windows NT 4 0 LPR Port is not listed unless the TCP IP Printing Service is installed ...

Страница 83: ...g lpd field In the Name of printer or print queue on that server field you have to enter a queue name direct hold or print on the GA 1110 printer Enter a queue depending on how you operate the printing direct print jobs are sent straight to the printer without spooling hold print jobs are held until users operate copying or moving them to the Print queue with the job management tools print print j...

Страница 84: ...rts on this server list 8 Insert the CD ROM into the CD ROM drive The installer automatically starts and the Welcome screen appears SUPPLEMENT When the installer does not automatically start double click on Setup exe in the Installr folder of the CD ROM 9 Click on Next The Software License Agreement screen appears ...

Страница 85: ... the PCL6 printer driver PostScript Driver Check this to install the PostScript printer driver AFM Check this to install the Agfa Monotype Font Manager 2000 11 Select Custom and click on Next The Choose Destination screen appears 12Click on Next Click on Browse and select the folder only If you want to change the folder which the software will be installed ...

Страница 86: ...alling the Agfa Monotype Font Manager 2000 17 Continue the operation to configure the option settings on the printer driver P109 Configuring the Options 15Click on Next Start copying files 14 Select the LPR Port that you create and click on Next The Start Copying Files screen appears The PostScript option PS3 Upgrade GE 1020 or PS3 HDD Upgrade GE 1030 is required to use the PostScript Driver ...

Страница 87: ... Power Users privilege To install the printer driver for LPR printing configure the LPR port first and then install the printer driver using the installer in the CD ROM 1 Click on Start and select Printers in Settings When using the Windows XP click on start and select Printers and Faxes The Printers folder is opened 2 Click on File and select Server Properties The Printer Server Properties screen...

Страница 88: ... Click on the Ports tab and click on Add Port The Printer Ports screen appears 4 Select Standard TCP IP Port and click on New Port The Add Standard TCP IP Printer Port Wizard screen appears 5 Click on Next ...

Страница 89: ...ard TCP IP Port Monitor screen appears 8 Select LPR at the Protocol option enter a queue name in the Queue Name field at the LPR Settings option and then click on OK In the Queue Name field you have to enter a queue name direct hold or print on the GA 1110 printer Enter a queue depending on how you operate the printing direct print jobs are sent straight to the printer without spooling hold print ...

Страница 90: ...returns to the Printer Ports screen 9 Click on Next 11 Click on Close The screen returns to the Print Server Properties screen The Hold queue and Print queue are only available when the HDD option PS3 HDD Upgrade GE 1030 is installed ...

Страница 91: ...aller automatically starts and the Welcome screen appears SUPPLEMENT When the installer does not automatically start double click on Setup exe in the Installr folder of the CD ROM 14 Click on Next The Software License Agreement screen appears 12Click on OK to close the screen The LPR Port is added in the Ports on this server list ...

Страница 92: ...this to install the Agfa Monotype Font Manager 2000 18 Select the components to be installed and click on Next The Select Port screen appears 16Select Custom and click on Next The Choose Destination screen appears 17Click on Next Click on Browse and select the folder only If you want to change the folder which the software will be installed ...

Страница 93: ...ation P107 Installing the Agfa Monotype Font Manager 2000 22 Continue the operation to configure the option settings on the printer driver P109 Configuring the Options 20Click on Next Start copying files 19 Select the LPR Port that you create and click on Next The Start Copying Files screen appears The PostScript option PS3 Upgrade GE 1020 or PS3 HDD Upgrade GE 1030 is required to use the PostScri...

Страница 94: ...ble only for Windows 2000 and Windows XP To install the printer driver for IPP printing install the printer driver by Add Printer Wizard SUPPLEMENT When you want to install the Agfa Monotypo Font Manager 2000 you should install it separately P107 Installing the Agfa Monotype Font Manager 2000 1 Click on Start and select Printers in Settings When using the Windows XP click on start and select Print...

Страница 95: ...NTER DRIVER 3 Click on Next 4 Select Network printer and click on Next 2 Double click on the Add Printers icon When using the Windows XP click on Add a printer in the Printer Tasks menu The Add Printer Wizard screen appears ...

Страница 96: ... address 192 168 255 48 http 192 168 255 48 ipp direct When you use the WINS server enter the print server name of the GA 1040 printer instead of IP Address Example Print Server Name e STUDIO45 http e STUDIO45 ipp direct The Connect to Printer screen appears 7 Click on Have Disk The Install From Disk screen appears Please enter ipp print instead of the ipp direct for the URL when the HDD option PS...

Страница 97: ...pe is A4 system select TOSHIBA e STUDIO45srs PCL6EU when you install the PCL6 printer driver or TOSHIBA e STUDIO45srs PS3EU when you install the PostScript printer driver 9 Locate the directory where the printer driver for Windows 2000 XP is located select the oemsetup inf file and click on Open PCL6 printer driver Windows 2000 CD ROM drive English Prntdrvr Pcl6_drvr Win_2000 Windows XP CD ROM dri...

Страница 98: ...nstalled on Windows 2000 XP 13Continue the operation to configure the option settings on the printer driver P109 Configuring the Options The PostScript option PS3 Upgrade GE 1020 or PS3 HDD Upgrade GE 1030 is required to use the PostScript Driver ...

Страница 99: ... when you want to use TopAccess or using the printer with NetWare server 5 x in the TCP IP network P16 SETTING UP THE TCP IP The IPX SPX and NetWare settings are completed correctly P34 SETTING UP THE IPX SPX AND NETWARE SUPPLEMENT When you want to install the Agfa Monotypo Font Manager 2000 you should install it separately P107 Installing the Agfa Monotype Font Manager 2000 The procedure to Insta...

Страница 100: ... 1 Open the NetWare server when using in bindery mode or NDS directory tree when using in NDS or NDPS mode in the Network Neighborhood with the Windows Explorer and double click on a queue Select a queue depending on how you operate the printing given name _direct print jobs are sent straight to the printer without spooling given name _hold print jobs are held until users operate copying or moving...

Страница 101: ...dd Printer Wizard screen appears SUPPLEMENT The queue names created on the NetWare server should be either given name _direct given name _hold given name _print given name can be any name Those queues are corresponding to the GA 1040 printer s queues Direct Hold and Print The Hold queue and Print queue are only available when the HDD option PS3 HDD Upgrade GE 1030 is installed ...

Страница 102: ... when you install the PCL6 printer driver or TOSHIBA e STUDIO45srs PS3EU when you install the PostScript printer driver 7 Locate the directory where the printer driver for Windows 95 98 Me is located select the oemsetup inf file and click on OK When you want to install the PCL6 printer driver locate CD ROM drive English Prntdrvr Pcl6_drvr Win_9x_ME When you want to install the PostScript printer d...

Страница 103: ...iver for Novell printing for Windows 95 98 Me only one printer driver can be installed for one print queue by operating the installation in this method If you want to install another printer driver for Novell printing install the printer driver by Add Printer Wizard and set the NetWare print queue to the printer port The PostScript option PS3 Upgrade GE 1020 or PS3 HDD Upgrade GE 1030 is required ...

Страница 104: ...alled and the print queue screen appears 12Make sure a test page is printed successfully and click on Yes to close the screen 14Continue the operation to configure the option settings on the printer driver P109 Configuring the Options ...

Страница 105: ...are is installed You have an apropriate privilege to access to the NetWare server 1 Open the NetWare server when using in bindery mode or NDS directory tree when using in NDS or NDPS mode in the Network Neighborhood with the Windows Explorer and double click on a queue Select a queue depending on how you operate the printing given name _direct print jobs are sent straight to the printer without sp...

Страница 106: ...y automatically start Click on Cancel to exit the installer and continue the operation 2 Click on Yes SUPPLEMENT The queue names created on the NetWare server should be either given name _direct given name _hold given name _print given name can be any name Those queues are corresponding to the GA 1040 printer s queues Direct Hold and Print The Hold queue and Print queue are only available when the...

Страница 107: ... or TOSHIBA e STUDIO45srs PS3EU when you install the PostScript printer driver 7 Locate the directory where the printer driver for Windows NT 4 0 Windows 2000 or Windows XP is located select the oemsetup inf file and click on Open PCL6 printer driver Windows NT 4 0 CD ROM drive English Prntdrvr Pcl6_drvr Win_NT4x Windows 2000 CD ROM drive English Prntdrvr Pcl6_drvr Win_2000 Windows XP CD ROM drive...

Страница 108: ...nly one printer driver can be installed for one print queue by operating the installation in this method If you want to install another printer driver for Novell printing install the printer driver by Add Printer Wizard and set the NetWare print queue to the printer port 11 Continue the operation to configure the option settings on the printer driver P109 Configuring the Options ...

Страница 109: ...ct Components screen appears 2 Click on Next Make sure both Program Files and Fonts are checked before clicking on Next If you want to change the directory where the program is installed click on Browse to change the directory Start copying files and the Status screen appears SUPPLEMENT When you checked AFM at the prompt of selecting the installed components during the installation of printer driv...

Страница 110: ... appears 4 Click on Finish Check on Yes review the Readme file now when you want to view the Readme file 5 Select Yes I want to restart my computer now and click on Finish You must restart your computer to enable the installed fonts and program ...

Страница 111: ...e printer drivers The procedure to configure the options is different depending on the version of the Windows P109 Windows 95 98 Me P111 Windows NT 4 0 2000 XP 1 Select the printer driver in the Printers folder Then click on File and select Properties The printer drivers properties screen appears 2 Click on the Options tab and set the options Windows 95 98 Me ...

Страница 112: ...ot the hole punch unit is installed This can be selected when Hanging Finisher Finisher or Saddle Stitch Finisher is selected at Finisher Not Installed Select this when no hole punch unit is installed 2 Hole Punch Unit Select this when the 2 Hole Punch Unit MJ 6001E is installed 2 3 Hole Punch Unit Select this when the 2 3 Hole Punch Unit MJ 6001N is installed 4 Hole Punch Unit F Select this when ...

Страница 113: ...g References for Windows 2000 XP The printer drivers properties screen appears 2 Click on the Options tab and set the options Pedestal This sets whether or not the pedestal is installed Not installed Select this when no pedestal is installed Pedestal 1 Select this when the Paper Feed Pedestal KD 1009 is installed Pedestal 2 Select this when the Paper Feed Pedestal KD 1009 and the Cassette Module D...

Страница 114: ...t this when the 2 Hole Punch Unit MJ 6001E is installed 2 3 Hole Punch Unit Select this when the 2 3 Hole Punch Unit MJ 6001N is installed 4 Hole Punch Unit F Select this when the 4 Hole Punch Unit F MJ 6001F is installed 4 Hole Punch Unit S Select this when the 4 Hole Punch Unit S MJ 6001S is installed 3 Click on OK to save settings SUPPLEMENT You can set the options automatically when the GA 104...

Страница 115: ...e PostScript printer driver on Windows NT 4 0 select the option under Installed Options and select the installed option from the list below PostScript Printer Driver 1 Select the printer driver in the Printers folder Then click on File and select Properties The printer drivers properties screen appears ...

Страница 116: ...ddle Stitch Finisher Select this when the Saddle Stitch Finisher MJ 1013 is installed Punch Unit This sets whether or not the hole punch unit is installed This can be selected when Hanging Finisher Finisher or Saddle Stitch Finisher is selected at Finisher Not Installed Select this when no hole punch unit is installed 2 Hole Punch Unit Select this when the 2 Hole Punch Unit MJ 6001E is installed 2...

Страница 117: ...the desktop 2 Open the English folder in the CD ROM and double click on AdobePS 8 7 Installer included in the Printer Driver folder The AdobePS 8 7 installation begins SUPPLEMENT If the AdobePS is already installed on your computer please make sure the version of AdobePS is 8 7 or later To check the version of AdobePS on your computer select the AdobePS file located in the Extensions folder under ...

Страница 118: ...ck on OK 4 Click on Replace When the old version of AdobePS is already installed on your computer the message screen as shown at right is displayed In this case click on Replace 6 Click on Restart 3 Click on Yes ...

Страница 119: ...led to the hard disk in the GA 1040 printer and print out Use this queue for a general printing Creating the AdobePS Printer 1 Click on apple menu and select Chooser The Chooser screen appears 3 Select a PostScript Printer Description file to be used and click on Select When the GA 1040 printer is an US version which the default paper size type is LT system select TOSHIBA e STUDIO45srs PS3UC When ...

Страница 120: ...lled Hanging Finisher Select this when the Hanging Finisher MJ 1011 is installed Finisher Select this when the Finisher MJ 1012 is installed Saddle Stitch Finisher Select this when the Saddle Stitch Finisher MJ 1013 is installed Punch Unit This sets whether or not the hole punch unit is installed This can be selected when Hanging Finisher Finisher or Saddle Stitch Finisher is selected at Finisher ...

Страница 121: ...119 INSTALLING THE PRINTER DRIVER 6 Click on OK ...

Страница 122: ...120 ...

Страница 123: ...APPENDIX 121 APPENDIX ...

Страница 124: ...h Job Status Yes Default Language English Print Start Page Yes Job List Order Normal Delete Time for Private Job 1 day Use Character Set Windows Job Log Setup only available when the PS3 HDD Upgrade GE 1030 is installed Enable Printed Queue Yes Jobs Saved in Printed Queue 10 Auto Print Job Log every 55 jobs No Auto Clear Job Log every 55 jobs No Job Log Page Size LT A4 TopAccess Setting SUPPLEMENT...

Страница 125: ... Length 60 lines Margin Unit inch for US mm for EU Margin Top 0 20 inch 5 mm Margin Left 0 20 inch 5 mm PS Setup only available when the PS3 Upgrade GE 1020 or PS3 HDD Upgrade GE 1030 is installed Print PS Error Page No Convert Paper Size No Allow Courier Substitution Yes Queue Setup only available when the PS3 HDD Upgrade GE 1030 is installed Publish Print Queue No Yes when GE 1030 is installed P...

Страница 126: ...OF Character Yes Time Out 30 sec Ethernet Transmission Speed Auto TCP IP Setting Ethernet Enable Ethernet Yes Enable Auto IP Yes Select Protocol DHCP IP Address Not Defined Subnet Mask Not Defined Gateway Enable Auto IP Yes Gateway Address Not Defined IPX SPX Setting Frame Type Auto ...

Страница 127: ...t Defined Enable Bindery Server3 No File Server Not Defined Bindery Print Server Not Defined Enable Bindery Server4 No File Server Not Defined Bindery Print Server Not Defined Enable Bindery Server5 No File Server Not Defined Bindery Print Server Not Defined Enable Bindery Server6 No File Server Not Defined Bindery Print Server Not Defined Enable Bindery Server7 No File Server Not Defined Bindery ...

Страница 128: ...nting Service Enable Windows Printing Service Yes Server Name e STUDIO45 Comment Not Defined Domain or Workgroup WORKGROUP Use WINS Server No Enable Auto IP No IP Address Not Defined LPD Printing Service Enable LPD Printing Service Yes Enable Port9100 Yes Select Port9100 Queue Direct Print when GE 1030 is installed ...

Страница 129: ......

Страница 130: ...Copyright TOSHIBA TEC CORPORATION 2002 ALL RIGHTS RESERVED 6LA50221000 R01112004801 TG ...

Отзывы:

Похожие инструкции для e-STUDIO28