background image

5

USING THE MANUAL

This machine has been designed to provide convenient copying features in a minimum amount of office space and 
with maximum operational ease. To get full use of all machine features, be sure to familiarise yourself with this 
manual and the machine. For quick reference during machine use, keep this manual in a handy location.

ABOUT THE OPERATION MANUALS

The operation manuals for the machine are as follows:

Operation Manual (Multifunctional Digital System) (this manual)

This manual contains explanations of the product and procedures for using the machine as a copier.

Online Manual (on the accessory CD-ROM)

This manual explains the procedures for using the machine as a printer.

Printer Driver Setup Guide (separate manual)

This manual contains instructions for installing the printer driver that allows the machine to be used with your 
computer and procedures for establishing initial printer settings.

THE MEANING OF "R" IN ORIGINAL AND PAPER SIZE 

INDICATIONS

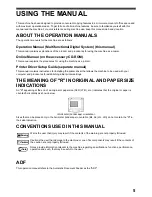
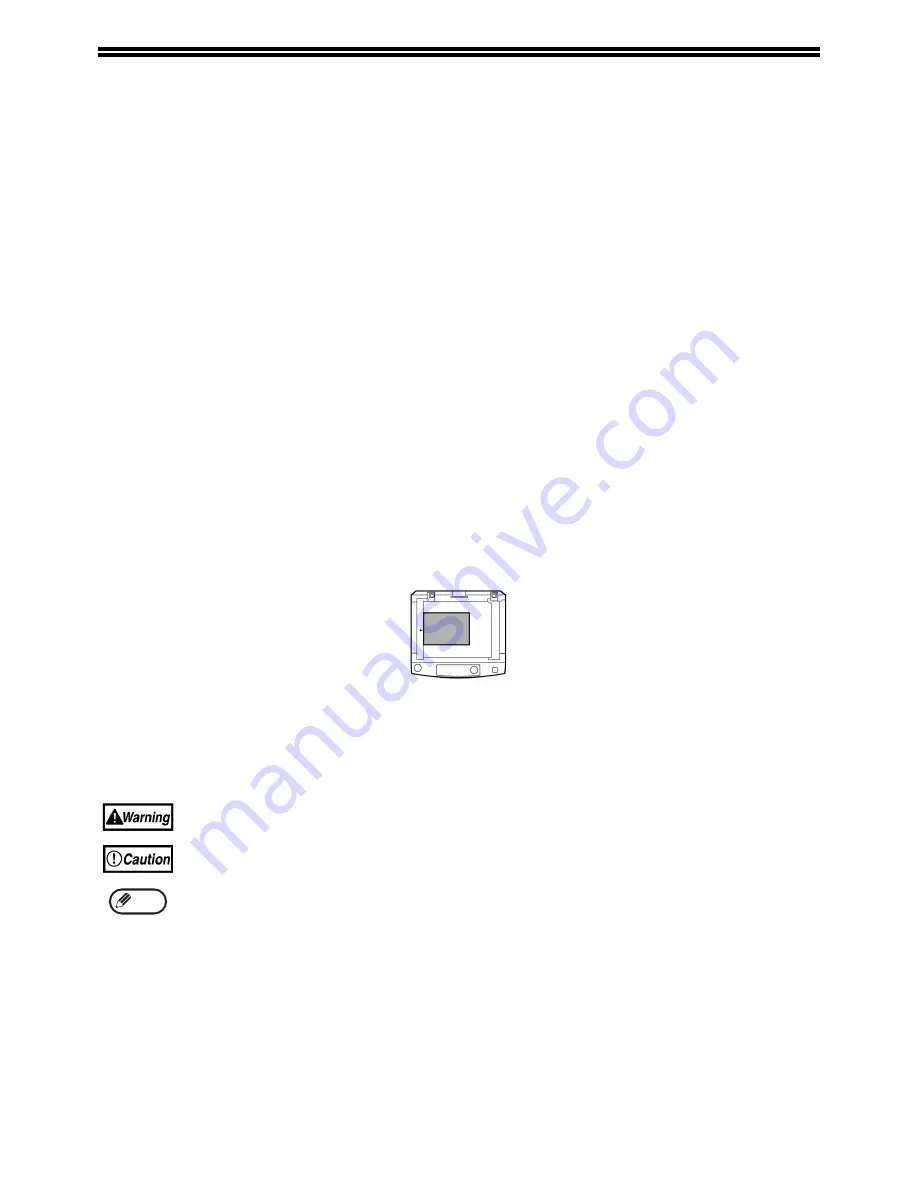
An "R" appearing at the end of an original or paper size (A4R (LT-R), etc.) indicates that the original or paper is 
oriented horizontally as shown below.

Sizes that can be placed only in the horizontal (landscape) orientation (B4, A3 (LG, LD)) do not contain the "R" in 
their size indication.

CONVENTIONS USED IN THIS MANUAL

ADF

This operation manual refers to the Automatic Document Feeder as the "ADF".

Warns the user that injury may result if the contents of the warning are not properly followed.

Cautions the user that damage to the machine or one of its components may result if the contents of 

the caution are not properly followed.

Notes provide information relevant to the machine regarding specifications, functions, performance, 

operation and such, that may be useful to the user.

<Horizontal (Landscape) orientation>

Note

Содержание e-STUDIO 161

Страница 1: ......

Страница 2: ......

Страница 3: ...t 73 23 CEE modifiées par la directive 93 68 CEE Dit apparaat voldoet aan de eisen van de richtlijnen 89 336 EEG en 73 23 EEG gewijzigd door 93 68 EEG Dette udstyr overholder kravene i direktiv nr 89 336 EEC og 73 23 EEC med tillæg nr 93 68 EEC Quest apparecchio è conforme ai requisiti delle direttive 89 336 EEC e 73 23 EEC come emendata dalla direttiva 93 68 EEC Este equipamento obedece às exigên...

Страница 4: ...ous radiation exposure Ozone information After a suitable place has been selected for the installation please do not change it Avoid excessive heat dust vibration and direct sunlight Also provide proper ventilation as the copier emits a small amount of ozone Machine noise information Ordinance 3 GSGV January 18 1991 The maximum sound pressure level is equal or less than 70 dB A according to EN2777...

Страница 5: ......

Страница 6: ...or accidents beyond the reasonable control of TOSHIBA TEC CORPORATION including without limitation acts of God war riot civil commotion malicious or deliberate damage fire flood or storm natural calamity earthquakes abnormal voltage or other disasters c additions modifications disassembly transportation or repairs by any person other than service technicians authorized by TOSHIBA TEC CORPORATION o...

Страница 7: ... RATIO SELECTION 22 MANUAL RATIO SELECTION 23 SELECTING THE VERTICAL AND HORIZONTAL COPY RATIOS SEPARATELY 24 TWO SIDED COPYING USING THE BYPASS TRAY 26 DUAL PAGE COPYING 27 INTERRUPTING A COPY RUN 28 3 PRINTER FUNCTIONS USING THE PRINTER MODE 29 BASIC PROCEDURE FOR PRINTING 29 4 USER SETTINGS ADJUSTING THE AUTOMATIC EXPOSURE LEVEL 31 TONER SAVE MODE AND HIGH IMAGE QUALITY MODE 32 CUSTOMISING SETT...

Страница 8: ...MAINTENANCE 56 CLEANING THE DOCUMENT GLASS AND ADF DOCUMENT COVER 56 CLEANING THE BYPASS TRAY PAPER FEED ROLLER 56 CLEANING THE TRANSFER CHARGER 57 7 PERIPHERAL DEVICES AND SUPPLIES PERIPHERAL DEVICES 58 AUTOMATIC DOCUMENT FEEDER 58 250 SHEET PAPER FEED UNIT 59 8 APPENDIX SPECIFICATIONS 60 SOFTWARE LICENSE 62 INDEX 64 ...

Страница 9: ...justments or performance of procedures other than those specified herein may result in hazardous laser radiation exposure The socket outlet should be installed near the equipment and be easily accessible ALWAYS keep the plug and outlet clean Prevent them from accumulating dust and dirt This could cause a fire and give you an electric shock due to the heat released by electric leakage DO NOT place ...

Страница 10: ...ements Microsoft Windows operating system is a trademark or copyright of Microsoft Corporation in the U S A and other countries Windows 95 Windows 98 Windows Me Windows NT 4 0 Windows 2000 and Windows XP are trademarks or copyrights of Microsoft Corporation in the U S A and other countries IBM and PC AT are trademarks of International Business Machines Corporation Acrobat Reader Copyright 1987 200...

Страница 11: ...e printer driver that allows the machine to be used with your computer and procedures for establishing initial printer settings THE MEANING OF R IN ORIGINAL AND PAPER SIZE INDICATIONS An R appearing at the end of an original or paper size A4R LT R etc indicates that the original or paper is oriented horizontally as shown below Sizes that can be placed only in the horizontal landscape orientation B...

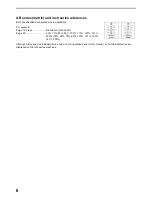
Страница 12: ...re applicable For example Page 15 step 1 B4 and A3 LG and LD Page 60 50 71 82 86 100 115 122 141 200 50 65 78 95 100 121 129 141 200 Although AB series size indications are shown on the operation panel of this manual inch series indications are displayed on the inch series machines ...

Страница 13: ... to 400 in 1 increments When the ADF is being used the zoom copy ratio range is 50 to 200 Continuous copying of up to 999 copies is possible Can be changed to a maximum of 99 copies in the user programs The user programs allow customized machine settings and management Access to the machine can be controlled by enabling audit mode Scan once Copy many The machine is equipped with a memory buffer al...

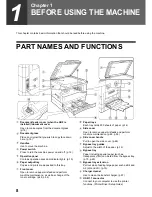
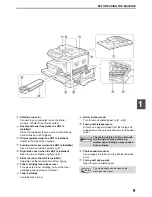
Страница 14: ...sited to this tray Front cover Open to remove paper misfeeds and perform machine maintenance as well as change of the toner cartridge p 49 p 54 Paper trays Each tray holds 250 sheets of paper p 14 Side cover Open to remove paper misfeeds and perform machine maintenance p 48 p 56 Side cover handle Pull to open the side cover p 48 Bypass tray guides Adjust to the width of the paper p 15 Bypass tray ...

Страница 15: ...en the ADF is installed Originals exit the machine here after copying Toner cartridge lock release lever To replace the toner cartridge pull out the toner cartridge while pushing on this lever Toner cartridge Contains toner p 54 Roller rotating knob Turn to remove misfed paper p 47 p 48 Fusing unit release levers To remove a paper misfeed from the fusing unit push down on these levers and remove t...

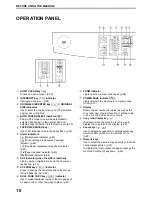
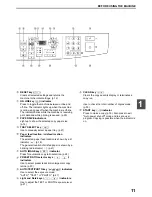
Страница 16: ...ghts up when originals are set in the document feeder tray p 19 XY ZOOM key indicator Press to change the horizontal and vertical copy ratios independently p 24 DUAL PAGE COPY key indicator Use to make individual copies of the two pages of an open book or other two page original p 27 ZOOM indicator Lights up when a zoom ratio is set p 24 POWER SAVE indicator Lights up when the machine is in a powe...

Страница 17: ...ors The selected paper feed location is shown by a lit indicator p 18 The general location of misfed paper is shown by a blinking red indicator p 47 AUTO IMAGE key indicator Press for automatic copy ratio selection p 22 PRESET RATIO selector keys indicators Use to select preset reduction enlargement copy ratios p 23 AUTO TEXT PHOTO key indicators Use to select the exposure mode AUTO TEXT or PHOTO ...

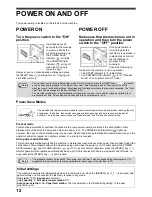
Страница 18: ...n the power is on All lights except the POWER SAVE indicator and ON LINE indicator go off To resume normal operation press the START key Normal operation also resumes automatically when a print job is received While in auto power shut off mode no keys except the START key can be used The machine reverts to the initial settings when it is first turned on when the RESET key is pressed or when no key...

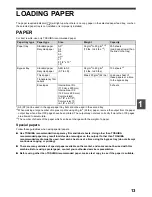
Страница 19: ... misfeeds or smudges on the output If other than TOSHIBA recommended media must be used feed each sheet one at a time using the bypass tray do not attempt continuous copying or printing There are many varieties of special paper available on the market and some cannot be used with this machine Before using special paper contact your authorized service representative Before using other than TOSHIBA ...

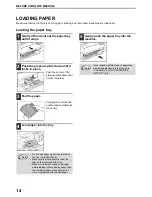
Страница 20: ...paper is not fanned double feeds or misfeeds may occur 4 Load paper into the tray 5 Gently push the paper tray into the machine Do not load paper higher than the line on the tray up to 250 sheets Make sure that the paper fits under the tabs on the right side of the tray Make sure the stack of paper is straight before loading it When adding paper take the remaining paper out and combine it into a s...

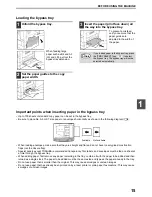
Страница 21: ...y are straight and flat and do not have loosely glued construction flaps not the closure flap Special papers except TOSHIBA recommended transparency film labels and envelopes must be fed one sheet at a time through the bypass tray When adding paper first remove any paper remaining in the tray combine it with the paper to be added and then reload as a single stack The paper to be added must be the ...

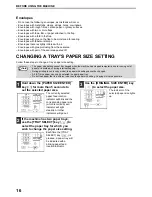
Страница 22: ...paper size The currently selected paper feed location indicator will blink and the corresponding paper size which is currently set indicator will light steadily All other indicators will go out 2 If the machine has two paper trays use the TRAY SELECT key to select the paper tray for which you wish to change the paper size setting Each time the TRAY SELECT key is pressed a paper tray will be indica...

Страница 23: ...r store the left guide in the slot at the left front of the paper tray 5 Press the START key and then the PAPER SIZE ENTER key To change the paper size setting of another tray repeat steps 2 to 5 after pressing the START key Important points when using the printer mode Make sure that the tray s paper size setting is the same as the tray s paper size setting in the printer driver For example if the...

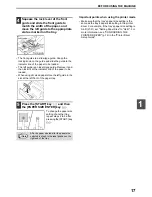
Страница 24: ...r of the required size in a tray or select the bypass tray with the TRAY SELECT key and copy from the bypass tray The bypass tray must be manually selected To copy on paper of a different size than the original select the paper with the TRAY SELECT key If the ORIGINAL SIZE indicator is blinking rotate the original so that it is in the same orientation as the blinking ORIGINAL SIZE indicator 4 Set ...

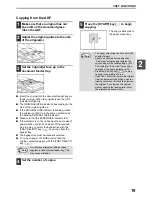
Страница 25: ...ass tray with the TRAY SELECT key and copy from the bypass tray The bypass tray must be manually selected To copy on paper of a different size than the original select the paper with the TRAY SELECT key 4 Set the number of copies 5 Press the START key to begin copying The copy is delivered to the paper output tray Do not place originals of different sizes together in the document feeder tray This ...

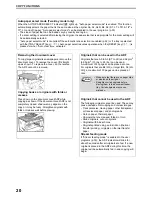
Страница 26: ... ADF is not completely closed shadows may appear on the copy or it may be fuzzy Straighten originals with folds or creases well before placing Originals that can be used in the ADF Originals that are A5 to A3 ST to LD and 56 g m2 to 90 g m2 15 lbs to 24 lbs can be used A maximum of 40 pages can be placed at once For originals that are B4 LG or larger B4 A3 LG LD a maximum of 30 pages can be placed...

Страница 27: ...the PHOTO indicator lights 2 Press the Light key or Dark key to adjust the exposure For a darker image press the Dark key For a lighter image press the Light key If exposure level 2 or 4 is selected the two indicators will light simultaneously SELECTING THE TRAY If you wish to use a tray other than the automatically selected tray for example you wish to enlarge or reduce the copy or use the bypass...

Страница 28: ... with the AUTO IMAGE key AUTOMATIC RATIO SELECTION below Reduction and enlargement ratios can be selected manually with the PRESET RATIO selector keys and or the ZOOM keys MANUAL RATIO SELECTION p 23 Separate settings can be selected for the vertical and horizontal ratios SELECTING THE VERTICAL AND HORIZONTAL COPY RATIOS SEPARATELY X Y ZOOM p 24 Ratios that can be selected will vary depending on w...

Страница 29: ...et the approximate ratio then press the Zoom keys or to increase or decrease the ratio To decrease or increase the zoom ratio rapidly hold down the Zoom keys or When a Zoom key or is pressed the ZOOM indicator will light up and the zoom ratio will appear in the display for about two seconds 4 Set the number of copies and other copy settings and then press the START key The copy will be delivered t...

Страница 30: ...rent value for the vertical direction will appear in the display 4 Use the PRESET RATIO selector keys and Zoom keys to change the copy ratio in the vertical direction Press the PRESET RATIO selector keys to select a ratio close to the desired ratio and then press the Zoom keys to adjust the ratio in increments of 1 The ratio appears in the display 5 Press the Copy ratio display key The selected ra...

Страница 31: ...d and the display will change to the number of copies display 8 Set the number of copies and other copy settings and then press the START key The copy will be delivered to the paper output tray To verify the copy ratios press and hold down the Copy ratio display key The vertical and horizontal ratios will be alternately displayed If you need to change the ratios press the PRESET RATIO selector key...

Страница 32: ...he placement of original A 3 Turn the copy of original A over and without changing the position of the edge closest to you insert it in the bypass tray Insert the paper all the way in 4 Select the bypass tray with the TRAY SELECT key and then press the START key The copy is delivered to the paper output tray Original B Original A Copy Copied original A Original A Copied original A Original A Origi...

Страница 33: ... number of copies and other copy settings and press the START key The copy will be delivered to the paper output tray A4 LT paper is used for dual page copying When used in combination with XY ZOOM copying enlargement is not possible Dual page copying cannot be used in combination with the enlargement copying Automatic ratio selection cannot be used when dual page copying is used Dual page copying...

Страница 34: ...press the START key 4 When the copy job is finished press the INTERRUPT key and remove the original s The INTERRUPT indicator will go off indicating that the interrupt function is no longer operating The copy settings will automatically revert to the settings selected for the copy run before the run was interrupted 5 Replace the previous original s and press the START key The interrupted copy run ...

Страница 35: ...lected and select print settings in the printer driver For information on the settings in the printer driver see the Online Manual the Printer Driver Setup Guide or the printer driver help file 5 Click the Print button or the OK button to begin printing The print job will be delivered to the paper output tray Important points when setting the paper size Make sure that the tray s paper size setting...

Страница 36: ...ey to begin printing When Use close paper size is enabled Printing will take place using a size of paper that is close to the size of the print image OPERATION IN COPY AND PRINTER MODES Some operations cannot be performed simultaneously when the machine is being used in printer mode or copy mode 1Can be used after pressing the INTERRUPT key 2 Printing will begin when the RESET key is pressed after...

Страница 37: ...d the ADF 1 To adjust the automatic exposure level in the ADF place the original in the ADF p 19 Make sure that the ADF indicator is lit 2 Press the AUTO TEXT PHOTO key to select PHOTO 3 Hold down the AUTO TEXT PHOTO key until the AUTO indicator blinks The exposure level indicators show the current setting 4 Press the Light key or Dark key to lighten or darken the automatic exposure level as desir...

Страница 38: ...O key to select TEXT 2 Hold down the AUTO TEXT PHOTO key until the PHOTO indicator blinks The exposure level indicators show the current setting 3 To enable toner save mode press the Light key To enable high image quality mode press the Dark key When enabling toner save mode make sure that 1 is lit When enabling high image quality mode make sure that 5 is lit 4 Press the AUTO TEXT PHOTO key to com...

Страница 39: ...mes even less power than preheat mode if the set duration of time elapses without the machine being used when the power is on All lights except the POWER SAVE indicator and ON LINE indicator go off To resume normal operation press the START key Normal operation also resumes automatically when a print job is received While in auto power shut off mode no keys except the START key can be used 4 Strea...

Страница 40: ...changed by the accidental pressing of a key 27 Audible signals volume 1 Long beep 2 Short beep 3 OFF This sets the volume of beep signals p 35 28 Base setting beep signal 0 OFF 1 ON Use this to sound a beep when a base setting is selected p 35 29 Number of copies limit 1 99 copies 2 999 copies Use this setting to select 99 or 999 for the maximum number of copies 30 Use close paper size 0 OFF 1 ON ...

Страница 41: ...setting beep The machine sounds three different types of beep signals a key entry beep that sounds when a valid key is pressed an invalid key beep that sounds when an invalid key is pressed and a base setting beep that sounds when a setting is the same as the base setting base settings are explained below The base setting beep is initially disabled If you wish to enable the base setting beep see B...

Страница 42: ...lanation 10 Auditing mode 0 OFF 1 ON Use to enable or disable Auditing mode Auditing mode is initially disabled 11 Account number entry None Use to set up account numbers Up to 20 accounts can be established 12 Account number changeNone None Use to change an account number 13 Account number deletion 0 Delete single account 1 Delete all accounts Use to delete an account number A single account numb...

Страница 43: ...e currently selected setting code blinks on the right side of the display 4 Enter the desired setting code for the program as explained in the detailed procedures on the following pages For the setting codes see AUDITING MODE SETTINGS p 36 5 Press the Light key to complete the settings The alarm indicators go off and the display returns to the number of copies display If you enter the wrong number...

Страница 44: ...r to be deleted with the Copy ratio display key and then press the START key Number of copies per account program No 14 Use this procedure to display the copy count of each account If no account numbers have been established the error code 14E will appear in the display 1 Select the account number with the Copy ratio display key 2 Hold down the 0 key The copy count of the selected account will app...

Страница 45: ...led appears in the display 1 Enter your 3 digit account number with the numeric keys When you enter your account number 0 appears in the display to indicate that copying is possible 2 Follow the appropriate steps to make the copy 3 When finished press the AUDIT CLEAR key To reset another account number enter the program number 15 for account number deletion and then repeat the procedure for Resett...

Страница 46: ...he paper or the image disappears in places 41 Paper misfeed 42 Original size not selected automatically 42 Copies are smudged or dirty 43 White or black lines appear on copies 43 Paper size for a paper tray cannot be set 43 A copy job stops before it is finished 43 The POWER SAVE indicator is lit 43 Any one of the alarm indicators is lit or blinking 43 Lighting fixture flickers 43 PRINTING PROBLEM...

Страница 47: ...original Select AUTO with the AUTO TEXT PHOTO key or press the Light key and Dark key to manually select an appropriate exposure If the copy is too light or too dark even though AUTO was selected with the AUTO TEXT PHOTO key adjust the automatic exposure level 21 31 Blank copies The original is not placed face up in the ADF or face down on the document glass Place the original face up in the ADF o...

Страница 48: ...r stick together Fan the paper well before loading it 14 The guides on the bypass tray do not match the width of the paper Adjust the guides to match the width of the paper 15 The bypass tray extension is not pulled out When loading a large size of paper pull out the extension 15 The bypass paper feed roller is dirty Clean the roller 57 A5 ST paper is loaded in lower paper tray A5 ST size paper mu...

Страница 49: ...r output tray is full Long copy runs are automatically paused every 250 copies Remove the copies in the paper output tray and press the START key to resume copying 22 The tray is out of paper Load paper 14 The POWER SAVE indicator is lit Any other indicators are lit If other indicators are lit the machine is in Preheat mode Press any key on the operation panel to resume normal operation 12 The POW...

Страница 50: ...see if the printer driver is installed 1 Click the start button click Control Panel click Printers and Other Hardware and then click Printers and Faxes On Windows 95 98 Me NT 4 0 2000 XP click the Start button select Settings and then click Printers 2 The TOSHIBA e STUDIO161 printer driver icon is not shown 3 If the icon is shown but you still cannot print the printer driver may not have been inst...

Страница 51: ...ove the paper from the tray and store it in a dark place in a bag to prevent moisture absorption You did not set sufficient margins in the paper settings of your application The top and bottom of the paper may be dirty if the margins are set outside of the specified print quality area Set the margins in the software application within the specified print quality area The printed image is skewed or...

Страница 52: ...correct orientation Rotate the original so that it is in the same orientation as the blinking ORIGINAL SIZE indicator 18 19 PAPER SIZE indicator Blinking A paper feed location is blinking A blinking paper feed location means that the size of paper loaded in the tray is different from the paper size setting for the tray Change the paper size setting To clear the display do one of the following Use ...

Страница 53: ...l from the document feeder tray Close the feeding roller cover Section B Open the ADF and rotate the two release rollers in the direction of the arrow to feed the original out Close the ADF and then remove the original If a small original A5 ST etc is misfed open the right side cover and remove the original Close the right side cover The paper may tear when you remove a misfeed In this event be su...

Страница 54: ...opening and closing the feeding roller cover or the right side cover 3 Return the originals indicated by the minus number in the display to the document feeder tray and press the START key Copying will resume from the originals that still remained when the misfeed occurred MISFEED IN THE BYPASS TRAY 1 Gently pull the misfed paper out 2 Open and close the side cover The misfeed indicator will go ou...

Страница 55: ...e cover The misfeed indicator will go out If paper is misfed here go to B Misfeed in the fusing area If the misfed paper is visible here go to C Misfeed in the transport area If paper is misfed here go to A Misfeed in the paper feed area The fusing unit is hot Do not touch the fusing unit when removing misfed paper Doing so may cause a burn or injury Do not touch the photoconductive drum green por...

Страница 56: ...d side cover The misfeed indicator will go out The fusing unit is hot Do not touch the fusing unit when removing misfed paper Doing so may cause a burn or injury Do not touch the photoconductive drum green portion when removing the misfed paper Doing so may damage the drum and cause smudges on copies Be careful about unfixed toner on the misfed paper not to soil your hands or clothes Roller rotati...

Страница 57: ...output area remove the paper by pulling it into the paper output area Be careful not to tear the misfed paper during removal 3 Close the side cover The misfeed indicator will go out The fusing unit is hot Do not touch the fusing unit when removing misfed paper Doing so may cause a burn or injury When closing the side cover press on the handle If the paper was torn make sure that no torn pieces rem...

Страница 58: ...r tray and remove the misfed paper Be careful not to tear the misfed paper during removal 3 Close the side cover The misfeed indicator will go out 4 Close the upper paper tray Push the upper paper tray in completely When closing the side cover press on the handle If the misfeed indicator does not stop blinking check for torn pieces of paper in the machine Note ...

Страница 59: ...the misfed paper is not seen in step 2 lift and pull out the lower paper tray and remove the misfed paper Be careful not to tear the misfed paper during removal 4 Close the lower side cover The misfeed indicator will go out 5 Close the lower paper tray Make sure that there is no misfed paper in the tray before pulling it out p 49 Note If the misfeed indicator does not stop blinking check for torn ...

Страница 60: ...hutter out of the toner cartridge Discard the shutter 6 Close the front cover The toner cartridge replacement required indicator will go out When the toner cartridge replacement indicator lights up little toner remains and thus copies may be faint Note After removing the toner cartridge do not shake it or tap on it Doing so may cause toner to leak from the cartridge Put the old cartridge immediate...

Страница 61: ...ne and the total output count can be counted up to 999 999 Total output count Hold down the 0 key The total output count appears sequentially in two parts while you hold down the 0 key Example Total number of pages output is 12 345 Total copy count Hold down the key The count display and counting method are the same as for the total output count Each A3 LD size page is counted as two pages During ...

Страница 62: ...ADF and the scanning window on the document glass with a soft clean cloth If necessary dampen the cloth with water Do not use thinner benzene or similar volatile cleaning agents CLEANING THE BYPASS TRAY PAPER FEED ROLLER If misfeeds occur frequently when feeding envelopes thick paper etc through the bypass tray wipe the paper feed roller at the feed slot of the bypass tray with a soft clean cloth ...

Страница 63: ...harger cleaner onto the transfer charger and gently slide the cleaner in the direction indicated by the arrow two or three times If the white sheet metal is smudged with toner wipe it with a soft clean cloth 6 Return the charger cleaner to its original position Close the upper paper tray Close the side cover by pressing the handle on the cover 7 Turn the power switch on Charger cleaner Slide the c...

Страница 64: ...ON reserves the right to make design and specification changes for product improvement without prior notice The performance specification figures indicated are nominal values of production units There may be some deviations from these values in individual units Note MR 2015 Automatic Document Feeder Acceptable original Weight 56 g m2 to 90 g m2 15 lbs to 24 lbs Size A5 to A3 ST to LD Capacity Up t...

Страница 65: ...opying The MY 1022 contains one 250 sheet paper tray Part names Specification MY 1022 Paper size B5 to A3 LT to LD Paper capacity One tray with capacity for 250 sheets of 90 g m2 24 lbs bond paper Paper weight 56 g m2 to 90 g m2 15 lbs to 24 lbs Power supply Drawn from the machine Dimensions 590 mm W x 471 mm D x 88 mm H 23 15 64 W x16 27 64 D x 3 15 32 H Weight 4 7 kg 10 4 lbs ...

Страница 66: ...s Fixed preset 50 71 82 86 100 115 122 141 200 50 65 78 95 100 121 129 141 200 Exposure system Document glass Moving optical source slit exposure stationary platen with automatic exposure ADF Moving original Paper feed One automatic feeding paper tray 250 sheets bypass tray 100 sheets Fusing system Heat rollers Developing system Magnetic brush development Light source Cold cathode fluorescent lamp...

Страница 67: ...e 0 02 mg m3 or less Dust 0 075 mg m3 or less Styrene 0 07 mg m3 or less Print speed 12 ppm Resolution 600 dpi Memory 16 MB Emulation GDI Interface IEEE1284 parallel connector USB connector USB1 1 Interface cables Parallel cable Shielded bi directional IEEE1284 cable max length 3 m 10 feet Please purchase a commercially available parallel cable USB cable Shielded twisted pair cable max length 3 m ...

Страница 68: ...e from one computer to another or over a network 3 Termination This license is effective until terminated You may terminate this License at any time by destroying the Software and related documentation and all copies thereof This License will terminate immediately without notice from TOSHIBA TEC CORPORATION and or TOSHIBA TEC CORPORATION s Licensors if you fail to comply with any provision of this...

Страница 69: ...ABILITY OR OTHERWISE NO ORAL OR WRITTEN INFORMATION OR ADVICE GIVEN BY TOSHIBA TEC CORPORATION OR A TOSHIBA TEC CORPORATION AUTHORIZED REPRESENTATIVE SHALL CREATE A WARRANTY OR IN ANY WAY INCREASE THE SCOPE OF THIS WARRANTY SHOULD THE SOFTWARE PROVE DEFECTIVE YOU AND NOT TOSHIBA TEC CORPORATION OR A TOSHIBA TEC CORPORATION AUTHORIZED REPRESENTATIVE ASSUME THE ENTIRE COST OF ALL NECESSARY SERVICING...

Страница 70: ...this manual 5 Copy functions 18 Copy ratio display key 10 24 Count Total Copy 55 Count Total Output 55 D Dark indicator 11 21 Dark key 11 21 31 32 Developer replacement required indicator 10 46 Display 10 Document cover 8 18 20 56 Document feeder tray 9 19 Document glass 8 18 56 DUAL PAGE COPY indicator 10 27 DUAL PAGE COPY key 10 27 E Environmental information 4 Exit area 9 F Feeding roller cover...

Страница 71: ...copying 24 Removing the document cover 20 Replacing the toner cartridge 54 Right side cover 9 47 Roller rotating knob 9 49 50 Routine maintenance 55 56 S Selecting the tray 21 Setting the number of copies 22 Side cover 8 Side cover handle 8 Specifications 60 START indicator 11 12 START key 11 12 18 19 35 Stream feeding mode 20 33 T Toner cartridge 9 54 Toner cartridge lock release lever 9 54 Toner...

Страница 72: ...gs Auditing mode Copies how to make 39 Setting procedures 37 Settings 36 Automatic exposure level setting 31 High image quality mode 32 Toner save mode 32 User programs 33 Setting procedures 35 Settings 33 Problem occurs Misfeeds Bypass tray 48 Machine fusing area 49 Machine paper feed area 49 Machine transfer area 51 ADF 47 Tray Lower paper tray 53 Tray Upper paper tray 52 Troubleshooting 40 Indi...

Страница 73: ...67 MEMO ...

Страница 74: ......

Страница 75: ...DP 1620 OME030059A0 ...

Страница 76: ......

Отзывы: