background image

189

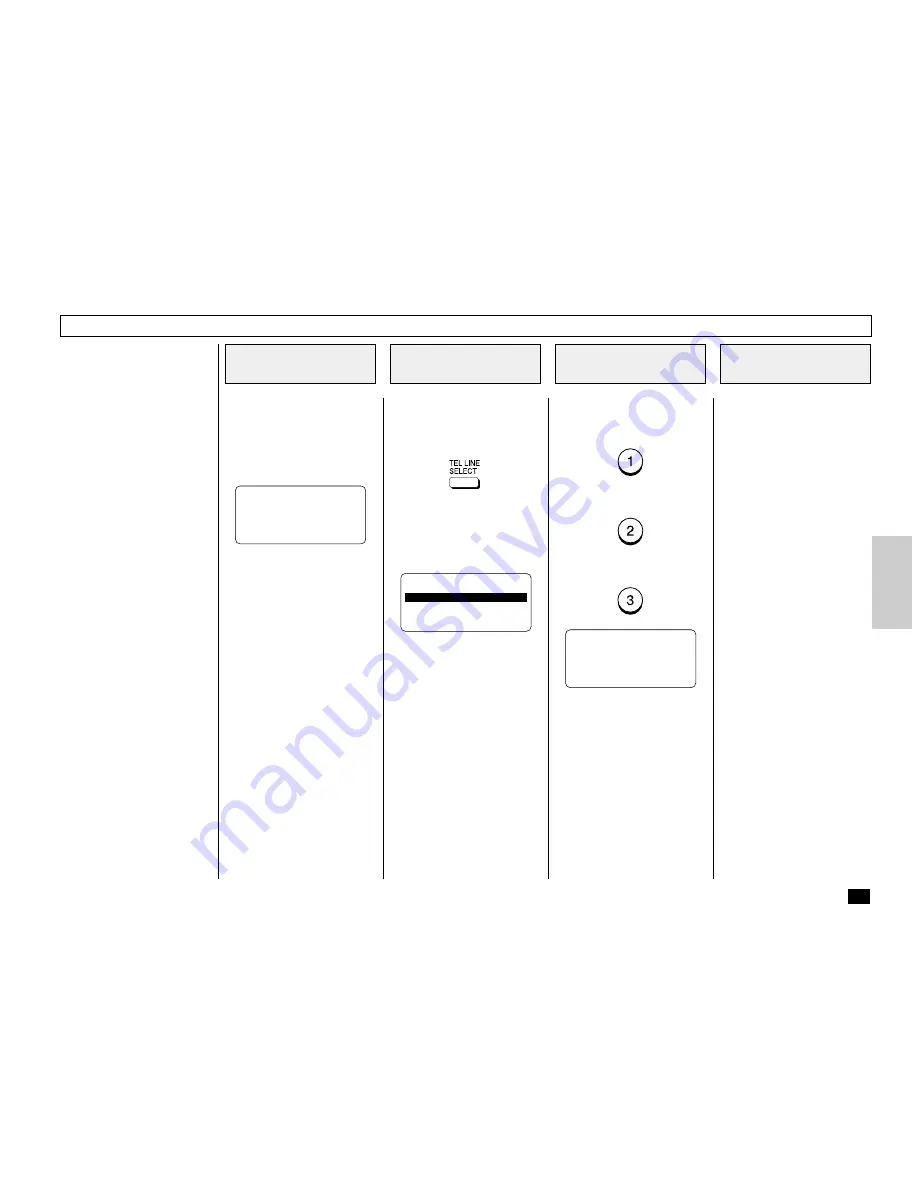
This option allows you to select
the phone line to be used for a
transmission if this facsimile is
equipped with the 2nd Line
Board.

You can activate this option
when programming an Abbrevi-
ated Dial Number (see page 70)
or One Touch Dial Key (see
page 77) if the communication
with a certain remote party al-
ways requires this option.

NOTE:

Line 2 is available for trans-
mission if Line 2 has been
set for Transmission/Recep-
tion (see page 69). In addi-
tion, if Line 2 is set for recep-
tion only with timer, trans-
missions are only possible
when the timer has expired.

Turn the Flip Panel to the “50-
73” view to select the desired
Function Key.

Press:

NOTE:

If no Line 2 Board is in-
stalled, an error prompt will
result from this application.

Load the document face down
in the Document Tray (see page
88).

Adjust the resolution and con-
trast if desired (see page 89).

Select the desired option.

To not select a specific line,
press:

To select Line 1, press:

To select Line 2, press:

Enter the number of the remote
facsimile using any of the fol-
lowing dialing methods or you
may designate another option at
this point.

One Touch Key Dialing
... See page 97

Alphabet Dialing
... See page 98

Abbreviated Dialing
... See page 99

Keypad Dialing
... See page 100

Line Selection

Load the Document

1

Display the TEL
LINE SELECT Menu

2

Select the Desired
Option

3

Enter the Facsimile
Number

4

TEL LINE SELECT

1.FIRST AVAILABLE

2.LINE #1

3.LINE #2

COMM. RESERVATION

RESIDUAL MEMORY  80%

ENTER TEL NUMBER

APR-15-00 SAT11:13

RESIDUAL MEMORY 100%

ENTER TEL NUMBER

Содержание DP120F

Страница 1: ...PLAINPAPERFACSIMILE OPERATOR SMANUAL ...

Страница 2: ...ner Toshiba has determined that this facsimile model meets the ENERGY STAR guidelines for energy efficiency ENERGY STAR guidelines require that all ENERGY STAR facsimiles maintain very low power consumption during idle state or have a Power Saver feature that will automatically stand down to an idle state after a period of inactivity For more information on the ENERGY STAR Program please contact E...

Страница 3: ...f service may be required But if advance notice is not practical you will be notified as soon as pos sible also you will be advised of your right to file a complaint with the FCC if you believe it is necessary The telephone company may make changes in its facilities equipment operations or procedures that could affect the operation of the equipment If this happens the telephone company will provid...

Страница 4: ...1 McNABB STREET MARKHAM ONTARIO L3R 8H2 NOTICE TO USERS AVIS L étiquette d lndustrie Canada identifie le marériel homologué Cette étiquette certifie que le matériel est conforme aux normes de protection d exploitation et de sécurité des réseaux de télécommunications comme le prescrivent les documents concernant les exigences techniques relatives au matériel terminal Le Ministére n assure toutefois...

Страница 5: ...tive housings when any part of the facsimile is opened This means that the facsimile is safe to use during normal operation and maintenance Adjustment or performance of procedures other than those specified herein may result in hazardous laser exposure The Center for Devices and Radiological Health CDRH of the U S Food and Drug Administration implemented regulations for laser products These regula...

Страница 6: ... Menu Operation 35 Keys Used in Menu Operation 35 Character Entry 36 Keys Used in Character Entry 36 Special Character Table 36 Character Correction 37 INITIAL SETUP 38 Initial Setting Summary 38 Language Selection 39 Date and Time Setting 40 Terminal ID Setting 42 Dial Type Setting 44 DEVICE CONFIGURATION 45 Configuration Summary 45 Bell Ringer Volume Adjustment 47 Alarm Tone Volume Adjustment 48...

Страница 7: ...Mode 112 Recording Paper Size 113 Reception Reduction Setting 113 Reception Discard Setting 114 Reverse Order Printing Setting 115 Reception Multicopy Setting 116 TELEPHONE HANDSET OPERATION Optional 117 On hook Dialing 117 Tone Output 118 Redialing 118 COMMUNICATION STATUS 119 Current Job Status 119 Display Print Transmission Report 120 Communication Journal 120 CANCELLING A COMMUNICATION JOB 121...

Страница 8: ...Transmission 194 LISTS AND REPORTS 195 LIST AND REPORT OPTIONS SETTING 195 Reception Journal Settings 195 Direct Transmission Report Setting 197 Memory Transmission Report Setting 198 Multi Address Transmission Report Setting 199 Multi Polling Report Setting 200 Relay Originator Report Setting 201 Relay Station Transmission Report Setting 202 Relay Destination Report Setting 203 Reception List Set...

Страница 9: ...0 INDIVIDUAL TEST MODE 241 INDIVIDUAL TEST Summary 241 ADF TEST 242 KEY TEST 244 LED TEST 245 LCD TEST 246 SPEAKER TEST 247 SWITCH TEST 248 TEST PRINT 251 TEST RESULT 252 PRINTING a TEST RESULT 252 REMOTE SERVICE 253 RDC Remote Diagnosis Configuration Service 253 AUTOMATIC SUPPLIES ORDER 254 Automatic Supplies Order Setting 254 SPECIFICATIONS 255 SUPPLIES 256 HARDWARE OPTIONS 256 TOSHIBA Viewer 25...

Страница 10: ...t been preregistered Multi Memory Access Operation Allows up to 5 operations such as transmission or reception on either line 1 or line 2 if so equipped printing scanning and programming to be performed at the same time Super Power Saver Mode Reduces power consumption to approx 2W by turning all unnecessary functions off in the standby mode FEATURES Substitute Memory Reception When the recording p...

Страница 11: ...esult in electric shock hazard or machine malfunction Keep fire sources away from the facsimile unit This may create a fire hazard Keep paper clips and staples away from the unit If metal objects fall in the unit it may damage the machine Avoid opening the unit while it is scanning or printing The operation will stop and it may cause a malfunction and or damage Do not drop hit or apply excessive s...

Страница 12: ...nt Tray Place documents face down on this tray to transmit or copy Scanner Cover Release Button Provides access to the document scanner area for periodic cleaning or clearing jammed originals See page 232 Document Guides Adjust the guides to the edges of the document to help ensure proper document alignment and smooth feeding See page 88 Operation Panel Used to perform programming and operation of...

Страница 13: ...nection for the telephone line cord from wall or PSTN system See page 18 External Telephone Connector Connection for an External Telephone set See page 18 AC Inlet 003 Line 2 Connector Connection for the 2nd telephone line cord from wall or PSTN system DP125F Standard DP120F Option Centronics PC Interface ...

Страница 14: ...onal access LCD view angle and provide rugged roller casters for easy cleaning With three recording paper trays installed Upper Recording Paper Tray Middle Recording Paper Tray optional Lower Recording Paper Tray optional Upper Recording Paper Tray Lower Recording Paper Tray optional 004 107 Handset optional Bypass Tray DP125F standard DP120F optional Bypass Tray DP125F standard DP120F optional Ha...

Страница 15: ...31 ALARM Lamp Is blinks when any error other than those listed above occurs see page 226 2 LINE 1 Lamp Blinks when communicating using Line 1 3 LINE 2 Lamp Blinks when communicating using Line 2 4 PC COMM Lamp Blinks when communicating between the facsimile unit and a personal computer 5 SUPER POWER SAVER key and SUPER POWER SAVER Lamp Press this key to select the Super Power Saver Mode Illuminate...

Страница 16: ...ent Tray to copy a document see page 95 17 TX REPORT Key Press this key to request or disable a Transmission Report for your current trans mission job 18 MODE Key and FINE U FINE HALFTONE Lamps Selects the desired resolution for transmission or copying When Standard mode is selected none of the MODE lamps will be illuminated see page 89 19 Menu Keys Keys These keys are used to scroll and highlight...

Страница 17: ...ed transmissions see page 183 RECOVERY TX Recovers from memory and sends incomplete trans missions see page 169 SEND AFTER SCAN Used to select whether the dialing starts while the machine is scanning the documents or after the ma chine has scanned all documents to memory see page 190 POLLING Designate polling communication see page 138 SUB ADDRESS COMM Add sub address digits to the remote facsimil...

Страница 18: ...ct your dealer immedi ately Packing List 1 Facsimile 1 2 Phone Line Cord Modular Cord 1 3 Document Exit Tray 1 4 Recording Paper Exit Tray 1 5 Fuser Cleaner 1 6 Developer Assembly 1 7 Drum Unit 1 8 Operator s Manual 1 9 Overlay 1 1 2 8 7 6 5 4 3 9 10 Make sure All Items are Enclosed 2 11 14 13 12 10 Warranty Card 1 11 AC Power Cord 1 12 Charger Cleaner 1 13 Mylar Scraper 1 14 Cotton Swab 1 15 Unpa...

Страница 19: ...ch of an electrical outlet Use an outlet not shared with equipment that generates electrical noise or consumes large amounts of electricity such as an air conditioner or a copier Within reach of a telephone connection Use a dedicated single line telephone connection Allow for adequate ventilation The rear and sides of the unit need to be clear to allow proper air flow to the unit s power supply He...

Страница 20: ...ne has been disconnected at the network interface Use caution when installing or modifying the telephone lines Avoid using a telephone other than a cordless type during an electrical storm There may be a remote risk of electric shock from lightning Do not use the telephone to report a gas leak in the vicinity of the leak FACSIMILE MACHINE INSTALLATION Connect the telephone line cord modular cord t...

Страница 21: ...abs of the Document Exit Tray into the slots on the left side of the unit Do not place heavy objects on the Document Exit Tray or apply strong force Extend the Document Exit Tray Extension for long doc uments Document Exit Tray Document Exit Tray Installation 026 Place the hooks of the Record ing Paper Exit Tray into the slots on the left side of the unit Do not place heavy objects on the Recordin...

Страница 22: ... side should be placed face down in the paper tray Press the Paper Pressure Plate down until it clicks About Recording Paper Use only recommended paper brands to optimize your fac simile performance Contact your authorized TOSHIBA dealer for more information Remove the recording paper when storing or relocating your facsimile Avoid using damaged folded or misaligned recording paper Use of damaged ...

Страница 23: ...ted under the two separation claws on the right side of tray Be careful not to damage the claws of the paper tray Push the paper tray all the way into the machine NOTE As the tray is closed listen for the sound of the paper pressure plate moving up into position Install the Recording Paper 5 Close the Paper Tray 6 Recording Paper Installation continued 033 034 ...

Страница 24: ... in the front right corner of the paper tray to match the new paper size About Paper Sizes Your TOSHIBA facsimile has been preset to accept letter size recording paper In the event that you receive a legal size 8 5 x14 recep tion it will automatically be reduced to fit onto letter size 8 5 x11 paper If you receive only Legal size receptions and do not wish them to be automati cally reduced Adjust ...

Страница 25: ...sparency or label Select OTHERS as the paper size NOTES You can load up to 100 sheets of Letter Legal A4 or A5 size paper 20 lbs Envelope transparency or label stock should be loaded one sheet at a time Place the paper in the center of the Bypass Tray when the paper size is set to OTHERS Install the Bypass Tray 2 Remove the two screws holding the Bypass Tray Cover Install the Bypass Tray Set the P...

Страница 26: ...ed Set the Recording Paper and adjust the Paper Guides to the correct paper size Pull up the Bypass Tray Paper Support Set the Recording Paper 6 Lower the Tray Lever 7 Lower the Tray Lever 122 Bypass Tray Paper Support Recording Paper 123 Paper Guide 124 Tray Lever ...

Страница 27: ...hand grasp the end of the protective strip under the Toner Cartridge Pull the strip firmly to completely remove it from the Toner Cartridge The sealing film will contain a small amount of toner on its surface Carefully dispose of the film in an appropriate waste re ceptacle to avoid soiling items it may come in contact with Open the Top Cover 1 Shake the Developer Assembly 2 Remove the Protective ...

Страница 28: ...op Cover then release the Lever Close the Top Cover 7 Developer Assembly and Drum Unit Installation continued Press firmly down on the green squares on the Drum Unit until the Drum Unit clicks into place Press Down on the Drum Unit 6 Drum Unit 044 045 ...

Страница 29: ...d side down Install the Fuser Cleaner 2 Fuser Cleaner Installation Holding the Top Cover Release Lever close the Top Cover then release the Lever Close the Top Cover 3 045 Fuser Cleaner 047 Grasp the Top Cover Release Lever to open the Top Cover Open the Top Cover 1 Top Cover Release Lever 037 ...

Страница 30: ...o your clothing since toner can not be removed easily If the toner sticks to your clothing immediately rinse out the toner with cold water Grasp the Top Cover Release Lever and open the Top Cover Remove the Developer Assem bly with the Drum Unit attached IMPORTANT Never touch the photo conductive drum the green surface of the Drum Unit If the surface is scarred or scratched it will cause print qua...

Страница 31: ...ompletely remove it from the cartridge NOTES Do not stand or turn the Developer Assembly up side down to avoid toner leaking out the cartridge after removing the strip Toner might stick to the strip Avoid toner sticking to your clothes furniture or other items since the toner cannot be removed easily Toner is not harm ful to the human body If any toner sticks to your clothes wash away the toner im...

Страница 32: ...ION The fuser s interior can be very hot Be careful when re placing the fuser cleaner Do not touch any surfaces inside the printer except as indicated Press firmly down on the green squares on the Drum Unit until the Drum Unit clicks into place Press Down on the Drum Unit 10 Fuser Cleaner Drum Unit 044 047 061 Holding the Top Cover Release Lever close the Top Cover then release the Lever Close the...

Страница 33: ... of the Drum Unit If the surface is scarred or scratched it will cause print quality problems Do not expose the photo conductive drum of the Drum Unit to light for more than 3 minutes If the Drum Unit is to be left anywhere outside the fac simile be certain to cover it with cloth paper etc Separate the Drum Unit from the Developer Assembly STORAGE NOTES The Drum Unit is a very im portant part of t...

Страница 34: ...l oper Assembly sides with the slots in the machine frame Press firmly down on the green squares on the Drum Unit until the Drum Unit clicks into place Press Down on the Drum Unit 6 Replace the Ozone Filter 7 Attach the new Drum Unit to the Developer Assembly 4 Install the Developer Assembly with Drum Unit 5 Drum Unit Ozone Filter Drum Unit Developer Assembly Replacing the Ozone Filter The Ozone F...

Страница 35: ...33 Drum Unit Replacement continued Holding the Top Cover Release Lever close the Top Cover then release the Lever Close the Top Cover 8 045 ...

Страница 36: ... Enter your facsimile s telephone number press If the Line 2 board is installed set the international code and facsimile s telephone number for line 2 OPERATION COMPLETED Displayed for 2 seconds 1 LANGUAGE 2 DATE TIME 3 TERMINAL ID 4 DIAL TYPE Terminal ID Setting the Terminal ID Page 42 1 SET TERMINAL ID TEL NUMBER MAX 20 Press Your TOSHIBA facsimile has been preset from the factory to receive fac...

Страница 37: ...e TONE function see page 118 or when in the Menu Operation press this key to scroll down the menu selection Key Press this key to display the preceding menu screen or to move the cursor to the left Key Press this key to display the sub menu screen or to move the cursor to the right ENTER Key or START Key When the currently highlighted item has sub items pressing this key operates the same as the K...

Страница 38: ...ace for entering numeric characters Special Character Table The Character Table lists special characters that can be entered when programming this facsimile The table lists the alpha keys in the left column and the characters that correspond to each key in the right column To enter the special characters entry mode press the ALTER NATE key on the keyboard Pressing the alpha key displays the specia...

Страница 39: ...to be deleted Delete the character by pressing Press to save your change Inserting Characters Using position the cursor over the point of insertion and press The message INSERT is displayed on the second row Enter the desired character s O in this example The character s will be inserted without deleting other characters in the line Press to save your change NEW YORK NEW YRK INSERT NEW YRK NEW YOR...

Страница 40: ... LANGUAGE Page 39 Selects ENGLISH FRENCH or SPANISH for displays and printing 2 DATE TIME Page 40 Sets the Month Day Year Time for your machine You may select to use the 4 digit or 2 digit format for the year and 24 hour or the 12 hour format for the time 3 TERMINAL ID FCC MANDATORY Page 42 Sets the Terminal ID Company Name Facsimile Number for your machine 4 DIAL TYPE Page 44 Configures your mach...

Страница 41: ...s Configura tion Setting you may continue to select other settings referring to their associated pages for in structions or press to exit the Configuration Setting mode and return to the Standby Mode LANGUAGE 01 ENGLISH 02 ESPAÑOL 03 FRANÇAIS OPERATION COMPLETED Display the LANGUAGE Menu 1 Select the Desired Language 2 Select Another SETUP Item or 3 1 LANGUAGE 2 DATE TIME 3 TERMINAL ID 4 DIAL TIPE...

Страница 42: ...X XXXX XXX Allows 00 to 23 as the hour value When 12 hour is selected Allows 01 to 12 as the hour value and designates AM or PM Change the day of week desig nation by pressing the following keys or When the correct date is en tered press Select the Time Format 2 Enter the Date Data 3 Highlight 2 DATE TIME using or and press or SET TIME FORMAT 1 24 HOURS 2 12 HOURS 1 LANGUAGE 2 DATE TIME 3 TERMINAL...

Страница 43: ...xit the Configuration Setting mode and return to the Standby Mode OPERATION COMPLETED Displayed for 2 seconds Select the Month Format 6 Select Another SETUP Item or 7 Returns to display the SETUP menu screen Select the date format for dis play and print for Month Day Year 4 digit for Day Month Year 4 digit for Year 4 digit Month Day for Month Day Year 2 digit for Day Month Year 2 digit for Year 2 ...

Страница 44: ...s to and from overseas se lect ADD by pressing If all of your documents are sent domestically select NOT NEEDED by pressing If you selected ADD in Step 3 enter the International Code for your country before entering your area code and telephone number Example United States 1 Then enter the telephone num ber that has been connected to the facsimile Highlight 3 TERMINAL ID using or and press or SET ...

Страница 45: ... or 5 Displayed for 2 seconds Returns to display the SETUP menu screen After completing this Configura tion Setting you may continue to select other settings referring to their associated pages for in structions or press to exit the Configuration Setting mode and return to the Standby Mode ...

Страница 46: ...igits from the Dial Keypad Highlight 4 DIAL TYPE using or and press or After completing this Configura tion Setting you may continue to select other settings referring to their associated pages for in structions or press to exit the Configuration Setting mode and return to the Standby Mode DIAL TYPE 1 MF 2 DP DIAL TYPE LINE 2 1 MF 2 DP DELETE ACCESS DIGIT ACCESS DIGIT MAX10 When the correct Access...

Страница 47: ... a 4 digit Account Code entry 06 PRINT DENSITY Page 59 Sets the Print Density 2 2 0 for the machine 07 DOCUMENT LENGTH Page 60 Enables or Disables the sending of documents longer than 1 Meter 39 4 08 LINE MONITOR Page 61 Enables or Disables the Line Monitor function 09 RECEIVE INTERVAL Page 62 Sets the interval 0 15 min the machine will wait after making four consecutive dialings NOTE indicates th...

Страница 48: ...es or Disables the Letter Head Paper function at during PC printing 14 REDIAL MODE Page 67 Sets the number of redials 01 14 05 and redial interval 01min 15min 03 min 15 AUTO RECEIVE MODE Page 68 Configures Auto and Manual receive modes As well as the Ring Delay 01 15 within auto receive mode 16 LINE 2 MODE Page 69 Configures the 2nd Facsimile Line for TX RX RX ONLY or RX ONLY TIME PERIOD NOTE indi...

Страница 49: ... Configuration Setting mode and return to the Standby Mode OPERATION COMPLETED Display the RINGER VOLUME Menu 1 Enter the Desired Volume Value 2 Select Another SETUP Item or 3 Enter the desired volume value 0 to 7 0 for minimum 7 for maximum or Move the cursor to the desired position using the following keys or When the desired value is dis played on the LCD display press Displayed for 2 seconds B...

Страница 50: ...iguration Setting mode and return to the Standby Mode OPERATION COMPLETED Display the ALARM VOLUME Menu 1 Enter the Desired Volume Value 2 Select Another SETUP Item or 3 Enter the desired volume value 0 to 7 0 for minimum 7 for maximum or Move the cursor to the desired position using the following keys or When the desired value is dis played on the LCD display press Displayed for 2 seconds Alarm T...

Страница 51: ...ration Setting mode and return to the Standby Mode OPERATION COMPLETED Enter the Desired Volume Value 2 Select Another SETUP Item or 3 Enter the desired volume value 0 to 7 0 for minimum 7 for maximum or Move the cursor to the desired position using the following keys or When the desired value is dis played on the LCD display press Displayed for 2 seconds Key Touch Tone Volume Adjustment Returns t...

Страница 52: ...iguration Setting mode and return to the Standby Mode OPERATION COMPLETED Enter the Desired Volume Value 2 Select Another SETUP Item or 3 Enter the desired volume value 0 to 7 0 for minimum 7 for maximum or Move the cursor to the desired position using the following keys or When the desired value is dis played on the LCD display press Displayed for 2 seconds Monitor Volume Adjustment Returns to di...

Страница 53: ...ccessed the ma chine Select the desired Super Power Saver Option to select Automatic mode Go to Step 4 Enter the time period in min utes for standby operation prior to entering the Super Power Saver mode Press OPERATION COMPLETED Display the POWER SAVER Menu 1 Select the Super Power Saver Option 3 Enter the Start Time Period 4 Power Saver Operation When the correct time period is displayed press S...

Страница 54: ...end time Move the cursor to the desired position using the following keys or Enter the time period PRINTER POWER SAVER TIME PERIOD 00 00 00 00 Example if the 24 hour format option is selected in DATE TIME setting Example if the 12 hour format option is selected in DATE TIME setting When OFF is selected the OPERATION COMPLETED message is displayed as shown at the bottom in Step 6 Returns to Step 1 ...

Страница 55: ...tting this function is not available Press To turn ON Facsimile Separator Page press To turn OFF Facsimile Separa tor Page press Separator Page Setting Separator Page FAX SEPARATOR PAGE 1 ON 2 OFF Display the SEPARATOR PAGE Menu 1 Select the Facsimile Separator Page Option 2 To turn ON Copy Separator Page press To turn OFF Copy Separator Page press Select the Copy Separator Page Option 3 Separator...

Страница 56: ...nfigura tion Setting you may continue to select other settings referring to their associated pages for in structions or press to exit the Configuration Setting mode and return to the Standby Mode Select Another SETUP Item or 6 Displayed for 2 seconds OPERATION COMPLETED TRAY SELECTION 1 LOWER TRAY 2 AUTO SELECT Returns to display the SETUP menu screen Go to Step 6 Displayed for 2 seconds Returns t...

Страница 57: ...t code Enable or Disable the Depart ment Code function for YES Enable for NO Disable If YES is selected the follow ing Master Code Entry screen is displayed Department Code NBR 01 is fixed as the Master Department Code Enter the Master Depart ment Name See page 36 if you need help selecting characters When the name is correctly dis played on the LCD display press The entered name is displayed on t...

Страница 58: ...ect ing characters When the name is correctly displayed on the LCD display press The entered name is displayed on the bottom row Enter a 5 digit Department Code Password using the Dial Keypad This password will be required to gain user depart ment access to the machine Important Record this pass word in a safe location so that it can be retrieved if it is lost or forgotten Enter the Master Departm...

Страница 59: ...nt Code and return to Step 6 of Department Code Setting See page 56 To retain the previously dis played Department Code with out modification and return to the Department Code Address Entry menu in Step 5 of Depart ment Code Setting See page 56 If you wish to continue repeat Steps 2 and 3 After completing this Configura tion Setting you may continue to select other settings referring to their asso...

Страница 60: ...it When a facsimile is transmitted the account code number will be recorded on the Transmis sion Journal Press After completing this Configura tion Setting you may continue to select other settings referring to their associated pages for in structions or press to exit the Configuration Setting mode and return to the Standby Mode OPERATION COMPLETED Displayed for 2 seconds Returns to display the SE...

Страница 61: ...lue 2 Move the cursor to the desired position using the following keys 2 to 2 2 for lighter print 2 for darker print or When the desired value is dis played on the LCD display press OPERATION COMPLETED Displayed for 2 seconds Returns to display the SETUP menu screen After completing this Configura tion Setting you may continue to select other settings referring to their associated pages for in str...

Страница 62: ...ument Length Option 2 OPERATION COMPLETED DOCUMENT LENGTH 1 1m 2 UNLIMITED After completing this Configura tion Setting you may continue to select other settings referring to their associated pages for in structions or press to exit the Configuration Setting mode and return to the Standby Mode Select Another SETUP Item or 3 Display the DOCUMENT LENGTH Menu 1 Document Length Setting Displayed for 2...

Страница 63: ...Press Display the LINE MONITOR Menu 1 To turn ON the monitor speaker press To turn OFF the monitor speaker press Select the Line Monitor Option 2 LINE MONITOR 1 ALWAYS 2 OFF OPERATION COMPLETED After completing this Configura tion Setting you may continue to select other settings referring to their associated pages for in structions or press to exit the Configuration Setting mode and return to the...

Страница 64: ...Setting you may continue to select other settings referring to their associated pages for in structions or press to exit the Configuration Setting mode and return to the Standby Mode Select Another SETUP Item or 3 This function insures there will be a period of time set aside to receive incoming facsimiles dur ing periods of heavy outgoing transmission activity After ev ery fourth consecutive tran...

Страница 65: ...r Su per G3 33 600 bps op erations If ECM is dis abled Super G3 opera tions are also disabled Press Display the SET ECM Menu 1 SET ECM 1 ON 2 OFF ECM Default Setting Select the desired ECM option The LCD screen shown below is displayed for 2 seconds To turn ECM to ON press To turn ECM to OFF press Select the ECM Option 2 OPERATION COMPLETED After completing this Configura tion Setting you may cont...

Страница 66: ...elect the Resolution 2 SET RESOLUTION 1 STANDARD 2 FINE 3 U FINE SET CONTRAST 1 NORMAL 2 DARKER 3 LIGHTER Display the DOCUMENT MODE Menu 1 Select the default contrast level by pressing one of the following keys Select NORMAL for normal documents by pressing Select DARKER to darken light originals i e for documents with light or faint print by press ing Select LIGHTER to lighten dark originals i e ...

Страница 67: ...use the entire document must be scanned into memory first then printing can oc cur NOTES Collating is the responsi bility of the operator Memory requirements are limited to one page at a time Display the COLLATE COPY Menu 1 Select the desired option To set COLLATE COPY to ON press To set COLLATE COPY to OFF press Select the Desired Option 2 OPERATION COMPLETED Page 3 Page 2 Page 1 Page 3 Page 2 Pa...

Страница 68: ...tional Recording Paper Trays are installed To select the Bypass Tray press To select the Upper Recording Paper Tray press To select the Middle Recording Paper Tray press To select the Lower Recording Paper Tray press OPERATION COMPLETED Displayed for 2 seconds Returns to display the SETUP menu screen OPERATION COMPLETED Displayed for 2 seconds Returns to display the SETUP menu screen This function...

Страница 69: ...r of redials from 0 to 14 attempts Redial Interval The Redial Interval sets the length of time between redial at tempts The default redial inter val is 1 minute You may change the interval from 1 to 15 minutes Select the desired REDIAL op tion To select the Redial Interval press Setting Redial Interval and Counter Display the REDIAL MODE Menu 1 Select the REDIAL Option 2 Enter the Redial Interval ...

Страница 70: ...ing this Configura tion Setting you may continue to select other settings referring to their associated pages for in structions or press to exit the Configuration Setting mode and return to the Standby Mode AUTO RECEIVE MODE 1 AUTO RECEIVE 2 MANUAL RECEIVE If MANUAL RECEIVE is se lected the following will be dis played for 2 seconds continue to Step 4 OPERATION COMPLETED When the desired ring coun...

Страница 71: ...is dis played on the bottom row Enter the start time and end time of the time period in which the Line 2 will be used for re ception only NOTES For 24 hour format 00 00 to 23 59 For 12 hour format 12 00 to 11 59 and the AM or PM designation When the correct time period is entered press Press After completing this Configura tion Setting you may continue to select other settings referring to their a...

Страница 72: ...r of available locations will vary depending upon the amount of informa tion stored in each location Turn the Flip Panel to the 50 73 view to select the desired Function Key Press To select ABB NUMBERS press Enter an Abbreviated Dial Num ber from 1 to 999 Display the TEL LIST ENTRY Menu 1 Display the ABB NUMBERS Menu 2 TEL LIST ENTRY 1 ABB NUMBERS 2 GROUP NUMBERS 3 ONE TOUCH KEYS Make sure the 3 d...

Страница 73: ... selection is rec ommended if the location is used in Group Dialing Direc tories RETAIN Retains the selected Abbre viated Dial Number informa tion without modification ABB NUMBER ENTRY ABB NUMBER 001 CANCELLED ENTER ABB NUMBER OR PRESS BACK TO PREVIOUS STOP TO COMPLETE Return to Step 3 Return to Step 3 to select a dif ferent Abbreviated Dial Number or press to return to the Standby Mode ENTER ABB ...

Страница 74: ...e Number Optional 8 Enter the telephone number you want to store up to 128 digits NOTE If your facsimile is connected to a PBX system you may need to enter an access digit 9 and a pause so the sys tem will connect you to an outside line In such cases press to enter a 3 sec ond pause This pause may be repeated if necessary and may be entered anywhere between digits A pause en try is indicated as a ...

Страница 75: ...which tel line is se lected when the 2nd Line is installed Select the Communication Option 9a If you have completed the de sired Communication Options setting for this Abbreviated Dial Number select COMPLETE by pressing Complete the Option Setup 9b Skip to Step 10 ABB NBR 001 PRESS ONE TOUCH KEY TO ENTER OR ENTER TO SKIP Abbreviated Dialer Registration continued These items are outside the LCD fra...

Страница 76: ...ications to SUB and from SEP compat ible devices IMPORTANT If you designate an incorrect sub address the communica tion will result in an error If you designate an unnecessary sub address the communication will result in error Select Communication Options continued 9 Sub Address Communication 9g Line Monitor Speaker 9e LINE MONITOR 1 ON 2 OFF To enable the monitor speaker press To disable the moni...

Страница 77: ...e Sub Address Comm Options Setup 9g 3 Select a SUB Sub Address Communication 9g 4 Select a SEP Sub Address Communication 9g 5 Select a PWD Sub Address Communication This item is outside the LCD frame To view it use the scroll key COMM OPTIONS 1 COMPLETE 2 DELAYED COMM 3 TX REPORT SUB ADDRESS COMM SUB MAX20 SUB ADDRESS COMM 1 COMPLETE 2 SUB 3 SEP 4 PWD Enter the required number max 20 digits then p...

Страница 78: ...UCH 01 ALREADY ASSIGNED ABB NBR 003 SMITH S OFFICE ONE TOUCH 01 ALREADY ASSIGNED ONE TOUCH 01 WEST REGION CENTER After 2 seconds One Touch key has been as signed with an Individual Phone Number ABB NBR 001 PRESS ONE TOUCH KEY TO ENTER OR ENTER TO SKIP ONE TOUCH 01 CANCEL 1 CANCEL 2 RETAIN If your facsimile is equipped with the Line 2 Board you will be able to designate which phone line to use Line...

Страница 79: ...imile numbers is busy and a 2nd facsimile is located at that same remote location the 2nd facsimile s telephone number can be programmed as an Alternate Number If the pressed One Touch key has already been registered with a telephone number the following information appears on the LCD display Display the TEL LIST ENTRY Menu 1 Display the ONE TOUCH KEYS Menu 2 Select a One Touch Location 3 When a P...

Страница 80: ... 5c Change One Touch Information 5 ONE TOUCH KEY ENTRY ONE TOUCH 03 CANCELLED ENTER ONE TOUCH KEY OR PRESS BACK TO PREVIOUS STOP TO COMPLETE After 2 seconds Return to Step 3 Return to Step 3 to select a dif ferent One Touch key or press to return to the Standby Mode ENTER ONE TOUCH KEY OR PRESS BACK TO PREVIOUS STOP TO COMPLETE To change the number or Loca tion ID remote facsimile name currently a...

Страница 81: ...stalled Select the Communication Option 9a These items are outside the LCD frame To view them use the scroll key Enter the telephone number you want to store up to 128 digits NOTE If your facsimile is connected to a PBX system you may need to enter an access digit 9 and pause so the system will connect you to an out side line In such cases press to enter a 3 sec ond pause This pause may be repeate...

Страница 82: ...le the facsimi le s Line Monitor Speaker when dialing with this One Touch key press To request a Transmission Re port automatically after sending document using this One Touch key select Transmission Report 9d Line Monitor Speaker 9e Quality TX 9f SET TX REPORT 1 ON 2 OFF To enable a TX Report press To disable a TX Report press The display returns to the first screen in Step 9 Select the next Opti...

Страница 83: ...ovides a Sub Address to route or retrieve messages press Returns to Step 8g 1 9g 1 Select the Sub Address Comm Options This item is outside the LCD frame To view it use the scroll key SUB ADDRESS COMM 1 COMPLETE 2 SUB 3 SEP 4 PWD To enter a SUB type Sub Ad dress press To enter a SEP type Sub Ad dress press To complete Sub Address entry or skip this option press The display returns to the first scr...

Страница 84: ...s Communication continued 9g Select the Telephone Line 9h If your facsimile is equipped with the 2nd Line Board you will be able to designate which phone line to use Line 1 or Line 2 for this One Touch key by pressing To allow the Line to be selected automatically press To designate Line 1 press To designate Line 2 press Returns to Step 9 TEL LINE SELECT 1 FIRST AVAILABLE 2 LINE 1 3 LINE 2 COMM OP...

Страница 85: ...ne Touch key Turn the Flip Panel to the 50 73 view to select the desired Function Key Press Enter a Group Number 1 to 1999 Example 1 To select GROUP NUMBERS press Group Number Registration Display the TEL LIST ENTRY Menu 1 Display the GROUP NUMBERS Menu 2 Enter a Group Number 3 TEL LIST ENTRY 1 ABB NUMBERS 2 GROUP NUMBERS 3 ONE TOUCH KEYS ENTER GROUP NUMBER OR PRESS BACK TO PREVIOUS STOP TO COMPLE...

Страница 86: ...is played Skip to Step 5 ENTER GROUP NUMBER OR PRESS BACK TO PREVIOUS STOP TO COMPLETE GROUP NBR 0001 ENTER ABB NBR OR OT ENTER TO COMPLETE Return to Step 3 Enter a Remote Station 6 Enter the addresses of the re mote stations to be preset in the group If a remote station is assigned to a One Touch key press the One Touch key If a remote station is assigned to an Abbreviated Dial Number enter the n...

Страница 87: ...the Group Number Setting 7a Retain the Group Number Setting 7b Complete Group Station Entries 8 GROUP NBR 0001 ALREADY ASSIGNED ABB NBR 118 DENVER OFFICE ABB NBR 118 CANCEL 1 CANCEL 2 RETAIN After 2 seconds Go to Step 7a or Step 7b After 2 seconds GROUP NBR 0001 ABB NBR 118 CANCELLED GROUP NBR 0001 ENTER ABB NBR OR OT ENTER TO COMPLETE Return to Step 6 GROUP NBR 0001 ENTER ABB NBR OR OT ENTER TO C...

Страница 88: ...urn to Step 3 Press to display the pre ceding level screen in Menu Screen mode Press to complete the Group Setting operation and re turn to the Standby Mode ONE TOUCH 01 ALREADY ASSIGNED ABB NBR 003 SMITH S OFFICE ONE TOUCH 01 CANCEL 1 CANCEL 2 RETAIN After 2 seconds To select 1 CANCEL to can cel the existing link or preset data of this One Touch key press GROUP NBR 0001 PRESS ONE TOUCH KEY TO ENT...

Страница 89: ...simile dealer or use a transparency with a paper backing attached at the lead edge Document Specifications NOTES Operator assistance may be required for pages longer than 420mm 16 5 inches For multiple sheets the documents must be the same size and paper type A small border region of each document is not imaged when each document is scanned The effective scanning area is as shown in the figure bel...

Страница 90: ...one page at a time manually fed When the document sheet is longer the Document Tray as sist it with your hand to insure proper feeding Up to 50 sheets Letter size can be loaded and sent at a time Stagger the leading edges of the sheets slightly and insert them into the document feeder After the facsimile pulls the document into the scan position slightly and stops you may change the resolution and...

Страница 91: ...th colors or shading Ultra Fine Mode Standard Mode when all the lamps are extinguished Fine Mode Each corresponding lamp is illuminated Press until the required resolution mode is indicated by the appropriate LED Ultra Fine Halftone Mode Fine Halftone Mode Scan Resolution Setting The mode changes as follows When Ultra Fine is selected the DF120F DP125F will scan all documents at 406 dots inch hori...

Страница 92: ...t or faint print LIGHTER To lighten the dark originals i e for documents with dark print or shaded areas Turn the Flip Panel to the 50 73 view to select the desired Function Key Press Display the SET CONTRAST Menu 1 SET CONTRAST 1 NORMAL 2 DARKER 3 LIGHTER Contrast Setting Select the desired Contrast level To select NORMAL press To select DARKER press To select LIGHTER press Your contrast setting ...

Страница 93: ...ion reservation or File Number is assigned When Memory Transmission is not selected the Direct Docu ment Transmission tray mode is active by default setting This allows your facsimile to function without the use of document memory Press Press Select the desired transmission mode To set Memory Transmission to ON press To set Memory Transmission to OFF press Display the Default Setting Menu 1 Displa...

Страница 94: ...he following is displayed for 2 seconds Press SEND AFTER SCAN 1 DIAL DURING SCAN 2 DIAL AFTER SCAN Select the Send After Scan Option 2 OPERATION COMPLETED WHEN MEMORY FULL 1 DELETE SCAN PAGES 2 SEND SCAN PAGES Select the Memory Full Option 3 Go to Step 4 To enable Send After Scan press Go to Step 3 After completing this Setting you may continue to select other settings referring to their associ at...

Страница 95: ...ndicating a transmission error Press Select the desired option To set Security Transmission to ON press To set Security Transmission to OFF press Press Default Setting for Security Transmission Display the Default Setting Menu 1 Display the SECURITY TX Menu 2 Select the Desired Option 3 OPERATION COMPLETED SET SECURITY TX 1 ON 2 OFF 01 MEMORY TX 02 SECURITY TX 03 COVER SHEET 04 RECOVERY TX 05 TTI ...

Страница 96: ...e Recording Area B A C D Paper Size for Copying A 216 8 5 216 8 5 Paper Size Letter mm inches Legal mm inches B 209 8 2 209 8 2 D 279 11 0 356 14 0 C 273 10 7 350 13 8 COPYING Page 3 Page 2 Page 1 Page 3 Page 2 Page 1 Page 3 Page 2 Page 1 Page 3 Page 2 Page 1 Page 1 Page 1 Page 2 Page 2 Page 3 Page 3 At the time of copying the COLLATE function may be selected This function will sort multiple page ...

Страница 97: ...A4 Selectable Paper Trays and their paper size are displayed You may select the paper tray and paper size of your copies using the following keys or NOTE The Bypass Tray is dis played only when it is set for LT LG or A4 size Then press If you select the Bypass Tray following is displayed If the thick paper is loaded in the Bypass Tray select ON by or and then press Example Tray 1 LT is selected CO...

Страница 98: ...row to select the Re duction option or Select the Reduction Option 5 Use the following keys to select the desired Reduction option 100 AUTO 86 75 or 50 or NOTE If AUTO is selected for Pa per Tray in Step 2 you can not select AUTO for Reduc tion Then press Example 86 reduction is selected 100 AUTO 86 75 50 COPIES 1 99 1 PAPER TRAY 1 LT REDUCT 86 COLLATE ON OFF When all settings are complete press N...

Страница 99: ...m buzzer sounds and the display returns to the pre vious status screen If you have programmed a re mote party s facsimile number to a One Touch key you can dial that number by pressing the corresponding One Touch key The document must be loaded and the resolution and contrast settings set before a transmis sion using One Touch Key dial ing Select the desired One Touch key from 01 to 73 see page 77...

Страница 100: ... fac simile returns to the screen in Step 1 Abbreviated Dialing Press the SPEED DIAL Key 1 Enter the Abbreviated Number 2 Press the START Key Tray 3 ABB NUMBER 1 999 COMM RESERVATION ABB NUMBER 1 999 10 ABB NBR 10 LONDON OFFICE ABB NBR 10 NUMBER NOT LISTED NOTE When an incorrect number is entered use to delete preceding digits or press once to start over from the beginning Example of Abbreviated D...

Страница 101: ...ialing Press the SPEED DIAL Key 1 The One Touch key or Abbrevi ated Dial Number and the name of the party appear on the LCD display for about 2 seconds Your facsimile will automatically start scanning the document into memory if enabled While scanning the facsimile dials connects and starts transmis sion ABB NBR 002 LONDON OFFICE Displayed for 2 seconds During transmission SCANNING TO MEMORY FILE ...

Страница 102: ...ect number is dis played press Enter the Facsimile Number 1 Press the START Key 2 Your facsimile will automatically start scanning the document into memory if enabled While scanning the facsimile will dials connects and starts transmis sion COMM RESERVATION TEL NUMBER MAX128 012345678 Keypad Dialing NOTE When an incorrect number is entered use to delete preceding digits or press once to start over...

Страница 103: ... to each transmission or polling reception job for internal control of reserved communications This File Number is very useful should it become necessary to cancel a memory operation It is also useful when tracking communication activities using the transmission and reception journals see page 205 RESIDUAL MEMORY The amount of memory remaining for memory transmission usage is called Residual Memor...

Страница 104: ... Dialing The facsimile starts scanning and storing the document into memory A File Number is assigned Residual Memory will decrease as the document is scanned Press to cancel the transmission operation When the document scanning is complete the facsimile returns to the Standby Mode Load the Document 1 Dial the Facsimile Number 2 Start Scanning 3 Return to the Standby Mode 4 MAY 17 00 WED11 49 RESI...

Страница 105: ... the actual transmission of the document to the remote par ty The documents will remain in the ADF and be transmitted one by one Direct Transmission Load the Document 1 Dial the Facsimile Number 2 Start Dialing 3 Example of screen displayed when Residual Memory has been depleted MAY 17 00 WED11 49 RESIDUAL MEMORY 100 ENTER TEL NUMBER MAY 17 00 WED11 49 RESIDUAL MEMORY 0 ENTER TEL NUMBER DIALING FI...

Страница 106: ...ion and transmission speed is displayed on the 3rd row When the communication is complete LINE lamp turns off and the facsimile returns to the Standby Mode Complete the Transmission 6 TRANSMIT P001 FILE NBR 025 EX 14400BPS 81 559 761234 MAY 17 00 WED11 54 RESIDUAL MEMORY 100 Direct Transmission continued Direct Transmission as Default Setting continued ...

Страница 107: ...ata Turn the Flip Panel to the 50 73 view to select the desired Function Key Press Select 1 YES by pressing Dial the facsimile number of the remote party using any of the four dialing methods One Touch Key Dialing See page 97 Abbreviated Dialing See page 98 Alphabet Dialing See page 99 Keypad Dialing See page 100 Direct Transmission continued Load the Document 1 Select YES 3 Dial the Facsimile Num...

Страница 108: ...ncorrect number is di aled press and fol low the instruction displayed on the LCD display to start the operation over Example of screen displayed while a number is entered using Keypad Dialing When you hear the answering tone press If an operator answers the phone pick up the handset if equipped and inform the re mote party that you wish to send a document Upon hearing the facsimile tone press Whe...

Страница 109: ... use the Keypad Dial ing procedure on page 84 do not press the final in this step If an incorrect number is dialed press and follow the instruction dis played on the LCD dis play to start the operation over This procedure may be useful when you want to talk with a remote party using the optional handset of the facsimile before sending a document Direct Transmission continued Load the Document 1 Pi...

Страница 110: ...g tone press If the remote party answers the phone you can inform the re mote party that you wish to send a document Upon hearing the facsimile tone press Then replace the handset When the transmission is com pleted the facsimile returns to the Standby Mode Press the START Key 4 MAY 17 00 WED11 54 RESIDUAL MEMORY 100 ...

Страница 111: ... the Dial Keypad on the fac simile does not accept any key entry When you hear the answering tone press on the facsimile If the remote party answers the phone you can inform the remote party that you wish to send a document Upon hearing the facsimile tone press Then replace the handset of the External Telephone When the transmission is com pleted the facsimile returns to the Standby Mode This proc...

Страница 112: ...et length see page 67 If the line is not connected after the set number of redialing at tempts the facsimile will record a LINE BUSY error Confirm the facsimile number of the remote party and repeat the transmission procedure When you hear the answering tone press If the remote party answers the phone pick up the handset op tional Inform the remote party that you wish to send a docu ment Upon hear...

Страница 113: ...esired job using the following scroll keys for the previous screen for the next screen Press When the desired job is dis played press The facsimile starts to dial the number for a transmission Press the REDIAL Key 1 Start Redialing 3 Manual Redialing Jobs in Memory Select the Job to be Redialed 2 REDIAL NUMBER NOT LISTED REDIAL ENTER START PREVIOUS SCREEN NEXT SCREEN If there are no jobs to be red...

Страница 114: ...t Manual Reception allows you to use the facsimile as a tele phone talking function first and then start a document reception by pressing 1 When the facsimile rings pick up the optional handset and talk with the remote party 2 If you hear the facsimile tone through the handset instead of operator s voice you may manually initiate a facsimile reception by pressing 3 Replace the handset to the cradl...

Страница 115: ...ording area of the paper it will be vertically reduced to fit on the recording paper installed The reception will be divided onto two sheets if the document needs to be reduced to smaller than 73 of its original size Effective Recording Area B A C D Paper Size Letter mm inches Legal mm inches B 210 8 3 210 8 3 D 279 11 0 356 14 0 A 216 8 5 216 8 5 C 271 10 6 348 13 7 If you desire to receive large...

Страница 116: ...unction allows up to 13 mm of the lower portion of the document to be discarded if the document is larger than the re cording paper To change this dimension contact your service repre sentative Press Display the DISCARD Menu 1 Select the Desired Option 2 OPERATION COMPLETED DISCARD 1 ON 2 OFF Reception Discard Setting ...

Страница 117: ... COMPLETED Reverse Order Printing Setting This function receives the entire facsimile document into memory and then prints the document in reverse order In this way the pages of the document will be in correct order Press Display the REVERSE ORDER PRINT Menu 1 Select the Desired Option 2 REVERSE ORDER PRINT 1 ON 2 OFF ...

Страница 118: ...int multiple copies of the same re ceived document automatically You may select REVERSE OR DER PRINT to collate the re ceived document Press Display the RX MULTI COPY Menu 1 Select the Desired Number of Copies 2 OPERATION COMPLETED RX MULTI COPY COPY NUMBER 01 99 01 Reception Multicopy Setting ...

Страница 119: ...ithin 1 minute after dialing the line will be auto matically disconnected When you finish talking return the handset to the handset cradle The display returns to the Standby Mode Enter the telephone number of the remote party using any of the following dialing methods One Touch Key Dialing See page 97 Abbreviated Dialing See page 98 Alphabet Dialing See page 99 Keypad Dialing See page 100 TELEPHON...

Страница 120: ...the Dial Keypad When the number you dialed is busy or you want to redial the last number you dialed you can recall the last number dialed us ing To use redialing with voice call ing you must press or pick up the optional handset of the facsimile first NOTE To prevent others from redialing your call press while in the on hook or off hook status This will clear the phone number reg ister Pick up the...

Страница 121: ... Press one of the following keys To cancel the job press To continue without cancelling the job press Current Job Status Continue or Cancel the Job 2 Select YES or NO 3 PENDING JOBS x CANCEL JOB TO CANCEL NO ENTRY When no jobs are re served or being pro cessed the screen below is displayed for 2 sec onds LINE 1 TRANSMIT P005 FILE NBR 999 G3 14400BPS 81 425 85 3002 CANCEL FILE NBR 999 1 YES 2 NO Th...

Страница 122: ...d job A Communication Journal or Transmission Journal and Re ception Journal separately can be issued to confirm 150 trans missions and 150 receptions With the Standby Mode screen displayed select the 50 73 view on the Flip Panels Press A communication journal is is sued See page 195 Select the Job 2 Printing a Job Status 3 Display Print Transmission Report Communication Journal PREVIEW TX REPORT ...

Страница 123: ...irst three items 1 to 3 indicated CANCELLING A COMMUNICATION JOB Cancelling a Direct Transmission Cancelling a Job Reservation A Document is Being Transmitted 1 Press the STOP Key 2 Select the Desired Option 3 Display the JOB CANCEL Menu 1 JOB CANCEL 1 TRANSMIT 2 RECEIVE 3 POLLING 4 POLLING RESERVE 5 JOB NUMBER NOTE The types of jobs displayed within the Job Cancel screen will vary depending upon ...

Страница 124: ...OB NUMBER 4 Cancel Other Jobs 5 Press the ENTER to Cancel the Job 6 Cancelling a Job Reservation continued JOB CANCEL ENTER CANCEL PREVIOUS SCREEN NEXT SCREEN Previous Job in the List SINGLE TRANSMIT REDFIELD EX MAY 29 23 25 FILE NBR 123 Next Job in the List JOB CANCELLED FILE NBR xxx CANCEL FILE NBR xxx 1 YES 2 NO To confirm deletion press To not cancel the selection press To cancel a reception u...

Страница 125: ...correct number is entered use to de lete the preceding digits or press once to start over from the beginning When the correct Group Num ber is displayed press ADVANCED FUNCTIONS MULTI ADDRESS TRANSMISSION BROADCASTING Group Broadcast Transmission Load the Document 1 Select the Group Location 2 Enter the Group Number 3 Press the START Key 4 Standby Mode screen Or display the Group Dial Di rectory b...

Страница 126: ...ion and con trast if desired see page 89 Press Multi Key Quick Broadcast Transmission Load the Document 1 Press the MULTI Key 2 MAY 17 00 WED11 49 RESIDUAL MEMORY 100 ENTER TEL NUMBER MULTI GROUP 000 ENTER TEL NUMBER SPEED DIAL KEY OR ONE TOUCH KEY After 2 seconds MULTI GROUP 000 ABB NBR 154 INFORMATION BUREAU MULTI GROUP 001 TO PREVIOUS ENTER MORE OR PRESS START NOTE If you select the same entry ...

Страница 127: ...EL To modify the existing number press to MODIFY Cancel the Existing Number 4a Select the CANCEL or MODIFY Facsimile Number 4 MULTI GROUP ABB NBR 154 DELETED Return to Step 3 Modify the Existing Number 4b MULTI GROUP 001 TO PREVIOUS ENTER MORE OR PRESS START Go to Step 3 for the Facsimile Number entry To retain the existing number press to RETAIN Retain the Existing Number 4c MULTI GROUP 001 TO PR...

Страница 128: ...o 50 abbreviated dial numbers or one touch keys or groups can be programmed For information on setting Relay Box see page 127 4 Due to advanced planning and setup requirements for the Relay Relay trans missions involving two or more Hub Stations transfers contact your authorized TOSHIBA dealer for detailed instructions How to Setup a Relay Transmission Hub Station Create a Relay Box within a hub u...

Страница 129: ... the facsimile telephone number of the Second Hub Station to a One Touch key or Abbreviated Number see pages 70 and 77 At this time the Relay Box Number located in the Second Hub Station should be registered as the SUB Address of the One Touch key or Abbreviated Number 2 Create a Relay Box in the Hub Station see Setting Up a Relay Box Register the One Touch key or Abbreviated Number programmed in ...

Страница 130: ... Step 8 Enter the password max 20 digits Enter the Box Number 5 Select the Password Option 6 Enter the Password 7 PROGRAM PASSWORD 1 YES 2 NO Then press ENTER PASSWORD PASSWORD MAX20 XXXXX RELAY END NUMBER PRESS SPEED DIAL KEY OR ONE TOUCH KEY Select 2 BOX SETUP by pressing Select BOX SETUP 3 Select the RELAY 4 TYPE OF BOX 1 CONFIDENTIAL TYPE 2 BULLETIN BRD TYPE 3 RELAY Select 3 RELAY by pressing ...

Страница 131: ... END NUMBER ABB NUMBER XXX ENTER MORE OR PRESS START Repeat this step until all of the required end station are en tered Then go to Step 9 Enter the One Touch Key of End Station 8a If an end station is assigned to a One Touch Key press Example One Touch Key 35 Go to Step 8 After 2 seconds RELAY END NUMBER ONE TOUCH 35 XXXXXX RELAY END NUMBER ONE TOUCH 35 ENTER MORE OR PRESS START If an end station...

Страница 132: ...nds to indicate that the Mailbox is reg istered TRANSMISSION REPORT TEL NUMBER MAX128 XXXX REGISTERED Cancel or Retain the Existing Station 8d If the End Station One Touch Key Abbreviated Dial Number or Groups Number designated in Step 8a 8b or 8c have al ready been entered under the same Relay Box the following LCD prompt is displayed Then press Go to Step 8 To cancel the existing End Sta tion On...

Страница 133: ...ued 10 Press the desired One Touch Key Example One Touch Key 01 The following screen is dis played for about 2 seconds to indicate that the Mailbox is reg istered Press the desired Abbreviated Dial Number Enter the Abbreviated Dial Num ber TRANSMISSION REPORT ONE TOUCH 01 REGISTERED TRANSMISSION REPORT ABB NBR 001 Enter the Number using the One Touch Key 10b Enter the Number using the Abbreviated ...

Страница 134: ...Box you want to delete Then press If the entered Box number does not have a password pro grammed go to Step 6 If the entered Box number has a password programmed the screen below is displayed Go to Step 5 Deleting a Relay Box Select SETUP DELETE 2 Select BOX DELETE 3 Enter the Box Number 4 SETUP MAILBOX 1 COMPLETE 2 BOX SETUP 3 BOX DELETE MAILBOX 1 CONFIDENTIAL 2 BULLETIN BOARD 3 RELAY 4 BOX SETUP...

Страница 135: ...t the can cellation is accepted Enter the Password 5 Complete the Procedure 6 CANCELLED Deleting a Relay Box continued Then press NOTE Make sure that the correct password is entered Other wise the machine will inform you that the password is in correct ENTER PASSWORD PASSWORD MAX20 ...

Страница 136: ...remote hub unit prior to sending document Load the document face down in the Document Tray see page 88 Adjust the resolution and con trast if desired see page 89 Select the 3 RELAY by press ing Relay Transmission to a Remote Hub Load the Document 1 Select the RELAY 3 MAY 17 00 WED10 22 RESIDUAL MEMORY 100 ENTER TEL NUMBER MAILBOX 1 CONFIDENTIAL 2 BULLETIN BOARD 3 RELAY 4 BOX SETUP Display the MAIL...

Страница 137: ...mile starts scanning the document into memory The following screen is dis played for about 2 seconds be fore returning to the Standby Mode Enter the Password for Reservation 6 Dial the Remote Hub Unit 7 Complete the Procedure 8 SCANNING INTO MEMORY FILE NBR 231 RESIDUAL MEMORY 90 TEL NUMBER MAX128 123 If the remote hub unit has a password programmed press Go to Step 6 If the remote hub unit does n...

Страница 138: ...See page 140 Polling Reception is the ability to call up another facsimile and re motely retrieve a document stored within the remote facsimile The following types of polling receptions are available Simple Polling The DP120F DP125F can call any other facsimile with polling reservation capabilities to remotely retrieve a document See page 141 Secure Polling The DP120F DP125F can call another TOSHI...

Страница 139: ...to prevent unauthorized re trieval of documents This password is used only when retrieving documents and not used during document reservation Bulletin Board Box Bulletin Board box allows multiple document retrievals from the mailbox If a new document is stored using the same Box number where another document is already present it replaces the existing one It is possible to setup a password require...

Страница 140: ...turers This TTI must be properly pro grammed into the remote fac simile for this procedure to func tion NOTES Only one Simple Polling reservation can be set at one time Simple Polling reserva tion is not available if a document is reserved in the Public Mailbox Load the document face down in the Document Tray see page 88 Adjust the resolution and con trast if desired see page 89 Turn the Flip Pane...

Страница 141: ...ANNING INTO MEMORY FILE NBR 140 RESIDUAL MEMORY 70 Enter a 4 digit Security Code 0000 to 9999 using the Dial Keypad Each digit of the en tered code is displayed as an asterisk Then press Go to Step 7 NOTE You must provide this 4 digit number to the remote party in advance or they will not be able to retrieve this docu ment If no code or an incor rect code is used a polling error will occur remote ...

Страница 142: ...ss The facsimile starts scanning the document Public Mailbox Polling Reservation Load the Document 1 Select PUBLIC FAX M BOX 3 Complete the Procedure 4 MAY 17 00 WED11 49 RESIDUAL MEMORY 100 ENTER TEL NUMBER POLLING 1 POLLING 2 POLLING RESERVE 3 PROG CONT POLL POLLING RESERVE 1 POLLING 2 PUBLIC FAX MAILBOX SCANNING INTO MEMORY FILE NBR 140 RESIDUAL MEMORY 70 ALREADY ASSIGNED 1 CANCEL 2 ADD 3 RETAI...

Страница 143: ...wing dialing methods One Touch Key Dialing See page 97 Abbreviated Dialing See page 98 Alphabet Dialing See page 99 Keypad Dialing See page 100 Press Select the security code option If the remote facsimile is a TOSHIBA facsimile and a 4 digit security code is pro grammed to the document to be polled select 1 YES by pressing Go to Step 5 If the remote facsimile is not a TOSHIBA facsimile or a Secu ...

Страница 144: ...he document When the operation is complete the following screen is displayed for about 2 seconds and your documents will be printed Enter the Security Code 5 Complete the Procedure 6 OPERATION COMPLETED FILE NBR 167 When the 4 digit security code is entered press Go to Step 6 POLLING SECURITY CODE Simple Secure Polling continued ...

Страница 145: ...ling See page 97 Abbreviated Dialing See page 98 Alphabet Dialing See page 99 Keypad Dialing See page 100 Group Dialing See page 123 After each entry the selected facsimile is displayed for 2 sec onds Press Multi Address Polling Display the POLLING Menu 1 Select POLLING 2 Press the MULTI Key 3 Enter the Number of Remote Facsimiles 4 POLLING ENTER TEL NUMBER POLLING 1 POLLING 2 POLLING RESERVE 3 PR...

Страница 146: ...elect the Security Code Option 5 Enter the Security Code 6 Complete the Procedure 7 OPERATION COMPLETED FILE NBR 167 MULTI POLLING SECURITY CODE 1 YES 2 NO If the remote facsimile is a TOSHIBA facsimile and a 4 digit security code is programmed to the document to be polled se lect 1 YES by pressing Go to Step 6 If the remote facsimile is not a TOSHIBA facsimile or no Secu rity Codes are being used...

Страница 147: ...the polling continues when power is restored If the set time period is shorter than the set call ing interval polling will be performed only once at the start time Select 3 PROG CONT POLL by pressing Enter the time interval between polling sequences 10 to 70 minutes Only interval settings of 10 minute increments are permis sible Example Enter 1 for 10 minutes or 2 for 20 min utes etc Then press Tu...

Страница 148: ...csimile is not a TOSHIBA facsimile or no Secu rity Codes are in use press No Security Code will be se lected and the facsimile will re turn to the Standby Mode The facsimile will automatically start polling at the time set in this procedure Enter the 4 digit security code for the document to be re trieved Select the Day of the Week 5 Enter the Number of Remote Facsimile 6 Select the Security Code ...

Страница 149: ... code option Turnaround Polling Load the Document 1 Select ON 3 Select the Security Code Option 4 MAY 17 00 WED11 49 RESIDUAL MEMORY 100 ENTER TEL NUMBER TURNAROUND POLL 1 ON 2 OFF TURNAROUND POLL SECURITY CODE 1 YES 2 NO TURNAROUND POLL SECURITY CODE 1 YES 2 NO If the remote facsimile is a TOSHIBA facsimile and a 4 digit security code is assigned to the document to be polled select 1 YES by press...

Страница 150: ...acsimile to perform an or dinary transmission When the transmission is complete poll ing of the document from the re mote facsimile will start immedi ately When the polling operation is complete the Turnaround Poll ing setting is automatically can celled Turnaround Polling continued Enter the Security Code 5 Complete the Procedure 7 Dial the Number of Remote Facsimile 6 COMM RESERVATION RESIDUAL M...

Страница 151: ... remote facsimile If the contents of this mailbox are to be polled remotely a pass word must be used A password is not mandatory if the contents are to be printed locally Bulletin Board Box Bulletin Board box allows multiple document retrievals from the mailbox It is possible to add a password requirement for docu ment reservation so that only users with the correct password can reserve documents ...

Страница 152: ...mote facsimile will re quire its operator to enter this password before be ing able to retrieve the document If you selected the Bulle tin Board Box in Step 4 assigning a password will require a password to be entered before any docu ments can be reserved into the Bulletin Board Box Enter the password max 20 digits Setting Up a Mailbox continued Enter the Box Number 5 Select the Password Option 6 ...

Страница 153: ...ng Select 3 BOX DELETE by pressing Enter the Box number max 20 digits of the Mailbox you want to delete Then press If the entered Box number does not have a password pro grammed go to Step 6 If the entered Box number has a password programmed the screen below is displayed Go to Step 5 Deleting a Mailbox Select BOX SETUP 2 Select BOX DELETE 3 Enter the Box Number 4 SETUP MAILBOX 1 COMPLETE 2 BOX SE...

Страница 154: ...at the can cellation is accepted Enter the Password 5 Complete the Procedure 6 CANCELLED Deleting a Mailbox continued Then press NOTE Make sure that the correct password is entered Other wise the machine will inform you that the password is in correct ENTER PASSWORD PASSWORD MAX20 ...

Страница 155: ...88 Adjust the resolution and con trast if desired see page 89 Select the desired type of Mail box To send the document to a Confidential Box press Select 2 TX TO MAILBOX by pressing Sending a Document to a Mailbox Remote Hub Load the Document 1 Select the Mailbox Type 3 Select TX TO MAILBOX 4 MAY 17 00 WED10 22 RESIDUAL MEMORY 100 ENTER TEL NUMBER MAILBOX 1 CONFIDENTIAL 2 BULLETIN BOARD 3 RELAY 4 ...

Страница 156: ... See page 100 The facsimile starts scanning the document into memory The following screen is dis played for about 2 seconds be fore returning to the Standby Mode Enter the Box Number 5 Enter the Password for Reservation 6 Dial the Remote Hub Unit 7 Complete the Procedure 8 TX CONFIDENTIAL ENTER TEL NUMBER SPEED DIAL KEY OR ONE TOUCH KEY SCANNING INTO MEMORY FILE NBR 231 RESIDUAL MEMORY 90 TX CONFI...

Страница 157: ...e desired Function Key Press Select the desired type of Mail box To reserve the document to a Confidential Box press Reserving a Document to a Mailbox Local Hub Load the Document 1 Select the Mailbox Type 3 Select INPUT TO MAILBOX 4 MAY 17 00 WED10 22 RESIDUAL MEMORY 100 ENTER TEL NUMBER MAILBOX 1 CONFIDENTIAL 2 BULLETIN BOARD 3 RELAY 4 BOX SETUP CONFIDENTIAL 1 PRINT MAILBOX 2 TX TO MAILBOX 3 POLL...

Страница 158: ...The facsimile starts scanning the document into memory The following screen is dis played for about 2 seconds be fore returning to the Standby Mode Enter the Box Number 5 Enter the Password for Reservation 6 Complete the Procedure 7 SCANNING INTO MEMORY FILE NBR 231 RESIDUAL MEMORY 90 Reserving a Document to a Mailbox Local Hub continued INPUT BULLETIN BRD PASSWORD MAX20 INPUT BULLETIN BRD PASSWOR...

Страница 159: ... If you are retrieving from a Bul letin Board Box go to Step 6 Retrieving Polling a Document from a Mailbox Remote Hub Display the MAILBOX Menu 1 Select the Mailbox Type 2 Select POLL FROM MAILBOX 3 Enter the Box Number 4 MAILBOX 1 CONFIDENTIAL 2 BULLETIN BOARD 3 RELAY 4 BOX SETUP POLL CONFIDENTIAL BOX NUMBER MAX20 To poll a document in a Bulletin Board Box press CONFIDENTIAL 1 PRINT MAILBOX 2 TX ...

Страница 160: ...0 The facsimile starts dialing the remote hub unit to retrieve the document The following screen is displayed for about 2 seconds before returning to the Standby Mode Enter the Password 5 Dial the Remote Hub Unit 6 Complete the Procedure 7 POLL CONFIDENTIAL ENTER TEL NUMBER SPEED DIAL KEY OR ONE TOUCH KEY OPERATION COMPLETED FILE NBR 234 Retrieving a Document from a Mailbox Remote Hub continued or...

Страница 161: ...If you are printing from a Confi dential Box go to Step 5 If you are printing from a Bulle tin Board Box go to Step 6 Printing a Document from a Mailbox Local Hub Display the MAILBOX Menu 1 Select the Open Mailbox Type 2 Select PRINT MAILBOX 3 Enter the Box Number 4 CONFIDENTIAL 1 PRINT MAILBOX 2 TX TO MAILBOX 3 POLL FROM MAILBOX MAILBOX 1 CONFIDENTIAL 2 BULLETIN BOARD 3 RELAY 4 BOX SETUP PRT CONF...

Страница 162: ...e starts printing the document The following screen is displayed during the printing sequence before returning to the Standby Mode Printing a Document from a Mailbox Local Hub continued Enter the Password 5 Complete the Procedure 6 MAY 17 00 WED10 22 RESIDUAL MEMORY 80 PRINTING ...

Страница 163: ...g from a Box with no password assigned go to Step 6 Select 5 CANCEL MAILBOX by pressing NOTE You may use to scroll up down the menu screen to select this option Cancelling Documents in a Mailbox Local Hub Display the MAILBOX Menu 1 Select the Mailbox Type 2 Select CANCEL MAILBOX 3 Enter the Box Number 4 MAILBOX 1 CONFIDENTIAL 2 BULLETIN BOARD 3 RELAY 4 BOX SETUP CANCEL CONFIDENTIAL BOX NUMBER MAX2...

Страница 164: ...the fol lowing screen for approximately 2 seconds before returning to the Standby Mode Cancelling Documents in a Mailbox Local Hub continued Enter the Password 5 Complete the Procedure 6 CANCELLED or Then press CANCEL CONFIDENTIAL PASSWORD MAX20 CANCEL BULLETIN BD PASSWORD MAX20 ...

Страница 165: ... limited to one transmission job or one Op eration Panel function printing a list accessing a Mailbox etc If the password does not match verify your password and re en ter ADVANCED TRANSMISSION FUNCTIONS Department Code Access DEPT CODE Standby Menu 1 Enter the Department Code 2 Complete the Procedure 3 MAY 17 00 WED10 22 RESIDUAL MEMORY 80 ENTER DEPT CODE MAY 17 00 WED10 22 RESIDUAL MEMORY 100 LO...

Страница 166: ...e starts scanning the document into memory When document scanning is complete the display returns to the Standby Mode Load the document face down in the Document Tray see page 88 Adjust the resolution and con trast if desired see page 89 Enter the number of the remote facsimile using any of the fol lowing dialing methods One Touch Key Dialing See page 97 Abbreviated Dialing See page 98 Alphabet Di...

Страница 167: ...r YES To omit an image on the cover sheet press for NO Enable or Disable the Cover Sheet attachment for ON Enable for OFF Disable When ON is selected the fol lowing screen is displayed When OFF is selected the OPERATION COMPLETED message will be displayed Con tinue to the final step WITH IMAGE 1 YES 2 NO When the document is pulled into the appropriate position the following screen is displayed Pr...

Страница 168: ...voice prompts or variations in number sequences such as long distance access codes or specialized access lines You can combine sets of numbers Abbreviated Dialing Alphabet Dialing One Touch Di aling and Keypad Dialing and pauses in a Chained dial se quence by using the Chain Dial Key If your operation requires paus ing for voice prompts you will need to insert pause signals be tween dial strings T...

Страница 169: ... TTI Menu 1 You can select the following options for your TTI information Inside The document is sent to the receiver with the TTI included in the document data Accordingly if any characters exist near the top edge of the sending data they may be overlapped with the TTI Outside The document is sent to the receiver with the TTI to be printed outside the sending data Accordingly if any characters ex...

Страница 170: ... is now complete The facsimile will display the same screen shown in Step 3 Enter the stored time length 01 to 24 in unit of hours Then press When completed the following screen is displayed Press to return to the Standby Mode Select the TTI Print option To select INSIDE press To select OUTSIDE press To select OFF press The display shows the screen below to indicate that the menu selection is acce...

Страница 171: ...w Date and time when the document file was stored into memory 4th row File number assigned to the transmission job When the desired job is dis played you have an option to re transmit the document or to permanently delete the job from memory You can also change the num ber of the remote facsimile if di aled from the Dial Keypad To re transmit the document or change the facsimile number press Enter...

Страница 172: ...To delete the selected docu ment stored for resending press To retain the selected document stored for resending press Sending Recovery Transmission continued Select the Cancel Option 5 DELETED FILE NBR 123 ...

Страница 173: ...cument Tray see page 88 Adjust the resolution and con trast if desired see page 89 Select the Flip Panel 50 73 view on the Operation Panel Press the CHARGE CODE key to initiate the PIN number se quence A will be displayed on the LCD display Enter the number of the remote facsimile Enter the PIN number The PIN number entered is masked with displayed on the LCD display When the entry is complete pre...

Страница 174: ...our facsim ile You can turn ECM OFF for a single transmission using this procedure The facsimile will au tomatically return to its default status immediately after that transmission is complete NOTE If ECM is set to OFF in the default setting procedure this procedure is not appli cable and the facsimile will warn you with an error mes sage NOT ALLOWED NOW Display the SET ECM Menu 1 Select the ECM ...

Страница 175: ...eption is not available for polling or mailbox retrieval requests from the remote facsimiles For this feature to work you must pre program the numbers of the facsimiles in your communication system into your DP120F DP125F s Abbreviated Number or One Touch Dial Key database In addition the remote facsimile must have the correct telephone number programmed as its terminal identification To turn ON P...

Страница 176: ...rogrammed in the remote facsimile s Terminal ID The Receiving Station ID will only be provided if it is programmed in this facsimile s Terminal ID Display the RTI Menu 1 RTI 1 ON 2 OFF Select the RTI Print option To print press Not to print press Select the RTI Print Option 2 OPERATION COMPLETED RTI Remote Terminal ID Print RECEIVED 05 17 2000 10 00 FROM 81425887449 TO TOSHIBA PAGE 001 Date Start ...

Страница 177: ...at caused the Memory Reception Display SET MEMORY RX Menu 1 Select the Memory Reception Option 2 SET MEMORY RX 1 ON 2 OFF MAY 17 00 WED10 22 PAPER EMPTY RESIDUAL MEMORY 90 MEMORY RECEPTION OPERATION COMPLETED To retrieve the data stored in memory simply correct the error con dition such as refill your paper tray with recording paper Your document will be printed automatically NOTES The default set...

Страница 178: ...ing an existing security code Press To select a security code for the first time or to change an exist ing security code press If the security code already ex ists and you wish to change the current code go to Step 4 When you enter a security code for the first time go to Step 5 If a new code needs to be en tered If the code already exists Before you change the security code you must enter the exi...

Страница 179: ... the DP120F DP125F auto matically prompts the secu rity code setting See the preceding section for details on setting the security code Press To set the activity period for Se cure RX press NOTE If a security code is not set the DP120F DP125F auto matically prompts the secu rity code setting See the preceding section for details on setting the security code Enter the current security code Then pre...

Страница 180: ...r each day of the week up to Sunday NOTE The day of the week is shown in line 1 of the LCD Selecting YES for Monday means Secure RX will be ac tive for the entire 24 hours of Monday The following is displayed for 2 seconds Press to return to the Standby Mode Secure RX Activation Period Setting continued Enter the Start and End Time 5 Select 24 HOUR SECURE RX Option 6 Set for Each Day 7 Complete th...

Страница 181: ...X Activation is set to OFF in the Secure RX Activation Period Setting an error will result upon press ing in the operation above The message NOT ALLOWED NOW will be dis played for 2 seconds then the screen returns to the Standby Mode To manually activate Secure RX press The following screen is dis played for 2 seconds to confirm your selection Then the display returns to the Standby Mode Secure RX...

Страница 182: ... NOW will be dis played for 2 seconds then the screen returns to the Standby Mode SECURE RX 1 START 2 PRINT Display the SECURE RX Menu 1 Secure RX Print Enter the 4 digit security code Then press The screen below is displayed for 2 seconds to indicate that Secure RX Print is selected If there are any received docu ments in memory the DP120F DP125F will print the docu ments automatically upon se le...

Страница 183: ...th the remote party always re quires this option Otherwise use the following procedure Load the document face down in the Document Tray see page 88 Adjust the resolution and con trast if desired see page 89 Enter the number of the remote facsimile using any of the fol lowing dialing methods One Touch Key Dialing See page 97 Abbreviated Dialing See page 98 Alphabet Dialing See page 99 Keypad Dialin...

Страница 184: ...nly You can activate this option while programming an Abbrevi ated Dial Number see page 70 or One Touch Dial Key setting see page 77 if communication with a specific remote party al ways requires this option Press Load the document face down in the Document Tray see page 88 Adjust the resolution and con trast if desired see page 89 Enter the number of the remote facsimile using any of the fol lowi...

Страница 185: ...ey Press Load the document face down in the Document Tray see page 88 Adjust the resolution and con trast if desired see page 89 Enter the number of the remote facsimile using any of the fol lowing dialing methods One Touch Key Dialing See page 97 Abbreviated Dialing See page 98 Alphabet Dialing See page 99 Keypad Dialing See page 100 Priority Transmission Load the Document 1 Display the PRIORITY ...

Страница 186: ...ect 9600 BPS press To select 4800 BPS press Turn the Flip Panel to the 50 73 view to select the desired Function Key Press Load the document face down in the Document Tray see page 88 Adjust the resolution and con trast if desired see page 89 Enter the number of the remote facsimile using any of the fol lowing dialing methods or you may designate another option at this point One Touch Key Dialing ...

Страница 187: ...use SUB SEP PWD refer to page 75 If you des ignate an erroneous or un necessary sub address the communication will result in an error Turn the Flip Panel to the 50 73 view to select the desired Function Key Press Load the document face down in the Document Tray see page 88 Adjust the resolution and con trast if desired see page 89 Select one of the following op tions from the menu To select SUB pr...

Страница 188: ... type To complete your sub address entry select option 1 COMPLETE in Step 3 When the sub address data has been entered the following is displayed Enter the number of the remote facsimile using any of the fol lowing dialing methods or you may designate another option at this point One Touch Key Dialing See page 97 Abbreviated Dialing See page 98 Alphabet Dialing See page 99 Keypad Dialing See page ...

Страница 189: ...e first page data of the facsimile will be printed but not the cover page data The cover sheet is always sent in Letter size The resolution for the cover sheet is fixed to FINE How ever if the receiving unit is set to STD the cover sheet is sent in STD Select the direct function access view on the Operation Panel Press To attach a cover sheet press Load the document face down in the Document Tray ...

Страница 190: ...e printed for retransmis sion only Remote Station ID printed when preset to the Abbrevi ated Dial Number or One Touch Dial Key used for dial ing Max 20 characters Your Station ID if preset max 40 characters Remote Name which was en tered using this operation Dialed Facsimile Number first 38 digits Your Name which was entered using this operation Your Facsimile Number max 20 digits Number of docume...

Страница 191: ... Line 2 Board is in stalled an error prompt will result from this application Load the document face down in the Document Tray see page 88 Adjust the resolution and con trast if desired see page 89 Select the desired option To not select a specific line press To select Line 1 press To select Line 2 press Enter the number of the remote facsimile using any of the fol lowing dialing methods or you ma...

Страница 192: ...ay see page 88 Adjust the resolution and con trast if desired see page 89 MAY 17 00 WED11 13 RESIDUAL MEMORY 100 ENTER TEL NUMBER Turn the Flip Panels to the 50 73 view to select the desired Function Key Press Display the SEND AFTER SCAN Menu 2 Select the desired Send After Scan Option To disable Send After Scan press The following screen is dis played You may dial the remote facsimile for your co...

Страница 193: ...end After Scan Temporarily contined Enter the Facsimile Number 5 Select the Memory Full Option 4 Select the desired Memory Full Option To delete the pages being scanned press To send the pages being scanned press The following screen is dis played You may now dial the remote facsimile for your com munication job The display will return to the Standby Mode in about 60 seconds if no keys are pressed...

Страница 194: ...mile will compare the number of pages actually sent with the number you entered Press Enter the number of document pages 1 to 999 The press Load the document face down in the Document Tray see page 88 Adjust the resolution and con trast if desired see page 89 Enter the number of the remote facsimile using any of the fol lowing dialing methods or you may designate another option at this point One T...

Страница 195: ...ment Tray see page 88 Adjust the resolution and con trast if desired see page 89 Turn ON the monitor speaker by pressing Enter the number of the remote facsimile using any of the fol lowing dialing methods or you may designate another option at this point One Touch Key Dialing See page 97 Abbreviated Dialing See page 98 Alphabet Dialing See page 99 Keypad Dialing See page 100 Line Monitor Load the...

Страница 196: ... Security Transmission by pressing Load the document face down in the Document Tray see page 88 Adjust the resolution and con trast if desired see page 89 Enter the number of the remote facsimile using any of the fol lowing dialing methods or you may designate another option at this point One Touch Key Dialing See page 97 Abbreviated Dialing See page 98 Alphabet Dialing See page 99 Keypad Dialing ...

Страница 197: ... the fax document on the report to facilitate identification To setup the Communication Report go to pages 197 to 203 RECEPTION LIST The DP120F DP125F will print a reception list under the following conditions Reservation to Local Mailbox When reserving a document to a Mailbox within the DP120F DP125F locally a reception list is printed Remote Mailbox When reserving a document to a Mailbox within ...

Страница 198: ...nal when is used press To print a RX Journal when is used press The following screen is dis played to confirm your selec tion OPERATION COMPLETED MANUAL OUTPUT Options 3 After completing the Reception Journal Setting you may con tinue to select other Report set tings referring to their associ ated pages for instruction or press to exit the Report Setting mode and return to the Standby Mode After c...

Страница 199: ...D To reduce the report size and print on A5 size paper press To print the report normally press NOTES To print the report on A5 size paper the A5 size paper must be loaded to the Bypass Tray option for DP120F in portrait and the recording paper size must also be set to OTHERS If no paper is loaded in the Bypass Tray the re port will be printed from another tray The following screen is dis played t...

Страница 200: ...emory TX 2 Set the Option for First Page Image 3 PRINT 1ST PG IMAGE 1 ON 2 OFF A5 SIZE PRINT 1 ON 2 OFF OPERATION COMPLETED To reduce the report size and print on A5 size paper press To print the report normally press NOTES To print the report on the A5 size paper the A5 size paper must be load ed to the Bypass Tray option for DP120F in portrait and the record ing paper size must also be set to OT...

Страница 201: ...Reports press To print a first page image of the document on the transmis sion report press To not print a first page image of the document on the trans mission report press The following screen is dis played to confirm your selection Select the Option for Multi Address TX 2 PRINT 1ST PG IMAGE 1 ON 2 OFF OPERATION COMPLETED After completing the Mult Ad dress Transmission Report Set ting you may co...

Страница 202: ...ed press To turn OFF automatic printing of this report press The following screen is dis played to confirm your selection SET MULTIPOLL REPORT 1 ALWAYS 2 ON ERROR 3 OFF OPERATION COMPLETED After completing the Multi poll ing Report Setting you may continue to select other Report settings referring to their associ ated pages for instruction or press to exit the Report Setting mode and return to the...

Страница 203: ...ress To print a first page image of the facsimile document on the trans mission report press To not print a first page image of the facsimile document on the transmission report press The following screen is dis played to confirm your selection Select the Option for Relay Originator 2 Set the Option for First Page Image 3 SET RELAY ORG REPT 1 ALWAYS 2 ON ERROR 3 OFF PRINT 1ST PG IMAGE 1 ON 2 OFF O...

Страница 204: ...reports press Go to Step 12 To print a first page image of the document press To not print a first page image of the document press The following screen is dis played to confirm your selection PRINT 1ST PG IMAGE 1 ON 2 OFF Display the RELAY STN REPORT Menu 1 Set the Option for Relay Hub Station 2 Set the Option for First Page Image 3 OPERATION COMPLETED After completing the Relay Sta tion Transmis...

Страница 205: ... To turn OFF Automatic sending of report press To send a first page image of the facsimile document press To not send a first page image of the facsimile document press The following screen is dis played to confirm your selection OPERATION COMPLETED PRINT 1ST PG IMAGE 1 ON 2 OFF SET RELAY END REPORT 1 ALWAYS 2 ON ERROR 3 OFF Select the Option for End Terminal 2 Set the Option for First Page Image ...

Страница 206: ...E MAILBOX is selected in Step 2 the follow ing screen displays Reception List Settings Select the Job for Reception List 2 RELAY RECEPTION LIST 5 LOCAL MAILBOX LIST 3 REMOTE MAILBOX LIST 4 OPERATION COMPLETED OPERATION COMPLETED OPERATION COMPLETED RELAY RECEPTION LIST 1 ON 2 OFF LOCAL MAILBOX LIST 1 ON 2 OFF REMOTE MAILBOX LIST 1 ON 2 OFF Display the RECEPTION LIST Menu 1 To turn ON press To turn...

Страница 207: ...report List Report Name Machine Counter Information Serial No lists the trans missions in the order they took place File No assigned to all com munication jobs at the time of scanning Date and Time the communication started Length of each transaction Minutes Seconds Number of Pages Remote Station s Fax Telephone Num ber is alternate number or sub ad dress dial was used Department No indicates the ...

Страница 208: ...ER Menu 1 Manual Print Printing will start when is pressed with no document loaded in the Document Tray PRINT NUMBER 1 1 50 1 PAGE 2 1 100 2 PAGES 3 1 150 3 PAGES Select the Option 2 Select one of the following op erations from the menu To print the 50 communication Journal press To print the 100 communication Journal press To print the 150 communication Journal press ...

Страница 209: ...uto Print if programmed see page 197 Printing will automatically start after a transmission is completed This is the result report printed after a Direct Transmission a job transmitted directly from the document feeder instead of from memory The print format is the same as that for the Transmission Journal on the preceding page except that the record of the only last transmission job is issued in ...

Страница 210: ...me when the job is accepted Remote Party s Name or Facsimile Tele phone Number Number of pages input to memory Time when the transmission started Time when the transmission ended the time when a Recovery Transmission is designated Number of pages transmitted normally Transmission result Auto Print if programmed see page 198 Printing will automatically start after a transmission is completed This i...

Страница 211: ...OUP 1001 1002 1999 POLLING FAX MAILBOX FILE NBR FUNCTION PGS MAIL DATE TIME TO 961 POLLING 099 MAY 13 17 30 RECOVERY TX FILE NBR FUNCTION PGS MAIL DATE TIME TO 970 SINGLE TX MAY 15 14 20 123 4567 PC JOB FILE NBR FUNCTION PGS MAIL DATE TIME TO Type of communication Box Number in case of Mailbox communication Destination Name or Dial Number of the Remote Party This is a listing of the communi cation...

Страница 212: ... 01 TSRQRPONMLKJIHGFEDCBA TEL NUMBER 12345678901234567890 UNSUCCESSFUL SENT PAGES GROUP NUMBER 0002 AABBCCDDEEFFGGHHIIJJ 0T 33 AAABBBCCCDDDEEEFFFGG 01 Auto Print if programmed see page 199 Printing will automatically start after all transmissions in the operation have been completed successfully or unsuccessfully This is the result report printed after a Multi address Transmis sion Receiver where ...

Страница 213: ... 007 008 009 010 OT 02 05 ABB NUMBER 014 HONG KONG OFFICE TEL NUMBER 1234567890123456789 UNSUCCESSFUL SENT PAGES GROUP NUMBER 0002 AABBCCDDEEFFGGHHIIJJ 0T 33 AAABBBCCCDDDEEEFFFGG 01 Auto Print if programmed see page 200 Printing will automatically start after all polling opera tions have been completed successfully or unsuccess fully This is the result report printed after a Multi polling Receptio...

Страница 214: ...e Relay Transmission was performed successfully Group Number Relay Station Name or Number End Terminal One Touch or Abbreviated Dial Numbers NOTE The format sample above is obtained when a Relay Transmission was performed with Group designations When a Relay Transmission is performed with individual designations the Group Number print is skipped Relay Transmission Originator Report Printing Proced...

Страница 215: ... station in a relay operation completes all of the transmissions as signed to it successfully or unsuccessfully This is the Relay Station result report output by the Relay Sta tion and printed after a Relay Transmission Each Relay Group to which the Relay Transmission was not completed SENT PAGES Number of pages sent normally Each Relay Group to which the Relay Transmission was performed successfu...

Страница 216: ...utomatically start after the relay station s report on the success or fail ure of the individual commu nications in the relay opera tion This is the End Terminal result report sent from the Relay Sta tion to the Originating Terminal and printed by the Originating Terminal Each Relay Group to which the Relay Transmission was not completed SENT PAGES Number of pages sent normally Each Relay Group to...

Страница 217: ...if programmed see page 204 Printing will automatically start upon receiving a re quest to perform a relay op eration The list is output on the Relay Station upon receiving a relay request File Number assigned by the Relay Station when the Relay request is received by the Relay Station Time and Date the Relay request is received Relay Group Numbers Number of documents received to memory by the Re l...

Страница 218: ... 01 OT 01 GROUP 0001 Issues a list of the documents reserved through the local i e your own station and remote stations using the Open Mail box System ITU T Compatible F code Communication To display the main menu press Mailbox Relay Box ITU T Compatible F code Communication List Printing Procedure To select 2 LISTS press Then to select 3 ITU MAIL BOX press 1 COMM OPTIONS 2 LISTS 3 INITIAL SETUP 4...

Страница 219: ...sed for the Department Control Mode To display the main menu press Available only when the Department Control Mode option is selected Department No Department Name Department Code for operating the department Accumulated number of pages operated by the department Sent NOTE The list shown is produced when the Master code 01 is used to initiate the print list operation If a user code 02 99 is used o...

Страница 220: ...phabetical Sort List as part of one operation se quence or individually one by one Issues all four lists one after another in one operation se quence The following will be printed For the print format and description of printed items see the page listed below Abbreviated Dial Number List page 220 Group Number List page 221 One Touch Number List page 222 Preset Dialing Number Lists All of Lists Pri...

Страница 221: ...ICE ABB 109 999999999 NEW YORK OFFICE ABB 900 333 912345678 Issues a listing of names pro grammed to Abbreviated Dial Numbers One Touch Keys and Group Numbers Turn the Flip Panel to the 50 73 view to select the desired Function Key Press Names of Abbreviated Dial Number One Touch Key or Group Number OT One Touch Key Numbers ABB Abbreviated Dial Numbers Group Group Number Preset Dialing Number List...

Страница 222: ...f Sub address Designated Time Line Monitoring Communication Speed Limit x 100 TX Report Issue Non issue Status Attached Fax Option Status if any Preset Dialing Number Lists continued Abbreviated Dial Number List Printing Procedure To select 2 ABB NUMBERS press TELEPHONE NBRS LIST 1 BY NAME 2 ABB NUMBERS 3 GROUP NUMBERS 4 ONE TOUCH NBRS 5 ALL REPORT ABB NBR NAME TEL NUMBER E MAIL ADDRESS TIME MONI ...

Страница 223: ...rinting Procedure To select 3 GROUP NUM BERS press Group Number TELEPHONE NBRS LIST 1 BY NAME 2 ABB NUMBERS 3 GROUP NUMBERS 4 ONE TOUCH NBRS 5 ALL REPORT GROUP NUMBER NAME OT ABB NUMBER 0001 ABCDEFGHIJKLMNOPQRST OT 01 02 03 04 05 06 07 08 09 10 11 12 13 14 15 16 17 18 19 20 ABB 001 002 003 004 005 006 007 008 009 010 011 012 013 014 015 016 017 018 019 020 021 022 023 024 025 026 027 028 029 030 0...

Страница 224: ...address Preset Dialing Number Lists continued One Touch Number List Designated Time Line Monitoring Communication Speed Limit x 100 TX Report Issue Non issue Status Attached Facsimile Option Status if any Printing Procedure To select 4 ONE TOUCH NBRS press TELEPHONE NBRS LIST 1 BY NAME 2 ABB NUMBERS 3 GROUP NUMBERS 4 ONE TOUCH NBRS 5 ALL REPORT ONE TOUCH NUMBER INFORMATION OT NBR NAME FUNCTION ABB...

Страница 225: ...TX RX TX SETTINGS MEMORY TX ON SECURITY TX OFF COVER SHEET OFF RECOVERY TX OFF TTI INSIDE SEND AFTER SCAN OFF RX SETTINGS SECURE RX OFF MEMORY RX ON RX REDUCTION ON DISCARD ON REV ORDER PRINT OFF PRIVILEGED RX OFF RTI OFF RX MULTI COPY 1 REPORT LIST JOURNAL MANUAL TX RX AUTO ON FAX POLL RELAY REPORTS COMMUNICATION REPORT ON ERROR A5 SIZE PRINT OFF MEMORY TX ON ERROR IMAGE A5 SIZE PRINT OFF MULTI T...

Страница 226: ... CODE 06 PRINTER DENSITY 07 DOCUMENT LENGTH 08 LINE MONITOR 09 RECEIVE INTERVAL 10 ECM 11 DOCUMENT MODE 12 COLLATE COPY 13 LETTER HEAD PAPER 14 REDIAL MODE 01 INTERVAL 02 COUNTER 15 AUTO RECEIVE MODE 16 LINE 2 MODE 2 TX SETTINGS 01 MEMORY TX 02 SECURITY TX 3 RX SETTINGS 01 SECURE RX 02 MEMORY RX 03 RX REDUCTION 04 DISCARD 05 REV ORDER PRINT 06 PRIVILEGED RX 07 RTI 08 RX MULTI COPY 4 REPORTS LIST 0...

Страница 227: ... after recovery from a power fail ure event Type of communication Box Number in case of Mailbox communication Station where the communication or the Mailbox is input Power Failure List File Number of the communication Time of Input Printing Procedure TX RX FILE NBR FUNCTION 001 MULTI TX 005 POLLING RX 006 PRG CONT POLL 010 MULTI POLLING POLLING FAX M BOX MAIL BOX FILE NBR FUNCTION MAIL FROM DATE T...

Страница 228: ...lete unneed numbers alter nate numbers and unnecessary pauses Use shorter names for the dialing addresses BROKEN REGISTRATION POWER FAILURE SCANNER COVER OPEN TOP COVER OPEN MEMORY OVERFLOW DOCUMENT JAM PAPER JAM XX UPPER PAPER EMPTY TROUBLESHOOTING ENTRY MEMORY FULL MIDDLE PAPER EMPTY The maximum number of manu ally input phone numbers 100 has been reached Split your transmission into two or more...

Страница 229: ...e tween the telephone line jack and the LINE2 connector on the right side of the machine see page 18 With the Optional NIC board installed a net work connection is not detected Insure you have a proper network connection If the same error message is displayed again call your service representative Optional NIC board is out of order Network related features do not work Power your machine off then b...

Страница 230: ...red within the Drum Developer section of the paper transport path A paper jam has occurred within the paper exit section of the paper transport path Open the right side access door and clear any paper Then draw out the Recording Paper Tray upper and remove any jammed recording paper Open the right side access door and clear any paper Then draw out the Recording Paper Tray middle and remove any jam...

Страница 231: ...ed call your ser vice representative Power the unit ON OFF then retry Retry the transmission or ask the remote party to transmit the docu ment again Check the actual document count Check polling options setup securi ty code etc and check if the poll ing document exists Error Code Cause How to Correct 42 50 53 B0 B5 C0 C4 D0 D2 F0 F1 87 Memory Overflow Line Busy Security Mismatch in Relay or Mailbo...

Страница 232: ...ner Cover is not closed fully Clear the error Make sure the power plug is plugged into the AC outlet and the power switch is ON Send the document again be ing sure to press before returning the handset Check the modular cord con nection between the wall socket and the facsimile Set the correct Dial Type in accordance with the line used for the facsimile see page 44 Try a voice call through the han...

Страница 233: ...latching po sitions After the recording pa per has been re placed a PAPER EMPTY error mes sage remains on the LCD display The received docu ment is difficult to read Unnecessary lines are printed You receive a docu ment that is complete ly blank even though you and the remote party followed the cor rect procedures Recording paper jam occurs frequently Problem Cause Solution The recording paper is ...

Страница 234: ... ment Check for pieces of pa per clips or staples which may have caused the failure Firmly close the Scanner Cover Confirm that the LCD display indicates that the facsimile is in the Standby Mode NOTE As for a document that has jammed in the facsimile make a duplicate using a copier and do the transmis sion over again with the new duplicate used as the send ing document Clearing a Document Jam Rem...

Страница 235: ...y closed Remove the Developer Assem bly with the Drum Unit IMPORTANT Never touch the photo conductive drum the green surface of the Drum Unit If the surface is scarred or scratched it will cause print quality problems While removing any jammed paper do not ex pose the photoconduc tive drum of the Drum Unit to light for more than 3 minutes If the Drum Unit is to be left any where outside the fac si...

Страница 236: ...e Top Cover firmly IMPORTANT When closing the Right Side Cover close it firmly until a click sound is heard on both sides When the Top Cover is closed the unit automati cally returns to the Standby Mode If there is any received document stored in memory If a recording paper jam oc curs during a reception the received documents are au tomatically stored in memo ry In that case the facsimi le will a...

Страница 237: ...te When the Recorded Image is not Clear Open the Scanner Cover 1 Wipe the Glass Surface and White Plate 2 Scanner Cover Release Button Glass Document Scanner Cleaning Procedure Vertical black line s Vertical white line s Horizontal black line s Horizontal white line s Faint or blurred print Stained If the problem occurs during both a transmission and in copy mode check the Document Scanner Unit If...

Страница 238: ... Close the Scanner Cover Make sure that the hooks on both sides are firmly latched Close the Scanner Cover 4 079 When the Recorded Image is not Clear continued Document Scanner Cleaning Procedure continued ...

Страница 239: ...d IMPORTANT Never touch the photo conductive drum the green surface of the Drum Unit If the surface is scarred or scratched it will cause print quality problems Do not expose the pho toconductive drum of the Drum Unit to light for more than 3 minutes If the Drum Unit is to be left anywhere outside the facsimile be certain to cover it with cloth pa per etc Clean the Transfer Wire and Discharge Wire...

Страница 240: ...ght side of the developer chas sis Separate the Drum Unit from the Developer Assembly Clean the Charger Wire 10 Clean the Charger Wire in the Drum Unit with a Charger Cleaner Insert the Charger Cleaner per pendicularly until it contacts the case Then move the Charger Cleaner in one direc tion horizontally slowly WARNING Moving the Charger Cleaner quickly or at an incorrect angle may damage or brea...

Страница 241: ...ring blade and black toner roller with a Mylar Scraper Install the Developer Assem bly with the Drum Unit at tached and close the Top Cover When the Top Cover is closed the unit automati cally returns to the Standby Mode Clean the Metering Blade 11 Attach the Drum Unit to the Developer Assembly 14 Return the Developer Assembly with Drum Unit and Close the Top Cover 15 Mylar Sheet Cotton Swab Meter...

Страница 242: ...page PHONE BOOK DATA TEST Checks the phone book data NOTE AUTO TEST cannot be performed if the data such as re ceived data delayed transmission or polling data is stored in the memory Press 1 AUTO TEST 2 INDIVIDUAL TEST 3 TEST RESULT LIST Select the AUTO TEST Menu 2 Press The auto test starts appears on the screen indicating that the test is under way Completed the AUTO TEST 3 When all the tests e...

Страница 243: ...EST 04 LCD TEST 05 SPEAKER TEST 06 SWITCH TEST 07 TEST PRINT NOTE Only 4 selections can be displayed at one time Enter the INDIVIDUAL TEST Menu 1 Select the Desired INDIVIDUAL TEST 01 07 2 Press or until the desired INDIVIDUAL TEST is displayed or enter the de sired INDIVIDUAL TEST 01 through 07 using the dial key pad INDIVIDUAL TEST MODE ...

Страница 244: ...e displayed at the lower right on the screen If a document jam occurs dur ing transport the screen below is displayed ADF TEST PAGES 001 ADF TEST START TO RESTART OR STOP TO COMPLETED PAGES XXX ADF TEST DOCUMENT JAM PAGES XXX Load the Document 2 To Continue or Exit the Test 3 To continue the ADF test press Load the documents again then press To end the test press ADF TEST PAGE NUMBER CORRECT 1 YES...

Страница 245: ...T continued Completed the ADF TEST 5 The word OPERATION COM PLETED is displayed on the screen and the unit returns to the individual test selection screen The result of the ADF test can be confirmed with the self test report To print the self test re port refer to PRINTING A TEST RESULT on page 252 If the result of the ADF test is judged to be NG call your ser vice representative ...

Страница 246: ...e individual test Unless is pressed within 10 seconds after the screen in Step 2 is displayed the test result is judged to be NG NOTE If you press before you press every other key the machine will reset to the Individual Test menu screen and no test result will be is sued KEY TEST OK The result of the key test can be confirmed with the self test report To print the self test re port refer to PRINT...

Страница 247: ...RESULT 1 OK 2 NG Select the Test Result Option 3 If all the LEDs are turn on press If even one LED is not lit press Completed the LED TEST 4 The word OPERATION COM PLETED is displayed on the screen and the unit returns to the individual test selection screen The result of the LED test can be confirmed with the self test report To print the self test re port refer to PRINTING A TEST RESULT on page ...

Страница 248: ...y The test result input screen is displayed five sec onds after the elements turn off LCD TEST ENTER TEST RESULT 1 OK 2 NG Select the Test Result Option 3 If all elements of the LCD turn on and off normally press If even one elements fails to turn on and off press Completed the LCD TEST 4 The word OPERATION COM PLETED is displayed on the screen and the unit returns to the individual test selection...

Страница 249: ...l the volumes are output normally After checking press SPEAKER TEST ENTER TEST RESULT 1 OK 2 NG Select the Test Result Option 3 If all volumes are output nor mally press If even one of them is not out put normally press Completed the SPEAKER TEST 4 The word OPERATION COM PLETED is displayed on the screen and the unit returns to the individual test selection screen The result of the speaker test ca...

Страница 250: ...thin 10 seconds after an opera tional instruction is displayed on the screen during the switch test the test result will be judged to be NG SWITCH TEST OPEN SCANNER COVER Check the Scanner Cover 2 Open the Scanner Cover When its open state is de tected the screen below ap pears After checking that the screen is displayed close the Scanner Cover Detects the open state of the Scanner Cover SWITCH TE...

Страница 251: ...he absence of a Process Unit SWITCH TEST PUT IN THE PROCESS UNIT SWITCH TEST UNLOAD PAPER IN THE BYPASS TRAY Install the Process Unit If no Bypass Tray is installed or no recording paper is placed in the Bypass Tray the screen below is displayed Check the Bypass Tray If Installed 6 Check the Process Unit Drum Unit with Developer Assembly 5 DOES THIS MACHINE HAVE A BYPASS TRAY 1 YES 2 NO Remove the...

Страница 252: ...If one Flip Panel is set on ei ther side move the Flip Panel on the right hand side to the left hand side and then move them to the right hand side SWITCH TEST OK Completed the SWITCH TEST 8 The result of the switch test can be confirmed with the self test report To print the self test report refer to PRINTING A TEST RESULT on page 252 If the result of the switch test is judged to be NG call your ...

Страница 253: ...ST PRINT Menu 1 The test print checks the print function by printing a test pat tern Press MAY 17 00 WED11 13 RESULT MEMORY 100 PRINTING LIST The test pattern is printed and the unit returns to the standby mode screen Print Sample ...

Страница 254: ...the results of the individual tests as a self test report PRINTING a TEST RESULT Select the TEST RESULT Menu 1 Press After completion of the list out put the display returns to the standby mode screen Print Sample Print Sample TEST RESULT ...

Страница 255: ... service center to retrieve information and reports set various machine settings program data and upgrading the firmware in the machine A separate contract with the service center will be required to receive this RDC service NOTES This capability is currently under development and is not yet available This RDC Service will be restricted to TOSHIBA trained technicians working for TOSHIBA authorized...

Страница 256: ...ine can automatically send an order sheet to a designated fax machine informing your supplier that a replacement Drum Kit or Toner Kit is required Contact your local authorized dealer for information on this setting NOTE This function is not available in the United States ...

Страница 257: ... mW wavelength 780 nm Memory Capacity Standard 3MB for DP120F 7MB for DP125F Optional Memory Card 4 MB Board DP120F only Machine Type Desktop type with both transmission and re ception functions Applicable Networks PSTN Public Switched Telephone Network Power Required 120 VAC 60 Hz Power Consumed Max 550 W operating 2 W or less standby in Super Power Saver mode Unit Dimensions Width 590 mm 23 2 in...

Страница 258: ...Kit TK 15 Developer Unit DU 15 2nd NCU Board with V 34 Modem GD 1030 US DP120F only Memory Board 4MB GC 1030 DP120F only Recording Paper Tray FU 15L Bypass Tray DP120F only BC 15 Handset HD 15 PCL Print Kit GA 1020 NIC Kit GF 1010 Internet FAX Kit GD 1040 SUPPLIES HARDWARE OPTIONS ...

Страница 259: ...257 TOSHIBA Viewer OPERATOR S MANUAL ...

Страница 260: ...on or Training i Any other uses not included in Permitted Uses above which would require a licence to use the copyright in the software The license contained in this agreement will terminate automatically and without notice from Wordcraft International Limited if any provision in this agreement is not complied with GOVERNING LAW This agreement shall be governed by the laws of the United Kingdom of...

Страница 261: ...F THE FUNCTIONS 269 Description of the Main Welcome Menu 269 Browse Folders 270 Changing the Device Configuration 270 Saving the Device Configuration 273 Add Edit Phonebook contacts on the DP120F DP125F 275 Saving the Phonebook 277 Creating a Routing Rules 279 Finding items stored in TOSHIBA Viewer folders 280 Creating Folder 281 File Scan 282 Scanning with your DP120F DP125F or other TWAIN compat...

Страница 262: ...onebooks for frequently used fax numbers and e mail addresses Creating graphics files in the Unimessage Pro Viewer Storing properties of files in the Unimessage Pro folders to be used with TOSHIBA Viewer s sophisticated search engine Routing of scanned images using TOSHIBA Viewer s simple wizard style Routing Rules This manual gives instructions on how to install TOSHIBA Viewer and basic informati...

Страница 263: ...dition Microsoft Windows 95 OSR1 Service Pack 1 is recommended 32M Bytes minimum 64M Bytes recommended for Windows 98 Second Edition and Windows NT 4 0 When using Windows NT4 0 please ensure that Microsoft NT4 0 Service Pack 4 or later is installed Display A 24 bit color video card and driver is recommended Configuration of the CD ROM The configuration of the CD ROM and the purposes for each folde...

Страница 264: ...ected to your PC is powered on Installation Prompts may vary de pending on your PC con figuration The screens show exam ples of Windows 95 Click Start and select Run Type D Toshiba Viewer Setup exe where D is your CD ROM drive Click OK Click OK 3 Click Next 4 1 Insert the CD ROM Type D Toshiba Viewer Setup exe 2 Start the Installation Select Language NOTE You can install the drivers by Plug and Pl...

Страница 265: ...uter before using the TOSHIBA Viewer After restarting the computer the Unimessage Pro de vice wizard automatically runs 9 Installation continued Click Next 8 Wait until file copying files is completed The Setup Complete screen automatically appears Installing the TOSHIBA Viewer continued Read the Software License Agreement 5 Choose the Destination Location 6 Select the Program Folder Start the Cop...

Страница 266: ...ps for each device Every time you operate the device setup a new TOSHIBA Viewer utility is created DeviceSetup Enter the details for each entry field NOTE At least Name Organization Address Country Telephone number and Fax number must be entered The Address entry must be more than 20 letters After all required entries are completed click Next 1 Select Yes select a device connected to this computer...

Страница 267: ...nstalling the TOSHIBA Viewer continued Device Setup continued Default System Device Name and Descriptive Device Name are already entered Rename them if required 3 Click Next Select the manufacturer of your fax and the device model Enter System Device Name and Descriptive Device Name Select Custom for the type of Setup 5 4 ...

Страница 268: ...the DP120F DP125F prints using a TOSHIBA Viewer driver TOSHIBA Viewer will ask if a printer driver for the DP120F DP125F should be created or not If you choose to create this printer it will be named after the DP120F DP125F but you can edit this name if you prefer Click Next NOTE If you choose not to create the print printer driver during the definition of the device or it is deleted you can creat...

Страница 269: ...Select whether to creat a shortcut and the location Complete the device setup TOSHIBA Viewer starts 11 10 9 Click Next NOTE If you want to install several TOSHIBA Viewers it is required to change the name of the shortcut to avoid the name being overlapped Click Finish ...

Страница 270: ...Remove Programs Click Add Remove Click Yes Exit all applications running on your machine and click OK After removing files is completed click OK NOTE During the uninstallation the confirmation dialogs for removing the shared files appear Click OK to delete all shared files in the TOSHIBA Viewer pro gram folder Restart your computer to complete the uninstallation Some files are deleted after restar...

Страница 271: ...rogress of messages examine the lists of received transmitted filed messages and print these lists or individual messages Copy This combines the functions of TWAIN scanning and printing and allows you to make multiple hardcopies of a document in the automatic document feeder of the TWAIN scanner File Scan This takes you to the TWAIN scanner driver or for DP120F DP125F the TOSHIBA Viewer Scan setup...

Страница 272: ...p tions of the each menu item select Contents and Index in Help menu to view the Help The remainder of the screen is divided into two parts On the left is the list of available folders To open a folder in the right pane click its name in the folder tree If a folder contains any unread items TOSHIBA Viewer will display the number of unread items within each folder after each folder s name in this s...

Страница 273: ...be worked as a printer and or scanner using the TOSHIBA Viewer When you want to change the port go to Step 2b When you want to configure the device settings click on Setup and go to Step 3 When you want to save changes click on OK 2a Change the device settings 2b Change the port Click on Port tab Select the port that your computer connects to your DP120F DP125F Click on OK to save changes ...

Страница 274: ... When you want to change the device settings file by copying the settings from a set file lo cated on your hard disk go to Step 3b When you want to change the device settings file by copying the settings from a user set tings file stored within TOSHIBA Viewer go to Step 3c For additional information on a specific item refer to Help and the appropriate section of the DP120F DP125F Operator s Manual...

Страница 275: ...ur DP120F DP125F Back to Step 2a NOTE Click the button to cancel adding editing the device configu ration Back to Step 2a SavingtheDeviceConfiguration 1 Open the Device folder The device setting file opened by TOSHIBA Viewer default name TOSHIBA is a temporary working file Every time TOSHIBA Viewer is opened the program accesses the attached facsimile and reads the current settings You can store t...

Страница 276: ...sing the left mouse button the contents of the device settings file are copied to the new settings file To save the new settings within the TOSHIBA Viewer go to Step 4a To save the new settings as a file on your local hard disk go to Step 4b Save new settings 4 Right click on the new settings file and select Save NOTE When you click the ü button or button to close the screen TOSHIBA Viewer will pr...

Страница 277: ...bb Number in the right pane Tel List Entry appears at the end of the existing list Double click on the desired items and enter the appropriate values To edit phonebook contacts double click on the item you want to edit then enter the new data Click the ü button to download the new settings to your DP120F DP125F Click the button to cancel adding editing the phonebook contacts When you want to chang...

Страница 278: ...esired set file select the file then click on Open The set file is loaded Continue to Step 2c Left click and hold on the user phonebook file then drag it to the device phonebook file and release the left mouse button NOTE Initially your mouse pointer will become a circle with diagonal line Upon reaching the desired phonebook file the pointer will take the form of an address label Upon releasing th...

Страница 279: ...to the new phonebook file To save the new settings within TOSHIBA Viewer go to Step 3a To save the new phonebook as a file on your local hard disk go to Step 3b 2 1 Open the Device folder The device phonebook opened by TOSHIBA Viewer default name TOSHIBA is a temporary working file Every time TOSHIBA Viewer is opened the program accesses the attached facsimile and reads the current phonebook setti...

Страница 280: ...er 3a Right click on the new phonebook file and select Save as The Save settings screen appears Designate the location on your hard disk and enter an appropriate file name then click on OK NOTE The phonebook file is saved as a set file on your hard disk The file extension is set This file can be retrieved by TOSHIBA Viewer Save as a file on your hard disk 3b Browse Folders continued Saving the Pho...

Страница 281: ...p plied with TOSHIBA Viewer To activate them go to the Routing Rules dialog select a suitable sample to base your own rule on click Copy click Modify enter the incomplete information and click Finish to store the completed rule For further details of Routing Rules click Help on the Routing Rules dialog to view related help topic Click New to create a new rule Routing Rules Wizard appears 2 Check o...

Страница 282: ... You can also search folders by selecting the Search history In order to search in the specific folder right click on the specific folder and select Find 1 Click Find icon 2 Define a new search Find icon Check on Include subfolders when you want to search folders in subfolders as well Click OK Searching starts For further details of searching click Help on the Search dialog to view a related help ...

Страница 283: ...rence to it within TOSHIBA Viewer If you drag from a TOSHIBA Viewer folder to another TOSHIBA Viewer folder TOSHIBA Viewer will normally copy the file to the target TOSHIBA Viewer folder However if the source references a file outside of the TOSHIBA Viewer folder structure i e was dragged in from a Windows Explorer folder only the reference to the external file is moved or copied If you open an im...

Страница 284: ...compatible application you are run ning e g PaintShop Pro Corel Photo Paint etc File Scan also provides a function that allows you to build a multi page docu ment from several sepa rate TWAIN scans This is useful if you want to scan different pages with different settings or if you want scan both sides of a document NOTE You can also operate the scan from the Main TOSHIBA Viewer Dis play However i...

Страница 285: ...all scanned pages are added into a document If you want to continue scanning repeat from step 3 to 4 NOTE You can add the scanned pages in desired order to create a multi page document For further details of the Scan multiple pages dialog click Help to view a related help topic Click OK Click OK For further details of the New message received dialog click Help to view a related help topic ...

Страница 286: ...dows printer drivers in Printers folder If you have not created you can also create a TOSHIBA Viewer GDI Printer from the Main TOSHIBA Viewer Dis play To create a GDI Printer refer to Changing the Device Configuration on page 270 Printing from TOSHIBA Viewer UniPad The TOSHIBA Viewer UniPad is the viewer in corporated into TOSHIBA Viewer The UniPad can view the scanned image UniPad is opened Selec...

Страница 287: ...ple with Windows NotePad The procedure may vary depending on the application Select Page Setup in File menu Page Setup dialog appears Click Printer Page Setup for Printer dialog appears Select DP120F DP125F Printer for Name Ckick Properties for general operation for printer properties Printer properties dialog appears Click OK Click OK on Page Setup for Printer dialog Back to Page Setup dialog ...

Страница 288: ...iewer GDI Printer continued Printing from Other Application continued 4 Set print settings Click OK Page Setup dialog is closed Select Print in File menu The print job is sent to DP120F DP125F The document is printed ...

Страница 289: ...cal Hub 161 Reception 122 ChainDial 166 CharacterEntry 36 Delete 37 Insertion 37 Replacing 37 Cleaning DocumentScannerCleaning 235 RecordingUnitCleaning 237 CommunicationJournal 205 Settings 195 CommunicationStatus Display and Print Transmission Report 120 Displaying Current Job Status 120 ConfidentialBox 149 ConfigurationSummary 45 ContinuousPolling 145 Contrast Setting 90 CopyReduction 95 Copyin...

Страница 290: ...Tray 19 Document Length Setting 60 Loading 88 DrumUnitReplacement 31 E ECM ErrorCorrectionMode Default ECM Setting 63 DisablingECMTemporarily 172 Error Codes Printed on Report 229 ErrorMessages 226 F File Number and Residual Memory 101 Front View 10 Function Keys 15 Discard see Reception Settings Function List 223 FuserCleaner Installation 27 Replacement 30 G Group GroupBroadcastTransmission 123 G...

Страница 291: ...onJournalSettings 195 CommunicationReportSettings 195 MailboxCommunications OpenMailbox 137 Overview 136 Reception List Settings 205 M Mailbox ITU TCompatible 149 Cancelling a Document in a Mailbox Local Hub 161 Deleting a Mailbox 151 DeletingDocuments 161 Mailbox List 216 Overview 136 Printing a Document from a Mailbox Local Hub 159 Reserving a Document to a Mailbox Local Hub 155 Retrieving Polli...

Страница 292: ...79 Quick Start 34 R RearView 11 Receiving 112 Automatic Receiving Mode 112 ManualReceivingMode 112 Selecting Quick Start 34 The Receiving Mode 112 Receiving Interval Setting 62 ReceptionJournal 205 Automatic Output 196 ManualOutput 196 Settings 195 Reception List Settings see Lists And Reports Settings ReceptionSettings Discard 114 Multi CopySetting 116 Reduction 113 Reverse Order Printing Setting...

Страница 293: ...y Polling Reservation 138 Security Transmission 194 Send After Scan Default Setting 92 Temporarily 190 SeparatorPageSetting CopySeparatorPage 53 Facsimile Separator Page 53 PC Print Separator Page 53 Setup Document Exit Tray 19 Facsimile Machine Installation 18 Printing Supplies Installation 20 Quick Start 34 Receiving 34 Unpacking 16 UserInterfaceOperation 35 Simple Polling 141 Simple Polling Res...

Страница 294: ...dCommunication TimeDesignation 181 DialingwithSub Address 185 LineMonitor 193 Line Selection 189 LowSpeedTransmission 184 Priority Transmission 183 Security Transmission 194 Send After Scan Temporarily 190 Setting the Page Count 192 TransmissionReport 207 Troubleshooting 226 Clearing a Document Jam 232 Clearing a Recording Paper Jam 233 Error Codes Printed on Reports 229 ErrorMessages 226 Receptio...

Страница 295: ... Copyright TOSHIBA TEC CORPORATION 2000 ALL RIGHTS RESERVED DP120F DP125F Printed in Japan ...

Отзывы: