background image

U

SING

 T

HE

 M

EDIA

 F

RAME

24

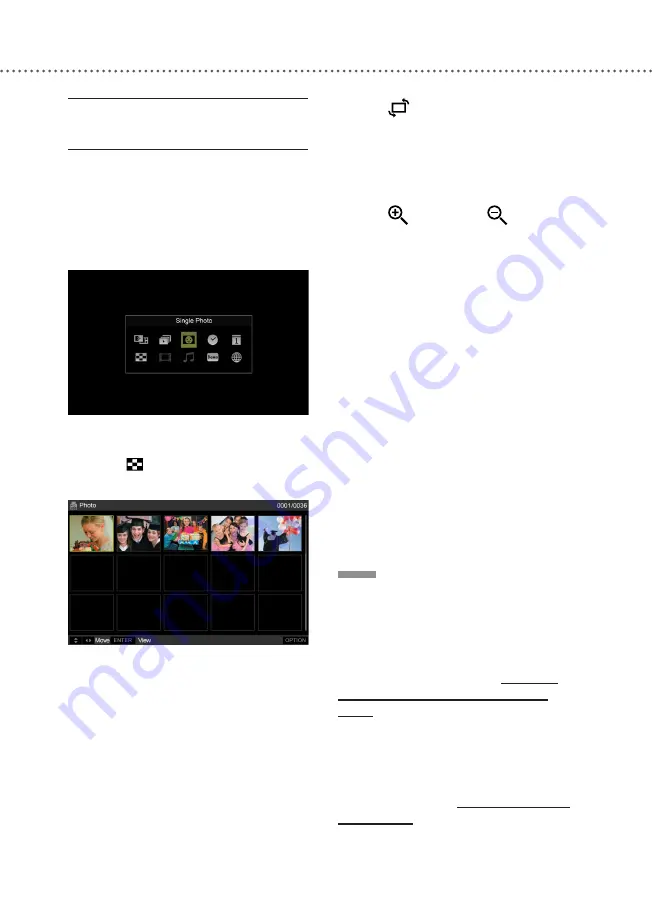
SINGLE


PHOTO


MODE


1

Press 

MODE

 to bring up the Mode 

menu.

2

Press ▲▼◄► or press 

MODE


repeatedly to select ‘Single Photo’, then 

press 

ENTER

The last viewed photo will be displayed. 

3

Press 

THUMBNAIL

 to bring up 

the file browser screen.  

4

Press ▲▼◄► to select a photo 

you would like to display, then press 

ENTER

.

5

The photo selected will be displayed. 

● Press ◄ or ► to switch to the previ-

ous or next photo stored in the same 

folder. 
● Press 

ENTER

 to return to slideshow.

● Press 


ROTATE

 to rotate the 

photo. In the case of a photo of internal 

memory, it is saved in the position of 

having rotated. In the case of the other 

photo, it is not saved in the position of 

having rotated.
● Press 

ZOOM IN

 or 

ZOOM 

OUT

 to enlarge the photo or reduce the 

photo size. (x1.0, x1.5, x2.0, x3.0, x4.0, 

x5.0). 
● After zooming in, press ▲▼◄► to 

move the zoomed area. Press 

ENTER 

t

o return to normal size.

● The ZOOM IN/OUT function is not 

applicable to a BMP/TIFF file. 
● The ZOOM IN/OUT function is not 

applicable in a slideshow.
● Press 

OPTION

 to display available 

applications. 
- Information On
- Information Off
- Copy This File 
- Delete This File

NOTE

♦ If you previously set the ‘File Access 

Level’ to ‘Specified Folder’, only files in 

the chosen folder will be shown for the 

Slideshow and the Single Photo modes.    

For details on how to modify the setting, 

please refer to the section: 

Settings 

> System Settings > File Access 

Level

.(Refer to page 52)

♦ If the desired photo you would like 

to view is not saved in the medium 

currently in use, you need to change the 

device setting first. For details, please 

refer to the section: 

Settings > Select-

ing Devices

.(Refer to page 53)

Содержание DMF102XKU - Wireless Digital Media Frame

Страница 1: ...l number are on the back of your Digital Media Frame Record these numbers in the spaces below Refer to these numbers whenever you communicate with your Toshiba dealer about this Digital Media Frame 2009 Toshiba Corporation Model number Serial number DMF102XKU DMF82XKU DMF82XWU ...

Страница 2: ......

Страница 3: ...s or modifications made to this equip ment not expressly approved by Toshiba or parties authorized by Toshiba could void the user s authority to operate the equipment This device complies with part 15 of the FCC Rules Operation is subject to the following two conditions 1 This device may not cause harmful interference and 2 this device must accept any interference received including interference t...

Страница 4: ...C adaptor Continued use in this state might cause fire electric shock or burns For details on repair consult Toshiba Customer Service 27 Coin shaped Battery a CAUTION Danger of explosion if battery is incorrectly replaced Replace only with the same or equivalent type 10 Protect the power cord from being walked on or pinched particularly at plugs convenience receptacles and the point where they exi...

Страница 5: ... of important operating and mainte nance servicing instructions in the literature accompanying the appliance 31 Wireless Communication a Turn off the digital media frame power in locations where a person using a pacemaker may be present nearby The radio waves generated by the product may affect the operation of the pacemaker b Keep the product away from the location of the pacemaker by at least 22...

Страница 6: ...e the digital media frame in a hot and humid place just after you move the unit from an air conditioned room When you use the digital media frame in a humid place Do not use the digital media frame when moisture condensation may occur If you use the digital media frame in such a situation it may damage memory cards and internal parts Remove the memory cards connect the AC adaptor turn on the digit...

Страница 7: ... result from deliberations of panels and committees of scientists who continually review and interpret the extensive research literature In some situations or environments the use of Wireless LAN may be restricted by the proprietor of the building or responsible representatives of the organization These situations may for example include Using the Wireless LAN equipment on board of airplanes or In...

Страница 8: ...8 ...

Страница 9: ...6 Using The Remote Control 17 Connecting to Power 18 Inserting Connecting Devices 19 Connecting to A Computer 21 Connecting Headphones 21 Mode Menu 22 USING THE MEDIA FRAME 23 Viewing Photos 23 Slideshow Mode 23 Single Photo Mode 24 Watching Videos 25 Playing Music 26 Displaying The Clock 27 Displaying The Calendar 28 Changing Display Style 29 Displaying Thumbnail 29 Viewing The Demo 30 Copying Fi...

Страница 10: ...Channel 42 Using FrameChannel 43 Using Google Picasa 44 Registering with Google Picasa 44 Using Google Picasa 45 SETTINGS 47 Menu Overview 47 Modifying Viewing Settings 49 Screen Settings 49 Photo Display Order 49 Slideshow Settings 50 Display Mode 50 Modifying System Settings 50 Language 51 Date Time Settings 51 File Access Level 52 Key Sound 52 System Manager 52 Selecting Devices 53 Modifying Ne...

Страница 11: ...s Macintosh is a registered trademark of Apple Inc Bluetooth is a registered trademark of Bluetooth SIG Inc All other brand and product names are trademarks or registered trademarks of their respective companies COPYRIGHTS The data you have recorded must be used for your own personal enjoyment The unauthorized recording use distribu tion or revision of copyrighted materials including without limit...

Страница 12: ...evious option NOTE If the touch control keys are not used the key display disappears in a few seconds Do not press the touch keys with force FRONT VIEW LCD Screen Remote Control Sensor Touch Control Keys ABOUT THE LCD The LCD panel contained in this product is manufactured using an extremely high level of precision technology however there may be an occasional pixel dot of light that does not oper...

Страница 13: ...MEDIA FRAME OVERVIEW 13 DMF102X Stand Speakers Wall Mounting Holes Rubber Supporter REAR VIEW DMF82X Stand Speakers Rubber Supporter ...

Страница 14: ...n SD MMC xD Card Slot MS MS Duo Card Slot WPS Button TO HANG THIS PRODUCT ON A WALL Be sure to use the screws appropriate for the material and strength of the wall Toshiba does not take any responsibility for any accident or damage caused by the failure to hang the Digital Media Frame on a wall properly ...

Страница 15: ...view Refer to page 29 ZOOM OUT Press to zoom out of a photo On the file browser screen press the button to reduce the size of a thumbnail picture Refer to page 24 ZOOM IN Press to zoom in a photo On the file browser screen press the button to increase the size of a thumbnail picture Refer to page 24 MENU Press to display the Menu screen Press again to close the Menu screen Refer to page 49 50 53 5...

Страница 16: ... PLACING THE MEDIA FRAME 1 Slide the Digital Media Frame into the slot of the rubber supporter as illustrated Rubber Supporter 2 Make sure the Digital Media Frame is stably placed NOTE The Digital Media Frame can be placed vertically If this product is placed vertically the angle of the displayed photo will change accordingly This feature does not apply to video playback ...

Страница 17: ...edia Frame via the remote control Do not drop or give the remote control a shock Do not leave the remote control near an extremely hot or humid place Do not spill water or put anything wet on the remote control Do not disassemble the remote control If the remote control does not func tion correctly or if the operating range becomes reduced replace the battery with new one Inserting a battery other...

Страница 18: ...O POWER 1 Connect one end of the AC adaptor to the Digital Media Frame 2 Plug the other end of the AC adaptor into the outlet AC Adaptor Turning on the Digital Media Frame Press the POWER button on the side of the Digital Media Frame or the ON STANDBY button on the remote control to turn on the Digital Media Frame The power indicator will turn to green CAUTION Do not connect the power plug to a po...

Страница 19: ...o turn on the device The power indicator will turn to green 2 Press the button again to switch to the Standby mode The power indicator will turn to red Power Indicator Center To Power Off 1 Press and hold the POWER button on the side of the Digital Media Frame for several seconds The power indicator goes out You can still use the ON STANDBY button during the power off mode INSERTING CONNECTING DEV...

Страница 20: ...emove the memory card while the Digital Media Frame is writing or deleting data Data saved on the memory card may be lost This memory card is a precision electrical instrument Do not bend drop or apply strong force to it Do not use or store the memory card in an environment of high static electric ity or electrical interference Avoid using or storing in areas of high temperature and humidity Be ca...

Страница 21: ...a USB based card reader using the Menu For details please refer to the section Settings Selecting Devices Refer to page 53 For details on how to use your USB memory device please refer to the owner s manual for the USB memory device Do not remove the memory card USB memory device while the Digital Media Frame is writing or deleting data Data saved on the memory card USB memory device may be lost C...

Страница 22: ...er to page 29 SLIDESHOW Select to start a photo slideshow Refer to page 23 SINGLE PHOTO Select to display the last viewed photo Refer to page 24 CLOCK Select to display the clock Refer to page 27 CALENDAR Select to display the calendar Refer to page 28 THUMBNAIL Select to bring up the file browser screen Refer to page 29 VIDEO Select to start playing the last viewed video file Refer to page 25 MUSIC...

Страница 23: ...f window shutters Random Blend Erase and Horizon tal Shutter styles are randomly applied to photos displayed Stack Photos are shown piled up on one another Snap Shot Photos are shown as snapshots pinned to a bulletin board 3 If you press ENTER during slideshow playback the Digital Media Frame will display one photo Press or to switch to the previ ous or next photo NOTE You can adjust the slideshow...

Страница 24: ...UT to enlarge the photo or reduce the photo size x1 0 x1 5 x2 0 x3 0 x4 0 x5 0 After zooming in press to move the zoomed area Press ENTER to return to normal size The ZOOM IN OUT function is not applicable to a BMP TIFF file The ZOOM IN OUT function is not applicable in a slideshow Press OPTION to display available applications Information On Information Off Copy This File Delete This File NOTE If ...

Страница 25: ...rowser screen 4 Press to select a video file you would like to watch then press ENTER 5 Playback will then start Press OPTION to display available applications Information On Information Off Copy This File Delete This File Press or to control the volume During playback press ENTER to pause the video NOTE The Digital Media Frame supports MPEG 1 MPEG 2 MPEG 4 video files The Digital Media Frame will...

Страница 26: ...bring up the file browser screen 4 Press to select a music file you would like to play then press ENTER 5 Playback will then start A photo slideshow is displayed on the screen Press OPTION to display available applications Repeat One Repeat All Copy This File Delete This File Press or to control the volume During playback press ENTER to pause the music NOTE The Digital Media Frame supports MP3 and...

Страница 27: ...ck styles If there are no photos in the medium currently used clock styles which feature photo display will not be applicable You can also switch the Digital Media Frame to clock view by pressing the CLOCK CALENDAR button on the remote control For details on how to modify the time setting please refer to the section Set tings Modifying System Settings Date Time Settings Refer to page 51 Clock Styl...

Страница 28: ...alendar styles If there are no photos in the medium currently used calendar styles which feature photo display will not be applicable You can also switch the Digital Media Frame to calendar view by pressing the CLOCK CALENDAR button on the remote control For details on how to modify the time setting please refer to the section Set tings Modifying System Settings Date Time Settings Refer to page 51...

Страница 29: ...thumbnail image can be increased reduced accordingly NOTE You can also change the display style using the Mode menu For details please refer to the section Media Frame Overview Mode Menu Refer to page 22 DISPLAYING THUMBNAIL 1 Press THUMBNAIL 2 A file browser screen will appear File Browser Screen Photos or Video Files If you were viewing photos or watching videos the file browser screen will be pr...

Страница 30: ...ls please refer to the section System Setup System Settings File Access Level Refer to page 52 You can also bring up the file browser screen using the Mode menu For details please refer to the section Media Frame Overview Mode Menu Refer to page 22 VIEWING THE DEMO 1 Press MODE to bring up the Mode menu 2 Press or press MODE repeatedly to select Demo then press ENTER A slideshow of pre loaded photo...

Страница 31: ...igital Media Frame to Photo Video Music mode using the Mode menu 2 Press THUMBNAIL to bring up the file browser screen 3 Press to select a file you would like to copy then press OPTION 4 Press to select Copy This File then press ENTER When copying the file of internal memory a storage media list is displayed In that case select a copy place 5 Press to select Yes then press ENTER 6 The copying proc...

Страница 32: ...at case select a copy place 6 Press to select Yes then press ENTER 7 The copying process will begin NOTE Do not turn the power off or remove the memory card USB memory device while the Digital Media Frame is copy ing data Data saved on the internal memory or memory card USB memory device may be lost Photos videos and music files will be copied from the connected memory cards USB memory devices to t...

Страница 33: ... the Digital Media Frame to Photo Video Music mode using the Mode menu 2 Press THUMBNAIL to bring up the file browser screen 3 Press OPTION to display available functions Press to select Delete Marked File s then press ENTER 4 Press to select desired file s you would like to delete then press ENTER to mark selection 5 Press OPTION to confirm 6 Press to select Yes then press ENTER 7 The deletion pr...

Страница 34: ...Vista SP1 Windows XP SP3 Windows 2000 Professional SP4 Operating System Macintosh MacOS X 10 4 10 4 5 10 5 2 10 5 5 10 5 6 Operation with all computers which meet the system requirements is not guaranteed TO DISCONNECT FROM A COMPUTER 1 Click Safely Remove Hardware icon on the taskbar 2 Click Stop USB Mass Storage Device Check the drive to be removed before clicking 3 The device can now be safely ...

Страница 35: ...n the screen 3 On your computer click the My Computer icon on Desktop screen for Windows users 4 A removable device representing the Digital Media Frame will be listed under My Computer for Windows users 5 Select the file s you wish to copy then copy the file s to the Digital Media Frame NOTE Do not turn the power off or discon nect the Digital Media Frame from a computer while it is copying data ...

Страница 36: ...USING THE MEDIA FRAME 36 ...

Страница 37: ...ronment may not be available Wireless antenna for the wire less LAN operates best in open location where no or few objects exist To enable the maximum range of wireless communica tion do not surround this product with books or stacks of thick paper Also avoid placing a metallic plate between this product and wireless antenna or covering the wireless antenna with a metallic case WI FI SETTINGS AUTO...

Страница 38: ...ly Connection failed is displayed PIN Code Mode 1 Press MENU to bring up the Menu screen 2 Press to select the Network Settings icon 3 Press to select Wi Fi Settings then press ENTER 4 Press to select Auto Configura tion then press ENTER 5 Press to select PIN Code then press ENTER PIN Personal Identification Number 6 The PIN code of the Digital Media Frame will appear on screen Please retain the co...

Страница 39: ...cessfully Connection failed is displayed WI FI SETTINGS MANUAL CONFIGURATION Select Wireless AP 1 Press MENU to bring up the Menu screen 2 Press to select the Network Settings icon 3 Press to select Wi Fi Settings then press ENTER 4 Press to select Manual Configuration then press ENTER 5 Press to select Select Wireless AP then press ENTER 6 The Digital Media Frame will start scanning for available...

Страница 40: ...to bring up the Menu screen 2 Press to select the Network Settings icon 3 Press to select Wi Fi Settings then press ENTER 4 Press to select Manual Configuration then press ENTER 5 Press to select Enter Network Name SSID then press ENTER 6 A screen requesting the SSID will appear Press to enter the network name then select OK to confirm SSID Service Set Identifier 7 A screen requesting the network ...

Страница 41: ... ENTER 5 On the highlighted tab press to select Static or DHCP mode then press ENTER DHCP Dynamic Host Configuration Protocol 6 If you have selected the DHCP mode a set of IP address is always assigned to your device automatically for network connection 7 If you have selected the Static mode press to start to enter the network information details On each highlighted tab press to adjust the number ...

Страница 42: ...amechannel com Terms and availability of the online service may subject to change without prior notice Please visit the service providers websites for the latest updates REGISTERING WITH FrameChannel 1 Press MODE to bring up the Mode menu 2 Press or press MODE repeatedly to select Online Service then press ENTER 3 Press to select FrameChannel then press ENTER 4 A screen offering the activation det...

Страница 43: ...ee a preset collection of channels when returning to the Digital Media Frame USING FrameChannel 1 Press MODE to bring up the Mode menu 2 Press or press MODE repeatedly to select Online Service then press ENTER 3 Press to select FrameChannel then press ENTER 4 A slideshow of channel contents will then start NOTE During connection an online service connectivity icon During connection an online servi...

Страница 44: ...k More Photos 3 Click Create an Account 4 Follow the on screen instruc tions to complete registration Terms and availability of the online service may subject to change without prior notice Please visit the service providers websites for the latest updates REGISTERING WITH Google Picasa 1 Press MENU to bring up the Menu screen 2 Press to select the Network Settings icon 3 Press to select Online Se...

Страница 45: ...ss MODE repeatedly to select Online Service then press ENTER 3 Press to select a desired Picasa account then press ENTER 4 A slideshow of photos will then start NOTE During connection an online service connectivity icon During connection an online service and a connection signal icon will appear on the top right corner of the screen If you press ENTER during slideshow playback slideshow will pause...

Страница 46: ...USING ONLINE SERVICES 46 ...

Страница 47: ...ation style Fit Screen Entire Image SYSTEM SETTINGS Language Select this option to set a preferred language English Spanish Date Time Settings Select this option to adjust system date time and to set the alarm clock Date Time Date Time Format Auto On Off Alarm File Access Level Select this option to set the level of files for application All Files Specified Folder Key Sound Select this option to e...

Страница 48: ...this option to view contents stored on the inserted MS card USB 1 USB 5 Select this option to view contents stored on the con nected USB memory device s NETWORK SETTINGS Wi Fi Settings Select this option to set up the Wi Fi connection Auto Configuration Manual Configuration IP Settings Online Service Settings Select this option to manage corresponding online service accounts Picasa 1 Picasa 2 Pica...

Страница 49: ...gs SCREEN SETTINGS Backlight Level Adjust the backlight level of the LCD screen Level 1 5 Contrast Adjust the contrast level of the LCD screen Level 1 5 Press on each highlighted item to modify the settings PHOTO DISPLAY ORDER By Date Time Newest First Photos are displayed according to the photo shooting date time starting with the photo taken most recently By File Name Photos are displayed accord...

Страница 50: ...y be scaled to a ratio completely filling the screen Entire Image Photo is displayed without ratio distortion There may be black bars shown on the screen borders MODIFYING SYSTEM SETTINGS 1 Press MENU to bring up the Menu screen 2 Press to select the System Settings icon 3 A list of options will appear on the screen Press to select an item you would like to modify then press ENTER 4 Press to selec...

Страница 51: ... Frame can be turned on off automatically at a scheduled time Press to modify the time Press to set the option to On to enable the function then press ENTER Alarm If the function is set to ON you can use the Digital Media Frame as an alarm clock Press to modify the time Press to set the option to On to enable the function then press ENTER NOTE When the alarm goes off you can press any button excep...

Страница 52: ... Yes No Select Yes to start the formatting process NOTE Formatting will erase all files saved in the internal memory Do not format the internal memory using a computer FILE ACCESS LEVEL All Files All files saved in the same medium can be viewed and selected for further applications Specified Folder Only files saved in a preset folder can be viewed and selected for further applications If you have s...

Страница 53: ...s not supported by the Digital Media Frame Multiple slot USB card reader is supported by the Digital Media Frame You can insert up to five memory cards to the connected card reader The memory card s will be listed as USB 1 5 respectively Depending on the type of card reader used The memory cards connected via a USB based card reader are listed according to the order by which they are inserted to th...

Страница 54: ...P Static If the option is set to DHCP the network IP address is automatically assigned If you select Static you need to enter the details of the network IP address ONLINE SERVICE SETTINGS Picasa 1 Picasa 2 Picasa 3 Follow on screen instructions to enter Picasa account details After the details are completed the Picasa 1 2 3 tab will be replaced by the account name you entered NOTE For details on h...

Страница 55: ...61 x 174 x 36 mm excluding stand Mass DMF102X Approx 1120g including stand DMF82X Approx 870g including stand DISPLAY Panel Size DMF102X 10 1 inches TFT active matrix DMF82X 8 0 inches TFT active matrix Resolution 800 H x 480 V pixels Brightness 250 cd m2 Aspect Ratio DMF102X 15 9 DMF82X 16 9 Backlight Life Approx 20000 hours SOUND Speakers Stereo speakers 0 5W 0 5W CONNEC TIONS Memory Card Slot S...

Страница 56: ...aximum size 8000 x 6000 EXIF 2 2 BMP maximum size 800 x 480 below 3MB TIFF maximum size 800 x 480 below 3MB Video MPEG1 320x240 30fps MPEG2 640x480 30fps MPEG4 SP 720x480 30fps ASP720x480 30fps Maximum bit rate 8Mbps File extension mpg mpeg avi Audio MP3 Layer3 32Kbps 320Kbps WMA Windows Media Audio v1 v2 32Kbps 192Kbps File extension mp3 wma NOTE The Digital Media Frame cannot support the playbac...

Страница 57: ...meChannel or Picasa services for uploading requires a personal computer and a working Internet connection To receive FrameChannel or Picasa services on your Digital Media Frame you need a working Wi Fi connection These services may be limited or unavailable based on conditions factors or events outside Toshiba s control such as your Internet provider contract connection router wiring and other net...

Страница 58: ...SPECIFICATIONS 58 ...

Страница 59: ...ice is supported by the Digital Media Frame Remove the memory card USB memory device then insert it to the corresponding slot socket again If a USB hub was previously connected disconnect the hub and insert the USB memory device directly to the USB socket Cannot show photos Check whether there are photos stored in the memory card USB memory device inserted Check whether the format of the image fil...

Страница 60: ...ther the protection switch on the SD memory card is set to the Lock position If it is set to Lock you cannot copy files to the memory card Cannot delete files Check whether the file you would like to delete is protected A protected file cannot be deleted Check whether the protection switch on the SD memory card is set to the Lock position If it is set to Lock you cannot delete files saved on the m...

Страница 61: ...w framechannel com The remote control does not work properly The remote control is not pointed at the remote sensor of the Digital Media Frame The remote control is too far from the Digital Media Frame The batteries in the remote control are exhausted The Digital Media Frame s remote sensor is exposed to a strong light source such as direct sunlight or other illumination Buttons do not work Power ...

Страница 62: ...TROUBLESHOOTING 62 ...

Страница 63: ...A DEFECTIVE DAV PRODUCT WITH A NEW OR REFUR BISHED DAV PRODUCT FOR A FEE Rental Units The warranty for DAV Product rental units begins on the date of the first rental or thirty 30 days after the date of shipment to the rental firm whichever comes first Commercial Units DAV Products sold and used for commercial purposes have a limited warranty for all parts and labor which warranty begins on the date ...

Страница 64: ...AL OR CONSEQUENTIAL DAMAGES SO THE ABOVE PROVISIONS MAY NOT APPLY TO YOU UNDER SUCH CIRCUMSTANCES 4 Labor service charges for set installation setup adjustment of customer controls and installation or repair of antenna systems are not covered by this warranty Reception problems caused by inadequate antenna systems are your responsibility 5 Warranties extend only to defects in materials or workmans...

Страница 65: ...plicable laws or in a written agreement a party who changes or redistributes the software with consent from the copyright holders or based on the aforementioned licenses shall not be held liable whatsoever for any loss arising from the use of or inability to use such software components The same applies even when the copyright holders or relevant third parties have been informed of the possibility...

Страница 66: ...ouncement including an appropriate copyright notice and a notice that there is no warranty or else saying that you provide a warranty and that users may by the GNU Library General Public License instead You can apply it to your programs too When we speak of free software we are referring to freedom not price Our General Public Licenses are designed to make sure that you have the freedom to distrib...

Страница 67: ...tive is allowed only for noncommercial distribution and only if you received the program in object code or executable form with such an offer in accord with Subsection b above The source code for a work means the preferred form of the work for making modifications to it For an executable work complete source code means all the source code for all modules it contains plus any associated interface de...

Страница 68: ...es not thus excluded In such case this License incorporates the limitation as if written in the body of this License 9 The Free Software Foundation may publish revised and or new versions of the General Public License from time to time Such new versions will be similar in spirit to the present version but may differ in detail to address new problems or concerns Each version is given a distinguishi...

Страница 69: ... it under certain conditions type show c for details The hypothetical commands show w and show c should show the appropriate parts of the General Public License Of course the commands you use may be called something other than show w and show c they could even be mouse clicks or menu items whatever suits your program You should also get your employer if you work as a programmer or your school if a...

Страница 70: ...efers to version 3 of the GNU Lesser General Public License and the GNU GPL refers to version 3 of the GNU General Public License The Library refers to a covered work governed by this License other than an Application or a Combined Work as defined below An Application is any work that makes use of an interface provided by the Library but which is not otherwise based on the Library Defining a subclas...

Страница 71: ...dified version of the Library that is interface compatible with the Linked Version e Provide Installation Information but only if you would otherwise be required to provide such information under section 6 of the GNU GPL and only to the extent that such information is necessary to install and execute a modified version of the Combined Work produced by recombining or relinking the Application with a ...

Страница 72: ... claim that you wrote the original software If you use this software in a product an acknowledgment in the product documentation would be appreciated but is not required 2 Altered source versions must be plainly marked as such and must not be misrepre sented as being the original software 3 This notice may not be removed or altered from any source distribution Jean loup Gailly jloup gzip org Mark ...

Страница 73: ...ment with the Unisys LZW patent GIF reading support has been removed altogether and the GIF writer has been simplified to produce uncompressed GIFs This technique does not use the LZW algorithm the resulting GIF files are larger than usual but are readable by all standard GIF decoders We are required to state that The Graphics Interchange Format c is the Copyright property of CompuServe Incorpo rate...

Страница 74: ...ane Glenn Randers Pehrson Willem van Schaik libpng versions 0 89 June 1996 through 0 96 May 1997 are Copyright c 1996 1997 Andreas Dilger Distributed according to the same disclaimer and license as libpng 0 88 with the following individuals added to the list of Contributing Authors John Bowler Kevin Bracey Sam Bushell Magnus Holmgren Greg Roelofs Tom Tanner libpng versions 0 5 May 1995 through 0 8...

Страница 75: ...ion does not invalidate any other reasons why a work based on this file might be covered by the GNU General Public License Networke Stack LWIP This file is part of eCos the Embedded Configurable Operating System Copyright C 1998 1999 2000 2001 2002 2003 Red Hat Inc Copyright C 2002 2003 2004 Gary Thomas eCos is free software you can redistribute it and or modify it under the terms of the GNU General ...

Страница 76: ... KIND EXPRESS OR IMPLIED INCLUDING BUT NOT LIMITED TO THE WARRANTIES OF MERCHANTABILITY FITNESS FOR A PARTICULAR PURPOSE AND NONIN FRINGEMENT IN NO EVENT SHALL THE AUTHORS OR COPYRIGHT HOLDERS BE LIABLE FOR ANY CLAIM DAMAGES OR OTHER LIABILITY WHETHER IN AN ACTION OF CONTRACT TORT OR OTHERWISE ARISING FROM OUT OF OR IN CONNECTION WITH THE SOFTWARE OR THE USE OR OTHER DEALINGS IN THE SOFTWARE ...

Страница 77: ......

Страница 78: ......

Отзывы: