background image

4

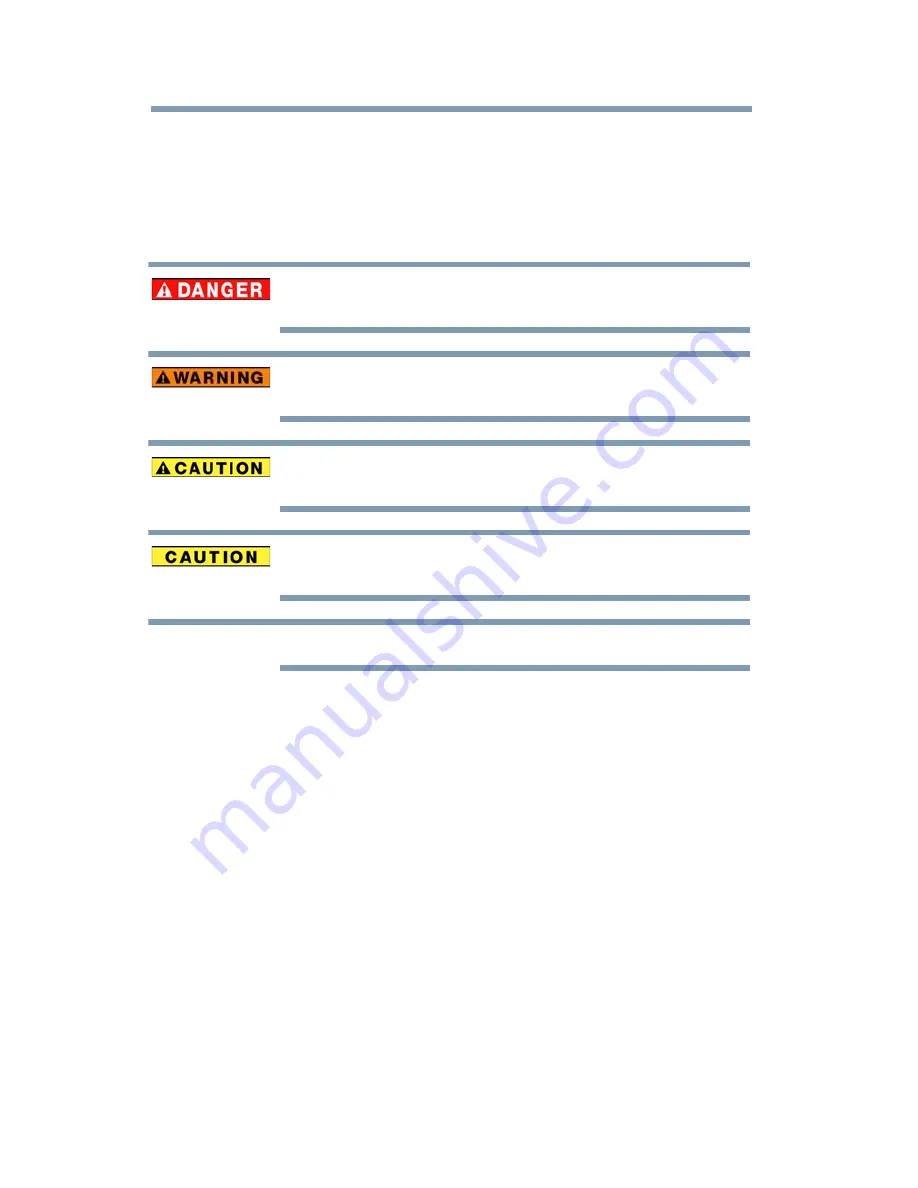
Safety icons

This manual contains safety instructions that must be observed to avoid potential 
hazards that could result in personal injuries, damage to your equipment, or loss 
of data. These safety cautions have been classified according to the seriousness of 
the risk, and icons highlight these instructions as follows:

Indicates an imminently hazardous situation which, if not avoided, will result 
in death or serious injury.

Indicates a potentially hazardous situation which, if not avoided, could result 
in death or serious injury.

Indicates a potentially hazardous situation which, if not avoided, may result 
in minor or moderate injury.

Indicates a potentially hazardous situation which, if not avoided, may result 
in property damage.

Provides important information.

Additional Information 

© Copyright 2012 TOSHIBA CORPORATION. All rights reserved. TOSHIBA 
reserves the right to make technical changes. TOSHIBA assumes no liability for 
damages incurred directly or indirectly from errors, omissions or discrepancies 
between this product and the documentation. 

About the built-in battery

The built-in battery pack is a lithium ion battery, which can 
explode if not used properly.

Do not attempt to replace the built-in battery. It is built-in and 
not changeable.

Charge the built-in battery only in an ambient temperature 
between 41 and 95 degrees Fahrenheit (5 and 35 degrees 
Celsius). Otherwise, the electrolyte solution might leak, battery 
performance might deteriorate, and the battery life might be 
shortened.

NOTE

Содержание CAMILEO CLIP

Страница 1: ...GMAA00371010 04 12 CAMILEO CLIP User sGuide English Español ...

Страница 2: ...ons However there is no guarantee that interference will not occur in a particular installation If this equipmentdoescause harmful interference to radioortelevision reception which can be determined by turning the equipment off and on the user is encouraged to try to correct the interference by one or more of the following measures Reorient or relocate the receiving antenna Increase the separation...

Страница 3: ...d 2 Avoid all contact with water and dry hands before using 3 Do not expose the camcorder to high temperature or leave it in direct sunlight Doing so may damage the camcorder 4 Use the camcorder with care Avoid pressing hard on the camcorder body 5 For your own safety avoid using the camcorder when there is a storm or lightning 6 Use only the accessories supplied by the manufacturer 7 Keep the cam...

Страница 4: ...otentially hazardous situation which if not avoided may result in property damage Provides important information Additional Information Copyright 2012 TOSHIBA CORPORATION All rights reserved TOSHIBA reserves the right to make technical changes TOSHIBA assumes no liability for damages incurred directly or indirectly from errors omissions or discrepancies between this product and the documentation A...

Страница 5: ...ook Inc HDMI the HDMI Logo and High Definition Multimedia Interface are trademarks or registered trademarks of HDMI Licensing LLC Intel Intel Core Celeron Centrino and Pentium are trademarks or registered trademarks of Intel Corporation or its subsidiaries in the United States and other countries Mac is a trademark of Apple Inc registered in the U S and other countries Microsoft Windows and Window...

Страница 6: ...t view 12 Underside view 12 Rear view 13 Chapter 2 Getting Started 15 Charge the Built in Battery 15 Inserting and Removing the Micro SD Card 16 About the Clip 17 Turning the Camcorder On and Getting Started 17 Turning on the Camcorder Standby Mode active 17 Turning the Camcorder Off 18 Menu options 18 Video Mode Menu 18 Photo Mode Menu 20 ...

Страница 7: ...7 Video Mode Menu 27 Photo Mode Menu 28 Video setup 29 Resolution 29 Stabilization 30 Motion detection 30 Face tracking 31 Slow motion 31 Pre record 32 Time lapse 32 Continuous play 33 Photo setup 34 Resolution 34 Self timer 35 Smile detection 35 Date printing 36 ISO 36 Slide show 37 Settings 38 Sound 38 TV format 39 Language 39 Time 40 Format 40 Restore default 41 Effects 42 Scene 43 Filter 43 ...

Страница 8: ... 53 Chapter 6 Viewing Files on the computer 54 Installing bundled software 54 Transferring files to a computer 55 Chapter 7 Uploading Files to the Internet 56 CAMILEO Uploader 56 Set up account information for the web site 59 Chapter 8 Webcam Mode 60 Chapter 9 Troubleshooting 61 Chapter 10 Other Information 62 Toshiba Support 62 Before you call 62 Contacting Toshiba 63 Toshiba s technical support ...

Страница 9: ...zoom helps you to control over the videos and photos you take The camcorder supports video recording at Full HD resolution of 1920 x 1080p You can also connect it to an HDTV via a mini HDMITM cable Mini HDMITM cable must be purchased separately and easily playback the recorded high definition videos on the wide screen HDTV Electronic Image Stabilization to record smoother videos Pause function to ...

Страница 10: ...ory allows you to take limited photos and to record limited videos without a memory card The memory card slot allows users to increase the storage capacity Partial memory of the built in memory is used for the camcorder s Firmware code Install the bundled software application for viewing the videos correctly on a computer Check the components Unpack the package and make sure all standard accessori...

Страница 11: ...he ports is not guaranteed in all environments or conditions System requirements Microsoft Windows XP Windows Vista Windows 7 Intel AMD Dual Core CPU or above 1 GB system memory 1 GB hard drive space CD ROM drive Available USB port 16 bit Color Display The LCD screen is manufactured using extremely high precision technology However some tiny black and or bright dots white red blue or green may app...

Страница 12: ...rview Front view Sample Illustration Front view Underside view Sample Illustration Underside view Lens Microphone Speaker LED indicator Record button Micro SD Tripod socket Mini USB 2 0 port Mini HDMI port Strap hook Card slot Reset button ...

Страница 13: ... operation is made in three minutes the camcorder will turn itself off automatically to conserve battery power Camera mode button Press to toggle Video Mode or Photo Mode Menu button Menu ON Exit Menu Playback Mode Record button Clip Menu button Left button Down button LCD screen Camera mode button Right button Power button Up button Record OK button ...

Страница 14: ...ng Up button Zoom in In Playback Mode go to the Information screen When playing videos press to increase volume Down button Zoom out When playing video press to decrease volume Left button In Preview Mode press to go to Playback Mode Move between the option items In Playback Mode press to go to the previous video photo Right button In Preview Mode press to toggle ANTI GLARE ON or ANTI GLARE OFF Wh...

Страница 15: ...1 Connect your camcorder to your computer 2 Select MASS STORAGE on the camcorder screen 3 The blinking light indicates that the camcorder is currently charging and the light remains on after the charging is completed 4 The full charge time is is up to 8 5 hours using the provided USB cable Actual charging time may vary depending on the battery and computer charging conditions Sample Illustration C...

Страница 16: ...may cause a fire or explosion possibly resulting in serious injury Inserting and Removing the Micro SD Card optional The camcorder comes with a limited internal memory which allows you to store limited photos and videos You can expand the memory capacity by using an optional Micro SD memory card 1 Open the ports cover 2 Insert the Micro SD card Optional into the slot until it locks properly 3 To r...

Страница 17: ...s it again To take a photo In Photo Mode press the Record button to take photo To view stored videos and photos Press the Left button to switch to the Playback mode There are two separate record buttons to be utilized depending on your mode of use Turning on the Camcorder Standby Mode active In order to conserve battery power the LCD will automatically turn off after idling about one minute to swi...

Страница 18: ...lay for 3 seconds then disappear You can delete or edit the recorded video file VIDEO SETUP Resolution Full HD 1080 30 1920 x 1080p 30fps HD 720 60 1280 x 720p 60fps HD 720 30 1280 x 720p 30fps VGA 480 30 640 x 480 30fps Stabilization ON Enable motion stabilization for smooth and stable video OFF Disable motion stabilization Motion detection ON Start video recording while detecting movements of ob...

Страница 19: ...50Hz TV output setting is PAL standard Languages English Czech Danish Dutch Finnish French German Greek Italian Norwegian Polish Portuguese Russian Swedish Spanish and Turkish Time Set up date and time Format YES Format memory card NO Do not format memory card Restore defaults YES Restore default factory settings and delete all data in Wi Fi profile NO Do not restore default factory settings VOICE...

Страница 20: ...carousel You can check the recorded photo files Press the Record OK button to enter the playback full screen mode The information screen will display for 3 seconds then disappear You can delete the recorded photo files PHOTO SETUP Resolution HIGH 16MP 4608 x 3456 16MP STANDARD 5MP 2592 x 1944 5MP LOW 3MP 2048 x 1536 3MP Self timer ON Activate 10 second delayed self timer OFF Disable self timer Smi...

Страница 21: ...ns Slideshow 2 seconds Display one photo every 2 seconds 5 seconds Display one photo every 5 seconds 10 seconds Display one photo every 10 seconds OFF Disable slide show SETTINGS Refer to the video mode menu VOICE RECORDING EFFECTS ...

Страница 22: ...tions Camera mode button 1 Press to toggle between Video mode and Photo mode Menu button 1 Menu ON 2 Exit Menu Playback mode Record button 1 In Video mode press to take video To stop recording press it again 2 In Photo mode press to take photo ...

Страница 23: ...t Left button 1 In preview mode press to go to Playback mode Right button 1 In preview mode press to toggle ANTI GLARE ON or ANTI GLARE OFF 2 While recording video audio press to pause the recording Press again to resume recording Record OK button 1 In Video mode press to take video To stop recording press it again 2 In Photo mode press to take photo Power button 1 Press down for one second to tur...

Страница 24: ... 720 30 VGA VGA 480 30 PHOTO RESOLUTION 16MP High 16MP 5MP Standard 5MP 3MP Low 3MP 3 ANTI GLARE ON 4 5 01 22 23 Video mode Remaining recordable time 15 Photo mode The number of photos that can still be taken at the current resolution 6 Zoom meter 1X 5X 5X Digital zoom Available for FULL HD 1080 30 video recording 1X 10X 10X Digital zoom Available for HD 720 60 HD 720 30 and VGA 480 30 video recor...

Страница 25: ...creen 1 In Video mode press the Record button to start recording 2 When a video is being recorded a time indicator will display on the LCD screen 3 To stop recording press the Record button again 4 To pause recording press the Right button To continue recording press it again ...

Страница 26: ...r taking photos The digital zoom can be set to 1X 5X FULL HD 1080 30 or 1X 10X HD 720 60 HD 720 30 and VGA 480 30 Operation Display Screen 1 In Photo mode press the Record button to take photo Operation Display Screen 1 Press the Right button in preview mode the ANTI GLARE icon will appear on the screen 2 Press again the ANTI GLARE icon will disappear ...

Страница 27: ...o access to the Video mode menu 3 Use the Right Left button to select the desired option on the carousel and then press the OK button to enter its menu 4 Or press to exit the Video mode menu VIDEO GALLERY VIDEO SETUP SETTINGS VOICE RECORDING EFFECTS Video files carousel RESOLUTION STABILIZATION MOTION DETECTION FACE TRACKING SLOW MOTION PRE RECORD TIME LAPSE CONTINUOUS PLAY SOUND TV FORMAT LANGUAG...

Страница 28: ...e 2 Press to access to the Photo mode menu 3 Use the Right Left button to select the desired option on the carousel and then press the OK button to enter its menu 4 Or press to exit the Photo mode menu PHOTO GALLERY PHOTO SETUP SETTINGS VOICE RECORDING EFFECTS Photo files carousel RESOLUTION SELF TIMER SMILE DETECTION DATE PRINTING ISO SLIDE SHOW SOUND TV FORMAT LANGUAGES DATE TIME FORMAT RESTORE ...

Страница 29: ...u 3 The menu contains eight options RESOLUTION STABILIZATION MOTION DETECTION FACE TRACKING SLOW MOTION PRE RECORD TIME LAPSE and CONTINUOUS PLAY for you to adjust the camcorder settings 4 Use the Right Left button to select the desired option on the carousel and then press the OK button to enter its menu 5 Or press the Up button to highlight the Return icon and then press the OK button to exit Op...

Страница 30: ...n press the OK button to validate the setting 3 Or press the Up button to highlight the Return icon and then press the OK button to exit Operation Display Screen 1 In the Video Setting menu select the MOTION DETECTION icon and then press the OK button to enter its setting menu 2 Use the Up Down button to select ON or OFF and then press the OK button to validate the setting 3 Or press the Up button...

Страница 31: ...o resolution is 320x240 Operation Display Screen 1 In the Video Setting menu select the FACE TRACKING icon and then press the OK button to enter its setting menu 2 Use the Up Down button to select ON or OFF and then press the OK button to validate the setting 3 Or press the Up button to highlight the Return icon and then press the OK button to exit 4 In Record mode aim the camcorder at the face s ...

Страница 32: ...isable Time Lapse 1 SECOND Record one frame per second 3 SECONDS Record one frame every 3 seconds 5 SECONDS Record one frame every 5 seconds Operation Display Screen 1 In the Video Setting menu select the Pre record icon and then press the OK button to enter its setting menu 2 Use the Up Down button to select ON or OFF and then press the OK button to validate the setting 3 Or press the Up button t...

Страница 33: ...files continuously Operation Display Screen 1 In the Video Setting menu select the Continuous Play icon and then press the OK button to enter its setting menu 2 Use the Up Down button to select ON or OFF and then press the OK button to validate the setting 3 Or press the Up button to highlight the Return icon and then press the OK button to exit NOTE ...

Страница 34: ...ntains six options RESOLUTION SELF TIMER SMILE DETECTION DATE PRINTING ISO and SLIDE SHOW for you to adjust the camcorder settings 4 Use the Right Left button to select the desired option on the carousel and then press the OK button to enter its menu 5 Or press the Up button to highlight the Return icon and then press the OK button to exit Operation Display Screen 1 In the Photo Setting menu selec...

Страница 35: ...he setting 3 Or press the Up button to highlight the Return icon and then press the OK button to exit Operation Display Screen 1 In the Photo Setting menu select the SMILE DETECTION icon and then press the OK button to enter its setting menu 2 Use the Up Down button to select ON or OFF and then press the OK button to validate the setting 3 Or press the Up button to highlight the Return icon and th...

Страница 36: ...PRINTING icon and then press the OK button to enter its setting menu 2 Use the Up Down button to select ON or OFF and then press the OK button to validate the setting 3 Or press the Up button to highlight the Return icon and then press the OK button to exit 4 As the function is activated the date will appear on the corner of the photo Operation Display Screen 1 In the Photo Setting menu select the...

Страница 37: ...isplay one photo every 10 seconds OFF Disable Slideshow Operation Display Screen 1 In the Photo Setting menu select the Slide show icon and then press the OK button to enter its setting menu 2 Use the Up Down button to select the desired setting and then press the OK button to validate the setting 3 Or press the Up button to highlight the Return icon and then press the OK button to exit ...

Страница 38: ...ion sound TV FORMAT LANGUAGES DATE TIME FORMAT and RESTORE DEFAULT 4 Use the Right Left button to select the desired option on the carousel and then press the OK button to enter its menu 5 Or press the Up button to highlight the Return icon and then press the OK button to exit Operation Display Screen 1 In the Settings menu select the SOUND icon and then press the OK button to enter its setting me...

Страница 39: ...ttings menu select the TV icon and then press the OK button to enter its setting menu 2 Use the Up Down button to select the desired setting and then press the OK button to validate the setting 3 Or press the Up button to highlight the Return icon and then press the OK button to exit Operation Display Screen 1 In the Settings menu select the LANGUAGE icon and then press the OK button to enter its ...

Страница 40: ...isplay Screen 1 In the Settings menu select the TIME icon and then press the OK button 2 Select Change settings and then press the OK button to enter time setting menu 3 Use the Up Down button to move between the lines of Day Month Year Hour and Minute 4 Use the Right Left button to adjust the numeric value 5 Press the Up button to highlight the Return icon and then press the OK button to exit Ope...

Страница 41: ...y Screen 1 In the Settings menu select the RESTORE DEFAULT icon and then press the OK button to enter its setting menu 2 Use the Up Down button to select YES or NO and then press the OK button to validate the setting 3 Or press the Up button to highlight the Return icon and then press the OK button to exit SETTING DEFAULT FACTORY SETTING RESOLUTION Video Full HD 1080p 30 Photo STANDARD 5M STABILIZ...

Страница 42: ...ideo photo mode menu 2 Use the Right Left button to select EFFECTS on the carousel and then press the OK button to enter its menu 3 The menu contains three options SCENE FILTER and WHITE BALANCE for you to adjust the camcorder settings 4 Use the Right Left button to select the desired option on the carousel and then press the OK button to enter its menu 5 Or press the Up button to highlight the Re...

Страница 43: ...onverted to black and white CLASSIC The image is converted to a sepia look NEGATIVE The image is converted as the negative of the normal Operation Display Screen 1 In the effects menu select the SCENE icon and then press the OK button to enter its setting menu 2 Use the Up Down button to select the desired setting and then press the OK button to validate the setting 3 Or press the Up button to hig...

Страница 44: ...tdoor condition FLUORESCENT Under fluorescent light condition TUNGSTEN Under tungsten light condition Operation Display Screen 1 In the effects menu select the WHITE BALANCE icon and then press the OK button to enter its setting menu 2 Use the Up Down button to select the desired setting and then press the OK button to validate the setting 3 Or press the Up button to highlight the Return icon and ...

Страница 45: ...er can be a voice recorder to record WAV audio files Operation Display Screen 1 Press to the Menu button to go to the video photo mode menu 2 Use the Right Left button to select VOICE RECORDING on the carousel and then press the OK button to enter its menu ...

Страница 46: ...button to start voice recording To stop recording press it again 4 While recording audio press the Right button to pause the recording Press again to resume recording 5 5 Or press the Up button to highlight the Return icon and then press the OK button to exit Operation Display Screen ...

Страница 47: ...ton to go to the audio thumbnail 2 Use the Right Left button to select the audio file you want to play and then press the OK button to playback it 3 When playing audio press the Up button to increase volume or press the Down button to decrease volume Operation Display Screen 1 Press the Up button to go to the information screen 2 Press the Down button to highlight the Delete icon to go to the dele...

Страница 48: ... mode Up button 1 In Playback Mode go to the information screen 2 When playing video audio press to increase volume Down button 1 When playing video press to decrease volume Left button 1 Go to the previous video photo audio Right button 1 Go to the next video photo audio Record OK button 1 Press to play pause the video audio Power button 1 Press down for one second to turn on or turn off the camc...

Страница 49: ...ack Mode Sample Image LCD screen information 1 Battery full power Battery medium power Battery low power 2 Return 3 Video Mode Video trimmimg Photo Mode Slideshow 4 22 of 25 Number of current video or photo Total number of videos or photos 5 Delete 6 Press the Record OK button to switch to thumbnail screen ...

Страница 50: ...ation Display Screen 1 In Video Photo mode press the Left button to switch to the Video Playback mode 2 Or select VIDEO GALLERY PHOTO GALLERY in the Video Photo mode menu 3 Use the Right Left button to go to the next previous video photo 4 Press the Up button to go to the video photo information screen of videos and photos NOTE ...

Страница 51: ...splay Screen 1 In the Video Playback Mode press the OK button to play or pause the video 2 While playing video press the Right Left button to fast forward rewind 3 Use the Up Down button to adjust the volume Operation Display Screen 1 In the information screen use the Down button to highlight the edit icon and then press the OK button to start to trim the video file ...

Страница 52: ...own button to highlight the preview icon and then press the OK button to watch the edited video preview 4 Press the Down button and then press the Right button to highlight the save icon Press the OK button to trim away the white portion and save the red portion 5 In confirmation screen you can select Overwrite or As New to save the edited video 6 Or press the Up button to highlight the Return ico...

Страница 53: ...e the Down button to highlight the slide show icon and then press the OK button to start the slideshow Operation Display Screen 1 In the information screen use the Down button and then the Right button to highlight the delete icon and then press the OK button to go to the confirmation screen 2 Select Yes and then press the OK button to delete the current file 3 Select No and then press the OK butt...

Страница 54: ...dly application that helps you managing your media and uploading your files to the web sites easily Adobe Reader is a popular program that you need to have installed to read the User s Manual Many computer users will find they already have this software installed on their computer To install the bundled software 1 Insert the CD ROM into your computer s optical disc drive The autorun screen appears...

Страница 55: ...to friends or post them on the web sites To do this you should 1 Connect the computer and camera with the supplied mini USB 2 0 cable 2 Select MASS STORAGE on the camcorder screen 3 To access files on your Micro SD card Video photo and audio files can be found on your computer at My Computer SD DCIM 100MEDIA path will vary depending on name of the card 4 To access files in the camcorder s internal...

Страница 56: ...to upload your files to social media web sites instantly It helps you share them with your family and friends on the web sites CAMILEO Uploader To upload files to the Internet 1 Connect the camcorder to your computer by using the supplied USB cable Sample Illustration Connecting the camcorder to a computer ...

Страница 57: ...execute the application 3 The main screen appears automatically on the desktop Sample Image CAMILEO Uploader main screen If ArcSoft MediaImpression is not installed you may be asked to install the H 264 codec ffdshow free under GPL license for correctly viewing the videos on CAMILEO Uploader 4 Choose the web site you wish to upload to 5 Click on VIDEOS PHOTOS to go to the videos photos thumbnail p...

Страница 58: ...e files you want to upload Click on Select All Deselect All to select deselect all video or photo files shown on the current page Sample Image CAMILEO Uploader main screen 7 Click on Upload to start uploading Sample Image CAMILEO Uploader screen Upload videos photos ...

Страница 59: ...blanks Then click on Save 4 You can check Remember Password to save your account information and password in this CAMILEO Uploader application If it is unchecked the password request will appear after clicking on UPLOAD on the thumbnail page Sample Image CAMILEO Uploader screen Sign up for new account Some social web sites may not be accessible in certain regions You must have Internet access to u...

Страница 60: ...he computer and camcorder with the supplied mini USB 2 0 cable 2 Select WEBCAM on the camcorder 3 In this mode you can implement live video conference meetings and multimedia communications Sample Illustration Connecting the camcorder to a computer ...

Страница 61: ...HC SDXC card to a high speed one Why do some of my indoor photos look blurry and dark The camcorder extends photo exposure time under low light indoor condition Keep the camcorder andthe target subject steady for several seconds when taking photos The shutter will sound when photos are being taken After connecting the USB cable to the computer 1 The disk DV indicates the internal memory of the cam...

Страница 62: ...stigate other sources of assistance first Try the following before contacting Toshiba Review the documentation supplied with your product If a problem occurs when you are running software applications consult the software documentation for troubleshooting suggestions Contact the software company s technical support department for assistance Consult the reseller or dealer from whom you purchased yo...

Страница 63: ...States at 949 583 3305 Warranty Online Warranty Information This product is covered by a One 1 Year Standard Limited Warranty A copy of the warranty is included on the enclosed CD and can be viewed online at http pcsupport toshiba com accessories1yr Warranty Service Customers located in the fifty 50 United States and District of Columbia may obtain warranty service by visiting the Toshiba Acclaim ...

Страница 64: ...GMAA00371010 04 12 CAMILEO CLIP Manualdelusuario ...

Страница 65: ... puede provocar interferencias perjudiciales a las comunicaciones por radio Sin embargo no se garantiza que no habrá interferencias en una instalación en particular Si este equipo provoca interferencias perjudiciales en la recepción de radio o televisión lo que se puede determinar apagando y encendiendo el equipo recomendamos al usuario que intente corregir la interferencia adoptando una o varias ...

Страница 66: ...se las manos antes de usar la videocámara 3 No exponga la videocámara a temperaturas elevadas ni la deje en contacto directo con la luz del sol ya que la videocámara podría averiarse 4 Use la videocámara con cuidado No presione el cuerpo de la videocámara con fuerza 5 Para su seguridad personal no utilice la videocámara durante una tormenta ni cuando relampaguea 6 No utilice baterías de especifica...

Страница 67: ...iones graves Este ícono indica la presencia de una situación potencialmente peligrosa que de no evitarse podría ocasionar lesiones menores o moderadas Este ícono indica la presencia de una situación potencialmente peligrosa que de no evitarse podría ocasionar daños a la propiedad Este ícono brinda información importante Información adicional Copyright 2012 TOSHIBA CORPORATION Todos los derechos re...

Страница 68: ...es ArcSoft MediaImpression y MediaConverter son marcas registradas de ArcSoft Inc Facebook es una marca registrada de Facebook Inc HDMI el logotipo de HDMI y High Definition Multimedia Interface son marcas comerciales o marcas registradas de HDMI Licensing LLC Intel Intel Core Celeron Centrino y Pentium son marcas comerciales o marcas registradas de Intel Corporation o de sus subsidiarias en Estad...

Страница 69: ...sta inferior 12 Vista posterior 13 Capítulo 2 Para comenzar 15 Carga de la batería incorporada 15 Inserción y extracción de la micro tarjeta SD opcional 16 Acerca del clip 17 Encender la videocámara y empezar a usarla 17 Encendido de la videocámara Modo de suspensión activo 17 Apagado de la videocámara 18 Opciones de menú 18 Menú de modo de video 18 Menú de modo de fotografía 20 ...

Страница 70: ...onfiguración del video 29 Resolución 29 Estabilización 30 Detección de movimiento 30 Seguimiento de caras 31 Cámara lenta 31 Pregrabar 32 Tiempo de espera 33 Reproducción continua 33 Configuración de la fotografía 34 Resolución 34 Temporizador automático 35 Detección de sonrisa 35 Impresión de la fecha 36 ISO 36 Presentación de diapositivas 37 Configuraciones 38 Sonido 38 Formato de TV 39 Idioma 3...

Страница 71: ...hivos en el computador 54 Instalación del software suministrado 54 Cómo transferir archivos a la computadora 55 Capítulo 7 Cómo cargar archivos a internet 56 CAMILEO Uploader 56 Información de configuración de la cuenta para el sitio web 59 Capítulo 8 Modo de cámara web 60 Capítulo 9 Solución de problemas 61 Capítulo 10 Otra información 62 Asistencia técnica de Toshiba 62 Antes de contactar a Tosh...

Страница 72: ...mbién se pueden entregar imágenes de alta calidad hasta de 16 megapixeles El zoom digital de 5x le ayuda a controlar los videos y fotografías que toma La videocámara admite grabación de video con resolución de alta definición completa HD de 1920 x 1080p También puede conectarla a un HDTV mediante un cable mini HDMITM el cable Mini HDMITM debe comprarse por separado y reproducir fácilmente los vide...

Страница 73: ...a de voz para grabar archivos de audio WAV La memoria integrada permite tomar fotografías o grabar videos de forma limitada sin utilizar una tarjeta de memoria La ranura para tarjeta de memoria permite a los usuarios aumentar la capacidad de almacenamiento Se utiliza una porción de la memoria integrada para el código de firmware de la videocámara Instale la aplicación de software suministrada para...

Страница 74: ...stá garantizada en todos los entornos o condiciones Requisitos del sistema Microsoft Windows XP Windows Vista Windows 7 CPU Intel AMD Dual Core o superior 1 GB de memoria del sistema 1 GB de espacio libre en el disco duro Unidad de CD ROM Puerto USB disponible Visualización en colores de 16 bits La pantalla de cristales líquidos LCD táctil se fabrica utilizando una tecnología de altísima precisión...

Страница 75: ...ción de muestra Vista frontal Vista inferior Ilustración de muestra Vista inferior Lente Micrófono Parlante Indicador LED Botón de grabación Ranura para el trípode Puerto Mini USB 2 0 Puerto Mini HDMI Gancho para la Botón de reinicio correa Ranura para la tarjeta Micro SD ...

Страница 76: ... operación en tres minutos la videocámara se apagará automáticamente para ahorrar batería Botón de modo de cámara Pulse el botón para alternar entre el modo Video o el modo Fotografía Botón Menú Menú Encendido Salir del Menú Modo Reproducción Botón de grabación Clip Botón Menú Botón Izquierdo Botón Abajo Pantalla LCD Botón de modo de cámara Botón Derecho Botón de encendido Botón Arriba Botón Graba...

Страница 77: ...miento En el Modo Reproducción vaya a la pantalla Información Al reproducir videos oprima para aumentar el volumen Botón Abajo Alejamiento Al reproducir videos oprima para disminuir el volumen Botón Izquierdo En el Modo Vista previa oprima para pasar al Modo Reproducción Desplazarse entre los ítems de opción En el Modo Reproducción oprima para pasar al video fotografía anterior Botón Derecho En el...

Страница 78: ...mara a la computadora 2 Seleccione Almacenamiento masivo en la pantalla de la videocámara 3 Una luz intermitente indica que se está cargando la videocámara y una luz sólida indica que se completó la carga 4 El tiempo para la carga completa es de hasta 8 5 horas utilizando el cable USB suministrado El tiempo de carga real puede variar dependiendo de la batería y de las condiciones de carga de la co...

Страница 79: ... un incendio o explosión que podría ocasionar lesiones graves Inserción y extracción de la micro tarjeta SD opcional La videocámara viene con una memoria interna limitada que le permite guardar una cantidad limitada de fotografías y videos puede aumentar la capacidad de la memoria utilizando una tarjeta de memoria Micro SD opcional 1 Abra la cubierta de los puertos 2 Inserte la tarjeta Micro SD op...

Страница 80: ...fía en el modo Fotografía oprima el botón Grabar Para ver los videos y fotografías guardados oprima el botón Izquierdo para pasar al modo de Reproducción Hay dos botones de grabación independientes para ser utilizados dependiendo del modo de uso Encendido de la videocámara Modo de suspensión activo A fin de ahorrar energía de la batería la pantalla LCD se apaga automáticamente después de estar ina...

Страница 81: ... Puede eliminar o editar el archivo de video grabado CONFIGURACIÓN DEL VIDEO Resolución Full HD 1080 30 1920 x 1080p 30fps HD 720 60 1280 x 720p 60fps HD 720 30 1280 x 720p 30fps VGA 480 30 640 x 480 30fps Estabilización ENCENDIDO Permite la estabilización del movimiento para video sin sobresaltos y estable APAGADO Desactiva la estabilización del movimiento Detección de movimiento ENCENDIDO Inicia...

Страница 82: ...configuración de salida de TV es PAL estándar Idiomas Inglés checo danés holandés finlandés francés alemán griego italiano noruego polaco portugués ruso sueco español y turco Hora Configuración de fecha y hora Formatear SÍ Formatear memoria tarjeta NO No formatear memoria tarjeta Restaurar predeterminados SÍ Restaura los valores predeterminados de fábrica y borra todos los datos de perfil de Wi Fi...

Страница 83: ...grabadas Puede revisar los archivos de fotografías grabadas Pulse el botón de Grabar Aceptar para entrar en el modo de pantalla completa de reproducción La pantalla de información se muestra durante 3 segundos luego desaparece Puede eliminar los archivos de fotografías grabadas CONFIGURACIÓN DE LA FOTOGRAFÍA Resolución HIGH 16MP 4608 x 3456 16MP STANDARD 5MP 2592 x 1944 5MP BAJA 3MP 2048 x 1536 3M...

Страница 84: ...800 para configuraciones de luz más bajas Presentación de diapositivas 2 segundos Muestra una fotografía cada 2 segundos 5 segundos Muestra una fotografía cada 5 segundos 10 segundos Muestra una fotografía cada 10 segundos APAGADO Desactiva la presentación de diapositivas CONFIGURACIONES Consulte el menú de modo de video GRABACIÓN DE VOZ EFECTOS ...

Страница 85: ... Pulse el botón para alternar entre el modo Video o el modo Fotografía Botón Menú 1 Menú Encendido 2 Salir del Menú Modo Reproducción Botón de grabación 1 En el Modo Video oprima para hacer videos Para detener la grabación oprímalo de nuevo 2 En el Modo Fotografía oprima para tomar fotografías ...

Страница 86: ...quierdo 1 En el Modo Vista previa oprima para pasar al Modo Reproducción Botón Derecho 1 En el Modo Vista previa oprima para alternar entre ANTI BRILLO ENCENDIDO o ANTI BRILLO APAGADO 2 Mientras graba video audio oprima para pausar la grabación Oprima de nuevo para reanudar la grabación Botón Grabar Aceptar 1 En el Modo Video oprima para hacer videos Para detener la grabación oprímalo de nuevo 2 E...

Страница 87: ...VGA VGA 480 30 RESOLUCIÓN DE FOTOGRAFÍA 16MP Alta 16MP 5MP Estándar 5MP 3MP Baja 3MP 3 ANTI BRILLO ENCENDIDO 4 5 01 22 23 Modo de video Tiempo de grabación restante 15 Modo de fotografía Cantidad de fotografías restantes que se pueden tomar con la configuración de resolución actual 6 Contador del zoom 1X 5X 5X zoom digital disponible para grabación de video FULL HD 1080 30 1X 10X 10X zoom digital ...

Страница 88: ...1 En el modo Video oprima el botón Grabar para iniciar la grabación 2 Un indicador de tiempo aparece en la pantalla LCD mientras se está grabando un video 3 Oprima de nuevo el botón Grabar para detener la grabación 4 Para pausar la grabación oprima el botón Derecho Para seguir con la grabación oprímalo de nuevo ...

Страница 89: ...grafías El zoom digital puede ajustarse a 1X 5X FULL HD 1080 30 o 1X 10X HD 720 60 HD 720 30 y VGA 480 30 Operación Pantalla de visualización 1 En el modo Fotografía oprima el botón Grabar para tomar la fotografía Operación Pantalla de visualización 1 Oprima el botón derecho en el modo de vista previa el icono ANTI BRILLO aparece en la pantalla 2 Oprima de nuevo y desaparece el icono ANTI BRILLO ...

Страница 90: ...o 3 Utilice el botón de derecha izquierda para seleccionar la opción deseada en el carrusel y a continuación pulse el botón Aceptar para entrar en su menú 4 O presione para salir del menú de modo de Video GALERÍA DE VIDEOS CONFIGURA CIÓN DEL VIDEO CONFIGURA CIONES GRABACIÓN DE VOZ EFECTOS Carrusel de archivos de video RESOLUCIÓN ESTABILIZACIÓN DETECCIÓN DE MOVIMIENTO SEGUIMIENTO DE CARAS CÁMARA LE...

Страница 91: ...grafía 3 Utilice el botón de derecha izquierda para seleccionar la opción deseada en el carrusel y a continuación pulse el botón Aceptar para entrar en su menú 4 O presione para salir del menú de modo Fotografía GALERÍA DE FOTOGRAFÍAS CONFIGURACIÓN DE LA FOTOGRAFÍA CONFIGU RACIONES GRABACIÓN DE VOZ EFECTOS Carrusel de archivos de fotografía RESOLUCIÓN TEMPORIZADOR AUTOMÁTICO DETECCIÓN DE SONRISA I...

Страница 92: ...o opciones RESOLUCIÓN ESTABILIZACIÓN DETECCIÓN DE MOVIMIENTO SEGUIMIENTO DE CARAS CÁMARA LENTA PREGRABACIÓN TIEMPO DE ESPERA Y REPRODUCCIÓN CONTINUA para que ajuste la configuración de la videocámara 4 Utilice el botón de derecha izquierda para seleccionar la opción deseada en el carrusel y a continuación pulse el botón Aceptar para entrar en su menú 5 O presione el botón Arriba para resaltar el i...

Страница 93: ...l botón Aceptar para validar la configuración 3 O presione el botón Arriba para resaltar el icono Retorno y a continuación presione el botón Aceptar para salir Operación Pantalla de visualización 1 En el menú de configuración de video seleccione el icono DETECCIÓN DE MOVIMIENTO y a continuación presione el botón Aceptar para entrar en su menú de configuración 2 Utilice el botón arriba abajo para s...

Страница 94: ...E CARAS y a continuación presione el botón Aceptar para entrar en su menú de configuración 2 Utilice el botón arriba abajo para seleccionar el ajuste deseado y a continuación pulse el botón Aceptar para validar la configuración 3 O presione el botón Arriba para resaltar el icono Retorno y a continuación presione el botón Aceptar para salir 4 En el modo Grabar enfoque la videocámara en las caras El...

Страница 95: ...al sujeto y ubíquela de forma segura antes de presionar el botón Grabar Una vez activada la función Pregrabar ésta se desactivará cuando se ajusta cualquier otra configuración Operación Pantalla de visualización 1 En el menú de configuración de video seleccione el icono Pregrabar y a continuación presione el botón Aceptar para entrar en su menú de configuración 2 Utilice el botón arriba abajo para...

Страница 96: ...de configuración de video seleccione el icono TIEMPO DE ESPERA y a continuación presione el botón Aceptar para entrar en su menú de configuración 2 Utilice el botón arriba abajo para seleccionar el ajuste deseado y a continuación pulse el botón Aceptar para validar la configuración 3 O presione el botón Arriba para resaltar el icono Retorno y a continuación presione el botón Aceptar para salir Ope...

Страница 97: ...ones RESOLUCIÓN TEMPORIZADOR AUTOMÁTICO DETECCIÓN DE SONRISAS IMPRESIÓN DE FECHAS ISO y PRESENTACIÓN DE DIAPOSITIVAS para que ajuste la configuración de la videocámara 4 Utilice el botón de derecha izquierda para seleccionar la opción deseada en el carrusel y a continuación pulse el botón Aceptar para entrar en su menú 5 O presione el botón Arriba para resaltar el icono Retorno a continuación pres...

Страница 98: ...ar la configuración 3 O presione el botón Arriba para resaltar el icono Retorno y a continuación presione el botón Aceptar para salir Operación Pantalla de visualización 1 En el menú de configuración de fotografía seleccione el icono DETECCIÓN DE SONRISA y a continuación presione el botón Aceptar para entrar en su menú de configuración 2 Utilice el botón arriba abajo para seleccionar Encendido o A...

Страница 99: ...ione el botón Aceptar para entrar en su menú de configuración 2 Utilice el botón arriba abajo para seleccionar Encendido o Apagado y a continuación pulse el botón Aceptar para validar la configuración 3 O presione el botón Arriba para resaltar el icono Retorno y a continuación presione el botón Aceptar para salir 4 Cuando la función está activada la fecha aparece en la esquina de la fotografía Ope...

Страница 100: ...iva la presentación de diapositivas Operación Pantalla de visualización 1 En el menú de configuración de fotografía seleccione el icono Presentación de diapositivas y a continuación presione el botón Aceptar para entrar en su menú de configuración 2 Utilice el botón arriba abajo para seleccionar el ajuste deseado y a continuación pulse el botón Aceptar para validar la configuración 3 O presione el...

Страница 101: ...FORMATEAR Y RESTAURAR LA CONFIGURACIÓN PREDETERMINADA 4 Utilice el botón de derecha izquierda para seleccionar la opción deseada en el carrusel y a continuación pulse el botón Aceptar para entrar en su menú 5 O presione el botón Arriba para resaltar el icono Retorno y a continuación presione el botón Aceptar para salir Operación Pantalla de visualización 1 En el menú de configuración de video sele...

Страница 102: ...ntinuación presione el botón Aceptar para entrar en su menú de configuración 2 Utilice el botón arriba abajo para seleccionar el ajuste deseado y a continuación pulse el botón Aceptar para validar la configuración 3 O presione el botón Arriba para resaltar el icono Retorno y a continuación presione el botón Aceptar para salir Operación Pantalla de visualización 1 En el menú de configuración de vid...

Страница 103: ...eccione el icono HORA y a continuación pulse el botón Aceptar 2 Seleccione Cambiar configuración y a continuación oprima el botón Aceptar para entrar en el menú de configuración 3 Utilice el botón arriba abajo para desplazarse entre las líneas de Día Mes Año Hora y Minuto 4 Utilice el botón derecha izquierda para ajustar el valor numérico 5 Presione el botón Arriba para resaltar el icono Retorno y...

Страница 104: ...uración de video seleccione el icono RESTAURAR PREDETERMINADO y a continuación presione el botón Aceptar para entrar en su menú de configuración 2 Utilice el botón arriba abajo para seleccionar Sí o No y a continuación pulse el botón Aceptar para validar la configuración 3 O presione el botón Arriba para resaltar el icono Retorno y a continuación presione el botón Aceptar para salir CONFIGURACIÓN ...

Страница 105: ...1 Oprima para pasar al menú de modo video fotografía 2 Utilice el botón de derecha izquierda para seleccionar EFECTOS en el carrusel y a continuación pulse el botón Aceptar para entrar en su menú 3 El menú contiene tres opciones ESCENA FILTRO y BALANCE DE BLANCOS para ajustar la configuración de la videocámara 4 Utilice el botón de derecha izquierda para seleccionar la opción deseada en el carruse...

Страница 106: ... modo Noche Filtro Puede seleccionar los efectos de filtro especiales en los videos o fotografías AUTO Tome fotografías sin ningún efecto especial en la imagen BLANCO y NEGRO La imagen se convierte en blanco y negro CLÁSICO La imagen se convierte en apariencia sepia Operación Pantalla de visualización 1 En el menú de configuración de video seleccione el icono ESCENA y a continuación presione el bo...

Страница 107: ... y a continuación presione el botón Aceptar para entrar en su menú de configuración 2 Utilice el botón arriba abajo para seleccionar el ajuste deseado y a continuación pulse el botón Aceptar para validar la configuración 3 O presione el botón Arriba para resaltar el icono Retorno y a continuación presione el botón Aceptar para salir Operación Pantalla de visualización 1 En el menú de configuración...

Страница 108: ...z para grabar archivos de audio WAV Operación Pantalla de visualización 1 Oprima el botón Menú para pasar al menú de modo video fotografía 2 Utilice el botón de derecha izquierda para seleccionar GRABACIÓN DE VOZ en el carrusel y a continuación pulse el botón Aceptar para entrar en su menú ...

Страница 109: ...ción de voz Para detener la grabación oprímalo de nuevo 4 Mientras está grabando el audio pulse el botón derecho para pausar la grabación Oprima de nuevo para reanudar la grabación 5 O presione el botón Arriba para resaltar el icono Retorno y a continuación presione el botón Aceptar para salir Operación Pantalla de visualización ...

Страница 110: ...ara pasar a la miniatura de audio 2 Utilice el botón de derecha izquierda para seleccionar el archivo de audio que desea reproducir y a continuación pulse el botón Aceptar para reproducirlo 3 Al reproducir audio pulse el botón Arriba para aumentar el volumen o pulse el botón Abajo para disminuirlo Operación Pantalla de visualización 1 Presione el botón Arriba para ir a la pantalla de información 2...

Страница 111: ...ucción Botón Arriba 1 En el Modo Reproducir vaya a la pantalla Información 2 Al reproducir videos oprima para aumentar el volumen Botón Abajo 1 Al reproducir videos oprima para disminuir el volumen Botón Izquierdo 1 Pasa al video fotografía o audio anterior Botón Derecho 1 Pasa al siguiente video fotografía o audio Botón Grabar Aceptar 1 Pulse para reproducir pausar el video audio Botón de encendi...

Страница 112: ...n de la pantalla LCD 1 Batería Alimentación plena Batería Alimentación media Batería Alimentación baja 2 Retorno 3 Modo Video Recorte de video Modo de Fotografía Presentación de diapositivas 4 22 de 25 Número actual de videos o fotografías Número total de videos o fotografías 5 Eliminar 6 Presione el botón Grabar Aceptar para cambiar a la pantalla de miniaturas ...

Страница 113: ...ación 1 En el modo de Video Fotografía pulse el botón izquierdo para cambiar al modo Reproducir video 2 O seleccione GALERÍA DE VIDEOS GALERÍA DE FOTOGRAFÍAS en el menú de modo de Video Fotografía 3 Utilice el botón Derecha Izquierda para ir al siguiente anterior video o fotografía 4 Presione el botón Arriba para ir a la pantalla de información de videos y fotografías NOTA ...

Страница 114: ...cir video pulse el botón Aceptar para reproducir o pausar el video 2 Mientras reproduce el video pulse el botón Derecha Izquierda para el avance y rebobinado rápidos 3 Use el botón Arriba Abajo para ajustar el volumen Operación Pantalla de visualización 1 En la pantalla de información utilice el botón Abajo para resaltar el icono de Editar y a continuación presione el botón Aceptar para empezar a ...

Страница 115: ... icono de vista previa y a continuación presione el botón Aceptar para ver la vista previa del video editado 4 Presione el botón Abajo y a continuación presione el botón Derecho para resaltar el icono guardar Presione el botón Aceptar para recortar la parte blanca y guardar la parte roja 5 En la pantalla de confirmación puede seleccionar Sobrescribir o Como nuevo para guardar el video editado 6 O ...

Страница 116: ...tar el icono Presentación de diapositivas y a continuación presione el botón Aceptar para iniciar la presentación de diapositivas Operación Pantalla de visualización 1 En la pantalla de información utilice el botón Abajo y a continuación el botón Derecha para resaltar el icono de borrado y presione el botón Aceptar para ir a la pantalla de confirmación 2 Seleccione Sí y a continuación presione el ...

Страница 117: ... ayuda a gestionar medios y transferir videos a Internet en forma sencilla Adobe Reader es un programa de software muy popular que se requiere para ver el Manual del usuario Muchos usuarios encontrarán que ya tienen instalado este software en su computadora Para instalar el paquete de software incluido 1 Inserte el CD ROM en la unidad de discos ópticos de la computadora Aparece la pantalla de ejec...

Страница 118: ... o colocarlos en Internet Para hacerlo 1 Conecte la computadora y la videocámara con el mini cable USB 2 0 que se suministra 2 Seleccione Almacenamiento masivo en la pantalla de la videocámara 3 Para acceder a archivos en su tarjeta Micro SD los archivos de videos fotografías y audio se pueden encontrar en la computadora bajo Mi PC SD DCIM 100MEDIA la ruta varía dependiendo del nombre de la tarjet...

Страница 119: ...rchivos a los sitio web de redes sociales de manera instantánea Le ayuda a compartirlos con su familia y amigos en los sitios web CAMILEO Uploader Para cargar archivos a Internet 1 Conecte la videocámara a la computadora usando el cable USB que se suministra Ilustración de muestra Conexión de la videocámara a una computadora ...

Страница 120: ...rincipal aparece automáticamente en el escritorio Imagen de muestra Pantalla principal de CAMILEO Si ArcSoft MediaImpression no está instalado se le puede solicitar que instale el H 264 codec ffdshow gratis bajo licencia GPL para visualizar correctamente los videos en CAMILEO Uploader 4 Seleccione el sitio web a donde desea transferir los archivos 5 Haga clic en VIDEOS FOTOGRAFÍAS para ir a la pág...

Страница 121: ...r todo Deseleccionar todo para seleccionar o deseleccionar todos los archivos de video o fotografías que aparecen en la página actual Imagen de muestra Pantalla principal de CAMILEO 7 Haga clic en Upload Cargar para empezar a transferir los archivos Imagen de muestra Pantalla de CAMILEO Uploader Cargar videos fotografías ...

Страница 122: ...go haga clic en Save Guardar 4 Puede señalar Recordar contraseña Remember Password para guardar su información de cuenta y contraseña en esta aplicación CAMILEO Uploader Si está desactivada la solicitud de contraseña aparece después de hacer clic en Cargar Upload en la página de miniaturas Imagen de muestra Pantalla CAMILEO Uploader Inscríbase para una nueva cuenta Es posible que en ciertas region...

Страница 123: ...a videocámara con el mini cable USB 2 0 que se suministra 2 Seleccione Webcam en la pantalla de la videocámara 3 En este modo puede implementar reuniones de video conferencia en vivo y comunicaciones multimedia Ilustración de muestra Conexión de la videocámara a una computadora ...

Страница 124: ...Por qué algunas de las fotografías de interiores aparecen oscuras y borrosas La videocámara extiende el tiempo de exposición de las fotografías en interiores o en condiciones de baja iluminación Mantenga la videocámara y el objetivo firmes durante varios segundos mientras toma las fotografías El obturador emite un sonido cuando se toma una fotografía Despuésdeconectar el cable USB a la computadora...

Страница 125: ...a otras fuentes de asistencia técnica Intente lo siguiente antes de comunicarse con Toshiba Revise la documentación suministrada con el producto Si el problema se produce mientras está ejecutando una aplicación de software consulte las sugerencias sobre posibles soluciones de problemas en la documentación del software Póngase en contacto con el personal de asistencia técnica del fabricante del sof...

Страница 126: ... 583 3305 desde fuera de Estados Unidos Garantía Información en línea sobre la garantía Este producto incluye una Garantía limitada estándar de un 1 año En el CD adjunto se encuentra una copia de la garantía la cual también se puede observar en línea en http pcsupport toshiba com accessories1yr Servicio de garantía Los clientes en los cincuenta 50 estados de Estados Unidos y en el Distrito de Colu...

Отзывы: