background image

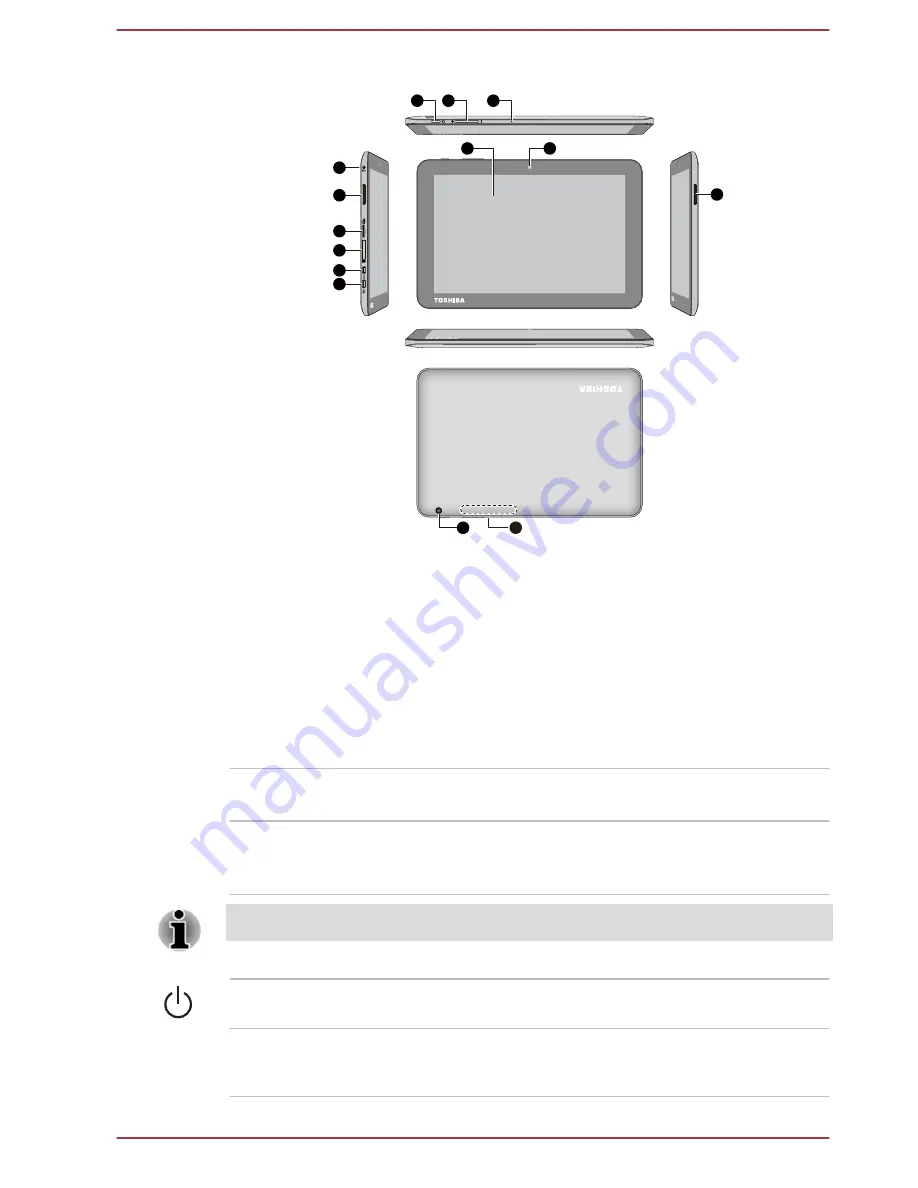
Figure 3-1 Grand tour of the tablet

7

6

7

8

9

11

10

3

5

4

1

2

12

13

1. Display screen

2. Web Camera (front)

3. Power button

4. Volume down/up button

5. Microphone

6. Headphone/Microphone combo jack

7. Speakers

8. Memory media slot

9. SIM card slot *

10. Micro-HDMI port

11. Micro-USB port

12. Web Camera (back)

13. Wireless communication antennas
(not shown)


* Provided with some models.
Product appearance depends on the model you purchased.

Display screen

Display screen brightness can be adjusted
manually.

Camera

Your tablet is equipped with a front Web Camera
and a back camera used for recording video or
taking photographs.

Both cameras might have different resolutions.

Power button

Press & hold this button to turn on/off the tablet.

Volume down/up
button

Press either of the buttons to decrease or
increase the volume.

User's Manual

3-2

Содержание AT10-B

Страница 1: ...User s Manual TOSHIBA AT10 B ...

Страница 2: ...anada Industry Canada IC 1 7 Following information is only for Turkey 1 7 Chapter 2 Introduction About the guide 2 1 Instruction Manual for Safety and Comfort 2 1 Safety icons 2 1 Chapter 3 Getting Started Check the components 3 1 Grand tour 3 1 Hardware 3 4 Using the tablet for the first time 3 6 Care and use of the battery 3 10 Charging the battery 3 10 Chapter 4 Basics Using the touch screen 4 ...

Страница 3: ...usic App 5 6 People 5 7 Service Station 5 7 TOSHIBA File Manager 5 9 TruCapture 5 12 Online Manual 5 12 Chapter 6 Settings Wireless networks 6 1 Device 6 9 Personal 6 15 Accounts 6 19 System 6 19 Chapter 7 Optional Accessories Memory media slot 7 1 SIM card slot 7 3 USB device 7 4 HDMI device 7 5 Wireless display 7 5 Optional TOSHIBA Accessories 7 7 Chapter 8 Troubleshooting Problem solving proces...

Страница 4: ...1 Chapter 10 Information for Wireless Devices Wireless Technology Interoperability 10 1 CAUTION about Wireless Devices 10 1 Wireless Devices and your health 10 2 Radio Regulatory Information 10 2 Device Authorization 10 7 Radio approvals for wireless devices 10 7 User s Manual iv ...

Страница 5: ...orporation s copy protection technology in the product must be authorized by Rovi Corporation Reverse engineering or disassembly is prohibited TO THE MAXIMUM EXTENT PERMITTED BY APPLICABLE LAW TOSHIBA CORPORATION ITS AFFILIATES AND OR SUPPLIERS TOSHIBA DISCLAIM ALL WARRANTIES WITH REGARD TO THE SOFTWARE EITHER EXPRESSLY IMPLIED OR STATUTORY INCLUDING BUT NOT LIMITED TO THE WARRANTY OF NONINFRINGEM...

Страница 6: ...bility of Google applications services and features may vary by country carrier phone model and manufacturer Bluetooth is a trademark owned by its proprietor and used by TOSHIBA under license Wi Fi is a registered trademark of the Wi Fi Alliance Miracast is a trademark of Wi Fi Alliance Secure Digital and SD are trademarks of SD Card Association Adobe Adobe PDF and Reader are either registered tra...

Страница 7: ...paration between the equipment and receiver Connect the equipment into an outlet on a circuit different from that to which the receiver is connected Consult the dealer or an experienced radio TV technician for help Only peripherals complying with the FCC class B limits may be attached to this equipment Operation with non compliant peripherals or peripherals not recommended by TOSHIBA is likely to ...

Страница 8: ...s toshiba teg com on the Internet Working environment The Electromagnetic Compliance EMC of this product has been verified typically for this product category for a so called Residential Commercial Light Industry Environment Any other working environment has not been verified by Toshiba and the use of this product in these working environments is maybe restricted or cannot be recommended Possible ...

Страница 9: ...rope com computers info reach for information about the presence in our articles of substances included on the candidate list according to article 59 1 of Regulation EC No 1907 2006 REACH in a concentration above 0 1 weight by weight Following information is only valid for EU member States Disposal of products The crossed out wheeled dust bin symbol indicates that products must be collected and di...

Страница 10: ...r the shop where you purchased the product These symbols may not stick depending on the country and region where you purchased Following information is only for India The use of this symbol indicates that this product may not be treated as household waste By ensuring this product is disposed of correctly you will help prevent potential negative consequences for the environment and human health whi...

Страница 11: ...tification number only signifies that the Industry Canada technical specifications were met Following information is only for Turkey Compliant with EEE Regulations Toshiba meets all requirements of Turkish regulation 26891 Restriction of the use of certain hazardous substances in electrical and electronic equipment The number of possible pixel failures of your display is defined according to ISO 9...

Страница 12: ...proper use of this tablet is described in the enclosed Instruction Manual for Safety and Comfort Be sure to read it before using the tablet Safety icons Safety icons are used in this manual to bring important information to your attention Each type of icon and its implication are identified as shown below Indicates a potentially hazardous situation which could result in death or serious injury if ...

Страница 13: ...heck the components Check to make sure that you have all of the following items Hardware TOSHIBA Tablet AC adaptor equipped with some models Micro USB cable Documentation Quick Start Guide Instruction Manual for Safety and Comfort If any of the items is missing or damaged contact your dealer immediately Grand tour Handle your product carefully to avoid scratching or damaging the surface The follow...

Страница 14: ...ommunication antennas not shown Provided with some models Product appearance depends on the model you purchased Display screen Display screen brightness can be adjusted manually Camera Your tablet is equipped with a front Web Camera and a back camera used for recording video or taking photographs Both cameras might have different resolutions Power button Press hold this button to turn on off the t...

Страница 15: ...sfer data from devices such as digital camera onto your tablet Refer to the Memory media slot section in Optional Accessories chapter for details Keep foreign metal objects such as screws staples and paper clips out of the memory media slot Foreign metal objects can create a short circuit which can cause damage and fire possibly resulting in serious injury SIM card slot This slot lets you insert a...

Страница 16: ... and the hardware of the tablet it is recommended that you become familiar with each before you operate the tablet The actual specifications might vary depending on the model you purchased Content that is copyright protected or has limited access rights cannot be played on this tablet Processor CPU Your tablet is equipped with Intel Atom Z3735F Mobile Processor Memory Memory on board This tablet i...

Страница 17: ...roller maximizes display performance Multimedia Web Camera Web Camera is a device that allows you to record video or take photographs with your tablet You can use it for video chatting or video conferences by using a communication tool Communications Bluetooth Bluetooth wireless communication function eliminates the need for cables between electronic devices such as computers printers and mobile p...

Страница 18: ... certain conditions might result in data loss Connecting the AC adaptor Some models are equipped with AC adaptor When battery power becomes low you must charge it Use only the tablet connected to an AC power source to charge the battery Never attempt to charge the battery with any other charger The AC adaptor can automatically adjust to any voltage ranging from 100 volt to 240 volt and to a freque...

Страница 19: ... source that does not correspond to both the voltage and the frequency specified on the regulatory label of the unit Failure to do so could result in a fire or electric shock possibly resulting in serious injury When you connect the AC adaptor to the tablet always follow the steps in the exact order as described below Connecting the plug to a live electrical outlet should be the last step otherwis...

Страница 20: ...de you can also charge your tablet although more slowly by connecting the Micro USB cable to the USB port on your PC Make sure your PC is turned ON while charging via USB If your PC is turned OFF depending on PC specifications the tablet battery may discharge We recommend that you do not use your tablet while charging via USB as auto shutdown may occur if the battery charge is too low Turning on t...

Страница 21: ... power If you are not going to use your tablet for a long time shut it down You can also turn the LCD off in order to extend battery life Shut down the tablet When you shut down the tablet no data will be saved The tablet will boot to the operating system s main screen the next time it is turned on 1 If you have entered data either save it to flash memory or to other storage media Never turn off t...

Страница 22: ...ecautions in order to handle your battery properly Refer to the enclosed Instruction Manual for Safety and Comfort for detailed precautions and handling instructions The lithium ion battery can explode if not handled or disposed of properly Dispose of the battery as required by local ordinances or regulations Charge the battery only in an ambient temperature from 5 through 35 degrees Celsius Other...

Страница 23: ...ture the temperature of the tablet and how you are using the tablet for example if you make heavy use of external devices then the battery might get scarcely charged up Battery exhausted time The following table shows the approximate exhausted time of a fully charged battery Battery type Time Battery 1 cell 19 5 Wh about 6 5 hours in use about 150 hours sleep mode Please be aware that the battery ...

Страница 24: ...llowing conditions The battery has not been used for a long time The battery has completely discharged and been left unattended for a long time In such cases you should follow the steps as detailed below 1 Fully discharge the battery when powered on until the system automatically turns the tablet off 2 Connect the AC adaptor to the Micro USB port on the tablet and to a wall outlet that is supplyin...

Страница 25: ...een until you reach the target position You can drag items on the Home screen to reposition them Swipe or slide To swipe or slide you quickly move your finger across the surface of the screen without pausing when you first touch it so you don t drag an item instead For example you slide the screen up or down to scroll a list Double tap Tap quickly twice on a webpage map or other screen to zoom Pin...

Страница 26: ...App shortcuts Tap to open an app All Apps Tap to see all your apps and widgets Favorite tray The Favorite tray is located at both left and right side of All Apps You can move your favorite apps to Favorite tray Back Return to the previous screen Home Return to the default Home screen Recent apps Tap to see the thumbnails of your recently used apps Some application can hide Back Home Recent apps ic...

Страница 27: ...your tablet s status Status icons Battery level Wi Fi status and other tablet s status are shown in icons on the right side of System bar Some status icons will not be shown if the status information are not available Notification icons The notification from system and apps are shown in icon on the left side of System bar Quick Settings You can use Quick Settings to change frequently used settings...

Страница 28: ...tifications of ongoing activities are listed first followed by notifications of events such as a new mail notification You can tap the area out of the notifications panel to close the notifications panel Responding to a notification To respond to a notification do the following 1 Open the notifications panel Your current notifications are listed in the panel each with a brief description 2 Tap a n...

Страница 29: ... screen You can add application shortcuts or widgets to Home screens You can also change the wallpaper Adding an item to the Home screen To add an item to the Home screens follow the steps listed below 1 Tap All Apps on the Home screen 2 Tap APPS and WIDGETS tab You can also swipe left or right to move between screens 3 Press hold an item and the Home screen will appear Drag it to the place you wa...

Страница 30: ...llpaper Creating a grouped folder Folders provide an easy way to organize and manage your apps shortcuts You can group several app icons into a folder Drag and drop an app icon on top of the other to automatically create a grouped folder To rename the created folder tap to open it and tap its name at the bottom to enter a new one Press hold an icon in the folder and drag it to the Home screen When...

Страница 31: ...o the USB port on the computer The Micro USB connector of the USB cable must be correctly plugged into the Micro USB port on the tablet Failure to do so correctly might result in possible damage to the Micro USB port Depending on your settings your tablet will be recognized as a removable MTP Media Transfer Protocol device or PTP Picture Transfer Protocol device allowing you to access its contents...

Страница 32: ... storage To perform the factory data reset do the following 1 Tap All Apps Settings Backup reset Factory data reset Reset tablet Erase everything 2 The factory data reset will be done Note that the following data will be erased System settings and application settings User installed applications Internal storage files such as music or photos Data in the removable media will not be erased User s Ma...

Страница 33: ...te everything you entered copy cut press hold the calculation area to select copy or cut Calendar You can use Calendar to remind on dates events or appointments Add events to Calendar You can add events to Calendar by following these steps 1 Press hold any blank period on your calendar or tap the New Events icon on the top right corner of Calendar screen 2 Enter Event name and set details for this...

Страница 34: ...rama mode Panorama mode allows you to take multiple subsequent photos and the tablet automatically join them together to create a single image with a wide angle view After the camera is set to panorama mode you will select how shots will be stitched slowly move the camera left to right or right to left Review your pictures videos You can review the pictures videos you ve just taken by swiping left...

Страница 35: ...re location Tap to enable or disable storing location information of pictures you take Clock In addition to displaying the date and time you can use Clock to set an alarm timer and stopwatch To open Clock tap All Apps Clock Working with Clock You can change Clock settings as follows Tap the icon to display a list of cities with different time zones Check to show the clock of a city on Clock screen...

Страница 36: ...verything in the display 3 Tap Start After starting a timer you can work with it as follows Enter a name Tap Pause a timer Tap STOP Tap to add one minute to the current time One minute can be added with each tap You can tap several times to add more minutes Delete a timer Tap Repeat a timer Tap Tap to add more timers The timer beeps when the time is up It will keep beeping until you tap STOP Using...

Страница 37: ...ply all or Forward operations You can also delete email and manage them in other ways Manage email accounts The Email application allows you to add and manage your email accounts To add an email account Tap the icon and select Settings On the Settings screen tap ADD ACCOUNT To edit account settings Tap the icon and select Settings General settings applies to all accounts To edit settings of a spec...

Страница 38: ...ake pictures or videos directly Refer to the Camera section for more information Work with pictures videos After opening a picture or a video you can work with it as follows Tap to share photo or video with other applications Tap to find several options on the photo video screen Detailed options are different between the photo and video screen The Google Play Music App You can use the Google Play ...

Страница 39: ...You can also manage that process manually Open People To open your contact tap All Apps People All of your contacts are displayed alphabetically in a scrolling list Tap a contact to view the details Entries for communicating with the contact are followed by details Import and export contacts To import export your contacts tap menu icon and then tap Import export Search for a contact You can search...

Страница 40: ...Tap the Check for Updates button and the application will refresh the list of available updates During normal operations the Service Station will periodically check to see if there are any updates for your system This is done automatically If there are new updates available you will be notified with the Service Station icon in the System bar of your tablet While the Service Station will periodical...

Страница 41: ...tation will download both application and system updates System updates require a reboot of your tablet Downloading a system update is the same as an application update Installing a system update is similar to an application update but you will be reminded that the tablet will be rebooted during the installation process Make sure to close any other applications and save all work prior to installin...

Страница 42: ...tive not full path of current folder Control panel Control panel contains several functional icons for file and folder operations Files and folders panel This panel is divided into five categories ALL MUSIC VIDEOS PICTURES and DOCUMENTS you can tap to view as you want Explore files and folders with optional layout in this panel You can read and collect additional information such as size thumbnail...

Страница 43: ...edirect to a folder where to paste the selected items Tap Paste in the Control panel to complete the operation Delete Tap Delete in the Control panel to delete the item s you have selected Confirm the operation by tapping OK Share Items can be shared with the other applications such as Email To do this first select the items and then tap icon Tap Share from the menu and select the app you want Gri...

Страница 44: ...lder TOSHIBA File Manager is designed to create folder shortcut in the Device panel 1 Press hold a folder to select it and then tap to open the menu 2 Tap Add to shortcut to add it to the Device panel This operation is only applicable to folders saved in the internal storage To remove a folder shortcut from the Device panel press hold the shortcut and tap OK However the storage device icon cannot ...

Страница 45: ...and data transmission Wi Fi data networks and Bluetooth devices such as headsets Options under WIRELESS NETWORKS which are briefly described below are used to configure and manage these connections You can tap More to get additional hidden options Refer to the following sections in this chapter for more details Wi Fi Tap to see available Wi Fi networks when Wi Fi is turned on Bluetooth Tap to see ...

Страница 46: ... configure your tablet so it can connect to them There are numerous systems for securing Wi Fi connections including some that rely on secure certificates or other schemes to ensure that only authorized users can connect Turn off Wi Fi when you are not using it to extend the life of your battery The Status bar displays icons that indicate Wi Fi status Connected to a Wi Fi network waves indicate th...

Страница 47: ...on 2 In the Wi Fi settings screen tap the plus icon 3 Enter the Network SSID name If the network is secured tap Security and then tap the type of security deployed on the network 4 Enter the required security credentials 5 Tap Save The tablet will connect to the wireless network Any credentials that you enter will be saved so you can connect automatically the next time you come within range of thi...

Страница 48: ...ttings Advanced Wi Fi settings are available following the steps below 1 Turn on Wi Fi if it is not already on 2 In the Wi Fi settings screen tap the Menu icon and tap Advanced Several options are described below Network notification By default when Wi Fi is on you receive notifications in the Status bar when your tablet detects an open Wi Fi network Uncheck this option to turn off notifications K...

Страница 49: ...share files or streaming videos audios from other compatible devices Tap the Menu icon and tap Wi Fi Direct to enable Wi Fi direct Tap SEARCHING FOR DEVICES to find the nearby available devices whose names will be listed under PEER DEVICES for connection You can also rename your device by tapping RENAME DEVICE option Wi Fi should be connected before using Wi Fi direct Wi Fi direct may fail to work...

Страница 50: ...sure that the Bluetooth is turned on Your tablet will scan for and display the names of all available Bluetooth devices in range If the device you want to pair with is not included in the list make it discoverable See the documentation that came with your device to learn how to make it discoverable by your tablet and for other instructions for pairing 3 If your tablet stops scanning before you mak...

Страница 51: ...t has a generic Bluetooth name by default which is visible to other devices when your connect them You can change the name so that it is more recognizable 1 Open the Settings app from All Apps 2 Make sure that the Bluetooth is turned on 3 In the Bluetooth settings screen tap the Menu icon and tap Rename tablet 4 Enter a new name for your tablet 5 Tap Rename to complete the operation To set a time ...

Страница 52: ...to edit 4 When you finished tap Save If you have created a new APN tap it in the APNs screen to start using it Data usage Some of the features described in this section apply only to models with 3G modules Data usage refers to the amount of data uploaded or downloaded by your tablet during a given period Additional fees may be charged when the data usage exceeds the limit depending on your wireles...

Страница 53: ...k Set mobile data limit Drag the line to the limit you want When the data usage reaches the limit mobile network will be turned off automatically You will receive a notification Device Options under DEVICE allow you to fine tune your tablet hardware Sound You can control sound volume and ringtone from Settings Sound Sound contains the following options Volumes Tap to open a dialog where you can dr...

Страница 54: ...here you can select which photos to be displayed Photo Frame Presents a slideshow of photos on your tablet Tap Quick settings icon to open a screen where you can select which photos to be displayed Photo Table Scatters photos on your tablet across your screen Press hold a photo to move it around the screen or swipe it away to hide it Tap Quick settings icon to open a screen where you can select wh...

Страница 55: ...s etc The amount of audio data of internal storage Downloads The amount of downloaded data of internal storage Cached data The amount of cached data for all apps of internal storage Misc The amount of miscellaneous data of internal storage You can also find the total storage amount of other users SD card SD card contains the following options after you insert an SD card Total space Shows total mem...

Страница 56: ...tions installed on your tablet along with their size They are sorted by name alphabetically by default RUNNING Tap to open a list of all applications services applications or parts of applications that provide services to other applications or that run even when their main application isn t running processes that are currently running and how much memory they are using Depending on the service whe...

Страница 57: ...ve any user s space completely Some options in Settings app are only available for owner The performance and response of the tablet may slow down when background users are running applications New users cannot be created when the storage space is not enough in the tablet Create a user To add a user you must be the owner Tap the Add user or profile and tap User A dialog will appear tap OK to contin...

Страница 58: ... profiles As the tablet owner you can create restricted profiles so that other users have restricted access to features and contents on your tablet Before you create a restricted profile you will need to set up a screen lock to protect your apps and personal data Create a restricted profile 1 Tap Add user or profile and tap Restricted profile A new profile with a list of applications displays Tap ...

Страница 59: ...tings Slide the Location switch to the ON position Location contains the following options Mode High accuracy Check this option to estimate your location faster and more accurately using GPS Wi Fi and mobile networks Battery saving Check this option to estimate your location using low battery intensive location sources such as Wi Fi Device only Check this option to estimate your location using GPS...

Страница 60: ...aven Enable widgets Check this option to enable widget on lock screen The default widget is digital clock To add more swipe from the left edge of the widget to right untill you see a plus icon Liveliness check Requires eye blink while unlocking if checked You can also choose None to disable screen lock However when multiple users are setup this option becomes unavailable Owner info or User info or...

Страница 61: ... of secure certificates and related passwords and other credentials You can use credential storage to establish some kinds of Wi Fi connections If you have not set a password for credential storage this setting is grayed Install from SD card Tap to install a secure certificate from the SD card Clear credentials Tap to delete all secure certificates and related credentials and erases the secure sto...

Страница 62: ...to open a screen where you can set the voice recognition function Text to speech output Tap to open a screen where you can set the text to speech engine required for text to speech function Mouse Trackpad Pointer speed Tap to set the mouse pointer speed by dragging the slider left or right Backup reset You can use the Backup reset settings to manage your personal data Backup Restore Back up my dat...

Страница 63: ...layed You can also use these settings to set your own time and time zone rather than obtaining the current time from the mobile network Automatic date time Check this option to auto sync time Automatic time zone Check this option to auto sync time zone This function is only supported by 3G models Set date Tap to open a dialog to manually set the date The system date cannot be set beyond Dec 31 203...

Страница 64: ... mode to easily zoom and pan your screen This feature is developed to help the low vision users Temporarily magnify Triple tap hold Magnify pan Triple tap hold then drag your finger Toggle magnification mode in or out Triple tap release or enter or exit an application to get out of magnification mode When you are in magnification mode you can Pan Drag two or more fingers across the screen Adjust z...

Страница 65: ...ay Tap to select the delay required for your tablet to notice that you are pressing and holding an item Printing You can use printing function to print contents of certain screens About tablet About tablet includes information about your tablet System updates Tap to open the screen to check your system for update Status Tap to open the Status screen with a long list of information about your batte...

Страница 66: ...Baseband version Display the baseband version This function is only supported by 3G models Build number Display the build number User s Manual 6 22 ...

Страница 67: ... the following memory media Secure Digital SD Card microSD SDHC SDXC Card Please note that not all memory media have been tested and verified to work correctly Therefore it is not possible to guarantee that all memory media can operate properly Memory media This section provides the important safety precautions in order to handle your memory media Points to note about microSD SDHC SDXC memory card...

Страница 68: ...uids or store in humid areas or lay media close to containers of liquid Do not touch the metal part of a card or expose it to liquids or let it get dirty After using card return it to its case The card is designed so that it can be inserted only one way Do not try to force the card into the slot Do not leave a card partially inserted in the slot Press the card until you hear it click into place Me...

Страница 69: ...s apply to all types of supported media devices To remove a memory media follow the steps as detailed below 1 Make sure all file operations are finished 2 Tap All Apps Settings Storage Unmount SD card 3 Push the memory media until you hear a click to partially release it 4 Grasp it and pull it out of the slot Do not remove the memory media while the tablet is in Sleep mode The tablet could become ...

Страница 70: ...wise the SIM card may be damaged Damage may also happen to the tablet 1 Remove the slot cover and push the SIM card until you hear a click to partially release it 2 Grasp it and pull it out of the slot USB device This tablet is equipped with a Micro USB port supporting USB host function This allows you to connect the following USB devices to the tablet USB flash drives USB HDDs only FAT file syste...

Страница 71: ...dia Interface display devices have not been confirmed some HDMI display devices may not function properly 1 Plug Type D connector of the HDMI cable into the Micro HDMI port on your tablet 2 Plug the other end of the HDMI cable into the HDMI port of the HDMI device Figure 7 3 Connecting an HDMI cable 1 2 1 Micro HDMI port 2 Micro HDMI Type D connector Please do not plug unplug an HDMI device when t...

Страница 72: ... display device Turning wireless display on or off 1 Tap All Apps Settings Display Cast screen 2 Tap the Menu icon to select Enable Wireless display Connecting your tablet with a wireless display You can connect a display wirelessly by the following steps 1 Make sure that the wireless display is turned on on your tablet Your tablet will scan for and display the names of all available displays in r...

Страница 73: ...nt to use you can add a number of options and accessories For reference the following list details some of the items that are available from your reseller or TOSHIBA dealer AC Adaptor If you frequently use your tablet at more than one site it may be convenient to purchase an additional AC adaptor to be kept at each site User s Manual 7 7 ...

Страница 74: ...meant only as a guide they are not definitive problem solving techniques In reality many problems can be solved simply but a few may require help from TOSHIBA Support if you find you need to consult others be prepared to describe the problem in as much detail as possible Preliminary checklist You should always consider the simplest solution first the items detailed in this checklist shall provide ...

Страница 75: ...s display panel problems may be related to the tablet s setup and configuration Problem Procedure Problems above remain unresolved or other problems occur You should initially refer to the documentation supplied to you with the software to understand the cause of the problems If you are still unable to resolve the problem contact your reseller dealer or service provider Memory Media Card Problem P...

Страница 76: ...and reconnect it to ensure it is firmly attached Sound system In addition to the information in this section please also refer to the documentation supplied with your audio device Problem Procedure No sound is heard Adjust the volume Check the software volume settings Check to see if system sound is muted Check to make sure the headphone connection is secure Wireless LAN If the following procedure...

Страница 77: ...e first Before contacting TOSHIBA try the following Review troubleshooting sections in the documentation supplied with your software and or peripheral devices If a problem occurs when you are running software applications consult the software documentation for troubleshooting suggestions and consider calling the software company s technical support department for assistance Consult the reseller or...

Страница 78: ...quirements Conditions Ambient temperature Relative humidity Operating 5 C 41 F to 35 C 95 F 20 to 90 noncondensing Non operating 20 C 4 F to 60 C 140 F 10 to 95 noncondensing Wet bulb temperature 29 C maximum Conditions Altitude from sea level Operating 0 to 6 561 feet 2 000 meters Non operating 0 to 40 000 feet 12 192 meters Power Requirements AC adaptor 100 240V AC 50 Hz or 60 Hz cycles per seco...

Страница 79: ...cification depending on the model you purchased as defined and approved by the Bluetooth Special Interest Group Logo certification with Bluetooth wireless technology as defined by the Bluetooth Special interest Group CAUTION about Wireless Devices The wireless devices have not completed verification of connection and operation with all devices which are using the Wireless LAN or Bluetooth radio te...

Страница 80: ...esponsible representatives of the organization These situations may for example include Using the wireless products on board of airplanes or In any other environment where the risk of interference to other devices or services is perceived or identified as harmful If you are uncertain of the policy that applies on the use of wireless devices in a specific organization or environment for example air...

Страница 81: ... if WAS RLAN s are used outside own premises Luxembourg Implemented General authorization required for network and service supply Russian Federation Limited e i r p 100mW Permitted to use only for indoor applications closed industrial and warehouse areas and on board aircraft 1 Permitted to use for local networks of aircraft crew service communications on board aircraft in area of the airport and ...

Страница 82: ...eration Canada Industry Canada IC This device complies with RSS 210 of Industry Canada Operation is subject to the following two conditions 1 this device may not cause interference and 2 this device must accept any interference including interference that may cause undesired operation of this device Ce dispositif est conforme à la norme CNR 210 d Industrie Canada applicable aux appareils radio exe...

Страница 83: ...nfiguration the distance between the antenna and the user should not be less than 20 cm Refer to the tablet user s manual for the details regarding antenna location The installer of this radio equipment must ensure that the antenna is located or pointed in such a way that it does not emit RF field in excess of Health Canada limits for the general population consult Safety Code 6 obtainable from He...

Страница 84: ...f this equipment may operate within the same range as industrial devices scientific devices medical devices microwave ovens licensed radio stations and non licensed specified low power radio stations for mobile object identification systems RFID used in factory production lines Other Radio Stations 1 Before using this equipment ensure that it does not interfere with any of the equipment listed abo...

Страница 85: ...Wireless LAN supports W52 W53 W56 Channel Device Authorization This device obtains the Technical Regulation Conformity Certification and it belongs to the device class of radio equipment of low power data communication system radio station stipulated in the Telecommunications Business Law of Japan Realtek RTL8723BS 802 11n Wireless LAN and bluetooth The Name of the radio equipment RTL8723BS DSP Re...

Страница 86: ...a Belgium Bulgaria Canada Cyprus Czech Rep Denmark Estonia Finland France Germany Greece Hong Kong Hungary Iceland India Indonesia Ireland Italy Japan Korea Latvia Liechtenstein Lithuania Luxemburg Malta Monaco Netherlands Norway Philippines Poland Portugal Romania Slovak Republic Slovenia Spain Sweden Switzerland UK USA User s Manual 10 8 ...

Отзывы: