5
Getting started
Installation
Accessories List
NOTE
Powering on the TV requires several seconds to load
programmes. Do not rapidly turn the TV off as it may cause the
TV work abnormally.
TV Front
The following accessories are included with TV:
OWNER’S MANUAL× 1 Base Stand × 2 Remote Control × 1
AAA Battery × 2
Screw × 4
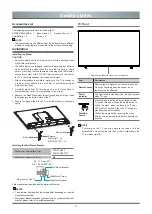
Installing the Stand
CAUTION
• Be sure to disconnect the A/C power cord before installing a stand
or Wall-Mount brackets.
• The LED display is very fragile, and must be protected at all times
when installing the base stand. Be sure that no hard or sharp
object, or anything that could scratch or damage the LED display,
comes into contact with it. DO NOT exert pressure on the front of
the TV at any time because the screen could crack.
• After the installation is complete, make sure the TV is steady on
a table or firmly attached to a wall mount, before removing all
protective film, if any.
1. Carefully place your TV face-down on a soft, flat surface to
prevent damage to the TV or scratching to the screen.
2. Remove the Base Stand from the accessory bag and then insert
the stands into the bottom slots of the TV.
3. Secure the Base Stand to the TV with the screws in accessory
tightly.
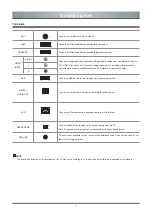
Item
Description
Remote sensor
Receive remote signals from the remote control.
Do not put anything near the sensor, as its
function may be affected.
Power
indicator
The light is red in standby mode, the light is green
when TV is on.
Standby /
Source
Press the single button when in standby mode,
TV will be turned on. Press the single button to
call up the menu, when the focus is on “Power
Off”, wait for 3 seconds, then the TV will go into
standby mode automatically.
/ Press the single button to call up the menu
and then select among the different input signal
sources.
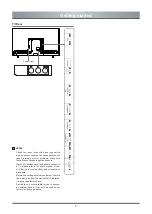
Wall mount hole pattern (mm)
200×200(43
”
)
200×300(50
”
/55
”
)
Wall mount screw size (mm)
M6
9.5 - 11.5 mm(43
”
)
8.0 - 10.0
mm(50
”
/55
”
)
Wall Mount Bracket
Wall Mount Screw
Wall Mount Spacer
Rear cover of the TV
Follow instructions provided with the wall mount bracket.
NOTES
•
The diameter and length of the screws differ depending on the wall
mount bracket model.
•
Wall mount bracket is optional, your device may not have wall mount
bracket, please refer to the actual accessories.
Installing the Wall Mount Bracket
Single button (Remote sensor / Power indicator)
NOTE
•
The accessories may be different from the list above due to different
models, countries/regions, please refer to the actual accessory bag.
Base stand
Base stand
Screws:
M4×16(43
”
) ×4
M4×12(50
”
/55
”
) ×4
Содержание 43U5050 Series
Страница 1: ...Bar code ...
Страница 27: ......
Страница 28: ...http global hisense com 1800 123 960 960 ...


