Toshiba 37XV500A Скачать руководство пользователя страница 13

13

Getting started

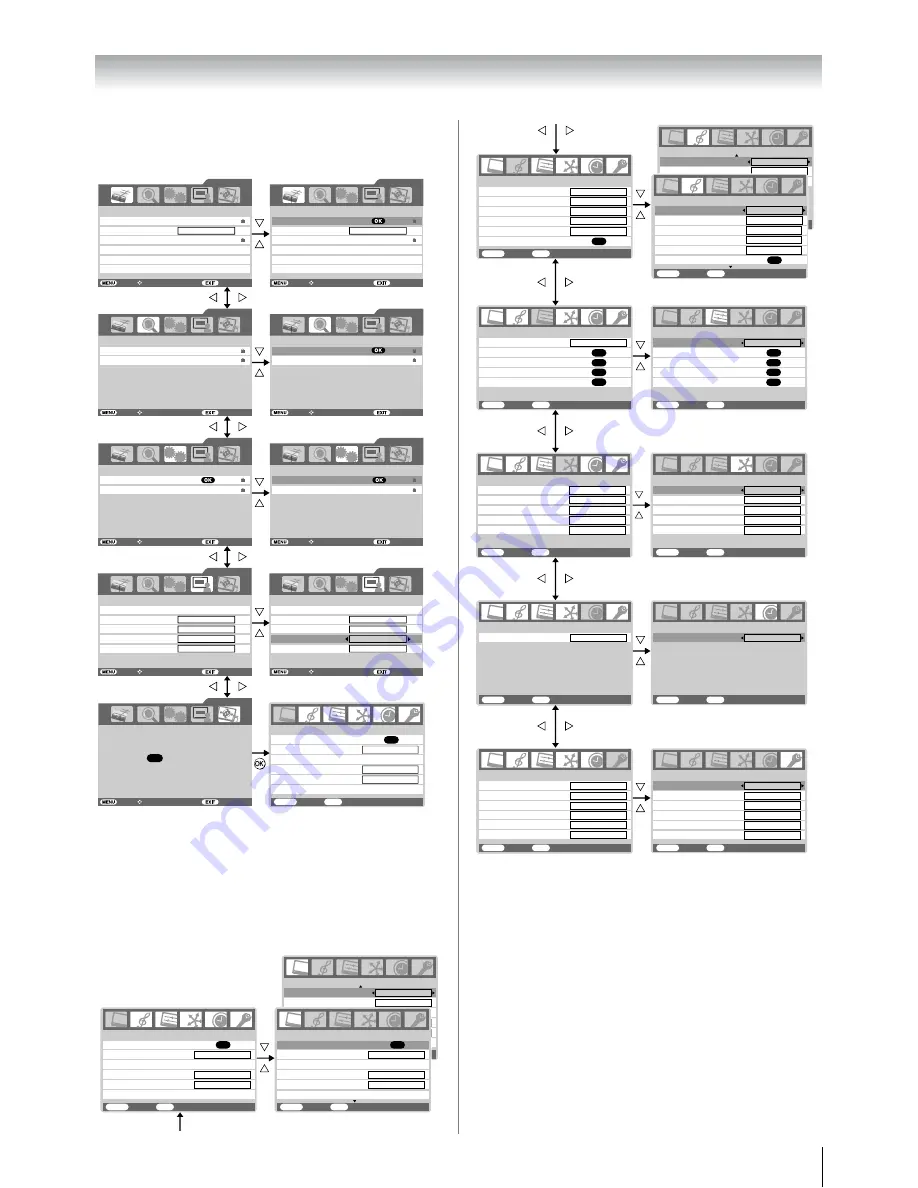
Displaying the DIGITAL SETTING chart

This menu will display only Digital TV selected.

Displaying the TV SETUP menu chart

When Analog TV is selected, press 

M

 will display the TV 

SETUP menu.
When Digital TV is selected, select the TV SETUP menu from 
DIGITAL SETTING chart.
There will be some functions which not available in Digital TV 
and these will appear in gray scale.

Notes for menu system:

In the video input mode (

o

-


o

3

),

 Auto tuning 

and


Manual tuning 

are not available. Instead, 

Manual setting


appears in the 

SET UP

 menu (

-

 page 25).

If you connect external equipment via component video 
source to external input, 

Colour system 

selection in the 

Manual setting

 menu is not available.

If you do not make a selection for a while, the menu display 
disappears automatically.

If you want to close the menu display instantly, press 

P

.

To return to the previous menu, press 

M

.

In the PC input mode, 

PC Setting

 appears in the 

SET UP


menu (

-

 page 38).

In the 480i, 576i or 1080i input signals mode, you can select 
the 

Cinema mode

 in the 

Picture settings

 menu (

-

 page 

20).

When the colour management function turns on (

-

 page 

21), you can select the 

Base colour adjustment

 in the 

PICTURE

 menu.

PROGRAMME menu

SCAN menu 

SYSTEM menu 

PROFILE menu 

TV SETUP menu 

PROFILE 

Audio Preference
Time Format

Time Zone
Transparency

DIGITAL SETTINGS 

I-Plate Display Time

1 sec 

GMT +08:30 

70 

SYSTEM 

Password 
Restore Factory Setting 

DIGITAL SETTINGS 

PROGRAMME

Channel List 

Favorite Mode 
Parental Rate 
EPG 

DIGITAL SETTINGS 

No Block 

Back 

Watch TV 

Select Function 

SCAN 

Auto Scan 

Manual Scan 

DIGITAL SETTINGS 

TV SETUP 

DIGITAL SETTINGS 

OK 

Press          for basic TV settings 

Back 

Watch TV 

Select Function 

Back 

Watch TV 

Select Function 

Back 

Watch TV 

Select Function 

Back 

Watch TV 

Select Function 

PROFILE 

Audio Preference
Time Format 

Time Zone 

Transparency 

DIGITAL SETTINGS 

I-Plate Display Time 

1 sec 

GMT +08:30 

24 hr 

24 hr 

70 

SYSTEM 

Password 

Restore Factory Setting 

DIGITAL SETTINGS 

PROGRAMME

Channel List 

Favorite Mode
Parental Rate 
EPG 

Timer 

Timer 

Alarm 

Alarm 

DIGITAL SETTINGS 

No Block 

Back 

Watch TV 

Select Function 

SCAN 

Auto Scan 

Manual Scan 

DIGITAL SETTINGS 

Back 

Watch TV 

Select Function 

Back 

Watch TV 

Select Function 

Back 

Watch TV 

Select Function 

On 

On 

3D Colour management

Picture settings

PICTURE

MENU

Back

Watch TV

EXIT

OK

Base colour adjustment

Active Backlight Control

Off

On

Auto Contrast

On

x.v.Colour selection

1/2

PICTURE

MENU

Back

Watch TV

EXIT

MPEG NR

DNR

Base colo

u

r adj

u

stment

Active Backlight Control

A

u

to

On

A

u

to Contrast

On

x.v.Colo

u

r selection

2/2

PICTURE 

menu 

3D Colo

u

r management

Pict

u

re settings 

PICTURE 

MENU 

Back Watch 

TV 

EXIT 

PICTURE 

MENU 

Back Watch 

TV 

EXIT 

Picture settin

g

OK 

Base colo

u

r adj

u

stment

Active Backlight Control 

OK 

Off 

On 

3D Colo

u

r management

Base colo

u

r adj

u

stment

Active Backlight Control 

Off 

On 

A

u

to Contrast

On 

x.v.Colo

u

r selection

A

u

to Contrast

On 

x.v.Colo

u

r selection

1/2

1/2

Low

SOUND 

menu 

SET UP 

menu 

TIMER

menu

FUNCTION

menu

Man

u

al t

u

ning 

OK 

A

u

to t

u

ning 

OK 

Lang

u

age 

SET UP 

MENU 

Back Watch 

TV 

EXIT 

English 

Tre

b

le 

Balance 

WOW 

Bass 

D

u

al 

MTS 

SOUND 1/2 

MENU 

Back Watch 

TV 

EXIT 

A

u

to 

D

u

al 1 

FUNCTION

MENU

Back

Watch TV

EXIT

On

Sleep timer

TIMER

MENU

Back

Watch TV

EXIT

00:00

TIMER

MENU

Back

Watch TV

EXIT

Sleep timer

00:00

FUNCTION

MENU

Back

Watch TV

EXIT

Teletext

Auto

Man

u

al t

u

ning 

OK 

OK

OK

A

V

 connection

OK

Pict

u

re position

A

u

to t

u

ning 

OK 

Lan

g

ua

g

SET UP 

MENU 

Back Watch 

TV 

EXIT 

En

g

lish 

A

V

 connection

Pict

u

re position

Stable sound                   

SOUND 2/2 

Off 

Bass 

b

oost 

Off 

OK 

A

u

to for mat

Off

4:3 stretch

Bl

u

e screen

On

Side panel

1

Teletext

A

u

to

On

A

u

to for mat

1

Teletext lang

u

age

1

Teletext lang

u

age

Off

4:3 stretch
Bl

u

e screen

Off

Side panel

1

OK

D

u

al 

MTS 

SOUND 1/2 

Back Watch 

TV 

Auto 

D

u

al 1 

Tre

b

le 

Bass 

Balance 

WOW 

OK 

MENU EXIT 

A

u

to Stand

b

y

T

V

 A

u

to Power

T

V

 A

u

to Inp

u

t Switch

Ena

b

le REGZA-LINK

REGZA-LINK

On

On

On

On

T

V

 Speakers

Speaker Preference

MENU

Back

Watch TV

EXIT

A

u

to Stand

b

y

T

V

 A

u

to Power

T

V

 A

u

to Inp

u

t Switch

Enable REGZA-LINK

REGZA-LINK

On

On

On

On

T

V

 Speakers

Speaker Preference

MENU

Back

Watch TV

EXIT

REGZA-LINK

menu

Содержание 37XV500A

Страница 1: ...se numbers in the spaces provided below Refer to them whenever you call upon your TOSHIBA dealer regarding this product Model number Serial number 37XV500A 42XV500A 46XV500A VX1A00104100 2008 DVB registration identification reference number 0000 37XV500A 0000 42XV500A 0000 46XV500A Trademark of the DVB Digital Video Broadcasting Project ...

Страница 2: ... feature settings 23 Selecting the video input source to view 25 Using REGZA LINK 26 Teletext in Analog TV 27 Teletext in Digital TV 28 Other Digital TV features and settings Setting the EPG Electronic Programme guide 29 Password 29 Parental rate 30 Channel list 30 Favorite Mode 31 Subtitle 31 Restore factory setting 31 Audio Preference 32 Transparency 32 TV Setup 32 Connecting your TV Back connec...

Страница 3: ...ff which may cause injury or damage 4 Never block or cover the slots and openings in the cabinet Never place the TV so that it is facing upward or on its side Never place the TV in a closet bookcase or other similar area where the ventilation is poor Never drape a newspaper tablecloth or curtain on the TV When installing the TV against a wall always keep the TV at least 10 cm away from the wall Ne...

Страница 4: ...ls down or drops it may cause injury or electric shock Use 1 Never place hot objects or open flame sources such as lighted candles or nightlights on or close to the TV High temperatures can melt plastic and lead to fires 2 The apparatus shall not be exposed to dripping or splashing and that no objects filled with liquids such as vases shall be placed on the apparatus When liquids are spilled or sm...

Страница 5: ...suffer an electric shock Service 1 Never repair modify or disassemble the TV by yourself It may cause a fire or an electric shock Consult a service technician for inspection and repairs 2 When a malfunction occurs or if smoke or an unusual odor comes from the TV turn off the TV and remove the power plug from the outlet immediately Make sure that the smoke or smell has stopped then contact a servic...

Страница 6: ...ot light up The LCD display panel is manufactured using an extremely high level of precision technology however sometimes some pixels of the screen may be missing picture elements or have luminous spots This is not a sign of a malfunction 4 About Interference The LCD display may cause interference in image sound etc of other electronic equipment that receives electromagnetic waves e g AM radios an...

Страница 7: ...n a designated disposal area Batteries must not be exposed to excessive heat such as sunshine fire or the like Attention should be drawn to the environmental aspects of battery disposal Never mix battery types or combine used batteries with new ones Notes If the remote control does not operate correctly or if the operating range becomes reduced replace both batteries with new ones If the batteries...

Страница 8: ...rogramme position page 15 Uu MENU up down When a Analog TV menu is on screen these buttons function as up down menu navigation buttons page 12 7 2 Volume When no menu is on screen these buttons adjust the volume level page 10 I i MENU left right When a Analog TV menu is on screen these buttons function as left right menu navigation buttons or adjust settings page 12 8 MENU Press to access the TV S...

Страница 9: ...andard composite video and standard analog stereo audio inputs page 33 16 o PC HDMI1 AUDIO input terminal PC audio input terminal is shared with HDMI 1 analog audio input terminal and their use can be configured in the SET UP menu page 33 35 17 o RGB PC input terminal For use when connecting a personal computer PC page 37 18 O AV OUTPUT output terminals For use when connecting a VCR HDD DVD video ...

Страница 10: ...ze selection page 18 Digital subtitle on off page 31 Stereo bilingual selection page 22 To display the Audio Track menu digital only To access sub pages when in teletext analog only page 27 Picture still page 19 When in TV mode Teletext function analog only To reveal concealed text page 28 To hold a wanted page page 28 To enlarge teletext display size page 28 To select a page while viewing a norma...

Страница 11: ... To display contents menu To change volume of the AV amplifier To operate menu To display DVD menu To display top menu To work interactive service control on device Picture mode selection Picture size selection To turn the device On Off To select input from external source connected to the device To change the channel To exit menu or return to previous menu accessed To Mute AV amplifier To display...

Страница 12: ...re the aerial is connected To setup the TV use the buttons on the remote control as detailed on page 10 1 Press the Welcome screen will appear This screen will appear the first time that the TV is switched on and each time the TV is reset 2 Press Q to proceed 3 The Select Location screen will appear Press or to select the state in which you live 4 Press Q to start tuning The Auto Scan screen will ...

Страница 13: ...TAL SETTINGS PROGRAMME Channel List Favorite Mode Parental Rate EPG Timer Timer Alarm Alarm DIGITAL SETTINGS No Block Back Watch TV Select Function SCAN Auto Scan Manual Scan DIGITAL SETTINGS Back Watch TV Select Function Back Watch TV Select Function Back Watch TV Select Function On On 3D Colour management Picture settings PICTURE MENU Back Watch TV EXIT OK Base colour adjustment Active Backlight...

Страница 14: ... Scan these channels might be found by using Manual Scan described in this section Also if you do not live in Australia you must use Manual Scan to scan those channels in your country 1 From the SCAN menu press or to select Manual Scan then press Q 2 Enter password using the Number buttons or press 0000 which is the default password then Manual Scan will appear 3 Press or to select the item you wi...

Страница 15: ...z If the colour of a certain channel is abnormal the automatic colour system selection A may have malfunctioned or sound system selection is wrong In such a case select another colour and or sound system page 42 D Programme position skip selection Press or to turn the programme position skip option on 8 or off The programme position will then be skipped when you select channels with PU or P u The ...

Страница 16: ... Stereo Dual audio status Note The programme position selection change between different format channels takes several seconds Switching between two programme positions You can switch two programme positions without entering actual position number each time 1 Select the first programme position you want to view 2 Select the second programme position with the Number buttons 0 9 3 Press The previous...

Страница 17: ...htly shorter duration than the value set in the Display Time setting Setting the Time Format From the PROFILE menu press or to select Time Format then press or to select the time to be displayed 24hr or AM PM format Sorting programme position analog only The TV is capable of receiving a number of different channels depending upon where you live Programme sorting is an easy way of storing each chan...

Страница 18: ... will eliminate or reduce the black bars on all the sides of the screen by zooming in and selecting the image without distortion 4 3 Use this setting to view a true 4 3 broadcast Super Live 1 When receiving 4 3 format signal this setting will enlarge the image to fit the screen by stretching the image vertically and horizontally holding the better proportions at the center of the image Cinema 1 Wh...

Страница 19: ...nfringe the copyright protected by the copyright laws In the PC input mode page 25 this function is not available Adjusting the picture position analog only Adjustment to the position of the picture may be made to suit your viewing preferences 1 Press M then press or to display the SET UP menu 2 Press the or to select Picture position 3 Press Q then press or to select an item you want to adjust 4 ...

Страница 20: ...e 1 From the Picture settings menu press or to select ClearFrame on the 2nd page 2 Press or to select On or Off Adjusting the colour temperature Colour Temperature increases the warmth or coolness of the picture by setting the red green or blue tint 1 From the Picture settings menu press or to select Colour Temperature on the 2nd page then press Q 2 Press or to select Cool Natural or Warm to suit ...

Страница 21: ...ess or to select Auto Contrast 2 Press or to select On or Off Setting x v Colour selection The colour range of x v Colour page 36 is an international standard and enables a wider colour range than conventional video applications If the x v Colour selection is set to Auto your TV will automatically detect images supporting x v Colour 1 From the PICTURE menu press or to select x v Colour selection 2...

Страница 22: ... settings are not stored in the TV memory Adjusting the sound quality 1 From the SOUND menu press or to select an item you want to adjust 2 Press or to adjust the settings as required Using the SRS WOW surround sound SRS WOW is a special combination of SRS Labs audio technologies that creates a thrilling surround sound experience with deep rich bass from stereo sound sources Your TV s audio will s...

Страница 23: ...function will switch 4 3 format programmes into a full screen picture 1 From the FUNCTION menu press or to select 4 3 stretch 2 Press or to select On or Off Note In HDMI signal format this function is available Adjusting the brightness of side panel You can adjust the brightness of side panel in 14 9 or 4 3 etc mode 1 From the FUNCTION menu press or to select Side panel 2 Press or to adjust the se...

Страница 24: ...he DTV timer LED will be changed from red to yellow If Menu or EPG is still open when timer action is scheduled to start the Menu or EPG will be closed automatically and then the timer will start The correct operation of the Timer depends on the information received from Broadcaster s stream The time and the deletion of service are examples of such information When broadcaster decides to delete an...

Страница 25: ...he video input mode list 2 Press Q DTV Digital TV o 1 o 1 video 1 input o 2 o 2 video 2 input or o 2S S video input o 3 o 3 component video input HDMI1 HDMI2 HDMI3 HDMI input PC o RGB PC PC input ATV Analog TV Notes When the component video input PC input mode or HDMI input mode is selected the AV OUTPUT terminals page 33 output audio signal only If a REGZA LINK device is connected to an HDMI inpu...

Страница 26: ...rts playing video or audio the TV will automatically switch to the appropriate HDMI input TV Auto Power If a REGZA LINK device is turned on or off the TV turns on or standby automatically Auto Standby If the TV is set to standby the TV will send a message to turn off the selected REGZA LINK device connected to the TV Speaker Preference From this item you can set your audio output preference to the...

Страница 27: ...rew Turkish Arabic Language 4 English French Hebrew Turkish Farsi Iranian Persian To select teletext mode Select a channel position with the desired teletext service 1 From the FUNCTION menu press or to select Teletext 2 Press or to select Auto or LIST mode Note When you are watching the teletext programme SET UP menu and FUNCTION menu are not selectable Teletext general information button Pressin...

Страница 28: ...al concealed text Some pages cover topics such as quizzes and jokes To discover the solutions press A B To hold a wanted page This function is included as it is part of the broadcast teletext system but you will not need it as this TV allows you to control the display of sub pages C To enlarge the teletext display size Press C once to enlarge the top half of the page press again to enlarge the bot...

Страница 29: ...mes can be locked to prevent viewing of unsuitable films and programmes These can only accessed with a password Default password is 0000 Setting the Password 1 Press M then press or to select the SYSTEM menu 2 Press or to select Password then press Q 3 Enter your password using the number buttons or press 0000 which is the default password 4 Press or to select Set Password then press Q 5 Use the N...

Страница 30: ... be entered before they can be accessed 8 Press the Red button to mark the selected channel for skip Skipped channels will not appear in the Navigation List Favorite EPG Timer and Alarm Note Broadcasters may from time to time update the service information of their channels If there is any change in the channel information or broadcasting parameters the favorite lock and skip status of the channel...

Страница 31: ...subtitle whenever such information is available in the channel you are viewing You may use I Plate to check if subtitle is currently available In Australia you may also view Subtitle by directly entering page 801 in Teletext However by doing so the TV remains in Teletext mode and you cannot change the channels because PU and Pu will change Teletext pages rather than channels To view subtitle it is...

Страница 32: ...o this TV When you select a Dolby Digital or MPEG audio track in Audio Track the sound is converted to the PCM 2ch format and output MPEG Audio Level 1 From Audio Preference press or to select MPEG Audio Level 2 Press or to adjust the MPEG audio level from 10dB to 0dB This setting will not be applicable to Dolby Digital audio Note Manufactured under license from Dolby Laboratories Dolby and the do...

Страница 33: ...rn off the power and unplug all of the equipment from the wall outlet before making any connections The output sound of the TV has a wide dynamic range Be sure to adjust the audio amplifier s volume to a moderate listening level before turning on the power Otherwise the speakers and your hearing may be damaged by a sudden high volume sound Turn off the amplifier before you connect or disconnect th...

Страница 34: ...ay the video input mode list then press or to select o2 page 25 then press Q Before connecting any external equipment turn off all main power switches If you connect both of the S VIDEO input terminal and VIDEO input terminal the S VIDEO signal will appear on the screen display changes to o 2S If you connect mono sound equipment to o 2 connect the audio output of the equipment to the L MONO jack o...

Страница 35: ...tal video with high bandwidth digital content protection which is being standardized for reception of high definition video signals Because this is an evolving technology it is possible that some devices may not operate properly with the TV E EDID Enhanced Extended Display Identification VGA VESA 640 5 480 60 72 75 Hz S VGA VESA 800 5 600 60 72 75 Hz XGA VESA 1024 5 768 60 70 75 Hz W XGA VESA 1280...

Страница 36: ...ng the wider colour signals from HDMI sources Lip Sync mode This option activates an auto audio video display timing adjustment function that allows HDMI source devices to accurately perform synchronization automatically All above HDMI settings require a proper HDMI source device If HDMI source products do not support these functions the TV may not work properly by activating these functions Notes...

Страница 37: ...l that signal is particular the PC signal may not be detected correctly Signal names for mini D sub 15 pin connector To connect a PC to the HDMI terminal on the TV When connecting a PC to the HDMI terminal on the TV use an HDMI to DVI adapter cable and analog audio cables If connecting a PC with an HDMI terminal use an HDMI cable type A connector Separate analog cables are not necessary For accept...

Страница 38: ... the clock phase which synchronize the PC signal and LCD display is not optimized the picture will blur This function enables you to adjust clock phase and display a clear picture 1 From the PC Setting menu press or to select Clock phase 2 Press or to obtain a clear picture Adjusting the sampling clock If the sampling clock does not match with the dot clock frequency of the PC blurred picture deta...

Страница 39: ...e connections set the REGZA LINK Setup menu as you desire page 26 The connected devices must also be set For details see the owner s manual for each device Notes If several devices are connected REGZA Link feature may not operate properly The REGZA LINK feature uses the CEC technology as regulated by the HDMI standard For proper operation it is recommended that you use HDMI cables with the HDMI Lo...

Страница 40: ...reen do not light up When you just buy and start to use this TV a flickering may be caused in the screen In this case switch off the TV then switch on it again to cure the condition The cold cathode fluorescent lamp used for the back light on this TV has longevity When the brightness of the screen comes down or the flickers of the screen are caused or some parts of the screen do not light up it ma...

Страница 41: ...for parental guidance codes transmitted within DVB SI EIT information using the DVB parental_rating_descriptor Receiver Menu Set up and Suggested OSD wording for Setting Blocking Restriction of access Resultant receiver action to received hex code is show programme is block until PIN entered Block All Transmitted rating hex code 0 x 00 0 x 01 0 x 02 0 x 03 0 x 04 0 x 05 0 x 06 0 x 07 0 x 08 0 x 09...

Страница 42: ...Hz Demodulator COFDM FFT Mode 2K 8K Constellation QPSK 16QAM 64 QAM Guard Interval 1 4 1 8 1 16 1 32 Inner Coding Rate 1 2 2 3 3 4 5 6 7 8 COMPONENT VIDEO INPUT terminals the signal format 480i 480p 576i 576p 720p 50 60 Hz 1080i 50 60 Hz These signal formats are converted to match the number of pixels of the LCD panel Country or region Colour Sound Bahrain Kuwait Israel Oman Qatar United Arab Emir...

Страница 43: ... etc page 4 Design and specifications are subject to change without notice Never service or remodel the TV by yourself It may expose you to a fire hazard or dangerous voltages o 1 Input Phono jacks A V o 2 Input 4 pin S video Phono jacks A V o 3 Input Component video Y PB CB PR CR Phono jacks Audio L Mono R O AV OUTPUT Output Phono jacks A V o RGB PC Input Mini D sub 15 pin Analog RGB o PC HDMI1 A...

Страница 44: ...YC J ...

Отзывы: