background image

13

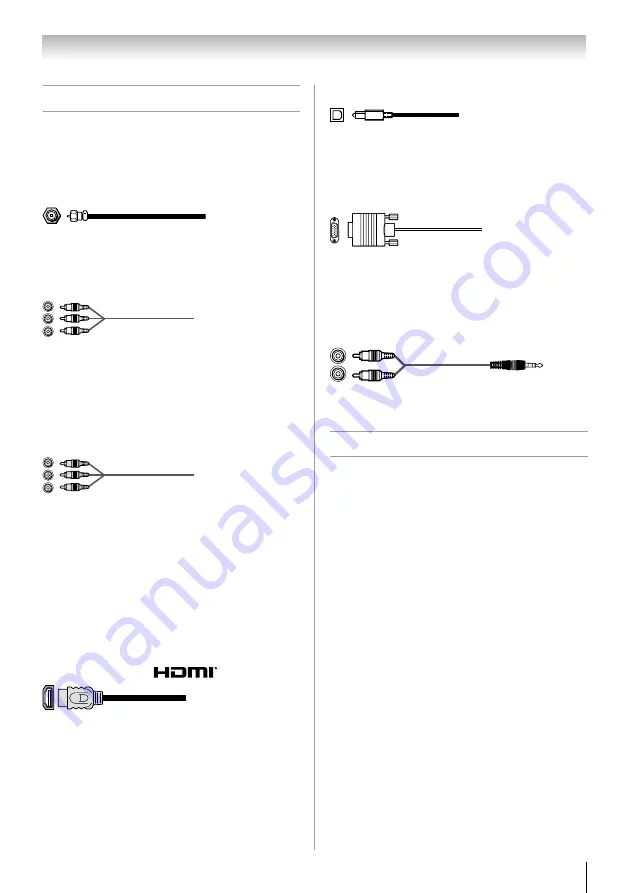
Overview of cable types

Cables can be purchased from most stores that sell audio/
video devices. Before purchasing any cables, be sure of 
connector types required by your devices and the length 
of each cable.

Coaxial (F-type) cable

Coaxial (F-type) cable is used for connecting your 
antenna, cable TV service, and/or cable converter box 
to the 

ANT/CABLE

 input on your TV.

Standard A/V cables (red/white/yellow)

Standard A/V cables (composite video) usually come 
in sets of three, and are for use with video devices with 
analog audio and composite video output. These cables 
(and the related inputs on your TV) are typically color-
coded according to use: yellow for video, red for stereo 
right audio, and white for stereo left (or mono) audio.

Component video cables (red/green/blue)

Component video cables come in sets of three and are 
for use with video devices with component video output. 
(ColorStream

®

 is Toshiba’s brand of component video.) 

These cables are typically color-coded red, green, and 
blue. Separate audio cables are required for a complete 
connection.

Note: 

Component video cables provide better 

picture performance than a standard (composite) 

video.

HDMI

®

 cable 

(with HDMI Logo “

”)

HDMI (High-Definition Multimedia Interface) cable 
is for use with devices with an HDMI output. An 
HDMI cable delivers digital audio and video in its 
native format. This cable carries both video and audio 
information; therefore, separate audio cables are not 
required for a complete HDMI device connection (

 

page 16 and page 19).

Note: 

HDMI cable provides better picture 

performance than a standard (composite) video.

Optical audio cable

Optical audio cable is for connecting receivers with 
Dolby Digital or PCM (pulse-code modulation) optical 
audio input to the TV’s 

DIGITAL AUDIO OUT

 terminal 

(

 

page 18).

Analog RGB (15-pin) computer cable

Analog RGB (15-pin) computer cable is for connecting 
a PC to the TV’s 

PC IN

 terminal (

 

page 18).

Note: 

Separate audio cables are required for a 

complete connection.

3.5mm Stereo to RCA Y-cable

3.5mm Stereo to RCA Y-Cable is for connecting audio 
signals from a DVI device to the TV.

About the connection illustrations

You can connect different types and brands of devices to 
your TV in several different configurations. The connection 
illustrations in this manual are representative of typical 
device connections only. The input/output terminals on 
your devices may differ from those illustrated herein. For 
details on connecting and using your specific devices, refer 
to each device’s owner’s manual.

Chapter 2: Connecting your TV

Содержание 32FT2U

Страница 1: ...tellite program For details please contact your TV antenna installer cable provider or satellite provider 2011 TOSHIBA CORPORATION All Rights Reserved Owner s Record The model number and serial number are on the back of your TV Record these numbers in the spaces below Refer to these numbers whenever you communicate with your Toshiba dealer about this TV Model number Serial number Owner s Manual In...

Страница 2: ...joy your new product please keep these safety tips in mind The Issue The home theater entertainment experience is a growing trend and larger flat panel displays are popular purchases However flat panel displays are not always supported on the proper stands or installed according to the manufacturer s recommendations Flat panel displays that are inappropriately situated on dressers bookcases shelve...

Страница 3: ...E Never place the TV on an unstable cart stand or table The TV may fall causing serious personal injury death or serious damage to the TV Important Safety Instructions 1 Read these instructions 2 Keep these instructions 3 Heed all warnings 4 Follow all instructions 5 Do not use this apparatus near water 6 Clean only with dry cloth 7 Do not block any ventilation openings Install in accordance with ...

Страница 4: ...ding conductors NEC Section 810 21 Power service grounding electrode system NEC Art 250 Part H Ground clamp Electric service equipment Ground clamps 33 DANGER RISK OF SERIOUS PERSONAL INJURY OR DEATH Use extreme care to make sure you are never in a position where your body or any item you are in contact with such as a ladder or screwdriver can accidentally touch overhead power lines Never locate t...

Страница 5: ...ntal considerations For disposal or recycling information contact your local authorities or the Electronics Industries Alliance www eiae org Choosing a location for your LCD TV To Display your LCD TV on the included Pedestal Stand Observe the following safety precautions 1 Read and Follow the pedestal assembly instructions included with the pedestal CAUTION Before beginning pedestal assembly caref...

Страница 6: ...gram This will allow removal of the pedestal stand 3 Once you have removed all four screws holding the pedestal stand in place remove the pedestal stand from the TV 32 TV CAUTION Always place the TV on the floor or a sturdy level stable surface that can support the weight of the unit To secure the TV use a sturdy strap from the hook s on the rear of the TV to a wall stud pillar or other immovable ...

Страница 7: ...rienced radio TV technician for help Caution Changes or modifications to this equipment not expressly approved by Toshiba could void the user s authority to operate this equipment Important notes about your LCD TV The following symptoms are technical limitations of LCD Display technology and are not an indication of malfunction therefore Toshiba is not responsible for perceived issues resulting fr...

Страница 8: ...icture 34 Selecting the picture mode 34 Adjusting the picture quality 35 Using the closed caption mode 35 Base closed captions 35 Digital CC Settings 36 CC Selector 36 Adjusting the audio 37 Muting the sound 37 Using the digital audio selector 37 Selecting stereo SAP broadcasts 37 Adjusting the audio quality 37 Selecting the optical audio output format 38 Using the Dolby Digital Dynamic Range Cont...

Страница 9: ...ition multimedia interfaces 1080p input support page 16 One set of ColorStream HD high resolution component video inputs page 15 Digital Audio Out optical audio connection with Dolby Digital optical output format page 38 CableClear digital picture noise reduction page 51 PC IN Analog RGB computer terminal pages 18 19 REGZA LINK allows control of external devices from the TV remote via HDMI connect...

Страница 10: ...ed all cables and devices to your TV 4 BEFORE connecting cables or devices to the TV learn the functions of the TV s connections and controls pages 11 12 5 Connect your other electronic device s to the TV pages 13 19 6 Install the batteries in the remote control page 20 7 See Learning about the remote control page 21 for an overview of the buttons on the remote control 8 AFTER connecting all cable...

Страница 11: ... TV press and hold the POWER button on the TV control panel for 5 or more seconds to reset the TV 4無 ARROWS pqtu When a menu is on screen these buttons function as up down left right menu navigation buttons 5無 MENU ENTER Press to access the menu system pages 22 23 When a menu is on screen the MENU button on the TV s control panel can function as the ENTER button 6無 EXIT Press to instantly close an...

Страница 12: ...put in Dolby Digital or PCM Pulse Code Modulation format for connecting an external Dolby Digital decoder amplifier or home theater system with optical audio input TV back panel connections For an explanation of cable types and connections see pages 13 19 1 6 7 5 2 3 4 Power Cord TV back 6無 VIDEO IN Standard composite video and standard audio inputs for connecting devices with composite video Note...

Страница 13: ...h HDMI Logo HDMI High Definition Multimedia Interface cable is for use with devices with an HDMI output An HDMI cable delivers digital audio and video in its native format This cable carries both video and audio information therefore separate audio cables are not required for a complete HDMI device connection page 16 and page 19 Note HDMI cable provides better picture performance than a standard c...

Страница 14: ...a or Cable signal Select the ANT CABLE video input source on the TV To view basic and premium Cable channels Turn OFF the VCR Select the ANT CABLE video input source on the TV Tune the TV to channel 3 or 4 whichever channel the Cable box output is set to Use the Cable box controls to change channels To view the VCR Turn ON the VCR Select the VIDEO video input source on the TV To view the camcorder...

Страница 15: ... player or satellite receiver does not have component video connect a standard A V cable to VIDEO terminal If your DVD player has HDMI video see page 16 To view antenna or Cable channels Select the ANT CABLE video input source on the TV To view the DVD player Turn ON the DVD player Select the ColorStream HD video input source on the TV To view satellite programs using the component video connectio...

Страница 16: ...rate analog audio cables are not required see illustration See Setting the HDMI audio mode page 26 HDMI device TV back panel To view the HDMI device video Select the HDMI 1or HDMI 2 video input source on the TV To select the video input source press on the remote control page 21 To connect a DVI device you will need One HDMI to DVI adapter cable For proper operation the length of an HDMI to DVI ad...

Страница 17: ...ables with the HDMI Logo Before controlling the device s After completing the above connections set the REGZA LINK Setup menu as you desire page 48 The connected devices must also be set For details see the operation manual for each device The REGZA LINK feature uses the CEC technology as regulated by the HDMI standard This feature is limited to models incorporating Toshiba s REGZA LINK However To...

Страница 18: ...gnals may not work properly creating a high noise level that may damage speakers or headphones THIS DAMAGE IS NOT COVERED BY YOUR WARRANTY The DIGITAL AUDIO OUT terminal may not output some digital audio sources because of copy restrictions Manufactured under license from Dolby Laboratories Dolby and the double D symbol are trademarks of Dolby Laboratories Connecting a personal computer PC With ei...

Страница 19: ... D sub15 pin terminal Depending on the DVD s title and the specifications of the PC on which you are playing the DVD Video some scenes may be skipped or you may not be able to pause during multi angle scenes Signal names for mini D sub 15 pin connector Pin No Signal name Pin No Signal name Pin No Signal name 1 R 6 Ground 11 Reserved 2 G 7 Ground 12 SDA 3 B 8 Ground 13 H sync 4 Reserved 9 5V 14 V s...

Страница 20: ...eries in accordance with applicable laws and regulations If the remote control does not operate correctly or if the operating range becomes reduced replace batteries with new ones When necessary to replace batteries in the remote control always replace both batteries with new ones Never mix battery types or new and used batteries Always remove batteries from the remote control if they are dead or ...

Страница 21: ... sound page 37 13無 VOL adjusts the volume level 14無 INFO displays TV status information as well as program details when available pages 48 49 15無 EXIT closes on screen menus 16無 ENTER activates highlighted items in the main menu system 17無 CH RTN returns to the last viewed channel or source page 31 18無 Arrow buttons pqtu When a menu is on screen these buttons select or adjust programming menus Als...

Страница 22: ...C4 T1 T2 T3 T4 Digital CC Settings Opens the Digital CC Setup menu Input Labeling Opens the Input Labeling menu Menu Language English Français Español Channel Browser Setup Opens the Channel Browser Settings menu REGZA LINK Player Control Opens the REGZA LINK Player Control Energy Saving Settings Opens the Energy Saving Settings menu Locks Enable Rating Blocking Off On Edit Rating Limits Opens the...

Страница 23: ...tatus System Information Opens the System Information screen Navigating the menu system You can use the buttons on the remote control or TV control panel to access and navigate your TV s on screen menu system Press to open the menu system When a menu is opened use the up down left right arrow buttons pqtu on the remote control or pq on the TV control panel to move in the corresponding direction in...

Страница 24: ... with However if you do not finish the entire Initial Setup process by pressing Power prior to step 5 above the Initial Setup window will appear every time you turn on the TV Selecting the menu language You can choose from three different languages English French and Spanish for the on screen display of menus and messages To select the menu language 1無 Press and open the Preferences menu highlight...

Страница 25: ... for Antenna This is normal however once channel programming is finished you should not have to repeat the programming process again unless your Cable TV service lineup changes significantly To program channels automatically 1無 Configure the antenna input source if you have not already done so page 24 2無 Press and open the Setup menu 3無 Highlight Installation and press 4無 A new set of Installation...

Страница 26: ...ypted channel the following message will appear Digital Channel Is Encrypted Press 1 on remote to remove channel Press while the message is on the screen to remove the unnecessary channel from the channel list Setting the HDMI audio mode To set the HDMI audio mode 1無 Press and open the Sound menu 2無 Highlight Audio Setup and press 3無 Press p or q to select HDMI 1 Audio and then press t or u to sel...

Страница 27: ...o select the region highlight Done and then press After the time zone has been set you will be asked to set the current Daylight Saving Time status To set the Daylight Saving Time status 1無 Press t or u to select Yes or No Highlight Done and then press Viewing the system status To view the system status 1無 Press and open the Setup menu 2無 Highlight Installation and press 3無 A new set of Installati...

Страница 28: ...urce and then press Note When selecting REGZA LINK input sources from the popup window using some Chapter 6 Using the TV s features REGZA LINK devices may automatically turn on When selecting input sources using you will have to press to actually select a particular device from the popup window Labeling the video input sources You can label each video input source according to the type of device y...

Страница 29: ...The Favorites Browser allows you to quickly set up a favorite channels inputs list that is integrated into the Channel Browser To add a favorite channel input 1無 Tune to the channel or input 2無 Press and hold for 3 seconds Note Additions are added to the beginning of the Favorites list on the left side of the Channel Browser To delete a favorite channel input 1無 Press to open the Favorites browser...

Страница 30: ...wse mode when you stop on an item in the Channel Browser it will be highlighted and the TV will automatically tune to the channel or input 2無 Press to close the Channel Browser To tune to a channel or input in Select mode 1無 While watching TV press or to open the Channel Browser and surf back to a previous item or forward to the next item in the list In Select mode when you stop on an item in the ...

Страница 31: ...l Options will not have anything listed until a scan is done Tuning to the next programmed channel To tune to the next programmed channel Press or on the remote control or TV control panel Note This feature will not work unless you program channels into the TV s channel memory page 25 Tuning to a specific channel programmed or unprogrammed Tuning analog channels Press the Channel Number 0 9 on the...

Страница 32: ...Press on the remote control 2無 While the Picture Size menu is open you can do one of the following to select the desired picture size Repeatedly press Press the corresponding Number button 0 5 while the Picture Size menu is opened Press or while the Picture Size menu is open To select the picture size using the menus 1無 Select Picture Size in the Theater Settings menu 2無 Press or to select the des...

Страница 33: ...y for HDMI 1080p 1080i 720p 480p and 480i ColorStream 1080i and 720p and ANT CABLE digital inputs 1080p 1080i and 720p Depending on the input signals the border of the picture may be hidden displayed in black or noisy Picture Size 4 3 Some program formats will display with sidebars and or bars at the top and bottom Normal for VGA SVGA XGA WXGA and SXGA sources and Photo files Normal is a non stret...

Страница 34: ...ata The current picture size you set under Selecting the picture size on page 32 Note The auto aspect ratio feature is not applicable to PC input To turn on the auto aspect ratio feature 1無 Press and open the Picture menu 2無 Highlight Theater Settings and press 3無 In the Auto Aspect Ratio field select On 4無 To save the new settings highlight Done and press To revert to the factory defaults highlig...

Страница 35: ...Sharpness and then press or to adjust the setting as described in the previous table 4無 To save the new settings highlight Done and press You can use any of the picture modes Selecting the picture mode above left as a starting point for adjusting the picture settings To revert back to the base mode that you began adjusting the picture settings from highlight Reset and press The picture qualities y...

Страница 36: ...l Standard Large Caption Text Type Auto Default Mono w Serif Prop w Serif Mono w o Serif Prop w o Serif Casual Cursive Small Capitals Caption Text Edge Auto None Raised Depressed Uniform Left Drop Shadow Right Drop Shadow Caption Text Color Auto Black White Red Green Blue Yellow Magenta Cyan Text Foreground Opacity Auto Transparent Translucent Flashing Solid Background Color Auto Black White Red G...

Страница 37: ... and open the Sound menu 2無 Highlight Audio Setup and press 3無 In the MTS field select Stereo 4無 To save the new settings highlight Done and press To reset the settings to the factory defaults highlight Reset and press Note You can typically leave the TV in Stereo mode because it will automatically output the type of sound being broadcast stereo or monaural If the stereo sound is noisy select Mono...

Страница 38: ...light Done and press To revert to the factory defaults highlight Reset and press Note This feature is available when turned to a digital RF channel with the Dolby Digital signal The Dolby Digital Dynamic Range Control will function in relation to Optical Output Format PCM mode Using the Locks menu The Locks menu includes the Enable Rating Blocking Edit Rating Limits Input Lock Panel Lock GameTimer...

Страница 39: ...system may become available for use in selectively blocking programs Note The currently tuned station must be receiving a digital signal before an additional rating system can be downloaded To download the additional rating system if available 1無 Press and highlight the Locks menu icon 2無 Press to display the PIN code entering screen 3無 Enter your four digit PIN code and press 4無 Press to highligh...

Страница 40: ...e for children under 13 PG Parental Guidance Suggested Some material may not be suitable for children G General Audience Appropriate for all ages Note If you place an in the box next to None Rated programs rated None will be blocked however programs that do not provide any rating information will not be blocked To display the rating of the program you are watching press on the remote control If it...

Страница 41: ...s and channels 3 and 4 4無 Press Locking channels With the Lock feature you can lock specific channels The locked channels can only be accessed by entering the PIN To lock channels 1無 From the Setup menu highlight Installation and press 2無 Press or to select Channel Options and press The list of channels will appear 3無 Press and then or to select a channel in the lock column 4無 Press PIN code entry...

Страница 42: ...zontal Position and Vertical Position If the picture is affected by interference readjust the Clock Phase and Sampling Clock To adjust the PC settings 1無 Repeatedly press to select PC input mode Selecting the video input source to view page 28 2無 Press and open the Setup menu 3無 Highlight PC Settings and press 00 00 Note If a PC is not connected or there is no PC input signal this feature will be ...

Страница 43: ...er Supported file system FAT16 and FAT32 Note Gently insert the USB device into the port and do not remove while using the Media Player USB device USB Mass Storage Class device MSC Support is not guaranteed for all devices Connect the USB device directly to the TV Do not use a USB Hub You must obtain any required permission from copyright owners to use copyrighted content Toshiba cannot and does n...

Страница 44: ...ew mode Single View In this view mode only files located in the selected directory shall be displayed This view allows you to change the photo content manually When moving from Multi View to the Single View the currently selected photo shall be displayed 1無 Press to view the next photo Press to view the previous photo 2無 Press to rotate the image 90 counterclockwise Press to rotate the image 90 cl...

Страница 45: ...t playback 4無 Press to move back the photo view mode now the music is playing in the background Contents Description Description Photo Photo list Multi view See page 44 Sorting To sort the folders and files 1無 Press to open the Quick Menu from Multi View mode 2無 Press or to select Sort 3無 Press or to select Title New or Old to set the sorting rule Title File sorting rules 1 Unicode priority 2 Nume...

Страница 46: ...TV either from the remote control or the TV control panel 1無 From the Preferences menu highlight Energy Saving Settings and press 2無 Press or to select Automatic Power Down 3無 Press or to select On or Off and press Note The default setting of this feature is Off 1 minute before switching to standby a warning message will appear When the following features are set the feature that is set for the ne...

Страница 47: ... REGZA LINK Player Control menu functions 1無 Press and open the Preferences menu 2無 Highlight REGZA LINK Player Control and press Energy Saving Settings 3無 Press p or q to select the item you want to control and press Item Description Power Turns the selected device on and off Root Menu Accesses the top menu of the selected device Contents Menu Accesses the contents list when you press At this tim...

Страница 48: ...ust or mute the volume of the audio This item will be grayed out unless a REGZA LINK compatible audio receiver is connected Note When you turn on the Audio Receiver change its input source or adjust the sound volume the sound will be output from the audio receiver s speakers even if TV Speakers has been selected Turn the TV off and on again to output the sound from the TV speakers To set the REGZA...

Страница 49: ...Duration Detailed description Note The location of the banner can be moved to the top or bottom of the screen by pressing or while the RECALL or INFO display is on screen Understanding the last mode memory feature If power is lost while you are viewing the TV the Last Mode Memory feature automatically turns on the TV when power is restored Note If you will be away from the TV for an extended perio...

Страница 50: ... select one of the factory set picture modes Sports Standard Movie or PC and then change the static gamma setting the picture mode automatically changes to Preference Chapter 7 Using the TV s advanced features Selecting the color temperature You can change the quality of the picture by selecting from three preset color temperatures Cool Medium and Warm as described below Mode Picture Quality Cool ...

Страница 51: ...gh Low Middle and High will reduce the noise in varying degrees from lowest to highest respectively 3無 To save the new settings highlight Done and press To revert to the factory defaults highlight Reset and press Using MPEG noise reduction The MPEG noise reduction feature allows you to reduce visible interference caused by MPEG compression Choices for MPEG noise reduction are Off Low Middle and Hi...

Страница 52: ...e to reduce visible interference in the TV picture page 51 Video Input Selection problems If the Input Selection window does not appear when you press on the remote control or TV press a second time This will cause a change to the next video input source and display the Input Selection window Cannot view external signals or channel 3 or 4 If you cannot view signals from external devices connected ...

Страница 53: ...ected is not closed captioned no captions will display page 35 If text is not available a black rectangle may appear If this happens turn off the closed caption feature page 35 A closed caption signal may not display correctly in the following situations a when a videotape has been dubbed b when the signal reception is weak or c when the signal reception is nonstandard page 35 Rating blocking V Ch...

Страница 54: ...x 34 mm Video Audio Terminals VIDEO AUDIO INPUT VIDEO 1 V p p 75 ohm negative sync AUDIO 200 mV rms 20dBFS 47K ohm or greater ColorStream component video HD INPUT VIDEO Y 1V p p 75 ohm PR 0 7 V p p 75 ohm PB 0 7 V p p 75 ohm Suggested formats 1080i 720p 480p 480i AUDIO 200 mV rms 20dBFS 47K ohm or greater HDMI INPUT HDMI compliant type A connector HDCP compliant Suggested formats See table on the ...

Страница 55: ...V Frequency H Frequency Pixel Clock Frequency VGA 640 480 59 940Hz 31 469kHz 25 175MHz SVGA 800 600 60 317Hz 37 879kHz 40 000MHz XGA 1024 768 60 004Hz 48 363kHz 65 000MHz WXGA 1280 768 59 870Hz 47 776kHz 79 500MHz 1360 768 60 015Hz 47 712kHz 85 500MHz SXGA 1280 1024 60 020Hz 63 981kHz 108 000MHz 480i 720 480i 59 940Hz 15 734kHz 27 000MHz 480p 720 480p 59 940Hz 31 469kHz 27 000MHz 720p 1280 720p 60...

Страница 56: ...moval and reinstallation of product that is mounted in such a manner as to impede normal service is not covered under these warranties This includes wall mounts custom cabinets and other installation methods that do not provide for direct and immediate access to the product for service purposes Labor service charges for set installation setup adjustment of customer controls and installation or rep...

Страница 57: ...OU FOR PARTS OR LABOUR Rental Units The warranty for Television rental units begins with the date of first rental or thirty 30 days from the date of shipment to the rental firm whichever comes first Your Responsibility Read the owner s manual thoroughly before operating this LCD Television Complete and mail the enclosed product registration card or register your LCD Television online at http suppo...

Страница 58: ... INCLUDING NEGLIGENCE UNDER A STATUTE OR UNDER ANY OTHER LAW OR FORM OR ACTION OR WHETHER ARISING OUT OF THE USE OF OR INABILITY TO USE THE TELEVISION EVEN IF ANY OF THE RELATED PARTIES HAS BEEN ADVISED OF THE POSSIBILITY OF SUCH DAMAGES OR OF ANY CLAIM BY ANY OTHER PARTY No person agent distributor dealer or company is authorized to change modify or extend the terms of these warranties in any man...

Страница 59: ...mited warranty on the one hand and any statement in the packaging of the Television or in any other document enclosed with or used in the context of the promotion or sale of the Television on the other hand the provisions of this limited warranty shall prevail How to Obtain Warranty Services If after following all of the operating instructions in this manual checked the Troubleshooting section and...

Страница 60: ... 37087 U S A TOSHIBA OF CANADA LTD HEAD OFFICE 191 McNABB STREET MARKHAM ONTARIO L3R 8H2 CANADA CableClear ColorStream GameTimer and TheaterWide are registered trademarks of Toshiba America Information Systems Inc Channel Browser DynaLight and SurfLock are trademarks of Toshiba America Information Systems Inc REGZA LINK is a registered trademark of Toshiba Corporation ...

Отзывы: