background image

7

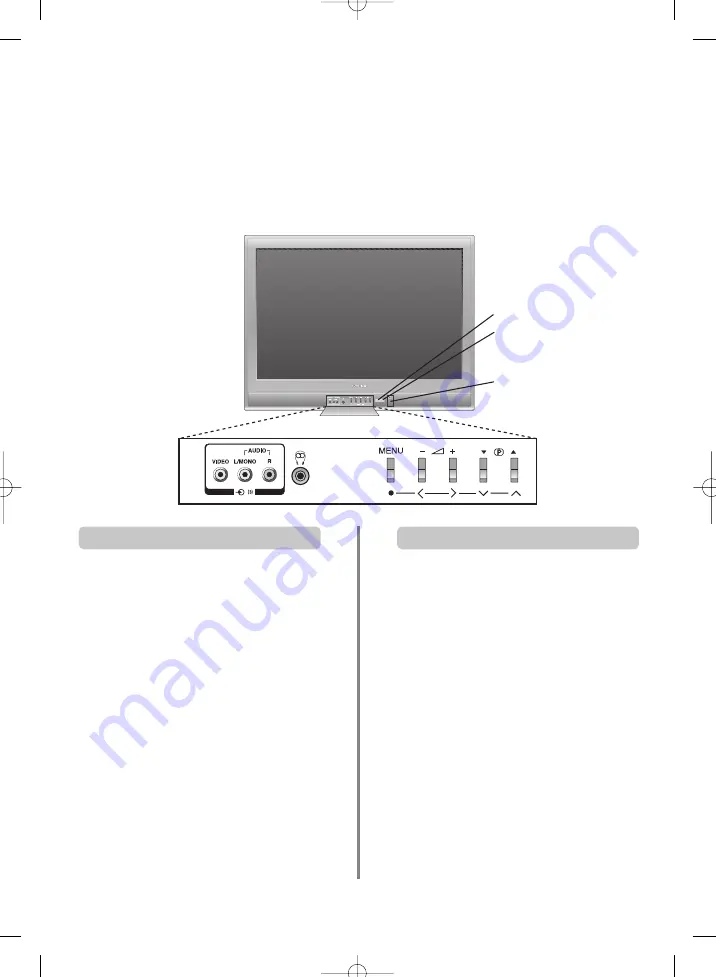
Front connections and controls

If the power-on light is unlit press the POWER button on
the front of the television to switch the television on, then
press a number button on the remote control to see the
screen.

To put the television into Standby press 

i

on the remote

control. To view the television press 

i

again or any of

the number buttons. The picture may take a few seconds
to appear. Standby should only be used for short periods
of time.

To set up the television you will now need to use the on-
screen menus. Press the 

MENU

button on the remote

control to see the top menu bar. 

This white menu bar will show five different topics shown 
in symbols. As each symbol is selected by pressing the

S

or 

R

button on the remote control, its respective options

will appear below. 

To use the options press the

Q

button on the remote

control to move down through them and 

S

or 

R

to select

the required choice. Follow the on screen instructions.

The functions of each menu are described in detail
throughout the manual.

A wide variety of external equipment can be connected via the sockets located behind the flap on the
television. Press the centre of the flap to open it.

Whilst all the necessary adjustments and controls for the television are made using the remote control, the
buttons on the television may be used for some functions.

Power Button

RED – Power On

GREEN – On timer is set

To alter the volume press 

j

+

To alter the programme position press 

e

e

F

f

f

.

Press 

MENU

and 

S

,

R

,

Q

or 

P

to control the sound

and picture options.

Press 

MENU

to finish.

Before connecting any external equipment, turn off
all main power switches.

When connecting mono sound equipment to 

Input 3

,

connect the audio output of the equipment to the
L/Mono socket on the television. 

To select the Inputs, press 

B

until the display shows

EXT3

as described on 

page 16.

Please always refer to the owner’s manual of the
equipment to be connected for full details.

Please note: 

Inserting the headphone jack will mute the

sound from all speakers.

Switching on

Using the controls and connections

Содержание 28ZH46 Series

Страница 1: ...28 32ZH46 47 Series Owner s manual true experience 28 32ZH46 47P FC 18 5 04 10 20 Page 1 ...

Страница 2: ...e correction dynamic sub bass 11 Stereo and bilingual transmissions stereo or dual language broadcasts 11 Widescreen viewing 12 Picture controls picture preferences contrast brightness colour sharpness noise reduction black stretch picture position automatic format widescreen still picture 13 Virtual Dolby Surround 14 The timer and time display setting the television to turn on and off and time di...

Страница 3: ...draw the mains plug and consult your dealer ABOVE ALL NEVER let anyone especially children push anything into holes slots or any other openings in the case this could result in a fatal electric shock NEVER guess or take chances with electrical equipment of any kind it is better to be safe than sorry TO FULLY DISCONNECT THE TELEVISION SWITCH OFF THE MAINS SOCKET AND REMOVE THE POWER PLUG Leave at l...

Страница 4: ...ty vii any damage or loss caused as a result of the owner s failure and or neglect to follow the instructions set out in the owner s manual viii any loss or damage caused directly as a result of misuse or malfunction of the product when used simultaneously with associated equipment Furthermore under no circumstances shall Toshiba be liable for any consequential loss and or damage including but not...

Страница 5: ...ng up on screen information and for the teletext initial index function To select input from external sources To select mode On screen Menus Selectable picture preferences Widescreen viewing Number buttons To return to the previous programme For On Standby mode To display teletext When using a TOSHIBA VCR or DVD press mto PAUSE press wto EJECT press lqto SKIP REWIND presssl to SKIP FORWARD pressrt...

Страница 6: ...ver to monitor external equipment return to normal television by pressing the desired programme position button To recall external equipment press Bto select between EXT1 EXT2 and EXT3 WE RECOMMEND THAT YOU USE SCART LEADS IN ADDITION TO AERIAL CABLES WHEREVER POSSIBLE Aerial cables Connect the aerial to the socket on the rear of the television If you use a decoder and or a video recorder it is es...

Страница 7: ...n instructions The functions of each menu are described in detail throughout the manual A wide variety of external equipment can be connected via the sockets located behind the flap on the television Press the centre of the flap to open it Whilst all the necessary adjustments and controls for the television are made using the remote control the buttons on the television may be used for some functi...

Страница 8: ...ure or the signal may be weak so the station order may be changed by using Programme Sorting which will appear on the screen The list of stations is now showing With Q or P highlight the station you want to move and press OK or R The selected station will be moved to the right of the screen B G Continental Europe I UK D K Eastern Europe L1 L2 France 5 6 Set up Language z English x Country z GB x A...

Страница 9: ... to eight characters Station Name Programme System Search Programme skip Channel Manual fine tuning Use P or Q to highlight the programme position required e g we suggest Prog 0 for a VCR Press MENU and using S or R select the Set up menu with Q highlight Manual Tuning press R to select Different Channel numbers may be displayed Continues on the next page To allocate a programme position on the te...

Страница 10: ... the procedure for each position Skipped programme positions cannot be selected by Pf P and P e Q or by the controls on the front of the television but can still be accessed by the number buttons on the remote control 3 4 5 Use P or Q to highlight the programme position to be skipped and press OK or Rto select Press Rto select Programme skip Use P or Q to turn Programme skip on Press OK to store o...

Страница 11: ...me Correction z Off x Dynamic Sub Bass z Low x Surround Mode z Off x EXIT To Exit fe Select z x Adjust I I I I I I I I I I I I I I I I I I I I I I I I I I I I I I I I I I I I I I I I I I I I I I I I I I I I I I I I I I I I I I I I I I Sound Bass 0 z x Treble 0 z x Balance 0 z x Volume Correction z On x Dynamic Sub Bass z Low x Surround Mode z Off x EXIT To Exit fe Select z x Adjust I I I I I I I I...

Страница 12: ...utton repeatedly to select between Super Live Cinema Subtitle Wide and 4 3 Please note Whenever the MENU button is pressed the picture size setting will change while the menus are ON the screen This is to ensure that the menus do not overlap the edges of the viewable area CINEMA When watching letterbox format films video tapes this setting will eliminate or reduce the black bars at the top and bot...

Страница 13: ...ptions alter depending on the widescreen format chosen and when viewing connected equipment In Cinema 1 Press P and Q to select an option then Sor R to adjust the settings 2 Still picture This television s 100Hz double scanning plus digital picture processing produces a flicker reduced picture In addition a still image can be held on the screen Press uto hold an image on the screen Press uagain to...

Страница 14: ... Spatial Audio mode will give a widening of the sound The sound will give the impression of coming from beyond the edges of the television set Panorama Selecting the Panorama mode gives not only a widening of the sound but also an amount of surround sound Traditional surround systems give left right centre and surround channels Panorama gives the sensation of these systems without the need for ext...

Страница 15: ...panel lock and blue screen The time display facility allows the current time to be seen on the television screen Press 8 9whilst watching a normal television broadcast to see a time display from the broadcaster It will remain on screen for about 5 seconds From the Feature menu select Panel Lock and choose On or Off usingSor R The television can be set to turn itself On or Off after a certain time ...

Страница 16: ... and stereo VCR to SCART 2 then select EXT1 as the EXT2 Output The signal received through SCART 1 will output directly through SCART 2 Most VCRs and decoders send a signal through the SCART lead to switch the television to the correct Input socket Alternatively press the external source selection button Buntil the picture from connected equipment is shown An S in the display e g EXT2S indicates t...

Страница 17: ...uttons pressing the coloured buttons or pressing P f P to advance to the next page and P e Q to go back to the previous page Select Teletext Mode from the Set up menu With S or R choose Auto or List then press EXIT The teletext character set will be automatically chosen by the language setting in the Set up menu Selecting Modes Navigating pages using Auto Teletext information 1 2 The four coloured...

Страница 18: ... when they are broadcast Press8 9again to cancel the display The news flash page must be cancelled before changing programmes To display an index initial page T At times it is convenient to hold a page of text Press qand STOP will appear in the top left of the screen The page will be held on screen until the button is pressed again To hold a wanted page q To discover the solutions on quiz and joke...

Страница 19: ...e controls on the front of the television work Q A Remove it by pressing CALL Why is there a message permanently on the screen Q A Check the correct input has been chosen S VIDEO or Video See AV connections Why is the VCR DVD picture in black and white Q A Good performance of text depends on a good strong broadcast signal This normally requires a roof or loft aerial If the Text is unreadable or ga...

Страница 20: ...997 32ZH 100W Standby 28ZH 2W 32ZH 2W Dimensions approx 28ZH 51cm H 68cm W 50cm D 32ZH 55cm H 76cm W 55cm D Weight approx 28ZH 39kg 32ZH 50kg Headphone socket 3 5mm stereo Accessories Remote control 2 batteries UM 4 AAA IEC R03 1 5V Toshiba Information Systems U K Limited Consumer Products Division European Service Centre Admiralty Way Camberley Surrey GU15 3DT UK Specification is subject to chang...

Отзывы: