Toshiba 21V53G Скачать руководство пользователя страница 8

ENGLISH

   - 8 -

NOTE: 

Remove batteries from remote control

handset when it is not to be used for a long

period.Otherwise it can be damaged due to

any leakage of batteries.

Switching the TV ON/OFF

To switch the TV on

Your TV will switch on in two steps:

1-

 Press the power button located on the front of

the TV. 

Then the TV switches itself to standby

mode and the 

RED LED 

located on the front of

the TV turns on.

2-

 To switch on the TV from stand-by mode either:

• Press a digit button on the remote control so

that a programme number is selected,

or,

• Press 

 or 

 button on the front of the

TV or   or   button on the remote control, so

that last switched off programme is selected.

Either way

 the TV will switch on and the 

RED

LED

 will turn 

GREEN

.

To switch the TV off

• Press the stand-by button on the remote control,

so the TV will switch to stand-by mode and the

STANDBY


LED

 will become 

RED

,

or,
• Press the power button located on the front of

the TV, so the TV will switch off and the

STANDBY

 LED

 will turn off.

Operating the TV

You can operate your TV 

using both

 the re-

mote control handset and onset buttons.

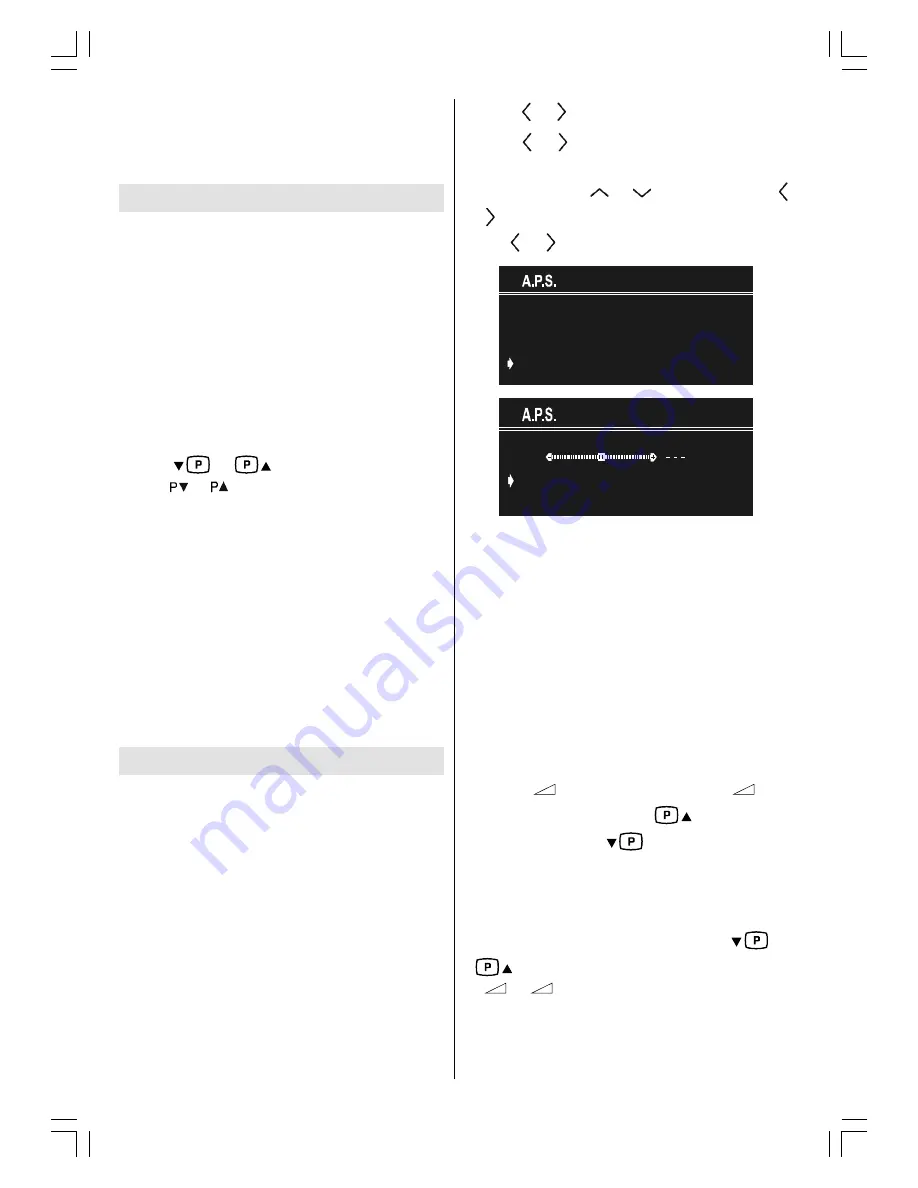
A.P.S.  (Automatic Programming

System)

"

PLEASE CHECK ANTENNA CABLE AUTO.

PROGRAMMING SYSTEM

" message will be

displayed when you


turn on your TV  for the first

time. 

APS, searches and sorts all channels

and stores them automatically.

To cancel APS before starting, press 

EXIT

button. First of all choose the "

COUNTRY

" and

"

LANGUAGE

".

• Press 

 or 

 button to select a country.

• Press 

 or 

 button to select a language.

This will affect the sort process in APS. To se-
lect “

START

” use 

 or 

 button and press 

or 

 button. To cancel APS during running

press 

 or 

 button.

3/($6( &+(&. $17(11$ &$%/(

$872 352*5$00,1* 6<67(0

&28175<

/$1*8$*(

67$57

8.

(1*/,6+

$36 ,6 5811,1*

&$1&(/

After APS is 

finalised

, a programme list will

appear on the screen. In the programme list

you will see the programme numbers and

names assigned to the programmes.

You can change the names and locations of

programmes using the Programme menu.

Operating with the buttons on the

TV set

Volume setting and programme selection can

be made using the buttons on the front panel.

Volume Setting and Programme Selection

• Press 

 to decrease volume or 

 + 

to

increase volume. Press


to select the

next programme or 

 to select the previous

programme.

Entering Main Menu

•  Press 

MENU

 button to enter Main menu. In the

Main menu select sub-menu using 

 or

 button and enter the sub-menu using

 or 

 +

 button. To learn the usage of the

menus, refer to the Menu System section.

toshiba ak30_290105.p65

03.02.2005, 09:54

8

Содержание 21V53G

Страница 1: ...ply or any other power source DO ensure that the TV is not standing on the mains lead DO NOT cut off the mains plug from this equip ment this incorporates a special Radio Inter ference Filter the removal of which will impair its performance IF IN DOUBT PLEASE CONSULTA COMPETENT ELECTRICIAN DO DO read the operating instructions before you attempt to use the equipment DO ensure that all electrical c...

Страница 2: ...sure your family know how to do this Special arrange ments may need to be made for infirm or disabled people DON T continue to operate the equipment if you are in any doubt about it working normally or it is damaged in any way switch off with draw the mains plug and consult your dealer DON T throw your batteries into a fire Dispose of your batteries in a designated disposal area or where suitable ...

Страница 3: ...s of recorded data whether caused during normal operation or misuse of the product WARNING NEVER LEAVE A STATIONARY IMAGE ON THE SCREEN If stationary images generated by TELE TEXT CHANNELIDENTIFICATION LOGOS COMPUTER DISPLAYS VIDEO GAMES ON SCREEN MENUS etc are left on the TV screen for any length of time they could be come permanently ingrained If you use your television to display com pletely st...

Страница 4: ...dy it should then be secured to the wall with a sturdy tie using the clip on the back of the television this will prevent it from falling over Use curtains or blinds to prevent di rect sunlight falling on the screen Make sure the television is located in a position where it cannot be pushed or hit by objects and that small items cannot be inserted into slots or openings in the case toshiba ak30_29...

Страница 5: ...re Blue Installation Menu Yellow Feature Menu Stereo Bilingual Mode Teletext Expand Aspect Ratio Teletext Update Teletext Reveal Time Teletext Hold Teletext Index page Green Picture Menu Red Sound Menu Cursor Down Programme Down Cursor Left Volume Down MENU Menu Personal Preferences Previous Programme Teletext on mix off Info toshiba ak30_290105 p65 03 02 2005 09 54 5 ...

Страница 6: ...ENGLISH 6 ControlPanelButtons AntennaConnections 32 5 21 2 3 21 5217 9 1 0 18 1 5 5 5 9 5 352 5 0 2 1 83 92 80 2 1 83 7 0 5 67 1 toshiba ak30_290105 p65 03 02 2005 09 54 6 ...

Страница 7: ...n Signaling NTSC Playback FrontAV in and BackAV out BeforeSwitchingonyourTV Power connection IMPORTANT The TV set is designed to oper ate on 230V AC 50 Hz After unpacking allow the TV set to reach the ambient room temperature before you connect the set to the mains Connections to the RF input socket Connect the aerial or cable TV plug to the RF input socket located at the back of the TV and connec...

Страница 8: ...NTENNA CABLE AUTO PROGRAMMING SYSTEM message will be displayed when you turn on your TV for the first time APS searches and sorts all channels and stores them automatically To cancel APS before starting press EXIT button First of all choose the COUNTRY and LANGUAGE Press or button to select a country Press or button to select a language This will affect the sort process in APS To se lect START use...

Страница 9: ...ayed If you press the same button again programme 2 will be displayed and so on MenuSystem The menu system lets you control the various functions of your TV The TV is controlled by choosing the commands which are displayed on the screen Press the MENU button The Main menu will be displayed at the middle on the screen To select a sub menu use or button and press or button Each option can also be se...

Страница 10: ...MONO and STEREO Equalizer To enter Equalizer sub menu select Equalizer using or button then enter Equalizer menu pressing or button 02 86 5 6725 In MODE item there are five predefined and one user defined options These are USER CLASSIC JAZZ ROCK POP and FLAT The predefined options can not be changed by the user If you change one of the frequency values of the predefined options the MODE is switche...

Страница 11: ...cture menu directly or Press MENU button now you are in Main menu In the Main menu select PICTURE using or button then enter the Picture menu by pressing or button Setting Brightness As you enter the picture menu Brightness will be the first selected option Press button to increase brightness Press button to decrease brightness Setting Contrast Using or button select Contrast Press button to incre...

Страница 12: ...Press OK button to store picture menu set tings in picture menu or press or button on store option to store picture menu settings Feature Menu Press the YELLOW button to enter the Feature menu directly or Press MENU button now you are in Main menu In the Main menu select FEATURE using or button Then enter the Feature menu by pressing or button 6 3 7 0 5 2 1 8 9 287387 2 2 1 6 79 Sleep Timer As you...

Страница 13: ...on on STANDARD you can change the standard to B G D K L L Selecting Search To start the search process press button for forward search or button for backward search SEARCH item blinks during search process until the process is stopped or signal is found To stop the search process press the or button again Selecting Fine Tuning You can use the Fine Tuning process for fine adjustment after coarse ad...

Страница 14: ...button if you change your mind The GREEN INSERT button is used to insert a s e l e c t e d p r o g r a m m e i n t o a n o t h e r programme s position Press the GREEN but ton to select a programme The selected programme is displayed in green characters With navigation buttons select a position and press the GREEN button again The selected programme is inserted into this position CANCEL function c...

Страница 15: ...After this time the TV goes into standby mode AV Modes By pressing the button you can switch your TV to AV modes except in Teletext mode Pressing this button consecutively will display input from one of the following connections AV 1 and AV 2 normal video from the external SCART inputs F AV normal video from the front AV connection and RGB improved qual ity RGB video from the external SCART input ...

Страница 16: ...ced by page number to indicate that page has been found Now you can display this teletext page by pressing button To Select Double Height Text Press button for the top half of the information page to be displayed in double height text Press button again for the bottom half of the information page to be displayed in double height text Press button once more for the full page of normal height text T...

Страница 17: ... of the TV Via the SCART Your TV set has two Scart sockets If you want to connect peripherals e g video decoder etc which have Scarts to your TV use EXT inputs If an external device is connected via Scart socket TV is switched to AV mode automati cally If the signal is RGB then the RGB OSD in dicator is displayed on the screen RGB mode If your equipment can output RGB signals connect it to the AV ...

Страница 18: ... Search and Store TV channels Store the test signal under programme number 0 Replace the aerial cable in the aerial socket ANT of your video recorder once you have stored the test signal Camera and Camcorder To connect to Front AV input F AV Connect your camera or camcorder to the in puts at the front of your TV Connect your equipment to the TV via VIDEO yellow AUDIO L white and AUDIO R red inputs...

Страница 19: ...ENGLISH 19 REARPANEL ConnectPeripheralEquipment 17 11 7 51 6 57 7 51 6 57 9 287 toshiba ak30_290105 p65 03 02 2005 09 54 19 ...

Страница 20: ...ghtly to the aerial socket Is the aerial cable damaged Are suitable plugs used to connect the aerial If you are in doubt consult your dealer No Picture means that your TV is not receiving any transmission Have you pressed the cor rect keys on the remote control Try once more Sound You can not hear any sound Check in case the key has been pressed this switches speakers off and on Sound is coming fr...

Страница 21: ...MBEROFPRESETCHANNELS 100 CHANNELINDICATOR On Screen Display RFAERIALINPUT 75 Ohm unbalanced OPERATINGVOLTAGE 230V AC 50 Hz AUDIOOUTPUT German Nicam Stereo AUDIO OUTPUT POWER WRMS 10 THD 2x6 5 W POWER CONSUMPTION 95W 3W standby PICTURETUBE Visible picture size 51 cm DIMENSIONS mm HLJKW NJ 0 16 216 PP toshiba ak30_290105 p65 03 02 2005 09 54 21 ...

Отзывы: