1-3
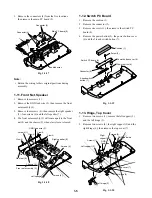
1-4. Sensor PC Board
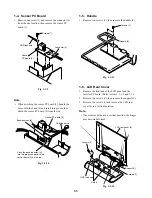
1. Remove one screw (1) and remove the connector (2)
from the one location, then remove the sensor PC
board (3).
Fig. 1-1-9
Note:
• When attaching the sensor PC board (3), bundle the
wires with the band (4) and insert into groove then
attach the sensor PC board (3) from the top.
Fig. 1-1-10
1-5. Handle
1. Remove two screws (1), then remove the handle (2).
Fig. 1-1-11
1-6. LCD Rear Cover
1. Remove the front panel, the LCD panel and the
inverter PC board. (Refer to item 1-1, 1-2 and 1-3.)
2. Remove two screws (1), then remove the support (2).
3. Remove two screws (3) and remove the LCD rear
cover (4) in a vertical position.
Note:
• If not removed when in a vertical position, the hinges
may become deformed.
Fig. 1-1-12
Screws (1)
Connector (2)
Sensor
PC board (3)
GND lead wire
Sensor PC board (3)
GND lead wire
Place the bundled wires (4)
into this groove and attach the
sensor board (3) on the top.
Bundled wires (4)
Screws (1)
Handle (2)
GND lead wire
Screws (3)
LCD rear cover (4)
Support (2)
Screws (1)
Guide
Содержание 15DL72
Страница 1: ...LCD TV SERVICE MANUAL FILE NO 050 200224 15DL72 DOCUMENT CREATED IN JAPAN Oct 2002 ...
Страница 6: ...This page is not printed ...
Страница 46: ...10 1 3 4 A B C D E G 2 5 6 7 8 9 F Fig 2 4 2 U001 Main PC board Bottom side 2 44 2 43 ...
Страница 48: ...2 46 This page is not printed ...
Страница 56: ...3 8 This page is not printed ...
Страница 57: ...TOSHIBA CORPORATION 1 1 SHIBAURA 1 CHOME MINATO KU TOKYO 105 8001 JAPAN ...

