Torrey W-LABEL Series Скачать руководство пользователя страница 24


24 


WLABEL Series


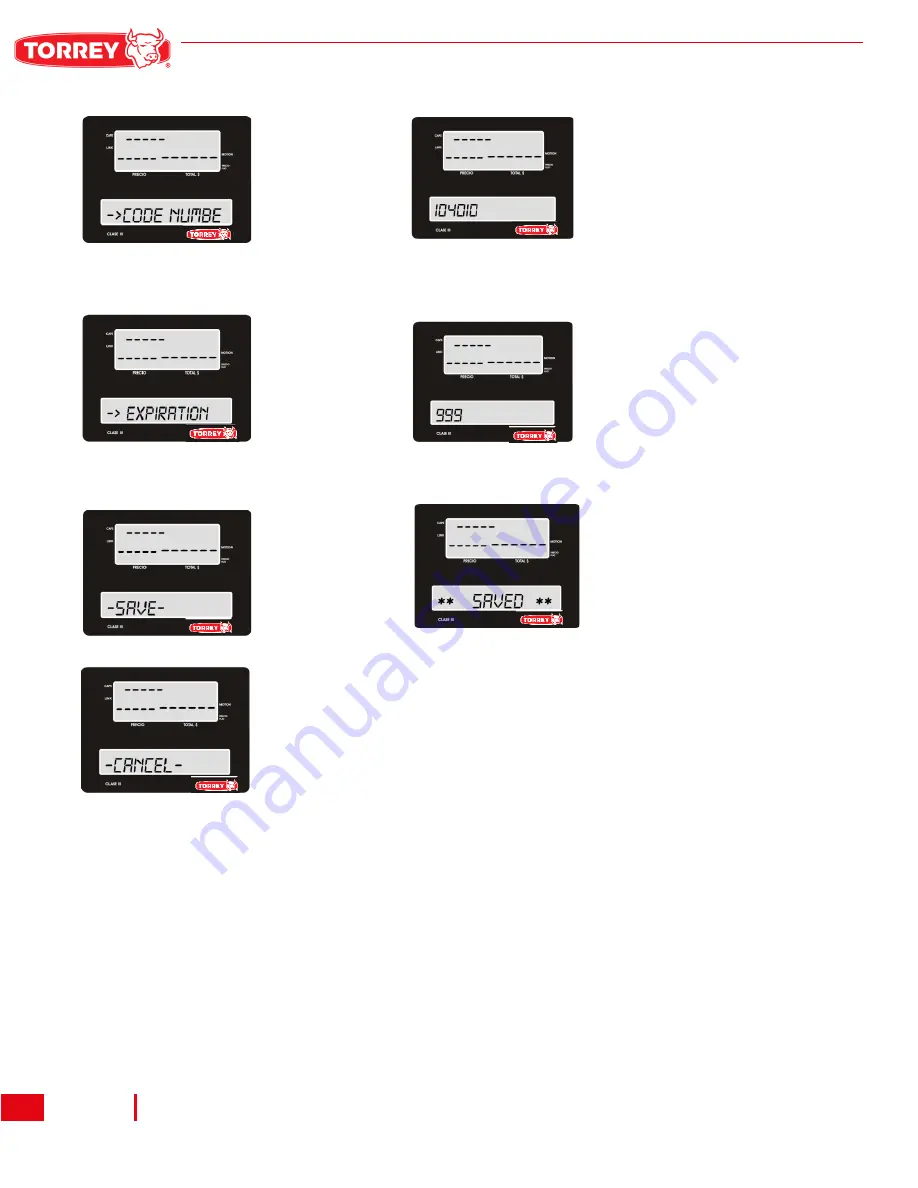
Cancelation:  You  can  cancel  a  product  creation  at  any  time, 
using the arrow pad to go to the cancel option. 

Once selected customer only will have to press ENTER. 


6.-Press: 
ENTER. 

6.1-  The  scale  by  default 
assigns  a  new  code  for  the 
product,  but  this  can  be 
changed by the user once he 
presses  

ENTER. 


8.- Press key: 

ENTER

.  

8.1-  Wait  a  few  seconds 
while  the  scale  saves 
changes,  and  once  it’s 
done it’ll go back to the 
sub menu. 


7.- Press Key 
ENTER. 
Expiration 
shall be 
expressed in 
days 


7.1- Enter the number of days. 

(from 1 to 999) 
The product will be fit for 
consumption 

Wait a few seconds while the 
scale saves changes, and 
once it’s done it’ll go back to


the sub menu. 


Содержание W-LABEL Series

Страница 1: ...REV 0 OWNER S MANUAL LABELING PRINTING SCALES BEFORE OPERATING THIS SCALE PLEASE READ THIS MANUAL THOROUGHLY W LABEL Series...

Страница 2: ...ENTERING THE SETUP MENU 16 8 SETTING OPERATING MODES SELECTING OR TICKETS The labeling scale WLABEL has two modes of product sales Pre packaging mode and Point of Sale mode 16 8 1 WHAT ARE THE PRE PA...

Страница 3: ...N 36 13 2 3 ADHOC HOT SPOT CONECTION CONFIGURATION 39 14 PRINTER CONFIGURATIONS 41 14 2 PRINTER CONTRAST SETTINGS 42 15 DATE AND TIME SETTINGS 43 15 1 SEE DATE AND TIME 43 43 15 2 SET DATE 44 15 3 SET...

Страница 4: ...PRODUCTS 58 23 4 PRE PACKING MODE SALE OF NON WEIGHABLE NON PLU PRODUCTS 59 23 5 POINT OF SALE MODE WEIGHABLE AND NON WEIGHABLE PRODUCTS SALE 59 60 24 APPLY DISCOUNTS 61 25 RETURNS 62 25 1 IMMEDIATE R...

Страница 5: ...racteristics Stainless Steel cabinet and plate Carbon steel base Thermal printer Keyboard Bubble Level and adjustable feet Permanent backlight on both displays Display for weight unit price and total...

Страница 6: ...W LABEL40L Capacity 40 lb Minimum Division 0 010 lb Programmable memories 500 PLUs Interface Keyboard Power cord Included Power 110 220 VCA 60 50Hz Max Tare 9 99 lb Plate s Dimensions 38cm L x 30cm w...

Страница 7: ...wing 1 Scale W LABEL 1 Power Cable 1 Thermic paper roll 1 roll with 750 thermic labels 1 Turret Display 1 WIFI antenna optional 1 Allen Wrench 3 16 1 Allen Wrench 1 8 2 screws 10 24 socket head 3 scre...

Страница 8: ...ward the front of the scale as shown in the image on the left Closing the Printer Once the roll of labels or tickets has been installed lift the lock lever on the front of the scale 1 Open the printer...

Страница 9: ...ensor 4 Wrap the remaining residue of the roll counterclockwise 5 Close the printer 3 2 TICKET PLACEMENT MODE OF SALE Printer Opening Pull the release lever on the right side of the scale toward the f...

Страница 10: ...objects such as knives razors pencils pens etc Use a slightly damp cloth to clean the scale Do not strike the scale plate with the object to be weighed this may damage the load sensor Avoid opening th...

Страница 11: ...iece and have not been programmed previously in the scale 5 DISPLAYS DESCRIPTION The W LABEL scale consists of the operator display and the customer display both show the same information to both oper...

Страница 12: ...n indicator active LINK Indicates whether the scale is connected to a device 6 ZERO icon places the reference to zero 7 NET icon Indicates that the TARE function is activated 8 MOTION Indicator Indica...

Страница 13: ...register their transactions Allows the output of a label or a small stretch of thermal paper ticket Activates the Change operation for more information see Section 24 Change Operation page 50 Activate...

Страница 14: ...and price of the products It activates the sale of several non weighable products or sale by pieces for more information see section 23 Sale by Pieces P g 46 Allows you to take a new reference to zero...

Страница 15: ...me of the product while a sale is being made The alphabetic keyboard when in DIRECT ACCESS mode enabled is used to enter the PLUs stored in the internal memory Go to section 11 Keyboard Mode Settings...

Страница 16: ...to enter the different options of this menu The different options in the CONFIGURATION menu are 1 GENERAL 2 PRODUCTS 3 NETWORK 4 PRINTER 5 DATE AND TIME 6 MEMORY 7 LANGUAGE 8 INFORMATION Access each...

Страница 17: ...e and install the roll of thermal labels 750 or the roll of thermal paper according to the instructions in the sections 3 1 Labeling Pre packing Mode 3 2 Ticket Placement Mode of Sale 8 2 Configuratio...

Страница 18: ...key 3 times Ticket and label print 9 MISCELLANEOUS PRODUCT CONFIGURATION The various products are those of which a sale is made without having to be programmed in the scale previously by enabling the...

Страница 19: ...pressing ENTER 3 With the direction arrows choose the option MISCELLANEOUS PRODUCTS and press ENTER 4 with the direction arrows select the option you find more convenient Press ENTER this will change...

Страница 20: ...this price will not be stored in the scale memory When the price lock is disabled the scale will allow to change the price without requesting the password 1 Enter the GENERAL 1 submenu following the...

Страница 21: ...CESS mode it will not be possible to enter new products during the sales operation In PRODUCT ENTRY mode it is possible to enter a new product during the sales operation but they can t be stored in th...

Страница 22: ...s 12 PRODUCTS CONFIGURATION In the 2 PRODUCTS submenu you can create new products edit the existing products or delete any of them 1 Enter the 2 PRODUCTS submenus following the steps described in sect...

Страница 23: ...n You will use arrow keys and the ENTER button 2 Press ENTER 2 1 Type the name of the new product and then press ENTER 3 Press Enter 4 Press Enter 3 1 Type the Price less than 999 99 and press ENTER 4...

Страница 24: ...for the product but this can be changed by the user once he presses ENTER 8 Press key ENTER 8 1 Wait a few seconds while the scale saves changes and once it s done it ll go back to the sub menu 7 Pre...

Страница 25: ...the options ENTER key and the red letter C 2 The screen will show the assigned code and product name you can choose a product to edit with the arrow keys you and then ENTER to begin editing 3 To modif...

Страница 26: ...like to edit with the arrow keys and then press ENTER 9 The ID code is not editable To watch it press ENTER 9 1 To go back to the edit menu press ENTER 10 Enter key ENTER Expiration shall be expresse...

Страница 27: ...12 steps 1 Get into the option pressing ENTER 2 Product s code and name are shown in the menu and can be watched by moving around with the arrow keys and once you select a product to delete press ENT...

Страница 28: ...twork type of your scale for connectivity with third party apps 1 Go into the NETWORK menu option from the main menu configuration p 14 2 With the arrow keys select the options 3 Then press ENTER Once...

Страница 29: ...work information complete such as WIFI STATUS CONNECTED DISCONNECTED RED SCALE_LINK_ IP MASK GATEWAY WIFI On this type of connection the scale can connect wireless by an access point modem to a networ...

Страница 30: ...option 1 Follow section 13 steps and select Network Info 2 Press ENTER to get into the menu And with the arrow keys to see the different options that it has such as ETHERNET STATUS CONNECTED DISCONNEC...

Страница 31: ...mation of ADHOC Connection 1 Follow section 13th steps into this option 2 Press ENTER to get into this menu option And move around with the arrow keys You ll see parameters such as TYPE ADHOC HOT SPOT...

Страница 32: ...if the scale is connected to a device Network name the scale generates automatically Shows the IP address of the scale Shows the Network Mask Shows data gateway of the scale To be off the menu just pr...

Страница 33: ...eys to see all the different options WIFI Only for scales with WIFI antenna ETHERNET ADHOC HOTSPOT to get into any of these presses ENTER The WIFI connection is done wirelessly between the scale a mod...

Страница 34: ...a few seconds while the scale configures this option and saves changes once it ends it goes automatically into the Look for network option but if you wish you can use the arrow keys to select for adva...

Страница 35: ...rds to normal DEL or C to erase characters BACK to go back to previous menu option In case of error on password the screen will show INVALID and 2 seconds after you ll be back into the WIFI network li...

Страница 36: ...cale should be active by now see reference 5 1 P 10 13 2 2 ETHERNET CONFIGURATION Connect the scale to a router by a RJ 45 cable 1 Follow the steps of section 13 2 Type of connection configuration P 2...

Страница 37: ...hen choosing DYNAMIC IP the scale configures automatically the necessary parameters for it to work dynamically on the scale 3 1 1 Once done 3 1 2 The scale will It will show reboot by itself READY and...

Страница 38: ...git with a different one with the number pad To erase a digit use the DEL key or the C key once finished editing the network mask press ENTER it will show a message TYPE GATEWAY 3 2 3 By default the g...

Страница 39: ...around with the arrow keys You can choose between NETWORK NAME NETWORK PASSWORD INITIATE ADHOC Choose one by pressing ENTER 3 1 Once you press ENTER the scale will show the network name so that you ca...

Страница 40: ...using the DEL key or the C key With the arrow keys you can move around the digits Press ENTER to go into the next section 3 1 4 Press ENTER to save the stablished parameters Once the scale saves the...

Страница 41: ...of the options with the arrow keys and press ENTER to select it 14 1 AUTO PRINT SETTINGS AUTO PRINT is a label exclusive option this function saves you time packing a product 1 Follow the steps on sec...

Страница 42: ...RAST 2 Press ENTER to go into this option and by using the arrow keys you can go onto the contrast levels By default the intensity level is 7 the raise of level can slow down the printer Press ENTER t...

Страница 43: ...ess ENTER Inside this menu you can find the following options SEE DATE AND TIME SET DATE SET TIME DATE FORMAT TIME FORMAT Select any of this option moving with the arrow key and press ENTER to get int...

Страница 44: ...ng press ENTER to save your year and go to month 4 Use the arrow keys to move around the digits and replace any of the digits with the number pad or press the DEL key or C key to erase a digit Once yo...

Страница 45: ...its with the number pad or press the DEL key or C key to erase a digit Once you re done with the month press ENTER to go to minutes 4 Use the arrow keys to move around the digits and replace any of th...

Страница 46: ...d format Once all the changes are saved press the return key 4 times to be off the menu 15 5 TIME FORMAT SETTINGS This menu option allows you to change the time format of the scale 24 HRS or 12 HRS AM...

Страница 47: ...oose any of the options navigating with the arrow keys and pressing ENTER 16 1 DELETE SALES This option erases all the sales done on the scale 1 Get into the 6 MEMORY menu option following section 7 s...

Страница 48: ...want to cancel this operation press the RETURN key or the C key to go back Press ENTER to confirm and erase all the products 4 the scale will ask you for the user s password and then it ll begin erasi...

Страница 49: ...RYTHING If you wish to cancel press the return key or the c key Press ENTER to confirm and initiate the process 4 The scale will ask you for the user s password usually 123456 to proceed with the oper...

Страница 50: ...selections Spanish English Choose any of these with the arrow keys and press ENTER to select 3 Once it s saved the menu will appear in the language selected previously and you can go off the menu pre...

Страница 51: ...NUMBER SOFTWARE VERSION Choose any of the options moving with the arrow keys and pressing ENTER to desired option 3 When choosing SERIAL NUMBER the display will show the serial number on display and...

Страница 52: ...adds weight to the product To use this function place the empty container on the plate and press The weight display will return to zero and the ZERO and NET indicators will be activated from this mome...

Страница 53: ...d the scale will go back to the main Screen and show the agent s name on the display for 3 seconds 19 4 FIXED PRICE SELECTION This option is used to pre pack a product 1 Choose the product you wish to...

Страница 54: ...the display will show the NEG indicator 20 PLU SELECTION Follow section 11 steps p 18 and choose SHORTCUTS Go back to scale s normal functions by pressing the RETURN key 3 times By this action the sh...

Страница 55: ...Price and then put the product s weight on the plate Once done press PRINT on the scale To cancel this function press the red C key on the scale twice to go back to the main Screen 22 NON PLU NON WEI...

Страница 56: ...k to its normal state If you don t want to repeat all the previous steps over and over you can press FIXED PRICE to work with a single product 23 PRODUCT SALE 23 1 PRE PACKING MODE WEIGHABLE PRODUCTS...

Страница 57: ...To make this kind of sale follow the next steps 1 Type in the product s code n the scale using the numeric pad followed by the PLU key on the scale The publicity display will immediately show the prod...

Страница 58: ...then press ENTER then the display will show the product s name on the publicity display 2 Type in the Price of the new product and then place the product on the scale s plate if you remove the weight...

Страница 59: ...ton PIEZAS and type the product s price press the X key and type the number of pieces of the product Lastly press PRINT To cancel press the red C key twice Item pz will appear on the display 23 5 POIN...

Страница 60: ...n applies to sell by quantity after typing the product in and pressing the X key and number of pieces to sell Once done with the sell press PRINT to get the new ticket Same steps apply to non plu prod...

Страница 61: ...NTER to finish the operation Choose with the arrow keys the product you want the discount to be applied maximum of 99 and press ENTER Then press the percentage to be applied on the sale And press ENTE...

Страница 62: ...ed yet or printed the ticket of the sale Press the D DEV PLU key With the arrow keys choose return if you do not wish to apply this function choose cancel sale Either way press ENTER at the end By mov...

Страница 63: ...a later return follow these steps Place the product on the scale Type in the plu number of the product to be returned And press D DEV PLU afterwards Immediately type in the password and press ENTER fo...

Страница 64: ...d a total amount of 493 75 to know how much change you must give press the plus key followed by the blue change button The display will immediately show CASH where we must type in the total amount the...

Страница 65: ...NFIGURATION Keep your customers up to date with publicities messages You can configure at least 5 messages for publicity which they can see directly in the scale Enable Disable general settings such a...

Страница 66: ...Link Mobile App is available on the following stores Apple devices requires iOS 10 3 or later Compatible with iPhone iPad and iPod Touch Android devices requires Android 5 0 or later Compatible with A...

Страница 67: ...owns scale s network to stablish a communication 2 Wifi Eth The mobile device and scale must be connected to the same network 3 Scalelink Server To use this connection type you have to install Scalel...

Страница 68: ...work that your scale created Search and select the network on your mobile device and enter the password has been created The password must be same you configured in scale s network You need return to...

Страница 69: ...ote If you prefer using device data you need to share your mobile s connection data and connect the scale in the same hotspot mobile has created Return to Scale Link App s menu and press Login then se...

Страница 70: ...s section you can view product s list add and edit products within your scale directly from Scale Link App 1 For create a new product within your scale 2 Press on product item to edit it within your s...

Страница 71: ...On this section you can view agent s list add and edit agents within your scale directly from Scale Link App 1 For create a new agent within your scale 2 Press on agent item to edit it within your sc...

Страница 72: ...this section you can view offer s list add and edit offers within your scale directly from Scale Link App 1 For create a new offer within your scale 2 Press on offer item to edit it within your scale...

Страница 73: ...you can view offer s list add and edit offers within your scale directly from Scale Link App 1 For create a new additional information within your scale 2 Press on additional information item to edit...

Страница 74: ...ur sale s report directly from Scale Link App 1 First time you access this section you see Last Update empty 2 Button to download real time sale s report from scale 3 You can access every report by pr...

Страница 75: ...es you can manage to apply in scale 1 Publicity Section to configure publicity messages for your customers 2 General Section to change general options security passwords and date and time formats 3 He...

Страница 76: ...r display Your customers are going to see theses message in scale s torret 1 First time you access this section you will see defaults messages for rear display You can change this message accord to yo...

Страница 77: ...llows you to enable and disable scale s functions such as general options security password and date time formats 1 Panel for enable or disable scale s functions 2 Panel for change Admin and Superviso...

Страница 78: ...to products using a supervisor password on the scale Allow Returns It allows you to make returns of products by typing the supervisor password on the scale Block Price Once this option is activated t...

Страница 79: ...nd supervisor passwords of the scale The different types of date formats are dd MM yyyy This can be understood as Day month year MM dd yyy This can be understood as month day year To have a 24 hours f...

Страница 80: ...Series 27 7 3 HEADLINES On this section you can change and configure until 15 headers for customer s ticket Once you configure the customer s ticket you can press check mark image button for save the...

Страница 81: ...can save until 35 shortcuts for your products 1 You can select any product of your scale and set the shortcut 2 If you want to delete or replace one shortcut you need to make a swipe left with your f...

Страница 82: ...82 WLABEL Series 27 7 5 BARCODE This Screen allows you to choose from 2 predefined formats based on the type of paper on the scale 1 Printing format panel 2 Barcode configurations panel 1 2...

Страница 83: ...ommendation A AGENT 2 F CONSECUTIVE 6 C Product s code 6 W Product s weight 5 T Total 6 D Department 2 N Product s number 2 P Prefix 2 X Not read digit V Checker non editable automatic Code Format Wei...

Страница 84: ...at choose CUSTOM introduce the content according to the list below Prefix Allows you to see and modify the prefix that gets printed at the beginning of the ticket Department Allows you to see and modi...

Страница 85: ...default is Total 4 Agent text Is the text that gets printed on top of the Agent s name 5 Publicity Text this is the text that gets printed on the publicity display by default is Thank you for your pu...

Страница 86: ...date on the ticket 14 Expiration Date Text This text gets printed on top of the expiration date indicator on the ticket 15 Piece Price Text This text gets printed on top of the total amount 16 Tare T...

Отзывы: