Torrey Pines Scientific, Inc.
16
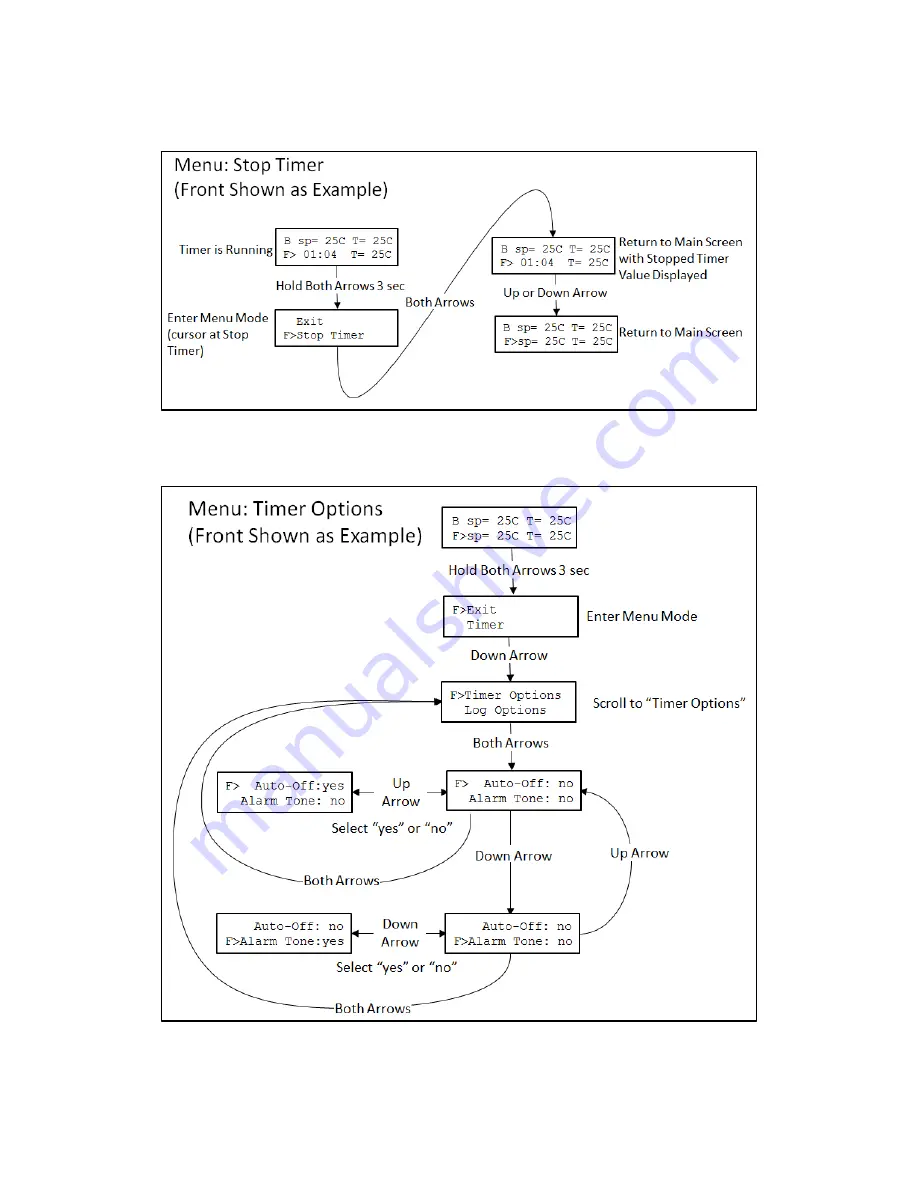
Figure 4:
Menu Map to Stop the Running Timer
Figure 5:
Menu Map to Select Timer Options
Страница 1: ...T Applies to version 5 2 and higher DOCUMENT NUMBER IC22 IC22XT 02 Revised Feb 2021 TORREY PINES SCIENTIFIC INC 2713 Loker Ave West Carlsbad CA 92010 TELEPHONE 760 930 9400 TOLL FREE 866 573 9104 FAX...
Страница 2: ...DATA LOGGER 6 VII FRONT AND REAR PANEL CONTROLS 8 FRONT PANEL 8 REAR PANEL 9 VIII SET UP PARAMETERS 10 SET UP PARAMETERS 10 SET UP INSTRUCTIONS 10 ENVIRONMENTAL INFORMATION 10 IX DISPLAY AND KEYBOARD...
Страница 3: ...Points 24 XII TEMPERATURE MEASUREMENT ERROR CODES 25 XIII RS232 SERIAL COM INTERFACE 26 Cable Pinout 26 COM Settings 26 XIV CLEANING MAINTENANCE AND CONSUMABLE PARTS 27 CLEANING 27 MAINTENANCE 27 SPAR...
Страница 4: ...ear period please return freight prepaid and correction of the defect will be made without charge Out of warranty products will be repaired on a charge basis III RETURN OF ITEMS Authorization must be...
Страница 5: ...if touched Use extreme caution at all times Never leave your unit accessible to others when it is hot Never touch the plate surface unless you are sure it is cool Note that there is a red LED on the f...
Страница 6: ...TIMER All units have a countdown timer for each plate reading in hours minutes and seconds It can be set to a maximum of 99 hours 59min 59sec The timer will be displayed in place of the Set Point temp...
Страница 7: ...ipped with EEPROM memory that will store user settings such as the last set point MENU options user changed calibration points and logged data points The stored values will be recalled each time the u...
Страница 8: ...r both the front F and back B plates Each set point temperature is set by pressing the up arrow button to increment the value and the down arrow button to decrement the value The arrow cursor on the d...
Страница 9: ...rrey Pines Scientific Inc 9 REAR PANEL The rear panel shown has the on off power switch at the left the 12 Volt DC power input jack in the middle the DB9 connector for the RS232 I O port is on the rig...
Страница 10: ...e line cord provided and then into a properly grounded 3 wire outlet of proper voltage 3 Plug the power supply cable into the rear of the chilling heating module 4 Place the sample on the plate surfac...
Страница 11: ...ting for easy viewing It is used to set all the parameters of the units The two push buttons enable the user to set a temperature to set a timer and to calibrate the temperature against a local standa...
Страница 12: ...th each press If the UP ARROW is pressed and held down the set point will increase by 1C after the first press but after holding for 2sec the set point temperature will rapidly increase until the butt...
Страница 13: ...ont plate features on the LCD display Likewise with the cursor referencing the back plate B pressing and holding both arrows will bring up the Menu of back plate features on the LCD display Scrolling...
Страница 14: ...RE As described in the KEYBOARD section of this manual use double key presses to pick the front or back plate To set a temperature for the front or back plate simply press the UP or DOWN ARROW until t...
Страница 15: ...he Menu See Figure 3 for details on setting and starting the Timer Figure 4 indicates how to stop the timer When the timer is stopped the last timer value is frozen on the screen until either the Up o...
Страница 16: ...Torrey Pines Scientific Inc 16 Figure 4 Menu Map to Stop the Running Timer Figure 5 Menu Map to Select Timer Options...
Страница 17: ...d depending on the method used See below See Figure 6 and Figure 7 for details on setting and clearing Idle Mode using the menu The unit will enter Idle Mode in two ways 1 By using the Menu option Set...
Страница 18: ...Torrey Pines Scientific Inc 18 Figure 7 Menu Map to Clear Idle Mode using the Menu Using the Menu...
Страница 19: ...n the unit is in Log mode the character L will be displayed on the LCD screen in the lower left corner Front Back or both plate temperatures may be logged by starting and stopping log sessions per the...
Страница 20: ...Torrey Pines Scientific Inc 20 Figure 9 Menu Map to Start Logging Session Figure 10 Menu Map to Stop Logging Session...
Страница 21: ...ne with the low and high calibration temperatures equal to the corresponding low and high temperatures in the expected range If operation at only a single temperature is required then single point cal...
Страница 22: ...ration the unit must be calibrated at either the low or high temperature calibration point but not both The rule of thumb is if the single point calibration point is less than 50C calibrate using the...
Страница 23: ...SURFACE MEASUREMENTS ARE DIFFICULT TEMPERATURE MEASUREMENT TO MAKE ACCURATELY Ensure that the unit and the measurement device have had sufficient time 10 mins to stabilize at the new calibration tempe...
Страница 24: ...igure 12 shows the keystrokes to reset the calibration points Select Reset Cal Pts and the unit will retrieve the calibration values obtained when the unit was calibrated at the factory prior to shipm...
Страница 25: ...displayed instead of the temperature value for Plate Table 1 below lists the error codes the possible cause and recommended action to address the error and return the unit to proper operating conditio...
Страница 26: ...wing each command that is sent to the IC22 IC22XT unit Refer to Appendix A of this document for a detailed description of the commands available when using the serial port The interface cable should b...
Страница 27: ...t the unit is not dirty to a point where proper performance is impaired This is especially important relative to the membrane switch and LCD window 3 Being certain to store the unit properly when not...
Страница 28: ...mber Description 730 0001 Power Cord US 730 0002 Power Cord Germany European 730 0003 Power Cord UK 730 0004 Power Cord Italy 730 0005 Power Cord Australia China XV ADDITIONAL SYMBOLS The following ar...
Страница 29: ...from the IC22 IC22XT will be terminated with this character Actually every string that is returned from the IC22 IC22XT will be terminated with a CR then a LF In HyperTerminal the combined characters...
Страница 30: ...nt for the front plate send s CR returned example 1 10 CR LF returned example 2 9 CR LF returned example 3 100 CR LF returned example 4 off CR LF if unit is in Idle Mode see Command i Command n for FR...
Страница 31: ...e command j CR is received by the IC22 IC22XT unit Idle Mode will cease and the unit will return to the previous set point If the command is not received in the proper syntax e CR LF will be returned...
Страница 32: ...e IC22 IC22XT unit the unit will begin to log plate temperature values at the rate defined by the log period setting ref le lm or l5 commands or front panel menu command If the command is not received...
Страница 33: ...nction Return all calibration values Description When the command m CR is received by the IC22 IC22XT unit the unit will return 4 values separated by commas and terminated by CRLF The values and order...
Страница 34: ...F CR returned ok CR LF Command Z Function Reset Unit to Default Configuration Description When the command Z CR is received by the IC22 IC22XT unit the unit will reset all non volatile memory to defa...
Страница 35: ...log_data 0 CR LF log_data n CRLF lc Lc clear log file FRONT clear log file BACK lc CR ok CR LF ls Ls start logging FRONT start logging BACK ls CR ok CR LF lp Lp stop logging FRONT stop logging BACK l...