


Unclogging a Nozzle
If a nozzle becomes clogged while you are spraying,
you can clean it using a hand-spray bottle of water
or a toothbrush.
1.
Stop the sprayer on a level surface, shut off the
engine, and set the parking brake.
2.
Set the master-boom switch to the O
FF
position
and then set the pump switch to the O
FF
position.
3.
Remove the clogged nozzle and clean it using a
spray bottle of water or a toothbrush.
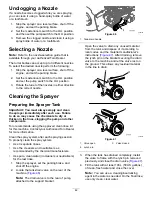
Selecting a Nozzle
Note:
Refer to the nozzle-selection guide that is
available through your Authorized Toro Dealer.
The turret bodies can accept up to 3 different nozzles.
To select the desired nozzle perform the following:
1.
Stop the sprayer on a level surface, shut off the
engine, and set the parking brake.
2.
Set the master-boom switch to the O
FF
position
and set the pump switch to the O
FF
position.
3.
Rotate the turret of the nozzles in either direction
to the correct nozzle.
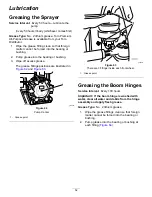
Cleaning the Sprayer
Preparing the Sprayer Tank
Important:
You must always empty and clean
the sprayer immediately after each use. Failure
to do so may cause the chemicals to dry or
thicken in the lines, clogging the pump and other
components.
Toro recommends using the approved clean rinse kit
for this machine. Contact your Authorized Toro Dealer
for more information.
Clean the spray system after each spraying session.
To properly clean the spray system:
•
Use 3 separate rinses.
•
Use the cleaners and neutralizers as
recommended by the chemical manufacturers.
•
Use pure, clean water (no cleaners or neutralizers)
for the last rinse.
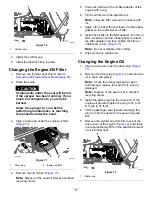
1.
Stop the sprayer, set the parking brake, and
shut off the engine.
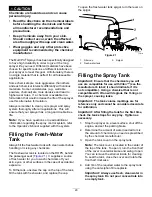
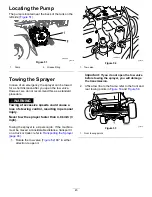
2.
Locate the tank-drain valve on the rear of the
machine (
).
Note:
The drain valve is to the rear of pump,
attached to the support bracket.
g028158
Figure 46
1.
Tank-drain handle
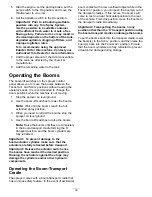
Open the valve to drain any unused material
from the tank and dispose of it according to
local codes and the material manufacturer's
instructions (
). After draining, remove
the lynch pin on the bracket securing the drain
valve to the machine and let the valve rest on
the ground. This allows any residual material
in the line to drain.
g018933
Figure 47
1.
Valve open
3.
Valve closed
2.
Lynch pin
3.
When the tank has drained completely, install
the valve to frame with the lynch pin removed
previously and close the drain valve (
).
4.
Fill the tank with at least 190 L (50 US gallons)
of clean, fresh water and close the cover.
Note:
You can use a cleaning/neutralizing
agent in the water as needed. On the final rinse,
use only clean, clear water.
42
Содержание Multi Pro 5800-D
Страница 74: ...Spray System Schematic g034336 Figure 95 74 ...
Страница 89: ...Notes ...
Страница 90: ...Notes ...


