


Installation
Loose Parts
Use the chart below to verify that all parts have been shipped.
Procedure
Description
Qty.
Use
1
No parts required
–
Prepare to install the kit
2
No parts required
–
Remove the hood.
3
No parts required
–
Remove the seats.
4
No parts required
–
Removing the coolant tank, ROPS
shield, and seat shroud.
5
No parts required
–
Remove the hydraulic lift lines.
6
No parts required
–
Remove the quick disconnect hose
fittings and the quick disconnect bracket.
Hydraulic control manifold
1
Straight hydraulic fitting (11/16 x 9/16 x
3/8 inch)
1
45° hydraulic fitting
1
90° hydraulic fitting
3
7
Straight hydraulic fittings (9/16 x 9/16 x
3/8 inch)
2
Prepare the hydraulic control manifold.
Flat manifold bracket
1
Flanged manifold bracket (HDX-Auto
Workman models)
1
Bolt (5/16 x 3/4 inch)
2
8
Lock washer (5/16 inch)
2
Install the manifold bracket and
Hydraulic control manifold.
Hose (3/8 x 95 inch)
2
3-position switch
1
9
Cable ties
AR
Install the hydraulic lift hoses.
10
No parts required
–
Connect the lift cylinder hoses to the
manifold.
Wiring Harness
1
3-position switch
1
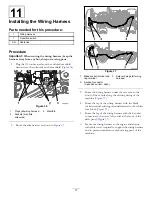
11
Cable ties
AR
Install the wiring harness.
Fuse block
1
Fuse (12 amp)
1
Decal (fuse block)
1
Bolt (5/16 x 3/4 inch)
1
12
Locknut (5/16 inch)
1
Install the fuse block.
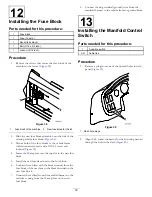
3-position switch
1
13
Cable ties
AR
Install the manifold control switch.
Neutral switch
1
Locknut (10-24 inch)
1
Carriage bolt (10-24 x 5/8 inch)
1
14
Switch plate
1
Install the hydraulic lift lever neutral
switch.
3


