background image

16

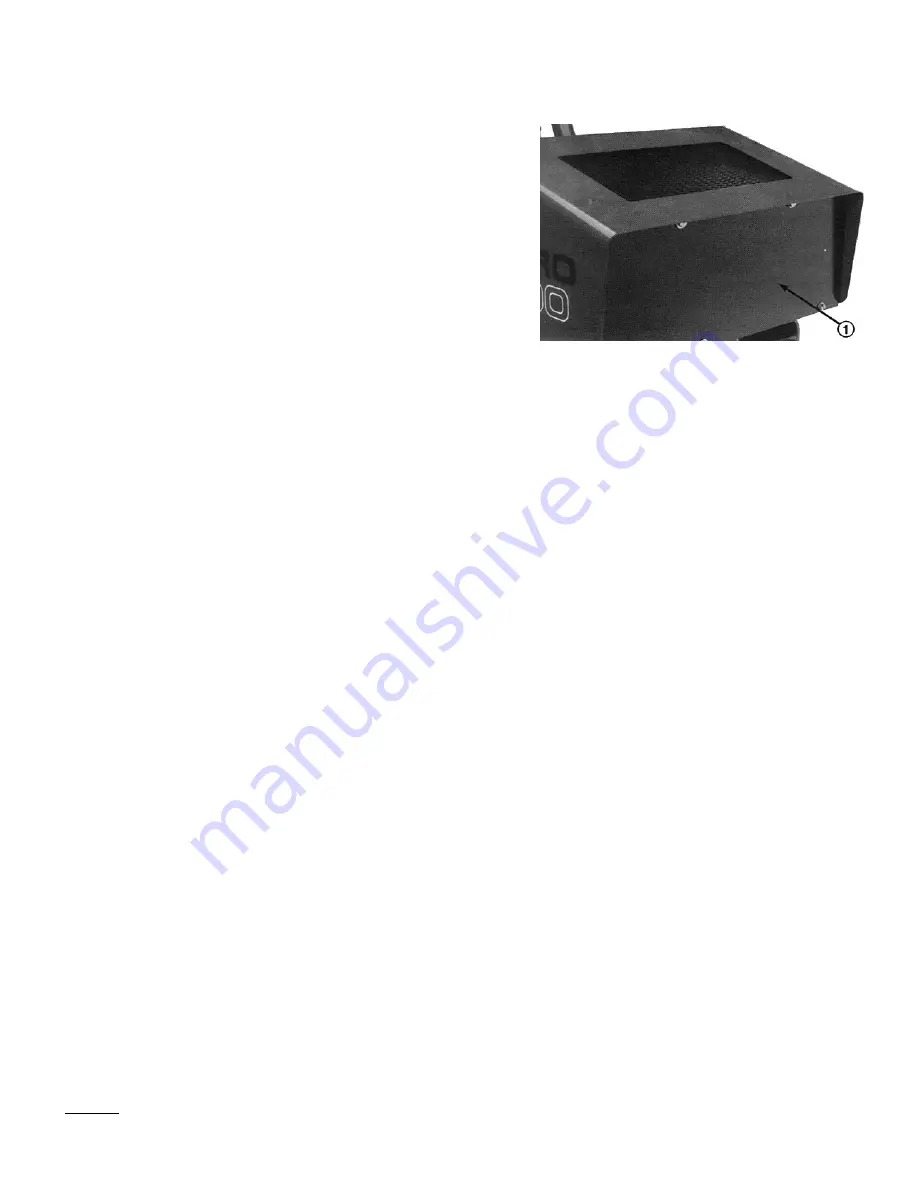
Figure 10

1.

Front Panel

LUBRICATION (Fig. 10)

The steering  shaft grease fitting must be lubricated regularly with
No. 2 General Purpose Lithium Base Grease. 

1.

Remove the (5) screws securing the front panel to the frame
(Fig. 10).  Locate grease fitting through the opening in the
frame.

NOTE: We do not recommend lubricating the steering chain
unless it becomes stiff because of rust.  If the chain rusts, it may
be lubricated lightly with a DRY-TYPE LUBRICANT.

CHANGING CRANKCASE OIL

For new engines, change the oil after the first 5 operating hours.
Thereafter, under normal conditions, change the oil after every 25
hours of engine operation. However, an engine operated in dusty or
dirty conditions requires more frequent oil changes. If possible, run
the engine just before changing oil. Warm oil flows more freely and
carries more contaminants than cold oil.

1.

Place an oil drain pan below the drain plug on bottom of
crankcase.  Clean the area around drain plug.

2.

Remove the drain plug and allow oil to flow into drain pan. After
the oil is drained, reinstall the oil drain plug.

3.

Remove the dipstick/filler cap and pour approximately 2.5 l of
oil having the APl “service classification” SF into the filler neck.
Oil viscosity is selected according to anticipated ambient tem-
perature. Temperature/viscosity recommendations are:

A.

Above 32° F (0°C)—Use SAE 30. The use of multi-weight
oil above 32° F (0°C) is not recommended due to increased
oil consumption an excessive combustion chamber deposits.

B.

Below 32° F (0° C)—Use SAE 5W-20 or 5W-30, and if
they are not available, 10W-30 or 10W-40 are acceptable
substitutes.

4.

Check the oil and make sure the level is up to the FULL mark on
the dipstick.  Add more oil if the level is low; however, DO NOT
OVERFILL.

5.

Dispose of oil properly.

Maintenance

Содержание 08882

Страница 1: ... A MODEL NO 08882 60001 UP SANDPRO 2000 The TORO Company 1996 To understand this product and for safety and optimum performance read this manual before starting operation Pay special attention to SAFETY INSTRUCTIONS highlighted by this symbol ...

Страница 2: ...s concerning safety read the safety instructions on pages 4 and 5 IMPORTANT identifies special mechanical information and NOTE identifies general information worthy of special attention If help concerning set up operation maintenance or safety is ever needed contact your local Authorized TORO Distributor In addition to genuine TORO replacement parts the distributor also has optional equipment for ...

Страница 3: ...shoes long pants and a helmet is advisable and required by some local safety and insurance regulations 7 Ensure the traction interlock switch is adjusted cor rectly so the engine cannot be started unless the trac tion pedal is released and in neutral position 8 Keep everyone especially children and pets away from the areas of operation 9 Since gasoline is highly flammable handle it care fully A Us...

Страница 4: ...d all hydraulic hoses and lines are in good condition before applying pressure to the system 22 Keep body and hands away from pin hole leaks or nozzles that eject hydraulic fluid under high pres sure Use paper or cardboard not hands to search for leaks Hydraulic fluid escaping under pressure can have sufficient force to penetrate skin and do serious damage If fluid is injected into the skin it mus...

Страница 5: ...on measurements of identical machines per 84 538 EEC Vibration Levels This unit has a vibration level of 2 5 m s2 at the posterior based on measurements of identical machines per ISO 2631 procedures This unit does not exceed a vibration level of 0 5 m s2 at the posterior based on measurements of identical machines per ISO 2631 procedures 5 ...

Страница 6: ...OES OR FOOT FORCE APPLIED FROM ABOVE EXPLOSION FIRE OR OPEN FLAME FIRE OPEN LIGHT SMOKING PROHIBITED EYE PROTECTION MUST BE WORN CAUTION TOXIC RISK FIRST AID FLUSH WITH WATER HYDRAULIC OIL HEADLIGHTS CHOKE ATTACHMENT RAISE ATTACHMENT LOWER STAY A SAFE DISTANCE FROM MACHINE STAY A SAFE DISTANCE FROM MACHINE F FORWARD R REVERSE N NEUTRAL DO NOT DISPOSE IN THE GARBAGE BATTERY CHARGING CONDITION 3 4 2...

Страница 7: ...nd lowering of the implement Cylinder Double acting Wheel Bearings Needle bearing in each wheel motor Tires 21 x 11 00 8 two ply pneumatic tubeless De mount able and interchangeable Recommended tire pressure is 27 kPa Speeds at 3000 RPM Variable between 0 and 15 8 kmh forward and 0 and 4 kmh reverse Seat Adjustment 10 cm fore and aft Additional 4 4 cm forward adjustment available by using front mo...

Страница 8: ...E 30 The use of multi weight oil above 32 F 0 C is not recommended due to increased oil consumption and excessive combustion chamber deposits B Below 32 F 0 C Use SAE 5W 2O or 5W 30 and if they are not available 10W 30 or 10W 40 are acceptable substitutes IMPORTANT Check the level of oil every 5 operating hours or daily Change the oil after every 50 hours of oper ation FILL THE FUEL TANK Fig 2 THE...

Страница 9: ...ile the engine is running hot or when the machine is in an enclosed area Vapors may build up and be ignited by a spark or flame source many feet away DO NOT SMOKE while filling the fuel tank to prevent the possibility of an explosion Always fill the fuel tank outside and wipe up any spilled gasoline before starting the engine Use a funnel or spout to prevent spilling gasoline and fill the tank no ...

Страница 10: ...l level is low add SAE 10W 30 or 10W 40 SF type motor oil until the level is up to the top of cone point on the tank screen DO NOT OVERFILL 4 Install the reservoir cap IMPORTANT To prevent system contamination clean the top of hydraulic oil containers before puncturing Assure the pour spout and funnel are clean CHECK TIRE PRESSURE Check tire pressure before operating the machine Correct air pres s...

Страница 11: ... to allow rpm to increase IMPORTANT For maximum pulling power the throttle should be in the Fast position and the traction pedal just barely depressed IMPORTANT The SAND PRO must not be operated in reverse with the implement in the down operating position or the implement could be severely damaged Ignition Switch Fig 6 The ignition switch used to start and stop the engine has three positions OFF R...

Страница 12: ...ter indicates the rate of battery charge or discharge Note During normal operation there will usually be slight amme ter needle movement to the positive side Lift Lever Fig 7 To raise the implement pull the lever up to lower the implement push the lever down When the desired posi tion is attained release the lever and it will return to neutral NOTE The SAND PRO has a double acting lift cylinder Do...

Страница 13: ...operate the machine in forward and reverse for one to two minutes Also operate the lift lever to be sure of proper operation of all parts 5 To stop the engine move the throttle control to the SLOW position and turn the ignition key to OFF Remove the key from from the switch to prevent accidental starting 6 Close the fuel shut off valve before storing the machine CHECK INTERLOCK SYSTEM OPERATION Th...

Страница 14: ... 8 hours operating time is required for SAND PRO break in period 2 Since the first hours of operation are critical to future depend ability of the machine monitor its functions and performance closely so that minor difficulties that could lead to major prob lems are noted and can be corrected Inspect the SAND PRO frequently during break in for signs of oil leakage loose fas teners or any other mal...

Страница 15: ...torque power to the rear wheels INSPECTION AND CLEAN UP At the completion of operation thoroughly wash the machine with a garden hose without a nozzle so excessive water pressure will not cause contamination and damage to seals and bearings Make sure cooling fins and the area around the engine cooling air intake are kept free of debris After cleaning inspect the machine for possible hydraulic flui...

Страница 16: ...l flows more freely and carries more contaminants than cold oil 1 Place an oil drain pan below the drain plug on bottom of crankcase Clean the area around drain plug 2 Remove the drain plug and allow oil to flow into drain pan After the oil is drained reinstall the oil drain plug 3 Remove the dipstick filler cap and pour approximately 2 5 l of oil having the APl service classification SF into the ...

Страница 17: ...and replace when dirty or damaged Do not wash the paper element or do not clean it with compressed air because damage will occur Note With the air cleaner disassembled check the air cleaner components for damage Replace if necessary Make sure the rubber breather tube in the base plate is securely in place or severe engine damage may occur 6 Reinstall the element with the precleaner element cover s...

Страница 18: ...correct spark plug heat range too high IMPORTANT A cracked fouled or dirty spark plug must be replaced Do not sandblast scrape or clean electrodes by using a wire brush because grit may release from the plug and enter combustion chamber resulting in engine damage 5 After setting the air gap at 025 install the spark plug in the cylinder head Tighten the plug to 13 20 Nm Push the wire onto the spark...

Страница 19: ...ditional three fourth s turn 6 Fill the reservoir to proper level refer to Check Hydraulic System 7 Place all controls in the neutral or disengaged position and start the engine Run the engine at its lowest possible RPM to purge the system of air 8 Run the engine until the lift cylinder extends and retracts and forward and reverse wheel motion is achieved 9 Stop the engine and check the oil level ...

Страница 20: ...ry in a cool atmosphere to avoid quick deterioration of the charge in the battery To prevent the battery from freezing make sure it is fully charged The specific gravity of a fully charged bat tery is 1 250 BATTERY CARE 1 Battery electrolyte level must be properly maintained and the top of the battery kept clean lf the machine is stored in a loca tion where temperatures are extremely high the batt...

Страница 21: ...y 30 days 6 Maintain cell level with distilled or demineralized water Do not fill cells above the fill line IDENTIFICATION AND ORDERING MODEL AND SERIAL NUMBERS The SAND PRO 2000 has two identification numbers a model number and a serial number These numbers are stamped into a plate located on left fender In any correspondence concerning the unit supply the model and serial numbers to ensure corre...

Страница 22: ......

Страница 23: ......

Страница 24: ......

Отзывы: