
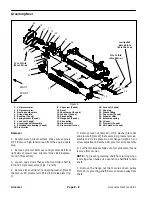


Greensmaster Flex 18/21
Groomer
Page 8 – 9
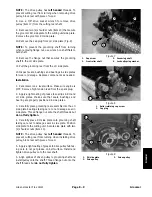
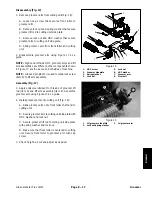
NOTE: The drive pulley has left handed threads. To
prevent cutting reel from turning when removing drive
pulley, block reel with piece of wood.
8. Use a 3/8” drive socket wrench to remove drive
pulley (item 17) from the cutting reel shaft.
9. Remove two (2) shoulder nuts (item 13) that secure
the groomer RH side plate to the cutting unit side plate.
Remove the groomer RH side plate.
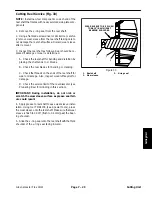
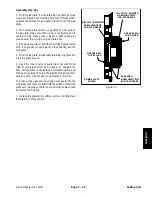
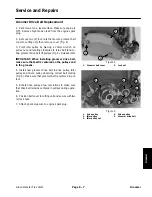
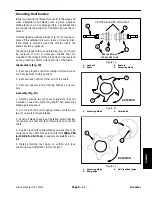
10.Remove the cap plug from LH side plate (Fig. 8).
NOTE: To prevent the grooming shaft from turning
when removing flange nut, use wrench on shaft flats to
hold shaft.
11. Remove the flange nut that secures the grooming
shaft to the LH side plate.
12.Pull the grooming reel from the LH side plate.
13.Inspect seals, bushings and bearings in side plates
for wear or damage. Replace components as needed.
Installation
1. Park mower on a level surface. Make sure engine is
OFF. Remove high tension lead from the spark plug.
2. Apply a light coating of grease to seal lips in RH and
LH side plates. Make sure that seals, bushings and
bearing are properly positioned in side plates.
3. Carefully place grooming reel assembly into the LH
side plate bearings taking care to not damage seal in
side plate. Thread flange nut onto the shaft threads but
do not fully tighten.
4. Carefully place RH side plate onto grooming shaft
taking care not to damage seals in side plate. Position
side plate to the cutting unit. Secure side plate with two
(2) shoulder nuts (item 13).
NOTE: The drive pulley has left handed threads. To
prevent cutting reel from turning when installing drive
pulley, block reel with piece of wood.
5. Apply a light coating of grease to drive pulley hub tak-
ing care to not get grease on belt surface. Install and
tighten drive pulley onto the reel shaft.
6. Align splines of driven pulley to grooming shaft and
install pulley onto the shaft. Thread flange nut onto the
shaft threads but do not fully tighten.
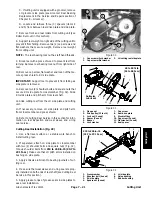
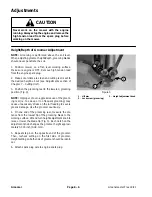
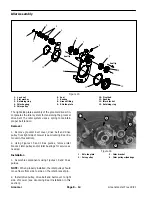
1. Cap
screw
2. Front roller shaft
3. Grooming
shaft
4. Locknut/spring
washer
Figure 7
4
3
1
2
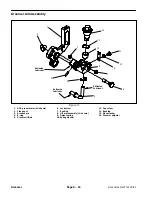
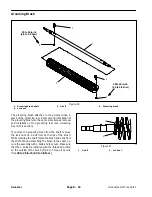
1. Roller retaining cap screw
2. Cap
plug
Figure 8
1
2
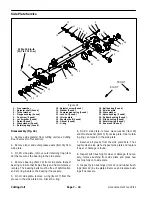
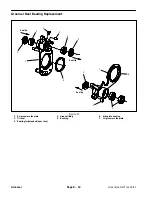
1. RH side plate
2. Drive
pulley
3. Driven
pulley
Figure 9
1
3
2
Groomer
Содержание 04022 Greensmaster Flex 21
Страница 2: ...Greensmaster Flex 18 21 This page is intentionally blank ...
Страница 4: ...Greensmaster Flex 18 21 This page is intentionally blank ...
Страница 10: ...0 09375 Greensmaster Flex 18 21 Page 2 2 Product Records and Maintenance Equivalents and Conversions ...
Страница 28: ...Greensmaster Flex 18 21 Traction and Reel Drive System Page 4 4 This page is intentionally blank ...
Страница 48: ...Greensmaster Flex 18 21 Traction and Reel Drive System Page 4 24 This page is intentionally blank ...
Страница 58: ...Greensmaster Flex 18 21 Page 5 10 Electrical System This page is intentionally blank ...
Страница 83: ...Greensmaster Flex 18 21 Page 7 13 Cutting Unit This page is intentionally blank Cutting Unit ...
Страница 85: ...Greensmaster Flex 18 21 Page 7 15 Cutting Unit This page is intentionally blank Cutting Unit ...
Страница 111: ...Greensmaster Flex 18 21 Groomer Page 8 15 This page is intentionally blank Groomer ...


