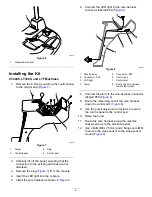
Toro 02945 Скачать руководство пользователя страница 6

3.

Remove the steering wheel, dashboard, and
front panel (

Figure 13

).

Note:

Carefully lift off the dashboard, ensuring

that the connectors to the existing switches are
not disturbed.

g307374

Figure 13

1.

Front panel

3.

Steering wheel

2.

Dashboard

4.

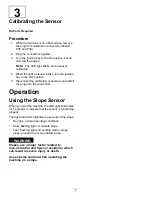
Remove the plug and install the LED light and
the slope-sensor decal to the dashboard (

Figure

14

).

If a hole for the LED light is not present, drill a
19-mm hole in the location shown in

Figure 15

..

g307287

Figure 14

1.

LED light

2.

Slope sensor decal

g308225

Figure 15

1.

40 mm

2.

25 mm

5.

Remove the plug and install the alarm on the
steering-column rear panel (

Figure 16

).

If a hole for the alarm is not present, drill a
30-mm hole in the location shown in

Figure 17

.

6


Содержание 02945

Страница 1: ...2947 30659 LT F3000 cab equipped 404879018 and above 02949 02750 T4240 cab equipped 405398421 and above 02950 31050TE PLH800 320000155 and above Safety Safety and Instructional Decals Safety decals and instructions are easily visible to the operator and are located near any area of potential danger Replace any decal that is damaged or missing decal140 2710 140 2710 1 1 Warning read the Operator s ...

Страница 2: ...y 1 LED indicator 1 Alarm 1 Wire harness 6 Cable tie 1 Slope sensor decal Installing the Kit T4240 Machines 1 Release the operator platform refer to your machine Operator s Manual 2 Use 2 bolts M6 x 35 mm and 2 flange nuts M6 to secure the slope sensor to the slope sensor mount g304899 Figure 1 1 Slope sensor mount 3 Slope sensor 2 Flange nut M6 4 Bolt M6 x 35 mm 3 Use 2 bolts M6 x 25 mm and 2 fla...

Страница 3: ...install the LED light in the control panel as shown in Figure 5 g307377 Figure 5 1 LED light 8 Connect the remaining wire harness connectors as follows Wire harness connector labeled P01 Connect to one of the 6 pin sealed connectors located on the main harness below the control panel Wire harness connector labeled P08 Connect to the LED light Wire harness connector labeled P09 Connect to the alarm...

Страница 4: ...nect the LED light to the wire harness connector labeled P08 Figure 8 g304404 Figure 8 1 Wire harness 5 Connector P09 2 Connector P08 6 Control pod 3 LED light 7 Control arm 4 Alarm 8 Route the wire harness toward the roll bar 7 Connect the alarm to the wire harness connector labeled P09 Figure 8 8 Route the remaining end of the wire harness down the control arm Figure 8 9 Use the previously remov...

Страница 5: ...onnectors located below the relays on the electrical panel 16 Use cable ties to secure the wire harness away from moving parts or pinch points 17 Install the slope sensor decal adjacent to the machine stability decal on the storage pod lid Figure 11 g308336 Figure 11 1 Machine stability decal 2 Slope sensor decal Installing the Kit PLH800 Machines 1 Remove the battery cover refer to the electrical...

Страница 6: ...e plug and install the LED light and the slope sensor decal to the dashboard Figure 14 If a hole for the LED light is not present drill a 19 mm hole in the location shown in Figure 15 g307287 Figure 14 1 LED light 2 Slope sensor decal g308225 Figure 15 1 40 mm 2 25 mm 5 Remove the plug and install the alarm on the steering column rear panel Figure 16 If a hole for the alarm is not present drill a ...

Страница 7: ...e harness and into the steering column Figure 18 g307376 Figure 18 1 Wire harness routing direction 8 Connect the remaining wire harness connectors as follows Wire harness connector labeled P08 Connect to the LED light Wire harness connector labeled P09 Connect to the alarm 9 Use a cable tie to coil together any additional amount of wire harness in front of the battery Figure 19 g307373 Figure 19 ...

Страница 8: ...ibration connectors and install the plug onto the connectors Operation Using the Slope Sensor When you start the machine the LED light illuminates for 5 seconds to indicate that the sensor is functioning properly The light and alarm indicates the severity of the slope No light normal operating conditions Slow flashing light moderate slope Fast flashing light and audible alarm steep slope proceed t...

Отзывы: