


16
WEEKLY MAINTENANCE
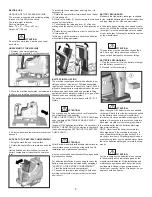
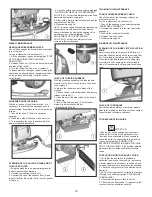
REAR SQUEEGEE RUBBER CHECK
Check the squeegee rubber wear and eventually
turn or replace it.
For the replacement it is necessary to:
1. Lift the squeegee (see under paragraph “STOP
OF THE MACHINE AFTER CLEANING
OPERATION”).
2. Release the hook (1) of the rubber holder blade
and take off the rubber.
3. Turn the rubber to a new side or replace it.
To reassemble the squeegee repeat inversely the
operations mentioned above, inserting the rubber
on the guides and blocking it with the rubber
holder blade.
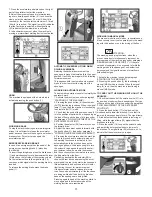
SQUEEGEE HOSE CLEANING
Weekly or in case of insufficient suction, it is
necessary to check that the squeegee hose is
not obstructed. Eventually, to clean it, proceed as
follows:
1. Take off the hose (1) from the squeegee
coupling.
2. Wash the inside of the hose with a water jet.
3. To reassemble the hose repeat inversely the
above-mentioned operations.
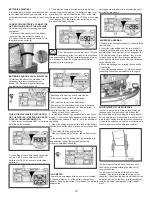
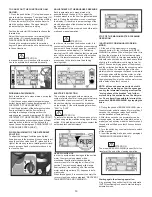
CLEANING OF THE SOLUTION TANK AND OF
THE OUTER FILTER
1. Bring the machine to an appropriate place for
the detergent solution draining.
2. Unscrew the solution tank cap (1).
3. Unscrew the cap of the exhaust filter (2) and
take off the filter. Be careful not to lose the gasket
of the cap.
4. Open the solution valve (see under paragraph
“FLOW ADJUSTMENT OF THE DETERGENT
SOLUTION”), so that the detergent solution flows
down into appropriate containers.
5. Rinse with a water jet the solution tank and the
components of the filter.
6. Reassemble all parts.
NOTE: in case of need it is possible to wash only
the components of the outer solution filter as
above-mentioned by closing the solution valve
adjustment (see under paragraph “FLOW
ADJUSTMENT OF THE DETERGENT
SOLUTION”), so that the detergent solution
remains in the solution tank.
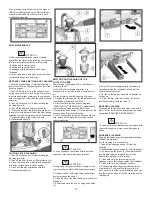
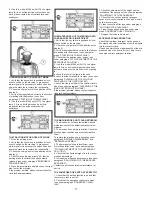
CHECK OF THE SIDE RUBBERS
With the brushes assembled, the side rubbers
must touch the floor. If they are worn, they have
to be replaced.
To replace the rubbers on both sides of the
machine:
1. Unblock the bar of the side rubber after having
released the knob (1).
2. Open the bar of the side rubber (2) as shown
in the figure.
3. Take off the fixing screws (3) of the rubber
blade (4) and replace the rubber.
4. Reassemble all parts.
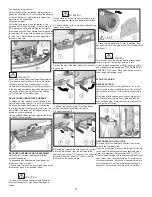
TWO-MONTHLY MAINTENANCE
FRONT SQUEEGEE RUBBER CHECK
Check the wear of the squeegee rubber and
eventually replace it.
For the replacement it is necessary to:
1. Take off the squeegee (see under paragraph
“SQUEEGEE CLEANING”).
2. Unscrew the wing nuts in the front part of the
squeegee.
3. Take off the rubber holder blade.
4. Replace the front rubber.
5. Reassemble all parts.
SIX-MONTHLY MAINTENANCE
CLEANING OF THE INNER FILTER SOLUTION
TANK
Empty the solution tank, remove the fitting (1) of
the water outlet by taking off the two screws that
fix it to the tank in the rear part of the machine.
Clean the inside filtrating part of the fitting from
eventual dirt. Pour some water into the tank to
clean it. Reassemble the fitting onto the solution
tank.
CHECK OF THE BRAKES
Check the braking efficacy of both rear wheels.
Should the braking be insufficient, please contact
the authorized technical assistance.
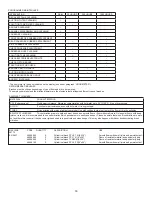
TROUBLESHOOTING GUIDE
ATTENTION:
If with the key switch positioned clockwise to
switch on the machine the display and other
functions are not activated, it is necessary to
check the batteries' connection to the machine
(see under paragraph “CONNECTION
BATTERIES' CONNECTION AND SWITCHING
ON OF THE MACHINE”). If the problem persists,
please contact the authorized technical assis-
tance.
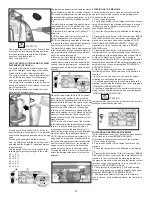
THE SUCTION MOTOR DOES NOT WORK
1. Verify that the key switch is positioned
clockwise to switch on the machine. In presence
of alarm signals it is necessary to switch off and
on again the machine to restore the functionality.
2. Check the charge level of the batteries on the
display (1).
3. Verify of having activated correctly the function
of drying (see under paragraph “STARTING OF
THE MACHINE”).
4. Check that the recovery tank is not full.
5. Check that the float switch (7) (optional) in the
recovery tank is assembled correctly.
Содержание BR 28/27
Страница 2: ...2...
Страница 3: ...3 NOTES...