


15
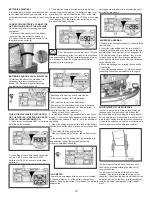
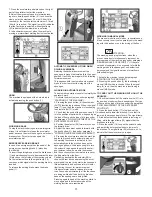
B. by pressing the push button (3) the manual
(MAN) functioning is chosen to start working in
manual mode and all functions have to be re-
established manually.
DAILY MAINTENANCE
ATTENTION:
All the following maintenance and cleaning
operations that refer to the following components
that are in contact with liquids and therefore:
• Solution and recovery tanks
• Solution and recovery filters
• Squeegee with their rubbers and hoses
• Brushes
must be carried out using gloves to protect from
contact with dangerous solutions.
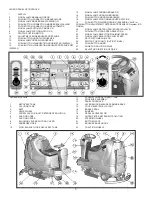
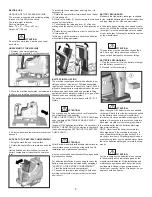
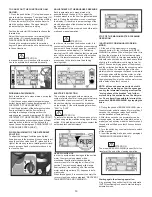
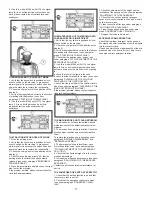
RECOVERY TANK EMPTYING AND CLEANING
1 Hold the exhaust hose (1) placed in the rear
part of the machine after having taken it off from
its fixing support.
2. Take off the plug (2) from the exhaust hose
acting upon its lever (3) and empty the recovery
tank into appropriate containers, in compliance
with the respective rules what the liquid disposal
concerns.
3. Take off suction cover (4) after rotating the
blocking levers (5).
4. Take off the filter and filter protection (6).
5. Rinse the inside of the tank with a water jet
through the hole become free of the filter, paying
attention to clean eventually also the float switch
(7) (optional) placed right under the hole.
6. Reassemble all parts.
SUCTION FILTER CLEANING
1. Take off suction cover (4) after rotating the
blocking levers (5).
2. Take off the filter (8) and its filter protection (6).
3. Clean all parts with a water jet and especially
the inside surfaces and the filter bottom.
4. Carry out cleaning operations carefully.
5. Reassemble all parts.
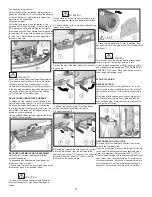
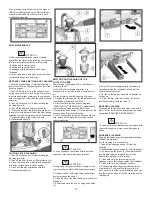
EMPTYING AND CLEANING OF THE
COLLECTION BOX
The machine is equipped with a collection box
for the solid dirt.
At the end of the cleaning operation it is
necessary to empty and to clean it with a water
jet.
For the emptying and the cleaning of the box:
1. Position the selector (10) for the adjustment of
the brushes pressure on position P1.
2. Start the machine (see under paragraph
“STARTING OF THE MACHINE”), automatically
the functioning mode manual (MAN) is set.
3. Activate the push button (17) of up/down of the
brushes base to lower the brushes.
4. When the brushes touch the floor and start to
turn, switch off the machine by turning the key
counterclockwise.
ATTENTION:
To carry out above operations with the electric
supply on, may cause damages to hands.
ATTENTION:
This operation must be carried out using gloves
to protect from contact with dangerous solutions.
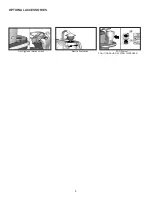
5. Unblock the bar of the right side rubber after
having released the knob (1).
6. Open the bar of the side rubber (2) as shown in
the figure.
7. Extract and carry the box by using its handles
(3).
8. Empty the box into appropriate containers, in
compliance with the respective rules what the
liquid disposal concerns.
9. Put the collection box back into its position up
to the end.
10. Place the bar of the side rubber (2) into its
position blocking it with the knob (1).
BRUSHES CLEANING
Disassemble the brushes and clean them with a
water jet (for the brushes disassembly see under
paragraph “BRUSHES DISASSEMBLY”).
ATTENTION:
To carry out brushes disassembly operations with
the electric supply on, may cause damages to
hands.
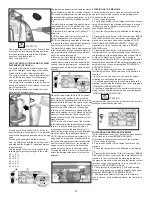
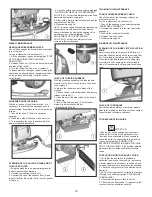
SQUEEGEE CLEANING
Keeping the squeegee clean guarantees always
the best drying result.
For its cleaning it is necessary to:
1. Take off the squeegee hose (5) from the
coupling.
2. Disassemble the squeegee (2) from its support
(1) by loosening the knobs (4) counterclockwise
and making slide the threaded parts in the
appropriate slots up to their release.
3. Clean with care the internal part of the
squeegee inlet eliminating eventual dirt residuals.
4. Clean with care the squeegee rubbers.
5. Reassemble all parts paying attention to put
the washers (3) into position, they are two for
each knob, so that they are assembled one under
and the other on each of the two slots present on
the support.
Содержание BR 28/27
Страница 2: ...2...
Страница 3: ...3 NOTES...